Sunday 26 February 2017

Sci-Fi Games 5 and 6 of the 6x6 Challenge

During this week I played out games 5 and 6 of the science fiction series of my 6 x 6 challenge. In both games I have Space Marines vs. space Orks. Both games used Sci Fi rules based upon Tank on Tank rules which I have been using and gradually modifying with each of the 6 challenge games.

For these two games I modified the rules to help differentiate between troops and non-troop units in the combat results. Previously troop and non-troop units were both shaken if the attacking 2D6 score was equal to their armour value and eliminated if greater. With the modification non-troop units keep the same approach, but troop units take two hits to be eliminated and are hit when the attacking 2D6 score is equal of greater than their armour value.

A few photos of game 5 with two reconnaissance elements making contact.

Space Marine forces quickly advance
A mobile Ork force moves forward
Ork "Deffkoptas" swiftly move up on the flank
Ork forces charge towards the Space Marines
Bikers take on the "Deffkoptas"
Space Marines fallback under a hail of fire from Orks
Remaining Space Marines retire

The sixth game was based upon the One Hour Wargame scenario 21 - Twin Objectives. This game to went the way of the Orks with their numbers making the difference towards the end as both sides engaged in an exchange of fire over the last few turns. So this is my first challenge completed.

Ork deployment

Space Marines defend one of the objectives
A flyer is available to help defend both objectives. The second objects is in the background.
Defenders prepare for defending the second objective 
The bulk of Orks attack the first objective
A smaller Ork attack on the second objective is dealt with

Orks try and press home their attack.
Defenders from the second objective race across to support the beleaguered defenders of the first  objective
A victory to the Ork boyz as they take the first objective and see off supporting units


Tuesday 21 February 2017

19th Century Wargaming and the next painting project

I have done limited painting since finishing off my Hundred Years War armies and building some Dark Age paper armies. Although the paper armies, while fun, did not really scratch the painting and creative itch.

Still remaining stashed away I have two sets of old miniatures still to paint up from when they were purchased way back in the mid 1970's and early 1980's. These are a Hinchcliffe English Civil War army and sizeable bunch of Spencer-Smith Plastic American Civil War.

I already have some ACW 15mm armies and have no desire to replicate the ACW period in another scale. After reading "Wargaming: Nineteenth Century Europe 1815-1878" by Neil Thomas, I have been toying with the idea of painting up the Spencer-Smith figures as imaginations armies. So I dug up the old figures from their box and started to see how many and what state they were in. The news was not good with a good fifty percent of the figures being brittle and breaking when tested.

Brittle plastic - such a sad sight
However, the good news is I have about 200 infantry and 50 cavalry all in a good state along with 20 artillery pieces and crew. They all passed the "bendy and break" test - a sad but necessary test. This number should allow me to create two reasonably sized imagination armies suitable for my 6x4 foot table. My next step is to start deciding upon some colourful uniforms by searching online sources. There are no plans to convert any of the figures just paint them.

Half were in a good state passing the bend and break test


Sunday 19 February 2017

Hundred Year War campaign - game 3

This is the third game of my Hundred Year War campaign, and we see the full English army in action against a French force defending a town on the English escape route to their ships.

English Units
3 x Bowmen
3 x Mounted Men at Arms
2 x Foot Sergeants
3 x Foot Men at Arms

French Units
3 x Crossbow
2 x Foot Sergeants
2 x Mounted Men at Arms
2 x Foot Men at Arms

Both sides deployed (including a unit of dice by the looks of it - whoops!)
The French right flank took up strong defensive positions in the town.
English forces ready for the assault upon the town

It was for the English to attack, and they did, quickly pushing forward their foot units supported by volleys of arrows from their bowmen. Their mounted men at arms moved forward to threaten the French left flank.

The English foot surge forward upon the French defending the town.
Mounted units square off against their counterparts while taking a few hits from an out of  photo crossbow men.
After some early success the battle for the town soon became a bit of a slog. French units in most cases were holding their ground and casualties were beginning to mounting amongst attacking English units.

Initial clashes in and around the town.
The French defenders and gallantly holding their own against superior numbers and English men at arms
French reserves move forward to support both the town defenders and mounted units
On the other flank both sides mounted units fought it out on the available clear ground. Initially the English held off, but were goaded into attacking after receiving a few effective crossbow volleys. While outnumber the French mounted units gave good account of themselves effectively neutralising the English mounted threat. The greatly remaining English mounted were neatly weakened and of little threat when faced by a fresh unit of Foot men at arms.

Mounted units fight it out
The remaining English mounted units, exhausted after the fight, face a fresh unit of men at arms
While the fighting was not really going their way, weight of numbers was starting to show in the English army's favour. Especially once their bowmen started to move up and support units battling it out around the town.

The remaining English mounted unit was quickly removed 
Fighting around the town had become chaotic
The remaining English men at arms critically took control of the town.
The loss of the town and nearby church saw the end of French resistance. Their numbers had been halved and a withdrawal now would only give a marginal victory to the English. Allowing the French an orderly retreat move on the campaign map to prepare for another defensive battle and buy themselves time while more elements of their army converged upon the area.

Loss of the nearby church
An English marginal victory.
I was able to use my cheaply made wattle fences in the game. Made them a couple of weeks ago (here).

Saturday 18 February 2017

Hundred Year War - Campaign Moves

In preparation for the next Hundred Years War games (part of the 6x6 challenge) the campaign side of this challenge required a few moves to determine where the next battle would be.

Previous battle games had seen Prince Riddick establish a position north of the river, and the Sheriff of Lockdew manage a successful rear guard action.

French chasing forces are forced to retire after a rear guard action
The English forces under the overall command of Prince Riddick are still a long way off from escaping in waiting ships. While more French forces are starting to close in.  The Prince and part of the English army has successfully positioned itself north of a river crossing. The remaining elements of his army have been ordered to consolidate on his position.

The English attempt to consolidate their army elements
The English army successfully crossed the river and elements of the French forces under the command of Baron Chastain wisely retired north to a nearby town where they would benefit from an additional two units in any battle.

French forces north of the English retire to a better position
Again the English successfully rolled 3+ more moving all their army elements to attack French elements to their north. Meanwhile messengers have been sent out by the French commander Duc Bonnet to place themselves north of the river as quickly as possible. Blocking the path the English appear to have committed themselves to.

English forces push north and clash with French defenders
With the battle decided, the dice generated terrain was laid out and the forces deployed. As the attacker the English have to place half their units first, then the defending French deploy all their units before the remainder English units are added as their second line.

The English get to select two units for each of their commanders. A total of an additional six units of any unit type. The French on the other hand get four additional units, two for their commander and two because the battle is near a town where they can drum up local units.

Game set up
The French Commander's view (all MiniFigs HYW collection)
I use a square grid which does not show well in photos so the regularly placed bushes show the square corners.
A view of the English deployment

Thursday 16 February 2017

Planning for some WW1 games

I am starting to plan out another set of games for the 6x6 challenge this time set in the WW1 period 1917-1918. I plan to use One-Hour Wargames (OHW) rules with a few modifications to add tanks and aircraft, which I used with much enjoyment about a year or so ago.

WW1 Peter Laing figures on a large base 3x4 inches
An infantry unit defending from their trenches
For units in trenches I used some quarter round wood to show units in trenches. They served their purpose, but don't really look very trench like. As I had some surplus brown felt left over from making fields I thought I would try out a different way of representing trenches.

Cost felt used to show trenches
The felt was cut out and duckboards quickly drawn on with a black marker pen as though you are looking down on the trenches. Also communication trenches can be shown.

With old trenches placed at the front
I recon I will just use the felt trenches without the old trenches (see below). Cheap and easy to make which is always a bonus for me.

A German Infantry unit occupying trenches
One rule adjustment which I intend to applying to OHW rules is reducing the number of hits you have to track. I am going to still roll the D6-2, D6 and D6+2 but for every two scored on the D6 deduct 1 hit rounding down. So a roll of 5 on a D6 would cause 2 hits. That way on the 7th hit the unit is eliminated, rather than the 15 in OHW.  Then units in cover require 3 to be scored for a hit (eg. a roll of 5 on a D6+2 = 7 and 2 hits).

Monday 13 February 2017

Hundred Years War Campaign - Game 2

The second battle of my Hundred Years War campaign has a French force under the command of Duc Bonnet catching up with the English rear guard commanded by the Sheriff of Lockdew. The term rear guard is being used very generously here as it was achieved by the Sheriff being the slowest element of the English army.

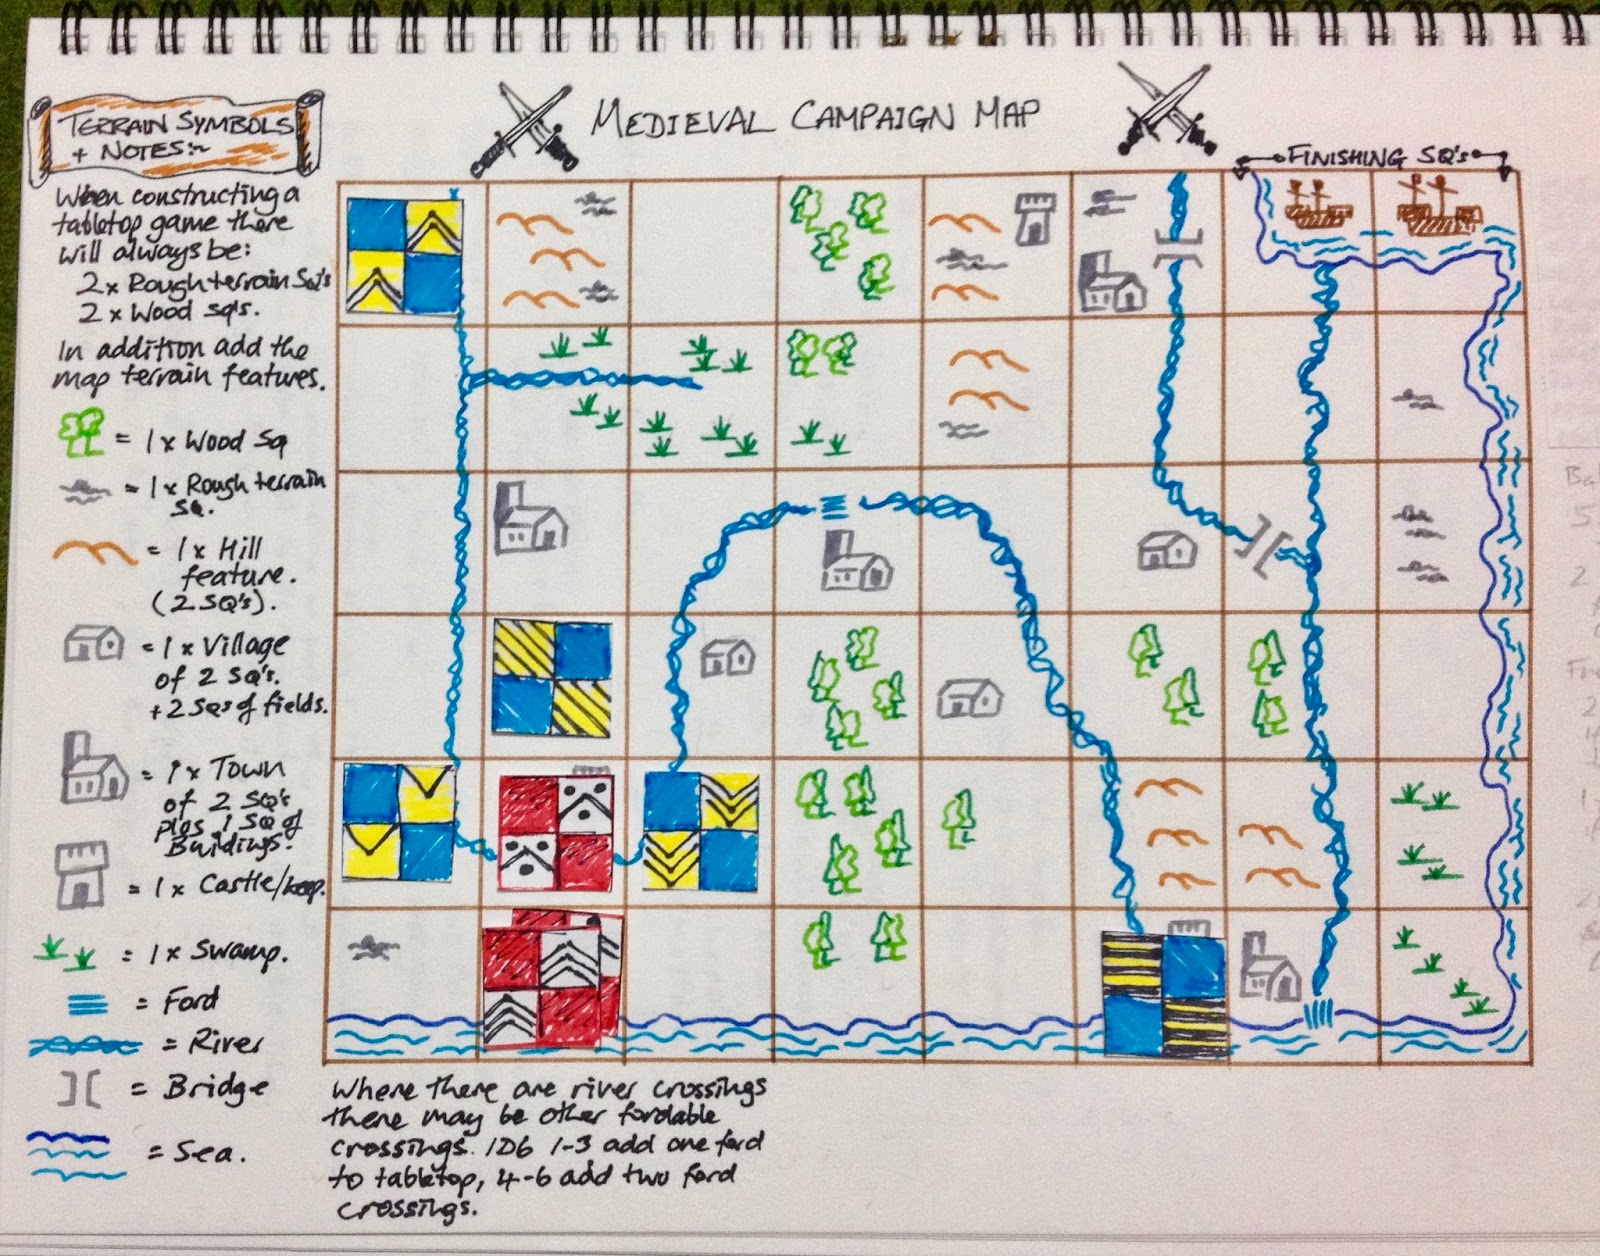
The terrain was open on the campaign map so consisted of two areas of rough terrain and two of wooded terrain, and each feature consists of two adjoining squares. These features were randomly placed based upon dice rolls. Both woods were located on the far left and were to play no part in the game.

The opposing forces line up
The English deployed there first line of troops followed by the French placing all their units, before the English placed their second line. The defensive army must put at least 50 percent of their units in the first line when deploying.

English forces lined up ready to face the pursuing French

The Sheriff of Lockdew has at his disposal:

  • 3 x Bowmen units
  • 2 x Foot Sergeants
  • 1 x Foot Men at Arms
  • 1 x Mounted Sergeants
The Sheriff placed himself with his trusted Men at Arms.


The French eager for action after all their chasing
The Duc Bonnet's chasing forces arrives with:


  • 3 x Crossbow units
  • 2 x Foot Sergeants
  • 2 x Mounted Sergeants (The Duc is located with one of these units)
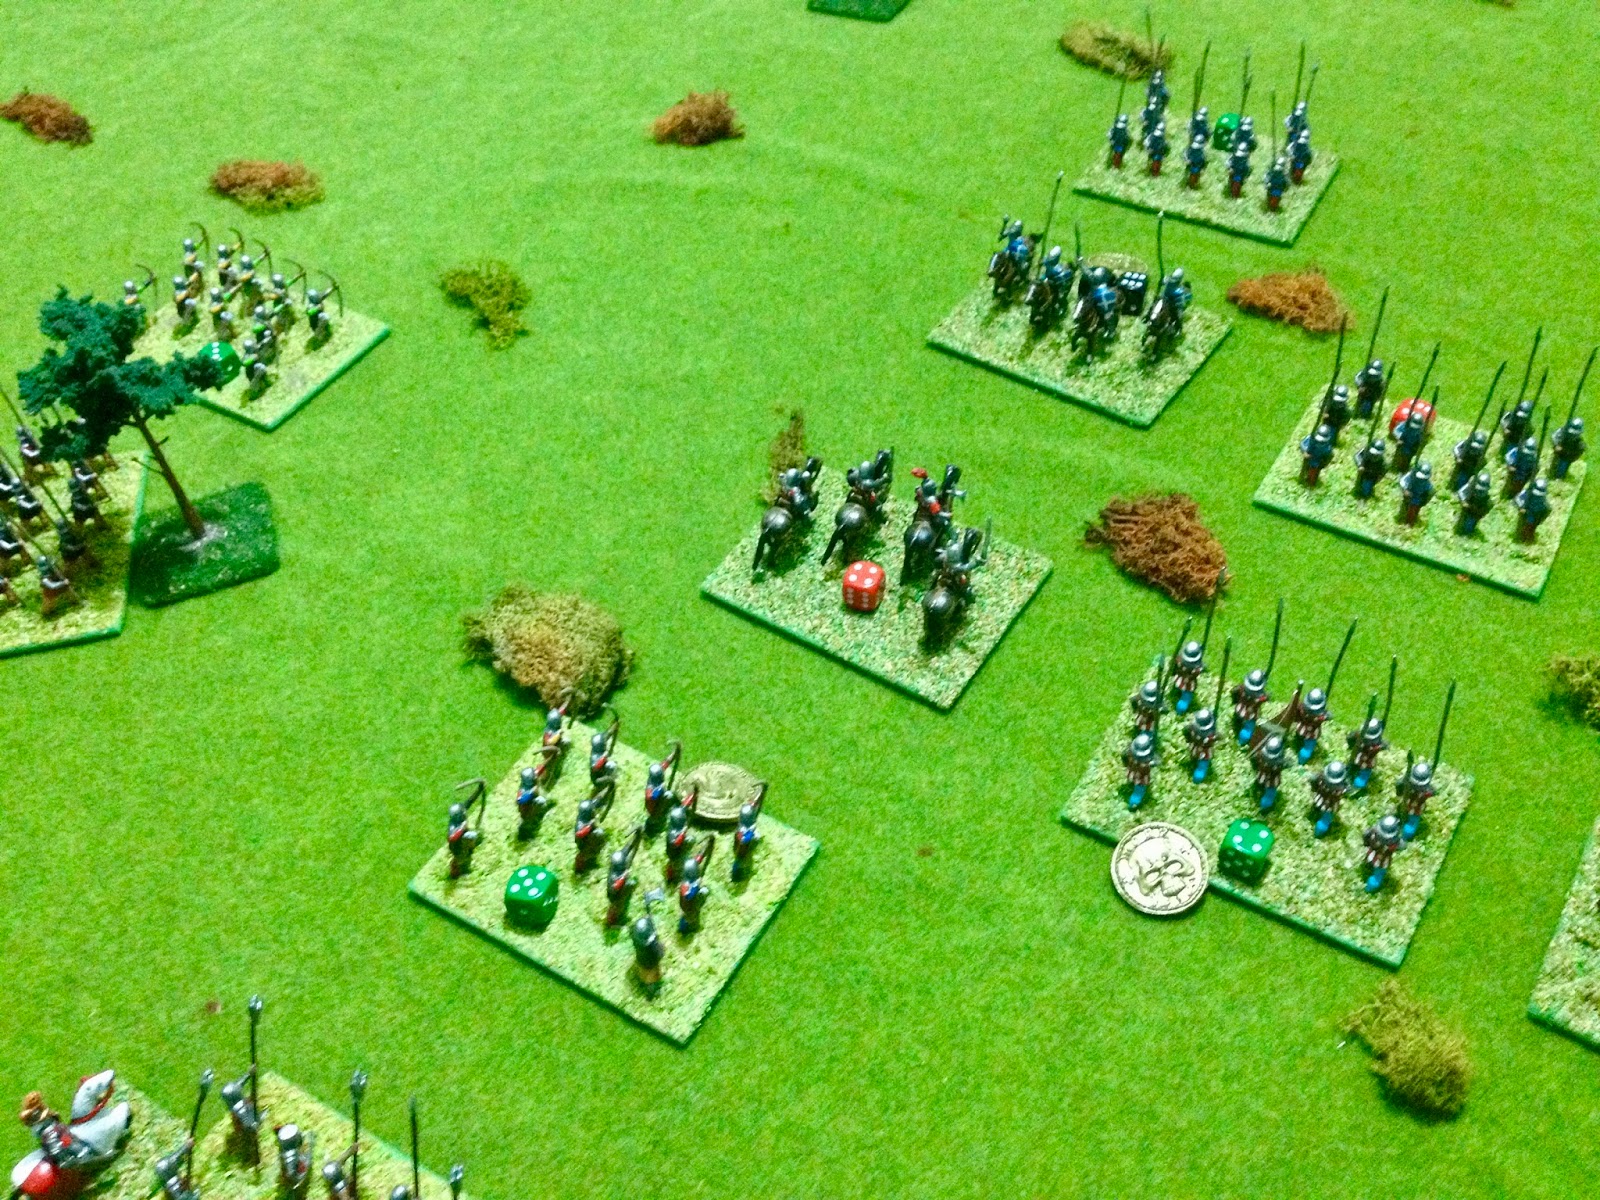
French Crossbow units push up on their left flank while foot Sergeants move forward in the centre.
The game started with the French pushing their crossbowmen up on the flank and causing a fair bit of damage to the English longbow men. Both units of Sergeants pushed up in the centre, however one was more successful that the other and actually made it to the English line.

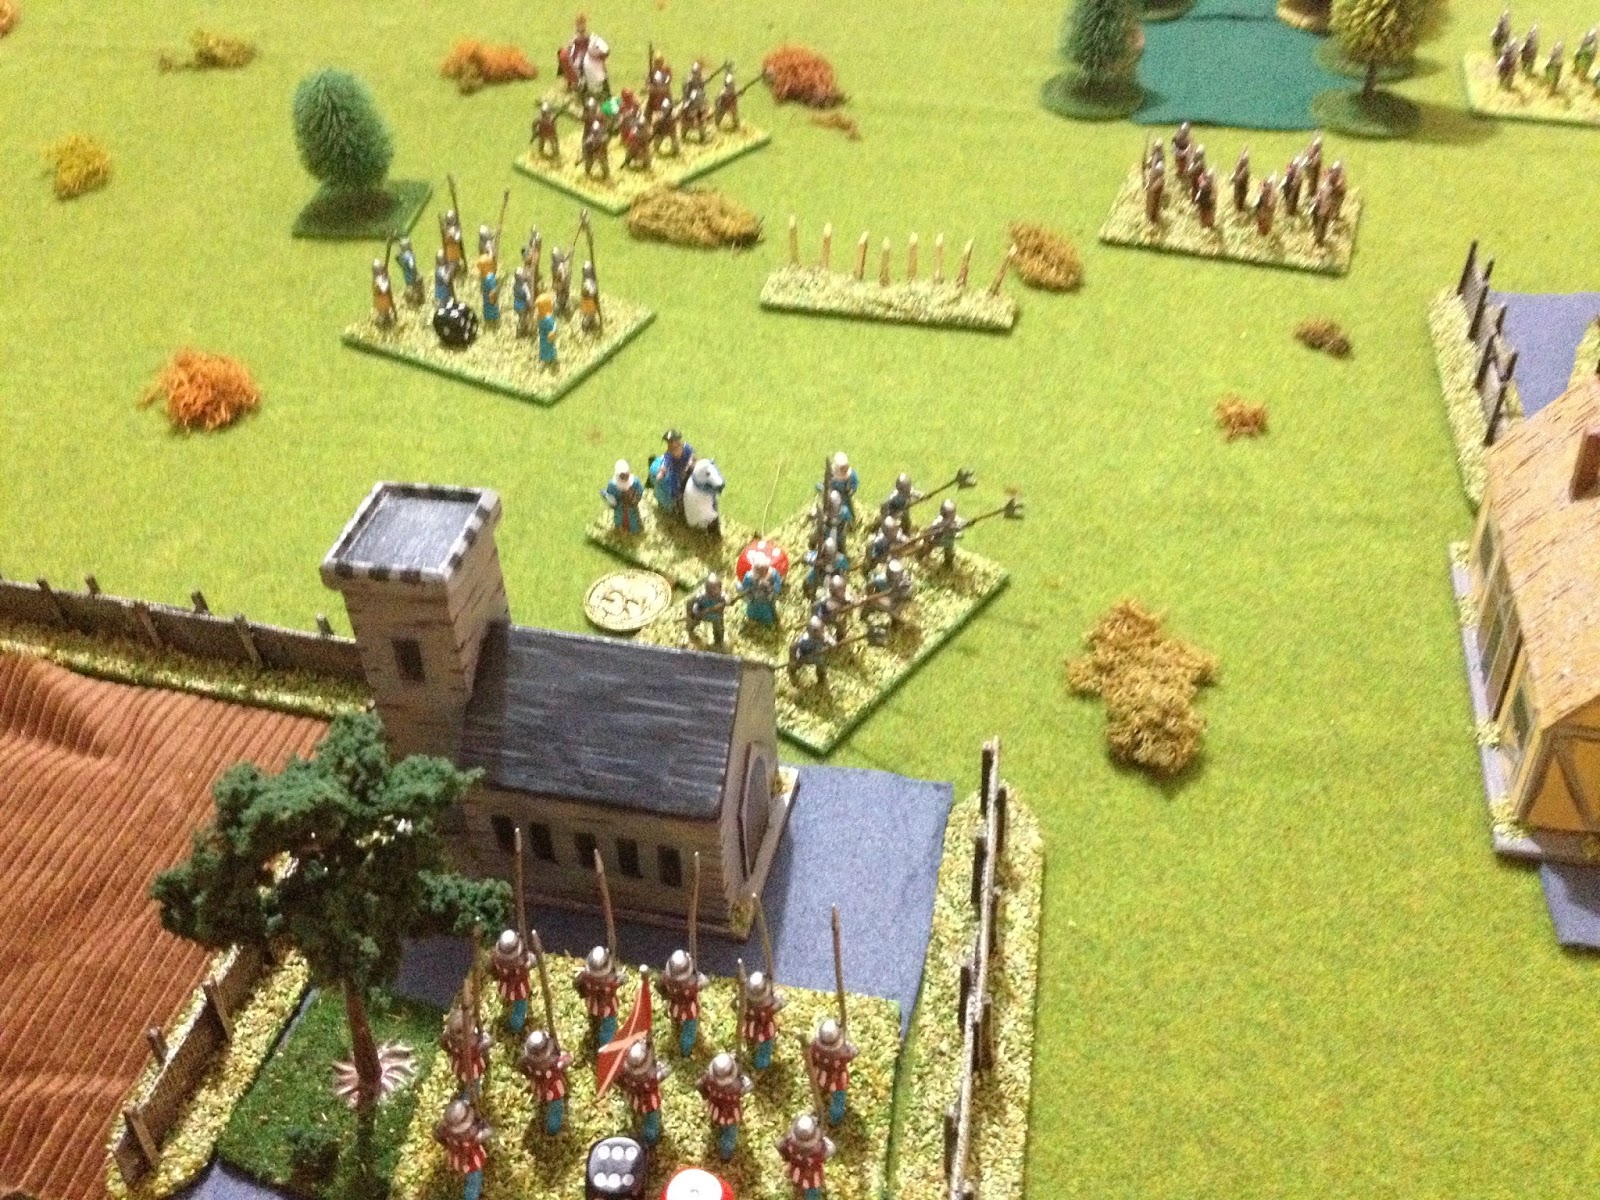
Duc Bonnet observes his mounted unit joining the attack
English mounted Sergeants push back their French counterparts who had successfully disrupted the English line.
On the right-hand side of the battle field the first unit of French mounted Sergeants charged into the English line causing damage and disorganising foot sergeants and bowmen units. Their English mounted counterparts countercharged to restore some semblance of order. Then continued to follow up the retreating French before being confronted by the second unit of French mounted Sergeants and being few in number they were quickly dispatched.

The game at this point was pretty much even and also saw the elimination of foot Sergeants units on both sides which had slogged away at each other to the point of exhaustion.

The English mounted Sergeants following up and eliminated their first mounted French unit only to run slap bang into the second unit lead by Duc Bonnet.
While the mounted units were charging and countercharging the Sergeant units in the centre had been slogging it out and both were to fight each other to a standstill and destruction. 
The final stage of the game had the remaining French mounted unit of Sergeants charge the English line which was now bolstered by the foot Men at Arms. The supporting French units failed to support the mounted unit lead by Duc Bonnet who attack the English alone. It was only a matter of time until this unit was eliminated. The Duc was lead away under protest by his retainers to safety.

Duc Bonnet leads a charge at the depleted English line
The French mounted unit was eliminated and the Duc Bonnet leaves the field ("Tis but a scratch")
The final stage of the game saw another French unit eliminated reducing the French unit strength to less than 50 percent. It was at this point I introduced the rule lose 50 percent of your force and a commander and the day is lost. So a hard fought victory to the Sheriff of Lockdew who quickly sent a messenger off to Prince Riddick informing him of his successful rear guard action against the overwhelming French forces of Duc Bonnet.