Saturday 29 April 2017

First game using 19th Century armies

I am now at the stage of having competed enough units of my Imagi-Nations armies to have a game. This will also help determine how many more unit I will need to complete. Both armies stand at 4 infantry units, 2 skirmish units, 1 dragoon unit, 2 cavalry units and 2 artillery units.

Start of my first test game
From the other side of the tabletop
When starting this project back in February I was unsure whether to use a grid or not. I had based up the units so a gridded game was an option. So with this first game I chose to go with a grid after laying out all the units to see how they fitted and looked on the tabletop.

Two columns on the move
For the rules I chose to use Neil Thomas' Rifle and Sabre rules from One-Hour Wargames as a starting rule set with a few modifications. Quite the usual starting point for most of the rules I use. I like the simplicity and additional rules can be easily added.

For a number of the variations Neil Thomas' 19th Century Wargaming book was the source of inspiration.

Columns advance towards the opposition
On the other flank
As the game progressed a few rule mechanisms were left by the wayside and other took their place. I now need to write up these modifications before I forget which of them worked and which did not. I ended the game early and will try a replay with a written up rules again this weekend. So while the rules are still in a flux, it was still a joy to get these old figures onto the tabletop.

All the models in these pictures are old Spencer-Smith plastic figures. Mostly ACW with a few Napoleonic lancers throw in. Conversions have been limited to trimming hats and adding the feathers using green-stuff to confederate infantry and cavalry models.

The advancing columns meet head on
Battle lines are drawn as reserves start to arrive
From playing this test game (admittedly with some work in progress rules) I think a few more units are going to be required when I start devising a campaign. I will want to be able to field forces with different make ups. So I plan to add to each side: 2 more infantry units, 1 more cavalry unit and 1 artillery unit. This will give me two armies of:

  • 6 infantry units
  • 2 skirmish units
  • 1 dragoon unit
  • 3 cavalry units
  • 3 artillery units

I am expecting to field between 8 to 12 units in a game on a 6x4 foot tabletop. More than 12 and the tabletop can get over crowed with units, and the whole game can turn into a bit of a boring slog.


Tuesday 25 April 2017

A mixed weekend of gaming, rules, conversions and painting

I ran out of time to do a post this past weekend. I was happily playing some test games to help finalise some Sci-Fi rule changes before writing up my notes. At the same time while pondering the rules I continued to paint up the 19th Century Imagi-Nations units, and also tried out a couple of conversions for a future Napoleonic project.

Imagi-Nation Painting
The painting of my Imagi-Nation units continues with one more infantry unit completed and a unit of dragoons on the painting table close to completion. In the next week (or two) I hope to start playing a game using rules based around Neil Thomas' One-Hour Wargames and Wargaming 19th Century rules.

Infantry in line

Sci-Fi Rules and Games
A few weeks back I posted about the activation approach I am using with these rules (link). With the activation mechanism settled, this weekend was spent trying to work out the combat rule mechanism.
  1. The attacking unit selects the weapon type best suited for the attack. This represents the primary weapon used by the unit in an attack. (Units can carry multiple weapons.)
  2. Roll the number of dice for the attack dependent upon the weapon and type of target. The more powerful the weapon or suitability against the target the more D6 are rolled.
  3. Select the highest scoring D6
  4. Subtract the units armour value (AV) from the highest score. Any remaining value is the number of hits a unit has taken. Lightly armoured troops have an armour value of 2 and heavily armoured troops (and vehicles) have an armour value of 4.
  5. Remove models from troop units or place damage markers on non-troop (vehicle) units.

When an attack is declared the defending unit can, if in a terrain square, choose to take cover and use the terrain cover value for it’s armour value. (Soft cover is AV=3 and hard cover AV=4.) 
The downside of taking cover is the unit becomes pinned and will need to use a move action to remove it. 
I did consider adding 1 to the armour value, but prefer this approach as it forces a decision to take cover. As a solo gamer this adds to my involvement in the game by causing me to make decisions (do I reduce casualties at the expense of movement in the following turn?)
As can be seen from the armour value the most hits on a lightly armoured unit (AV=2) is 4 with a roll of 6, and for a heavily armoured unit (AV=4) 2 hits would be sustained. Units have a maximum of 5 models or 5 hits for non-troop units (vehicles or big monsters).
W40K Tyranid forces attack Space Marines
Lightly armoured Tyranid units use cover to advance
As I write this post I am halfway through writing up the rules. I hope to post them with some example pictures to help with explanations next week.

Future Napoleonic Project
As I get closer to finishing my 19th Century armies I will have a number of ACW figures remaining. If I convert these and combine with some plastic Napoleonic Spencer-Smiths, I should be able to field two forces (a mix of cavalry, artillery an infantry) for some One-Hour Wargaming style games with units on single bases.

French Line Infantry - formerly ACW 
Green stuff used to create the shako - the only modification
I will be painting them to represent (as best as possible) campaign style uniforms. These are simple figures with few details so the campaign style dress is the best fit and will be quicker to paint.

Basing will be 3x4 inches

Wednesday 19 April 2017

Paper ships for next 6x6 gaming challenge - games 1 and 2

With a few paper ships made it was time to play a couple of games using the Galleys and Galleons by Ganesha games, which is my next 6x6 gaming challenge. I played two games, the first one with my daughter who was visiting over Easter and was kind enough to offer to play,  and the second was a solo game.

Spanish Galleons
English Galleons
The first game was a bit of a hoot as both players tried getting to grips with the sailing rule mechanics of the game. Some missed activations saw one of Spanish galleons merrily sailing off the board.  The remaining Galleons fought  it out with the English who suffered badly after a successful boarding action and some excellent broadsides by the remaining Spanish galleon. A win to the Spanish and my daughter who was delighted to have won.

Game 1 - only one photo was taken of the game itself
Looking up and remembering the multiple special rules was quite frustrating in the first game. So for the second game I converted these various special rules into some galleon statistics. So rather than just quality and combat, I had quality, shooting value, boarding value, and defence value. This helped speed up the combat quite significantly in the second game.

Start of the second game
Spanish galleons split by the reef.
A successful boarding action by the Spanish
A second Spanish win
By the end of the second game, a second Spanish victory, I had certainly come to grips with the basic rules. I liked the activation approach which works very effectively as the galleons manoeuvre to try and gain the advantage over their opposite number. The effects of combat also get factored into the activation process and the level of risk you want to take when rolling for successful actions.

Monday 17 April 2017

Hundred Years War Campaign Finishes

After the last Hundred Years War game, which was an English major victory, the French forces were forced to retire away from the waiting ships. Leaving the way open for the English army to escape to the waiting ships.

The next campaign moves were going to be critical for the English as their army elements would be reducing in number and exposed to an attack. To move the English need to roll 3+ and French 4+. The dice rolls went the way of the English and two army elements with their baggage successfully boarded the waiting ships, while the third inched (quite literally) closer to escape.

The way to the ships is open 
So would their be a final game? No, the dice favoured the English again and the third, and final, army element made it to the ships. Unfortunate campaign activations have been a fairly consistent theme for the French who on more than one occasion had an opportunity to wreak some havoc on the English army, but for the some unlucky dice rolls. I must confess I was hoping for one more game out of this campaign.

The English army slips away
The book "War Game Campaigns" by Donald Featherstone was the source of inspiration and map for what turned out to be a most enjoyable campaign. The campaign rules were not used from the book, but a much simpler set were made up as the aim was to string together a series of games. Part of the 6x6 challenge to play 6 games using Lion Rampant rules (which did get some modification as the campaign games progressed).

The English ready to board their ships
The main objective of the campaign was to provide context and interest to the games, which they did. Here are some initial thoughts:

  • The terrain drawn in each campaign square influenced the number and type of tabletop terrain features. This proved successful and the resulting dice generated terrain posed some interesting choices for the defender who always got to choose the side they wished to defend.
  • The game set up worked out. It had the defender always deploying their first line of defence with 50 percent of their available units. The attacker then placed all their units in two lines. Then the defender placed all remaining units in a second defence line behind their first defensive line.
  • The campaign stopped me from overloading the tabletop with too many units (a failing of mine). The more interesting games often had the fewest units.
  • I allowed myself the latitude to make up some of the rules as the campaign went. For example, what to do with major vs minor victories. Allowing the victor of a major victory to determine the path of retreat for a defender.
  • Campaign attrition worked out well. Another rule made up and based on some useful post comments. Where after every 3 games armies could field one less unit, unless the army element was accompanying the baggage (when the rule did not apply).
  • The same campaign approach could work just as well with a campaign dealing with a relieving force trying to get to a besieged garrison.

What next? While I am still working through my longish running AWI campaign which is about two-thirds of the way through. I now need to give some thought to a WW1 1917-18 campaign for another 6x6 challenge.


Saturday 15 April 2017

Hundred Years War Campaign - Game 10

The last battle (game 9) was a draw so all army elements remained in the campaign square. The next campaign moves may see both sides getting some much needed reserves from nearby campaign zones. However, after the campaign activations, neither side was able to gain additional support, and we have Baron Bechard again facing two English army elements under the command of Prince Riddick.

As both sides had remained in the campaign zone they were allowed to prepare defences. A combination of stakes and pavises was allocated to both sides determined by an average dice roll.

French and English forces remain in the same campaign square after a drawn battle
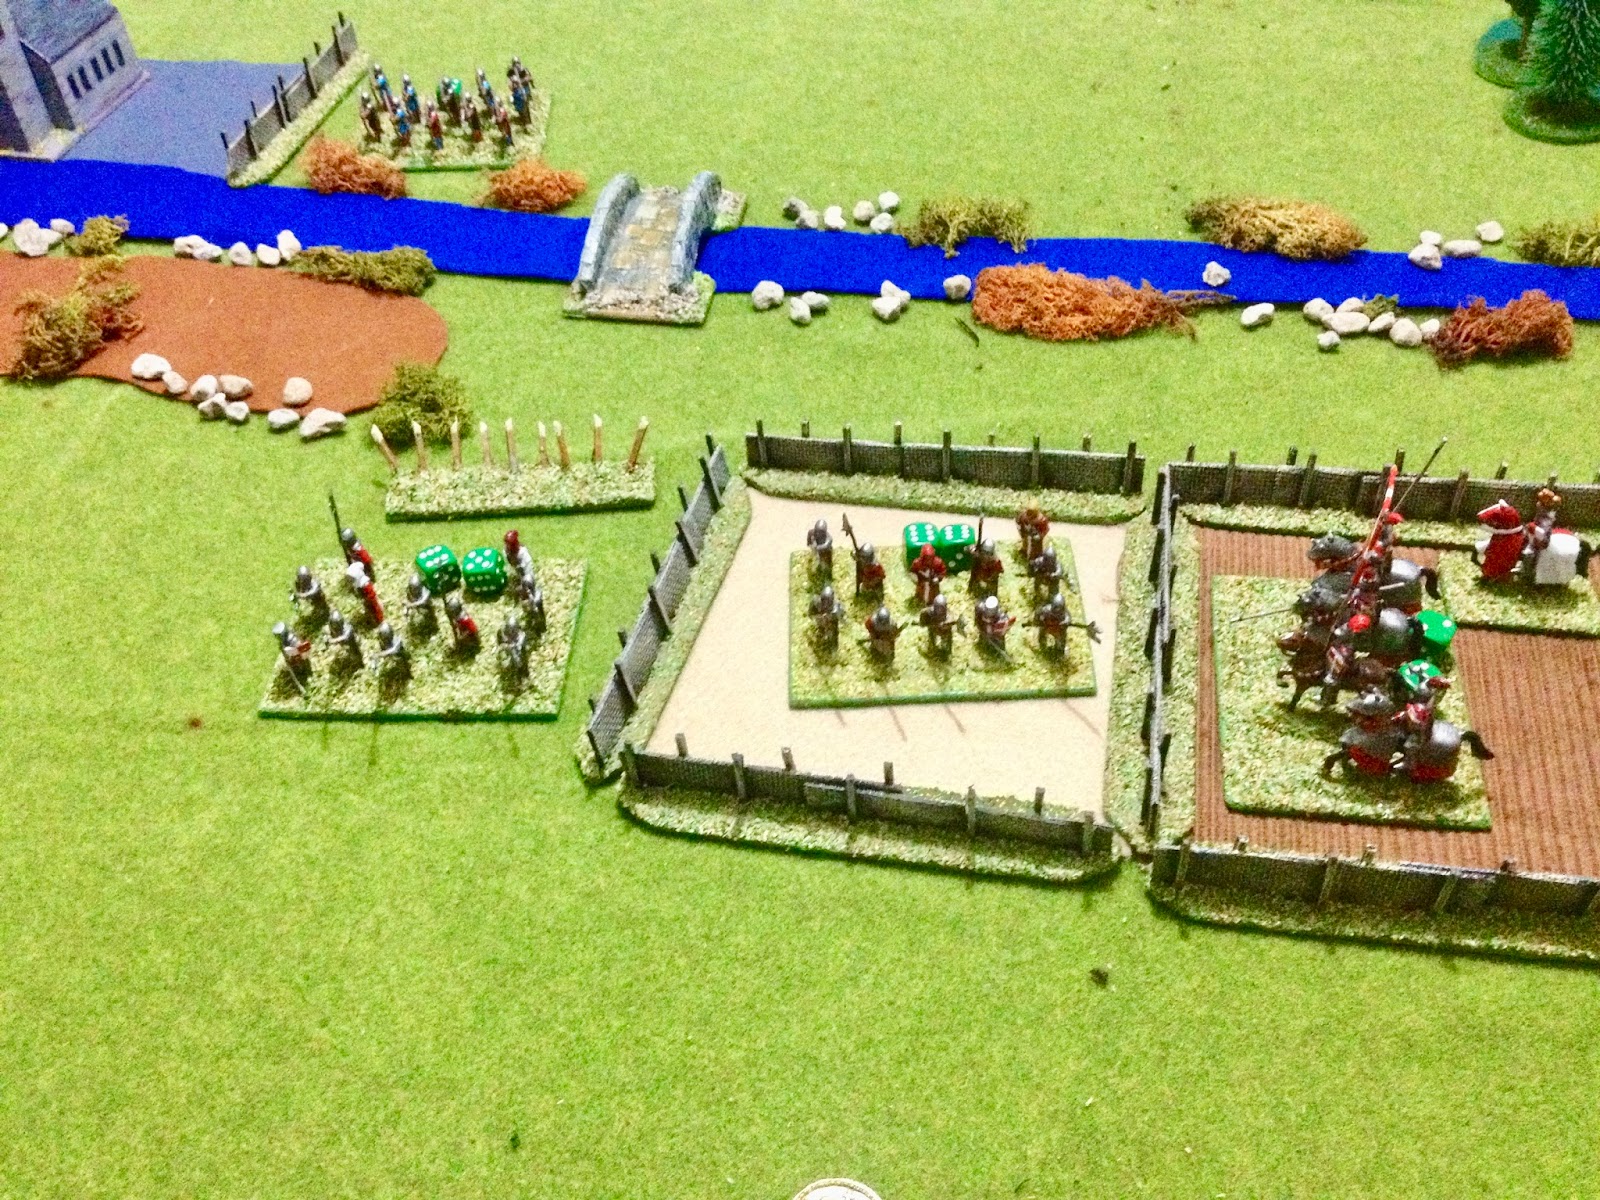
The terrain was generated by the usual dice rolls and a well placed river with only two crossing points was to the advantage of the defending French.

The main English force
The French in prepared positions
Both side position one unit to cover the wooden bridge

The French were able to field:

  • 4 x foot men at arms
  • 1 x foot sergeants
  • 3 x crossbow

While the English took to the field with:

  • 1 x mounted men at arms
  • 3 x foot men at arms
  • 3 x archers
  • 2 x foot sergeants

The games opening moves saw both sides happy to exchange volleys of arrows in an attempt to wear down the opposition. The English were able to concentrate their archers and won the opening phase of the game forcing the French line back from the bridge.

English archers advance to exchange volleys with their opposite number
Missile fire forces the French left flank to give way
The next phase of the battle saw the English move forward on both bridges. The French had moved the crossbow unit defending the wooden bridge across to support the defence of the stone bridge.

English foot sergeant unit advances on the undefended wooden bridge
The main English attack was advancing to cross the stone bridge
The English assault moved swiftly across the stone bridge. Some poor activation rolls by the French allowed the English men at arms to cross the bridge relatively unscathed.

French face attacking English. While in the background Prince Riddick moves his single mounted unit to his left flank.
Soon all French reserves were involved in a fierce battle to throw back the attacking English
The first assault by the English was successfully forced back by the defenders lead by Baron Bechard.  Of particular note was the remaining crossbow unit which shot volley after volley of bolts to deplete the attacking English.

French defenders put up a strong defence
The main English assault is thrown back across the stone bridge
With the defenders wakened after the first assault, the English regrouped and moved their archers into position to support the next assault. Meanwhile the English mounted men at arms had crossed the wooden bridge.

The English army prepares for a second assault
The English are able to coordinate their attacks on both flanks
The combined attack from both bridges was too much for the gallant defenders who ceded the field of battle. Included in the casualties was the brave Baron Bechard, who was slain in the confusion of the final melee.

A major English victory
So Prince Riddick was able to pull off a major victory. An important win for the English who can now determine the path of retreat for the French and open the way to the awaiting ships. The next campaign moves will determine how much of the English army escapes.

The English get 1 campaign point for each army element that makes it to the ships, and 1 additional point for the baggage. The French get 1 point for each one stopped. This could be a dangerous time for the English, moving their baggage to the ships will deny them the ability to field so many archers and foot sergeants. Something the French could easily capitalise on.

Wednesday 12 April 2017

19th Century paining and HYW campaign moves

The painting continues with the 19th Century project with two artillery units wrapped up this week, as I start preparing the next infantry unit. I am getting close to being able to play a small game, most likely using One-Hour Wargaming rules as a starting point.

Latest additions to 19th Century Imagi-Nations
The forces are starting to come together ready for a small game
The other side in need of some cavalry and not just dragoons 
Over this Easter weekend I am hoping to complete a couple more Hundred Years War games, and may even be able to complete the campaign.  The last game was a draw so the next game was always going to be a rematch. The question was would either side be bolstered by some additional forces arriving. The dice answered that question - No. Although another part of the French is starting to close in.
A repeat battle will now take place


Sunday 9 April 2017

Trying out different activation rules

After playing a few Hundred Years War campaign games in a row, it was time to do something a bit different. So for a change I have be messing about with some rule ideas for my SciFi games.

A test game in progress using a 6 inch grid
As a bit of background I am currently using a 6 inch grid for my games and units are either single models for vehicles and large creatures, or units of up to 5 models. The numbers are partly due to the combat rule mechanisms I am currently using, but also from a practical point of view as 5 models fit nicely into a square containing terrain.

The rules are starting to come together into a style of game I want and enjoy. For me the activation approach used for units has been lacking in previous rulesets I have used, written or adapted. I have played a few games now with the new approach where the rules had lots of minor modifications noted down, then scribbled out, or just reworked and tweaked.

So here is the approach I am taking for the activation mechanism. It uses an IGO-UGO approach with players activating each of their units during their turn. To activate a unit a player rolls between 1-3 D6 depending on the type of unit and their situation:
  • Low quality units (Robots) roll 1D6, but can roll 2D6 if they are adjacent to a leader.
  • Medium quality (Veteran) units roll 2D6
  • High quality (Elite) units, units with a hero, or units with a leader roll 3D6
Any odd scoring D6 allows a unit to make a move. Where two odd scores are rolled a unit may move twice. All movement must end if a unit enters a terrain feature, unless they are a type of unit that ignores terrain, such as a hoverer or flyer.

A unit of Necrons (low quality unit) roll 2 dice instead of 1 because they are next to a unit with a leader. A roll of 5 and 3 (odds) allows them to move twice as indicated by the red arrows.
An even score allows a unit to shoot, assault, unpin or go into overwatch. Once a unit performs one of these activities it cannot perform any more actions during the players turn. A unit with two even scores can still only shoot or assault once, but can use both even scores to give them an advantage when shooting or assaulting an enemy unit. (Note - an assault occurs when a unit is adjacent to a target enemy unit and so can use close combat weapons. Both shooting and assaulting use the same combat mechanism for simplicity, except an assaulting unit moves into any squares vacated when an enemy unit is destroyed.)

1) A unit with a leader rolls 3, 2, 4. It uses its odd score (3) to move forward as shown by the red arrow.
2) Now having moved the unit shoots at the target Necrons using the even scores (2 and 4).  The  use of two even scores allows them to shoot with an advantage as indicated by the two blue arrows. You could consider it concentrated fire.
One of the benefits I find from this activation approach is units can always do something, even if it is moving to cover when you wanted them to shoot.

When it is not a player's turn they can interrupt and activate a unit or units which are in overwatch to shoot or assault an enemy unit: about to be activated, is performing actions, or has finished activating.

During its turn a Necron Destroyer uses an even score to move into overwatch.
Space Marine unit moves forward ready to assault, but the Destroyer uses its overwatch to shoot at the moved unit after it has moved and before it assaults.
So that's it for the activation mechanism, I am now writing up all my rules notes and hoping I can keep all the rules on one page or at least one sheet of paper printed front and back.

In between test games, where I pondered rule options, I was able to complete a unit of Dragoons for my 19th Century image-nations project. Next up is a couple of artillery units using various spare wheels and barrels to fix up this broken bits of brittle plastic.

A unit of Dragoons


Saturday 8 April 2017

Hundred Years War campaign - game 9

It appears the end of the campaign is in sight with English forces now within one campaign move of escaping to the waiting ships. A delaying attack on the English escape by Baron Bechard is made in the hope that other elements of the French army will be able to close in time and stop Prince Riddick and his army.

Campaign Map
Baron Bechard took to the field with 7 units. Included were 2 units because there was a nearby town which could bolster his force.

  • 1 x mounted men at arms
  • 1 x foot men at arms
  • 2 x crossbow men
  • 1 x archers
  • 2 x foot sergeants


The French occupy the town to secure their right flank 
 The English force led by Prince Riddick split their attack into two. On their right flank:

  • 1 x mounted men at arms
  • 1 x mounted sergeants
  • 2 x archers
  • 1 x foot sergeants

And on their left facing the town:

  • 2 x foot men at arms
  • 1 x foot sergeants
  • 1 x archers

Not dissimilar to the last engagement the English made a wide flank attack while advancing the town with their remaining units in the hope of keeping as many of the French units occupied and away from the flank attack.
French forces prepare for the English flank attack
English right flank cross the river

Both English attacks moved very slowly giving both sides the opportunity of using missile fire to soften up the opposing force.

French move to defend the town, but are wary of the flanking force.
Finally the English force starts to advance after much delay
The English pushed further around with their mounted units forcing the Baron Bechard to withdraw his left flank back towards the town.

English mounted forces move prepare to attack
French prepare for the attack
The English made a combined attack on both the town and French left flank. During the fighting, which saw the French dislodged from the town and the English men at arms push home their attack, Prince Riddick was unhorsed and carried from the field injured. Baron Bechard narrowly escaped injury himself and was able to retire with his remaining units.

The town is taken
Baron Bechard escapes

With victory in sight - the English commander is injured, the French commander narrowly escapes, and we have our first drawn game. A point to the French for injuring Prince Riddick and one point to the English for being the first to reduce the opposition forces by 50 percent.

This is not a good result for the English as French forces will remain in the campaign square forcing a rematch with the possibility of more French units arriving.