I have finished making all the terrain I currently need for my Star Wars project, which included one final building and a few hills. For the hills, I decided to try using upholstery foam. It is dense enough to support the weight of the models without any sagging. I have used foam for hills before, but that was for my smaller scale 6mm WWII armies (see here).
 |
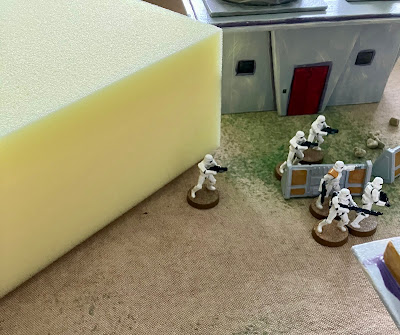
| A completed foam hill with Rebels taking up position. |
The upholstery foam I purchased for $30 was much thicker than needed at 100mm (almost 4 inches). So the first step was to slice it in half, bringing the height down to a more suitable 50mm which will work well with the 35mm Star Wars Legion figures. I did this using a sharp kitchen knife. After the hills were cut out, I then shaped them with scissors. In all I made two smaller hills and one larger one.
After shaping all three hills, they were all given an initial coat of watered-down sand-coloured paint. While the paint was still wet I added a darker sand colour around the sides, followed by a purple-brown wash at the base. Doing this while the paint I still wet allows the colours to be blended. The hills were left to dry in a warm spot for around 24 hours. It takes the foam takes a very long time to dry out thoroughly. Once fully dry, I finished them off by dry-brushing them with a light sand colour.
 |
| The 100mm upholstery foam, far too high to be used as a hill for the Star Wars Legion miniatures which stand 35mm high. |
 |
| The foam is cut to size, then sliced in half using a sharp kitchen knife. |
 |
| Preparing for shaping the hill. |
 |
The hills are shaped with scissors.
|
 |
| The hills are painted a sand colour using watered down paint. |
 |
| The hill sides are painted with a dark sand colour and the bottom the hill a purple-brown colour. Once dry they are dry-brushed with a light sand colour. |
 |
| The large hill being defended by Empire forces. |
The final building for this project is now made and painted. I generally try to finish all the buildings in one go, or at least over a few painting sessions, as this helps with giving the buildings a consistent look. I have found that coming back later to add more buildings often results in slight variations in style or colour choices as I always seem to forget one step or colour that I originally used.
All the buildings have flat roofs, allowing me to swap in different rooftop features using the scatter terrain made from old down-lights, parts off an old lamp, and leftover piping from our house renovations.
 |
| The final building is completed. |
 |
| All the buildings and scatter terrain. |
 |
| The flat building roofs allow the features to be swapped and provide a different look. |
I found a cheap Empire TIE Fighter online. While it is 1/72 scale, smaller than the Star Wars Legion figures, which are closer to 1/48 scale, that does not really matter. I generally prefer to use slightly scaled-down aircraft, as they look better on the tabletop because they do not overwhelm the other miniatures.
 |
| A recent purchase of a Star Wars TIE fighter. |
And finally, I am starting to get a few more games played. I have been using and modifying scenarios from the One-Hour Wargames book.
All this terrain modelling and painting has meant I have not been able to write up a battle report this week as I had hoped.
 |
| A game underway. |


Great bit of terrain making, the foam hills really looks good and the last building adds in really well with the ones made already, all looks great on the table top. Great backdrop too, great 50s/60s vibe.
ReplyDeleteThere is a bit of a 50s/6os sci-fi look to the buildings. It was not intended when I started, but it all seems to work.
DeleteExcellent work on the terrain
ReplyDeleteThanks, it is always fun up cycling wood cutoffs to make the terrain.
DeleteNeat stuff,, Peter! The backdrop in your game photos remind me of Barsoomian illustrations.
ReplyDeleteIt is based on a search of sci-fi landscape images so could well have similarities to Barsoom.
DeleteI like the use of foam for hills, I'm thinking they'll be ideal to go under my terrain fleeces. They weigh next to nothing and won't warp, but just how sharp was that knife you used to slice it?
ReplyDeleteI also think sub-scale aircraft look better when combined with land troops, OTOH over-scale aircraft look better with ships.
I made sure I sharpened the knife before starting each hill. The foam is quite dense so it seems to cut very cleanly.
DeleteYour Star Wars project seems to be coming together nicely 👏👏
ReplyDeleteIt’s a shame you don’t have any furniture upholsterers nearby, as there’s every chance they would have plenty of off-cuts to be disposed of.
Cheers,
Geoff
The foam was reasonably priced and I can get another 5 or 6 hills from the piece I bought.
DeleteExcellent stuff Peter. Always impressed by your terrain.
ReplyDeleteChris/Nundanket
Thanks. Space is becoming an issue so the foam hills can easily get thrown on top of the shelves with no worry of damage.
DeleteThe hills, in particular, are really nice, Peter!
ReplyDeleteThanks. They work well for a sci-fi setting.
DeleteVery clever work with the hills Peter. Another great idea to be stolen!
ReplyDeleteThe battlefield looks fantastic. Really sets the scene.
They are very easy to make, the only downside is waiting for the paint to dry as the foam sucks up all the paint washes.
DeleteThis was a very clever way to create light weight terrain which also looks good. At Nec Warley a few years ago I saw this method used on a small American model railway layout in O gauge, It looked very convincing. Thanks for sharing!
ReplyDeleteYes, very light and pretty muck unbreakable. I can throw them on top of the shelves when not in use and don’t need to worry about them falling off.
DeleteGreat pictures Peter, particularly the one of the game underway. the foam hill is very effective.
ReplyDeleteThanks. All the terrain is starting to come together.
DeleteExcellent work all round there Peter and all the terrain comes together very, very nicely:).
ReplyDeleteIt is pretty much all done, although I am on the look out for some more alien looking plants.
DeleteGreat terrain additions and nice tutorial to boot.
ReplyDeleteThe hills have already been put to use in a few games. I have some foam left over and I am thinking of other possible uses.
Delete