Saturday, 31 March 2018

French Indian War - Game 7

The next battle in the French Indian War campaign is a small game, but is important for the progress of the campaign. For if British win they will be able to threaten French settlements on the Great Lakes. For the campaign background and operational moves goto Palouse Wargaming Journal where Jonathan provides the context for this battle.

A quick search to get some idea of how to layout the tabletop delivered this contemporary drawing.

A contemporary drawing of Fort Le Boeuf
As the game is quite a small one with the larger British force having 6 units. I decided the game will be played on 4x4 foot tabletop using a 6 inch grid (8 squares by 8 squares). To represent the edge of the plateau upon which the fort sits, I laid out some difficult terrain which the British will have to negotiate. If they get held up the French will hope their fort guns will cause some additional casualties.

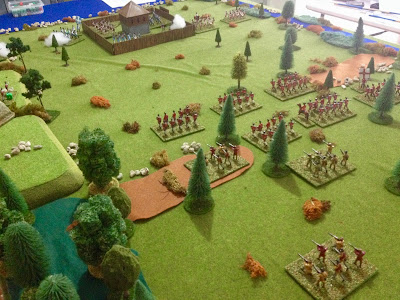
Tabletop setup
Orders of Battle

French
Commander Bougainville (A0D1)
3 Regulars (representing 1 regiment)
1 Artillery (must be located in the fort)
Army resolve = 5

British
Commander Braddock (A0D1)
6 Regulars (representing 2 regiments) and 1 of the units will be Grenadiers
Army resolve = 7

Game Report
The French under the command positioned a half their force in advance of the fort in the hope the British line would be disrupted moving across difficult terrain and they could inflict some casualties before retiring in line with the fort.

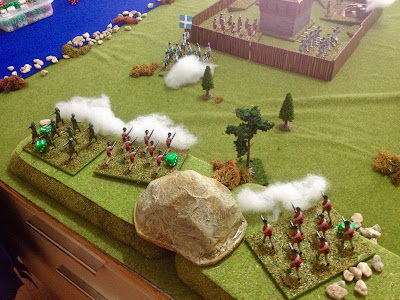
French open fire at the advancing British line.
Return fire from the British line found its mark and the French took quite a few casualties.
Failing to retire quickly meant another volley of the British line which resulted in the loss of a unit and their commander Bougainville.
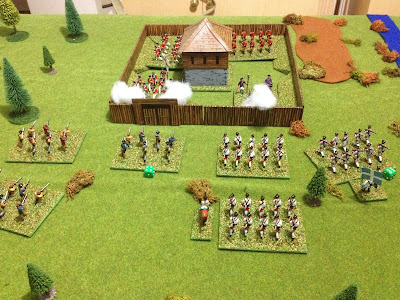
With the French commander killed or wounded. The British pressed their advantage and quickly eliminated the second French unit outside the fort. French army resolve collapsed and they ceded the fort and marched out. Neither side lost any regiments as a consequence of this engagement.

This turned out to be a really quick game played out over just 4 turns. Just one of those unusual games campaigns throw up and ones you would never think of setting up and playing yourself.

What happened to Commander Bougainville? Does he live to fight another day? A quick D6 roll decided his fate (1-2 escapes injury, 3-4 wounded and needs to convalesce for a couple of months, and 5-6 killed in action). A 2 was scored and he survives!

Friday, 30 March 2018

A quick WW2 game planned and ECW project starts

Before playing the next game in the French Indian War campaign, I thought I would get in a quick WW2 game and setup the tabletop.
British in prepared defensive positions 
German forces move forward
This weekend I plan to get my first English Civil War unit painted up and work out the painting technique to use. As usual I will be using 4x3 inch bases so they fit nicely on the 6 inch gridded tabletop.

Planned basing arrangement of figures 
6 musketeers, 4 pikemen, Standard and Officer
If you are wondering why the flag is blue. It is because I use painters masking tape to make the flag. It sticks well when you wrap it around the pole, and can later be easily shaped.


Tuesday, 27 March 2018

Finishing off a battle mat

A couple of weekends ago I started on making my own battle mat while waiting for the glue to dry on a star fort I was making. The first stage of making the mat can be found here, and briefly describes how I roughly darkened up the light green curtain material with a rough brushing of watered down mid-green and also a green-brown colour mix. At the time I did not think I had got the colour and overall look I wanted.

Battle mat in use
One of the comments suggested using a sponging technique (thanks Norm). After searching through the shed full of paint and painting equipment I found my old natural sponge. So with sponge in hand and a slightly watered down green (a colour I use on my bases before they get flocked) I started sponging. With each sponging gradually building up the desired effect and colour depth I was looking for.

A close up of the sponged effect over the brushed on washes.
With the paint dry it was time to use the battle mat for a WW2 game. The mat being curtain material has a backing which gives it some weight, so it sits quite nicely over books or blocks to make smooth looking hills.

With all the terrain added
After setting up the terrain for a game and standing back to look at the end result. It occurred to me how much some of those early wargaming books (Battle, Introduction to Battlegaming, and Operation Warboard spring to mind) have influenced me with their ideas and chapters on making your own terrain. Because with the exception of trees (only a quarter of the trees are home made) all the other terrain was home made from balsa wood, modelling materials and various purchases from the hardware store. While many of the terrain ideas come from various blogs, those early wargaming authors sowed the seed for much of my approach to wargaming today.


Sunday, 25 March 2018

French Indian War Campaign - Game 6

Game 6 of the French Indian War campaign has French and British forces fighting over the familiar ground of Fort William-Henry. The campaign moves leading up to this battle can be found on Jonathan's Palouse Wargaming Journal blog.

Order of Battle
The figures in brackets are the campaign regiments which are represented by 3 units on the tabletop.

French Defenders
6 (2) Regulars
1 Artillery piece within the fort
Commanded by Dieskau (A2D2)
Army Resolve = 8

British Attackers
6 (2) Regulars
3 (1) Rangers
3 (1) Militia
Commanded by Monckton (A2D1)
Army Resolve = 13

A quick note on a rule change for this game. Over the last 5 games defending forces have failed to successfully defend their fortifications. Rather than allowing a defending unit the option to re-roll a poor D3 score when shooting. Now units within fortifications add 1 to their score when shooting at unit adjacent to the fortifications.


Battle Plans
For the French the plan is to defend both flanks of the fort. Grenadiers on their right flank aim to hold off any attack from the hills. While on the other flank 2 units or Regulars will hold position adding their fire to those of the fort.

The British plan is to move up their Rangers along the hills and once the French Grenadiers are engaged move their lines up veering towards the French right flank.

As British Rangers move up through the hills French Grenadiers open fire. 
Some Ranger units are delayed, but advance units engage the Grenadiers whose shooting is proving very accurate.
With the French right flank engaged the British line advances.
All Ranger units are engaged trying to put pressure on the Grenadiers. 
The Fort and left flank open fire as the British line move into range.
Grenadier musket fire eliminates a Ranger unit.
The British assault on the fort begins.
Militia units are brought into the line to provide extra musket fire.
Both sides have Regular units eliminated as the assault moves into full swing. The British units were unable to storm the fort due to the number of hits they had accumulated. Forcing them to remain adjacent to their commander and allowed the French to reinforce the walls.
The French Grenadiers finally succumb to musket fire from Rangers and supporting Militia units. While on the other flank Commander Dieskau prudently retires to avoid being eliminated. 
The British right flank retires as they concentrate their efforts on the left corner. Both siders were wary of accumulating any more losses and failing their army resolve.
A final push by the British to get a toe hold in the fort.
Two Brush units are lost and they fail their army resolve, a victory to the defending French.
A French victory and another close game. The French army resolve would not have survived another unit loss. I plan on keeping the rule change for the next game.

Tuesday, 20 March 2018

Siege works for a siege wargame

Work continues with preparing for a siege wargame. This week I have been creating the siege works terrain.

Round dowel is cut and fly screen repair material wrapped around the dowel.
Different size dowel is used to add variety.
I tried using a filler and an expanding glue. I went with the glue as it was quicker (but a bit messy).
Bases are covered in PVA glue and dipped into model railway ballast.
The pieces are first painted a light grey and once dry, painted with a watered down dark brown.
The wicker of the gabions are dry brushed with a light grey.
The earth is then given a reddish brown wash and a final dry brush of a light sand colour.
Everything gets a painted with a varnish and before it drys some flock is carefully sprinkled as a final touch. The green flock was added as a last minute idea as the defences were looking too drab.

So while I have yet to write any rules for a siege game. Here are a few photos of how I hope my games will look. I use brown felt cut into strips of various size for the parallels and communication trenches. The siege work terrain is placed on the parallel strips.

Three parallels have been constructed.
A defenders view
Attacking forces 

I now need to make a couple siege mortars for besieging army.

Monday, 19 March 2018

French Indian War Campaign - Game 5

The 5th campaign game was going to be a smaller game than previous. The background for the attack on Fort Stanwix can be found on Jonathan's Palouse Wargaming Journal.

Attack on Fort Stanwix
The orders of battle. Each campaign regiment (in brackets) is represented on the tabletop by 3 units.

British
No named commander
3 (1) Regulars
1 Artillery based in the fort
Army resolve = 3

French
Commander Drucour (A0D1)
3 (1) Regulars
3 (1) Militia
Army resolve = 7

The British forces were all deployed in Fort. The French deployed south of the fort with the intent of conducting a straight forward assault on the fort with all units.


The game was setup on a 4x4 foot space with the Mohawk River on the East flank and woods and a hill on the West flank.

Table setup with British defenders waiting in the fort 
French forces turn up ready for the assault
British defenders open fire as French units come into range
Casualties mount on the attackers as the close. The rules halve the range of weapons when attacking units in fortifications. While those units in the fort can re-roll shooting rolls, but must accept their second score.
A milita unit is eliminated. A roll of 3 against their army resolve reminds the attackers the need to push ahead.
A French unit scales the walls after the defending artillery unit is eliminated. British roll a 2 against their meager army resolve of 3. 
British units counterattack and eliminate the French unit - gaining control of the fort again.  The French  resolve is weakening.
A second French unit scales the walls and the British surrender.
Another victory for the French and an important political victory in terms of the campaign. This was quite a fun little game, but has raised a question for me about army resolve when defending a fort. I am now thinking the rules should allow a defending force to increase their army resolve by 2.

Saturday, 17 March 2018

Building a star fort - Part 2

Yesterday I spent the whole evening finishing off my star fort with a series of washes and dry brushing. The fort itself has been constructed so it can represent both larger and smaller star forts by adding up to three bastions.

In terms of constraints, the fort construction had to fit and line up with my 6 inch gridded tabletop, and accommodate my troops which are on 4x3 inch bases. This has meant the fort is a tad stylised and geared towards the practicalities of wargaming.

The completed fort with Spencer-Smith miniatures defending
A different configuration of a smaller fort with a supporting redoubt
So, here are the remaining steps I used to complete the fort and its bastions. See the fort construction part 1 post here.

With the fort covered (in the now dry) paper towel small bits of the thinest available balsa wood is randomly stuck on to represent the stone work. You could use cardboard as an alternative, I chose balsa wood as it's a slightly thicker and gets picked out better when dry brushing.
Once all the balsa stonework has been added. The pieces are varnished to provide a seal. Past experience has taught me to always do this step. It stops any later leakage of colour from any components used to construct the terrain piece.
Everything gets a coat of mid-grey paint.
With the construction completed and the base coat of paint dry. The remaining steps are just about apply colour to create some depth, pick out details and give an impression of detail when there is none on the model. My painting style uses quick dry brushing and wash methods and is very loose (and easy).

To break up the mass of grey I added some brown to the grey paint and painted the centre yard and fortification's terreplein (the horizontal surface of a rampart on which cannon are placed and protected by a parapet)
All surfaces now get a wash of black. Sometimes I will do two washes of black to get the darkness I need before building up the colours with dry brushing.
The fort now gets a dry brushing of the original mid-grey. To add some more depth of colour to the terreplein a wash of sandy mid-brown was applied. I did not plan to do this, but it just did not look quite right and something else was needed.
Then using a thinned down black paint the stonework is picked out by going around the balsa stonework pieces and  painting the outline of stonework on the flat surface. I do this quickly with a fine brush trying to avoid any uniformity. You do not need to be too precise, as being precise can jar with the overall look.

The entry gate is painted dark brown, then a mid brown is painted on in strips using a detail brush. Depending upon the look I sometime choose to paint the odd line with a light tan brown to highlight details.

With the thinned black paint dry. I go over the painted stonework with a thinned blue to give a variation to the colour.  While difficult to see it in the pictures it does help to provide some more depth and softens the lines. Finally a light sand colour is lightly dry brushed to pick out edges and add another colour.
I will occasionally continue with dry brushing or washing selected areas where I have missed areas in my haste or some part does not look quite right. But I keep reminding myself this is meant to be a practical piece of wargaming terrain and not to fuss over detail.

A final coat of matt varnish is applied to protect the terrain.
And on to the tabletop
The quick and loose painting of detail gives the right impression when wargaming unless you choose to look closely.

With the fort completed and ready for a French Indian War game. Total cost to build is between $25 to $35 as I pick up all the materials from the local hardware store.

I now need to turn my attention to making the besiegers terrain features of saps and parallels. Storming this fort will be no easy task!