Sunday 29 March 2020

WW2 Western Desert Campaign - Game 2

This post unfortunately has no photographs of the game which I deleted after a hurried tidy up. Doh! After that admission of foolishness on to the campaign and overview of the game with maps only.

On the campaign map the previous game in the centre reflected a game between two armoured forces.

Campaign Map
The defending force card was revealed for the second game and we have an armoured force attacking an infantry force in defensive positions. This is a critical game for the Allied forces who if they suffer a second game loss will have to retire all forces by one zone on the campaign map.

Orders of battle are...

Allied forces

3 x HQ
3 x Reconnaissance Units (A/C and Carriers)
6 x Infantry
3 x AT (no more than half can be 6 pounders)
4 x Matilda and Valentine Tanks
2 x Artillery (25 Pounder and 5.5” Gun)

Additionally Allied forces can add 6 improved positions and 12 minefield hexes.

Axis forces

3 x HQ (2 x HQ if less than 12 units)
4 x Reconnaissance -(2 x AC, 2 x Armoured Infantry)
8 x Tank (2 x PzII, 5 x PzIII, 1 x PzIV)
2 x Infantry
2 x AT Guns (one SPG)
1 x Artillery (SPG)
1 x 88mm Gun

With the forces identified the next step is determining the terrain setup. Cards were drawn and laid out. The defending Allies chose their base edge and decided not to switch any of cards vertically. The attacking Axis forces are able to switch to adjacent cards horizontally, and chose to push the escarpment terrain into the centre in the hope of splitting the defending forces.

Allied forces pick their base edge to defend.
Axis forces move the escarpment into the centre.
The end position is used as a guide for setting up the tabletop.
With no photographs this game report will be rather brief and will rely on the maps. The Allied force had dug all its infantry and AT guns in a series of improved position across the centre of the tabletop. Minefields had been added to those defending the two tracks. The majority of available armour made up of Matilda and Valentine tanks were position in the centre to support either flank. Armoured cars and carriers were position to support their left flank and defenders in the rough terrain.

Initial positions
Axis forces arrive and quickly focused on the Allied left flank and the defenders positioned in the rough terrain. While this approach avoids the minefields, the rough terrain reduces the mobility of their armoured forces which cannot enter rough terrain hexes.

The advance quickly slowed down and a few tanks that strayed too close to the escarpment were lost to AT guns. As the direction of the attack became known Allied tank and armoured car forces were pushed to bolster defences.

Axis forces attack the Allied left flank.
By midday the longer ranged German weapons were able to dislodge the defending infantry and AT guns. However, their tank units were unable to work their way around the rough terrain as all routes were blocked by Allied armour.

Any Axis breakthrough was blocked by Allied armour.

Axis infantry was rushed up to assist with taking the rough terrain, as their tanks took on the well armoured Matilda tanks. As the afternoon progressed Axis tank numbers prevailed and a breakthrough was achieved.

A hard earned breakthrough is achieved in the afternoon.
A second Axis victory which in the context of the campaign means the allied forces will retire one zone on the main map. A second campaign turn will now begin again with supplies and selecting whether they are directed to attack, defence or replacement of lost equipment.

Campaign map after Allied forces retire one zone.

Thursday 26 March 2020

A Jacobite Rebellion game using orders

I still have to write up my last WW2 Western Desert campaign game over the weekend as it requires a map, which takes a bit of time. As a quick of a change in scenery, certainly on the tabletop, I opted for a quick Jacobite Rebellion game using the One Hour Wargaming scenario "Counter Attack".

A couple of turns into the game. The six units a side of 40mm Jacobite Paper soldiers fills my 6x4 foot tabletop quite nicely without getting too crowded.
One of the approaches I have been taking recently has been use orders. I don't particularly like using written orders so I use tokens in indicate movement, and where there is no token the unit is assumed to be holding and will fire at the nearest enemy unit.

Three colours are required. Red and Blue are for the opposition and Grey for  your own units.
At the start of a turn two orders are assigned to units on the opposing side. The simplicity of OHW rules makes this easy as units either move, shoot or melee. I work through the six units one by one asking the question what are the options? In some cases there is only one sensible approach and both orders are the same. As a generally rule I try and have half the units with two options. For example, a units has two orders to move, one to stay with the main body and the other to move wide to protect the flank.

Orders, blue and red, are placed on opposition units.
After all the orders are placed, I check the order colours again to make sure the blue orders are complimentary of each other, and repeat the process with the red. A straightforward task with only six units on the table with OHW.

An example of a unit with red orders to move and blue orders will be to hold and shoot at the nearest enemy unit.
After reviewing the opposition order options it is now time to place the orders for my units. Only one set of orders is required. As I guess and try and counter both possible options. I then roll the dice for the opposition forces, 1-3 and blue orders are actioned, 4-6 and red orders are actioned.

On my turn I follow the orders placed.

Only one set of orders for my own units.
I find this approach enjoyable as I think of different order options for the opposition. At some points in the game it is quite difficult to have half the units with two different options. If this happens I won't force this rule as I don't want the game ruined by irrational orders.

A quick note on additional rules applied to Horse and Musket OHW rules for Jacobite games:

  • Highlanders move 9" and charge at +2 in hand to hand combat. On their first charge they roll two D6 and select the highest.
  • Line infantry on their first volley roll two D6 and select the highest.
  • Commanders, 3 per side, can join a unit during their move and reduce hits by D6-1 once. They remain with the unit for the remainder of the game.

Sunday 22 March 2020

WW2 Western Desert Campaign - Game 1

The context for this first game of my WW2 Western Desert campaign has the Axis forces directing their supplies to take the offensive and Allied forces taking a defensive stance directing their supplies into defences.
Game in progress
The first step was to set up the tabletop terrain. I am using the terrain cards I made last week with a desert theme to determine the layout. Once the cards are shuffled and laid out the defending player gets to choose the side they wish to defend.

Terrain cards laid out and the defender (red arrow) selects the side to defend.
The defender is allowed to swap two adjacent cards up or down to improve their position.

The defender is allowed to swap two adjacent cards vertically.
The attacking player takes the opposing side and is allowed to swap to adjacent cards sideways to improve their attacking options.

The attacker can swap two adjacent cards horizontally.
Once all the swaps are complete the terrain is setup on the tabletop. As a general rule I have three features, of the type depicted on card, placed on the tabletop area they are depicting. I finally add some scrub across all areas which only benefits infantry and AT gun units with cover.

Final card setup after each side has swapped. (Swapping is optional for a player.)
The layout is transferred to the tabletop and a scrub is added.
To determine the forces involved and type of game I had originally thought about having a number of scenarios. I have subsequently opted to use some of scenario rule mechanisms from Neil Thomas' "Wargaming: Nineteenth Century Europe 1815-1878" where the scenarios is determined with dice. In my next post I will write up the rule adaptations I am using.

For this game the Allied forces have had some supply difficulties and must remove 20% of their units. Axis forces had a better dice roll and can attack on one of the flanks with 30% of their forces. However, 30% of the Allied forces can be deployed well in advance of their baseline edge.

Order of battle...

Allied Forces

  • 3 x HQ
  • 2 x Reconnoissance (Stuart tank and Carrier)
  • 7 x Tanks (3 x Crusaders, 1 x Stuarts, and 3 x Grants)
  • 3 x Infantry
  • 2 x AT (1 x Portee and 1 x 6 Pounder)
  • 1 Artillery (1 x 25 Pounder)
Allied forces are able to dig in their infantry and AT guns. However, I forgot to add the minefields they are allowed for taking defensive approach with their supplies. I will need to make an adjustment in the next game for this oversight.


Axis (German)

  • 2 x HQ
  • 2 x Reconnaissance (1 x AC, 1 x Armoured Infantry)
  • 5 x Tank (2 x Pz II 2 x Pz III, 1 x PzIV)
  • 2 x Infantry
  • 2 x AT Guns (one SPG)
  • 1 x Artillery (SPG)
  • 1 x 88mm Gun

Flanking force

  • 1 x HQ
  • 3 x Tank (Pz III)
  • 1 x AC
  • 1 x Armoured Infantry

Game Report

The Allied forces placed 70 percent of their defending units first. Then after the Axis deployment placed their remaining 30 percent in advance of their defensive line. Axis forces had 30 percent of their units in reserve ready to appear later in the game on either flank. A dice roll would determine the flank.

Allied forces setup defences around the town.

Allied defences setup

Morning Attack

The attack began at 8am in the morning with all German units advancing. Taking advantage of their advanced position Allied tanks moved forward and quickly repulsed German reconnaissance elements and blocked the German tank advance.

Initial deployments and opening moves.
Very quickly a tank battle ensued. Allied air support was called upon to help stem the advancing German tanks.
Allied tanks block initial German advances. 
Advancing German tanks suffer damage from Allied air support.

Tank battle and flanking force arrives

As morning progressed to noon, the tank battle swung in favour of the attacking forces and the remaining Allied tank units retired back to their defensive line. Additional tank units and armoured cars units arrived on the German left flank. Their attack was initially stalled by small tank and reconnaissance force positioned in the hills.

Flanking forces arrive and Allied units retire to their defensive line.
Allied tanks retire to their defensive line.
Flanking units arrive.
German air support arrives to soften up defensives.

Afternoon assault on defensives

The assault on Allied defences was paused briefly for air support and to bring up supporting artillery. The primary attack would be led by the recently arrived flanking force. After some initial opposition the attackers numbers started to tell and defences began to crumble.


Final actions
Attacking forces concentrate their fire to overcome the defences.
Attacking units
Last ditch defence of the town.
The defence collapses.
A victory to Axis forces. My oversight forgetting to add minefields made it easier for attacking forces.

The lost units will be recorded for future campaigning and both forces can reorganise and divisional workshops can repair equipment.

Tuesday 17 March 2020

North Africa campaign preparation tasks

Having completed the campaign map this past weekend, I am planning to begin the campaign with the first game this coming weekend. But before I can start the games I have three areas I need to complete:

  1. Terrain cards
  2. Orders of battle
  3. Scenario options for the games.

I used terrain cards during my English Civil War campaign and they worked out really well. A new series of terrain cards is needed. To create them I used the same approach as with the campaign map, felt tipped pens and colouring pencils.

Desert terrain cards depicting hills, escarpments, swamp, rough ground, open ground, roads and town.
For orders of battle need to be finalised, I am trying to gauge what is a suitable starting size for a good game and for during the campaign when there are losses which cannot be resupplied. The order of battle represents a portion of a division, rather than the whole division, which maybe trying to a breakthrough or capture key terrain.

The rules used are based upon Lock 'n' Loads boardgame Tank on Tank. Naturally for such a tank oriented game all the Infantry divisions will all have supporting tank elements.

German Panzer Division is represented here.
A portion of am Allied armoured division
Allied Infantry Division with tank support
The final task is to determine a small range of 6 scenarios which will be played (selection based on a D6 dice roll). So far I have four taken from "Wargaming An Introduction" by Neil Thomas:

  1. Encounter Battle
  2. Frontal Assault
  3. Surprise Assault
  4. Escalating Engagement
  5. ?
  6. ?
I am going to look thought the scenarios in One Hour Wargaming to fill the final two types of game.

Saturday 14 March 2020

Preparing for WW2 North Africa Campaign

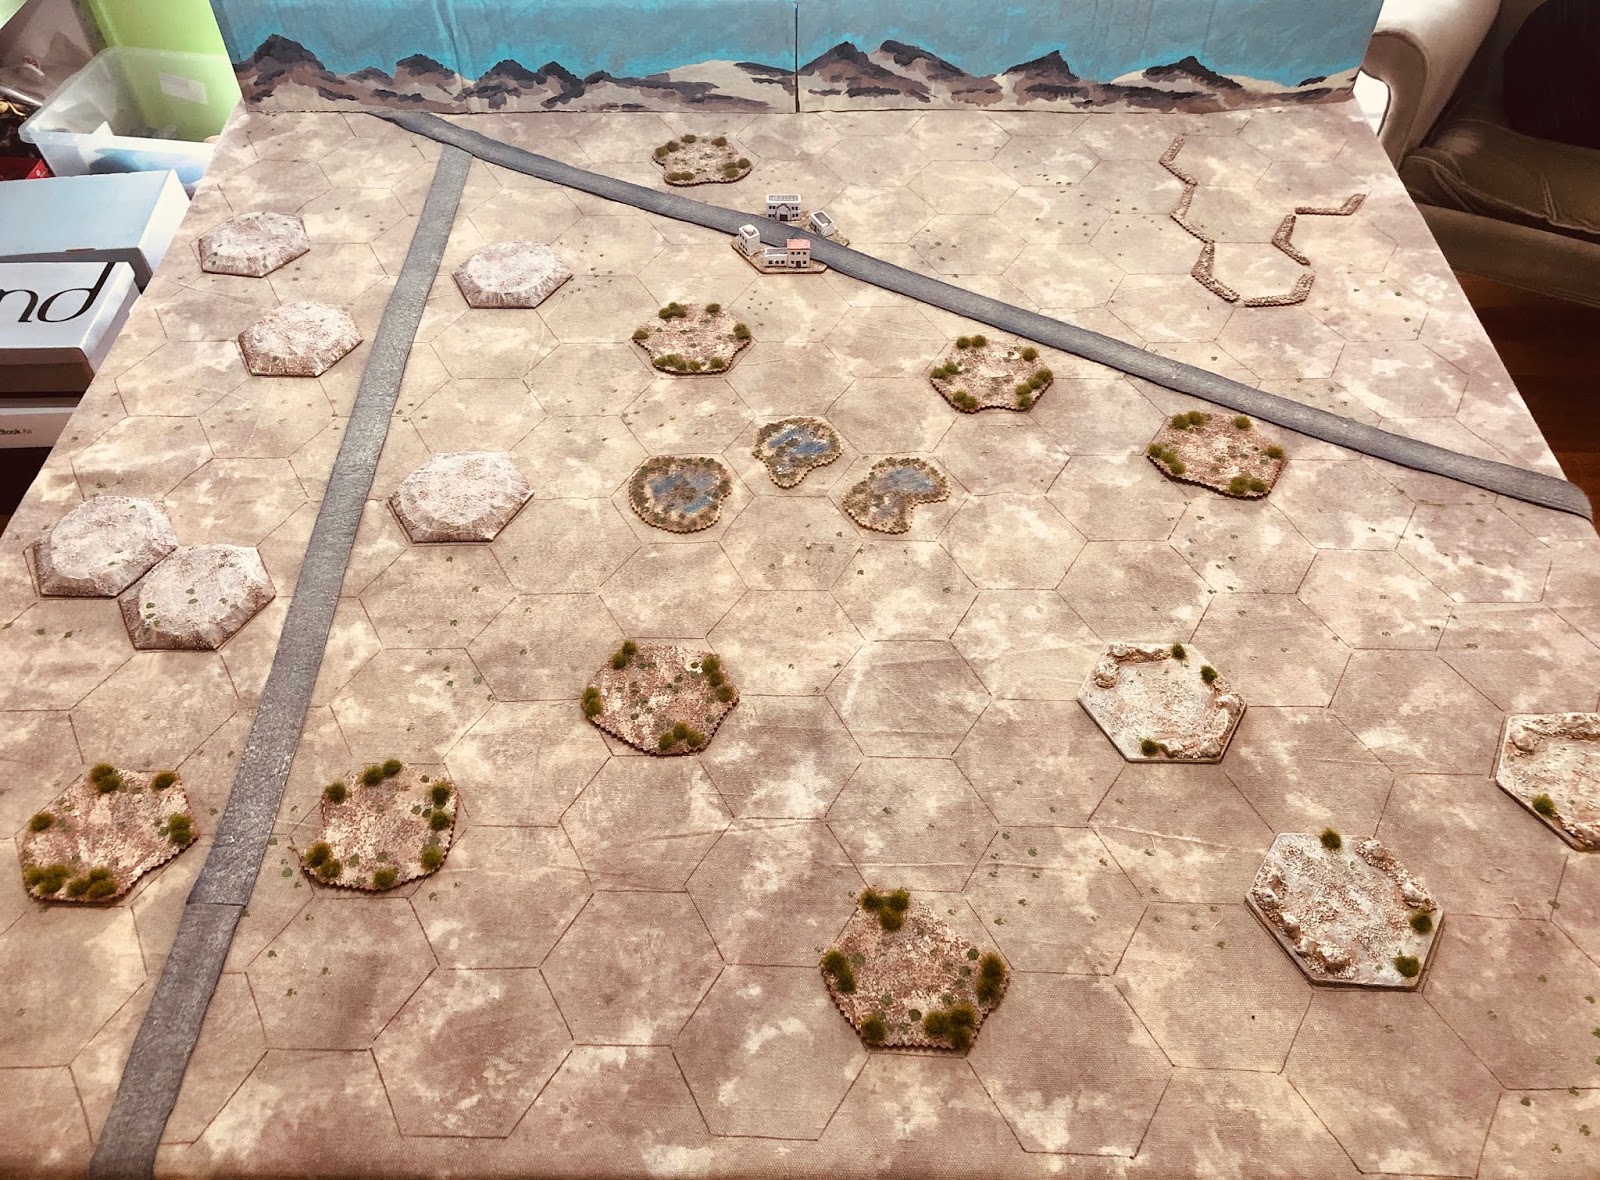
The objective of this campaign is to provide a narrative for a series of tabletop games. My games use 1/300 Heroics and Ros models on a hex grid, using a variant of "Tank on Tank" boardgame rules. They provide quick games which can be setup and played to completion within about an hour.


While I don’t want to be dealing with supply in the tabletop game, I do want supply to be reflected in the campaign game mechanics as supply was a major factor in the North African campaign. Something both sides had to deal with.

The Desert campaign lends itself to a linear campaign approach. What better starting point is there than KISS Rommel campaign rules to get inspiration for the map layout and approach. These are available on https://freewargamesrules.fandom.com/wiki/Freewargamesrules_Wiki.

Campaign map drawn using felt tipped pens and colouring pencils for shading. The map is divided into zones for the inner campaign.
With linear campaigns there is always the question of how many steps to have in the campaign? The temptation is to always add too many steps and as a result campaigns can drag on too long. So I was mindful not to get too ambitious.

In terms of timescale, each campaign move represents 1 month. During each month’s turn players direct the supplies they receive to one of three areas:

  1. Launch an attack
  2. Prepare defences
  3. Reequipping units

The flow of supplies can be interrupted and must be diced for each month. A D10 dice is used to determine this. Axis forces get supplies 80% of the time and Allied forces 90% of the time. I don't quantify the volume of supplies, armies are either supplied or not supplied, and the areas represent the focus of supplies.

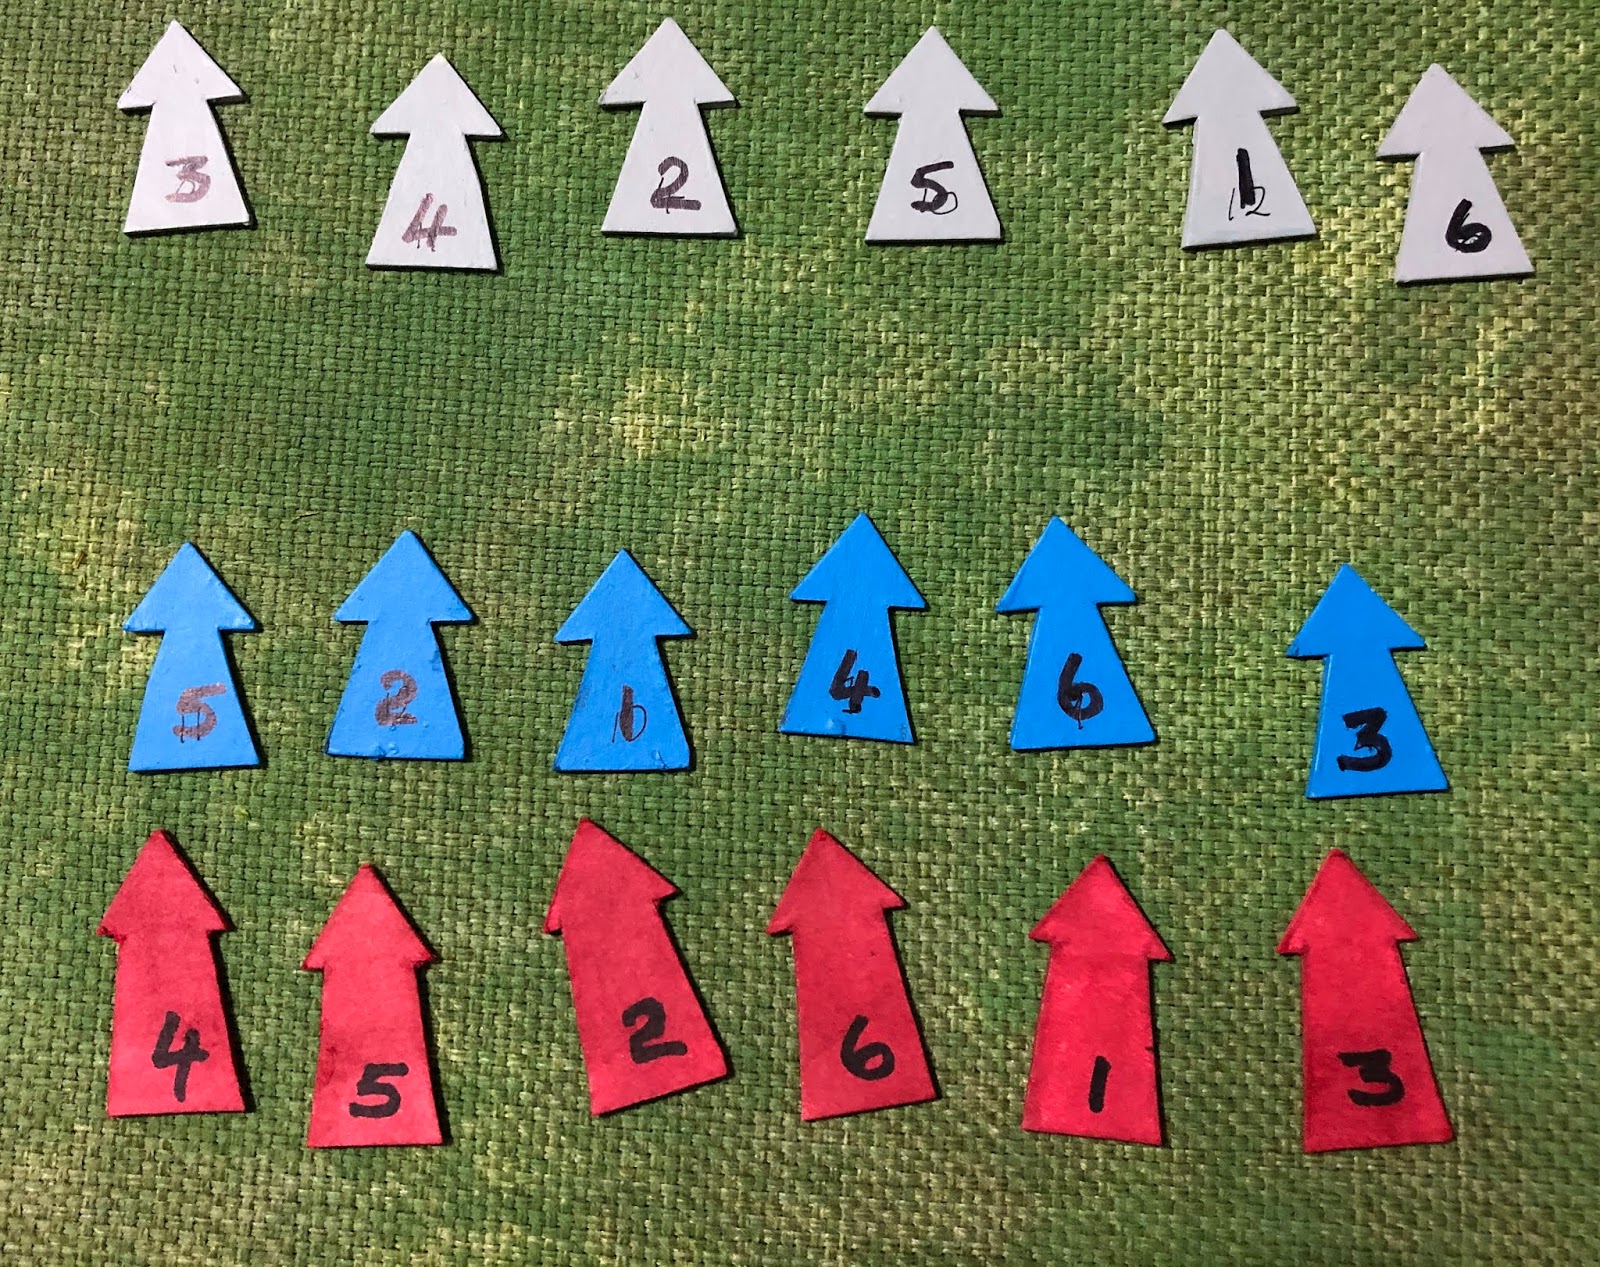
Each side has five counters representing their forces grouped at a divisional level. This is where the one bit of paperwork is used to track divisional losses and recovery throughout the campaign. Both sides line up their divisional force counters on the board. The campaign begins with Allied and Axis forces positioned at Tobruk, the centre point of the linear campaign.

Campaign forces.
Players dice for their supplies and assuming the flow of supplies is successful, assign their supplies (attack, defence, or reequipping). It is quite possible for both players pick the same supply option. Should that be the case the following occurs:

  • Prepare defences - No battles occur for the month. When battle does come the defending player’s units will have prepared positions and minefields.
  • Reequip units - No battles occur for the month. Players attempt to recover lost units for all their divisions.
  • Launch attacks - When both players decide to attack roll the dice to decide which player attacks, if scores are drawn the Axis player is the attacker. The losing player’s supplies will instead be directed to reequipping units.

Once an attacker is identified the best of three tabletop games are played to determine the result of the attack. However, before these games occur there is still some campaign activity to occur. Both players pick up their divisional counters and reposition them face down. The attacking player then reveals their counters and selects the division which is acting as the spearhead of the attack, and the opposing enemy unit on the map is revealed.

Both sides reposition their forces and the defending forces are concealed.
The units on the defending side are only revealed after an attack is declared. Divisions may only attack their opposite number.
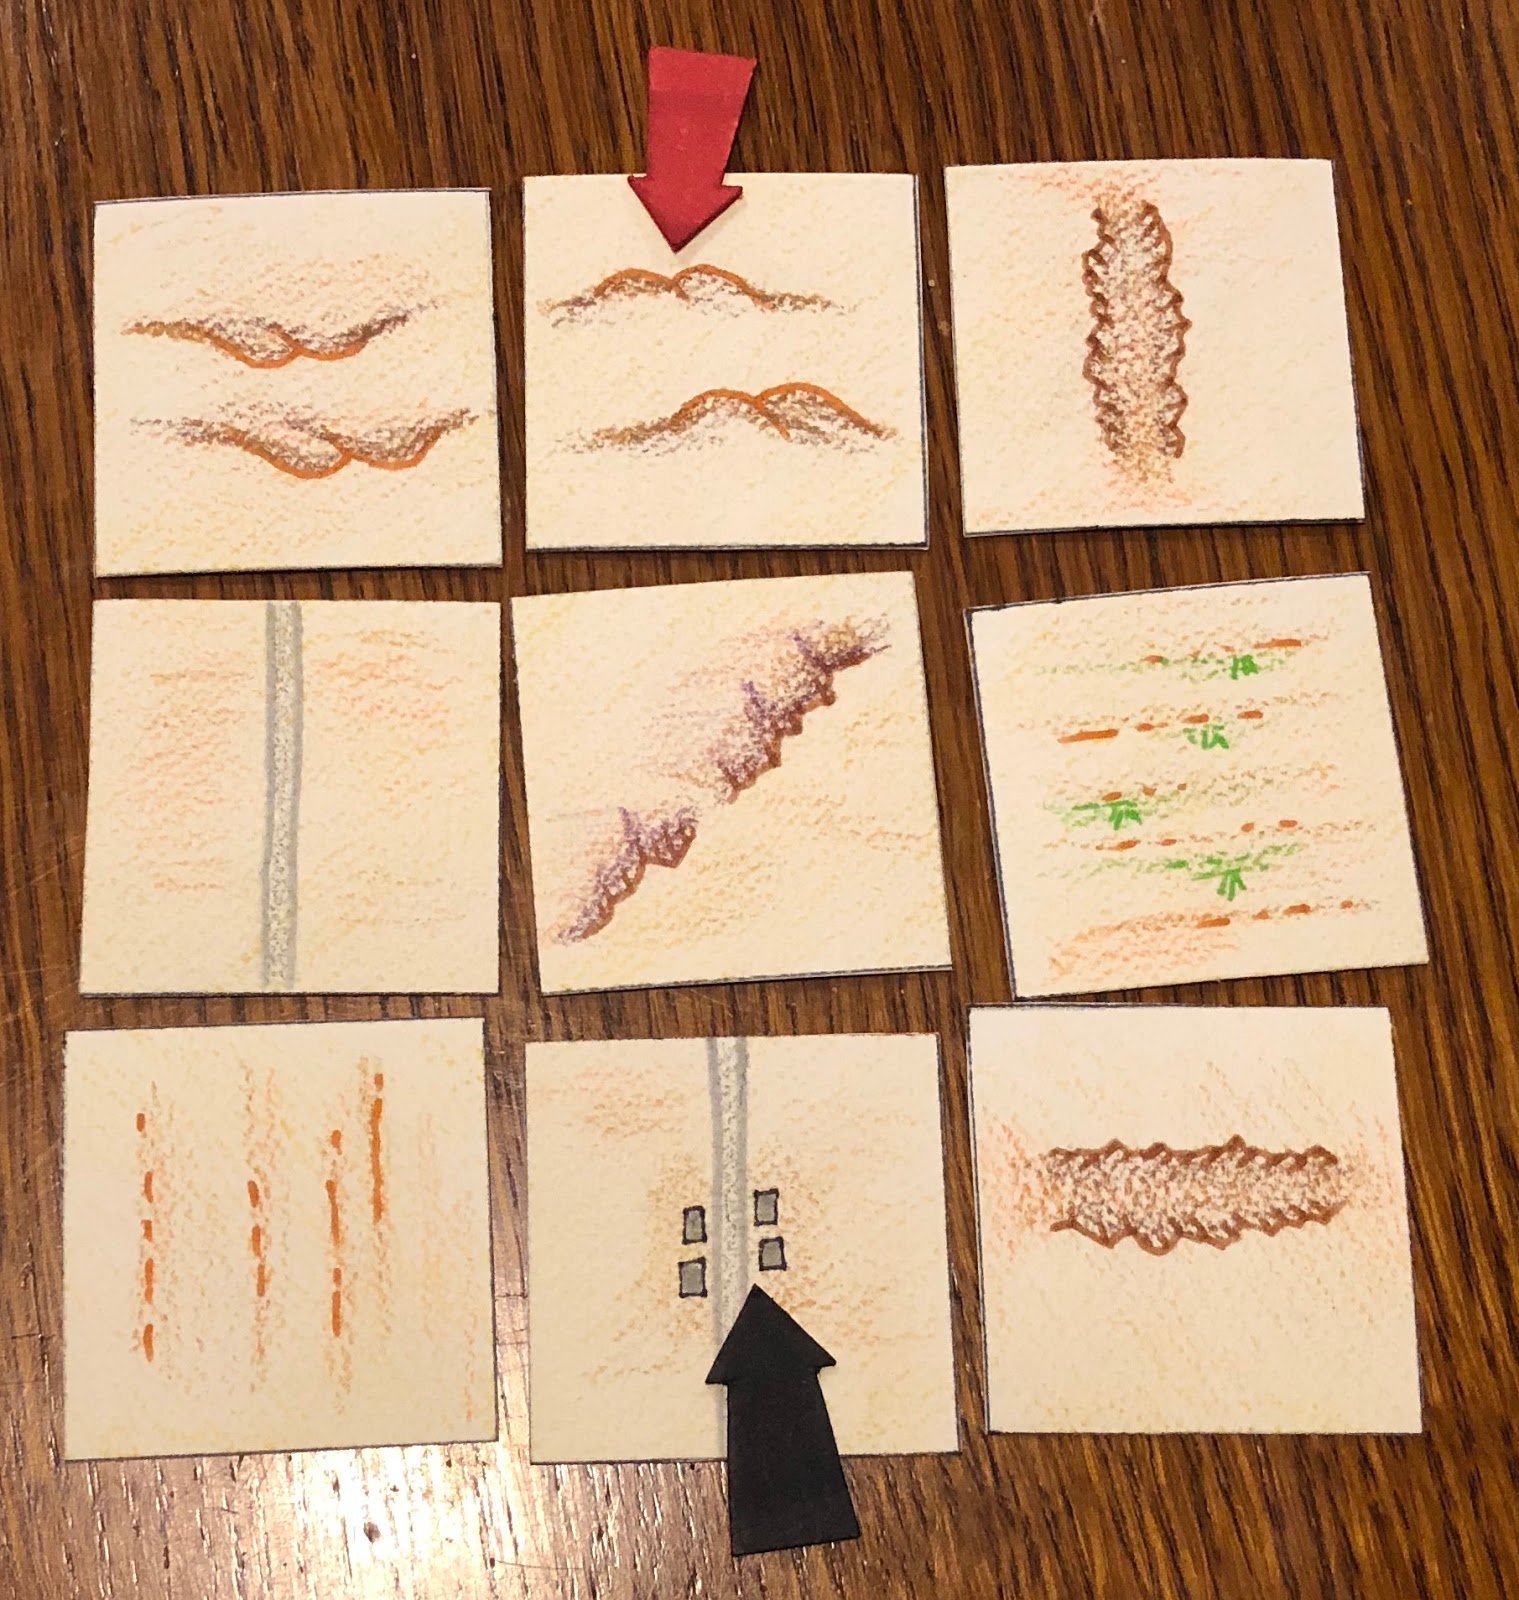
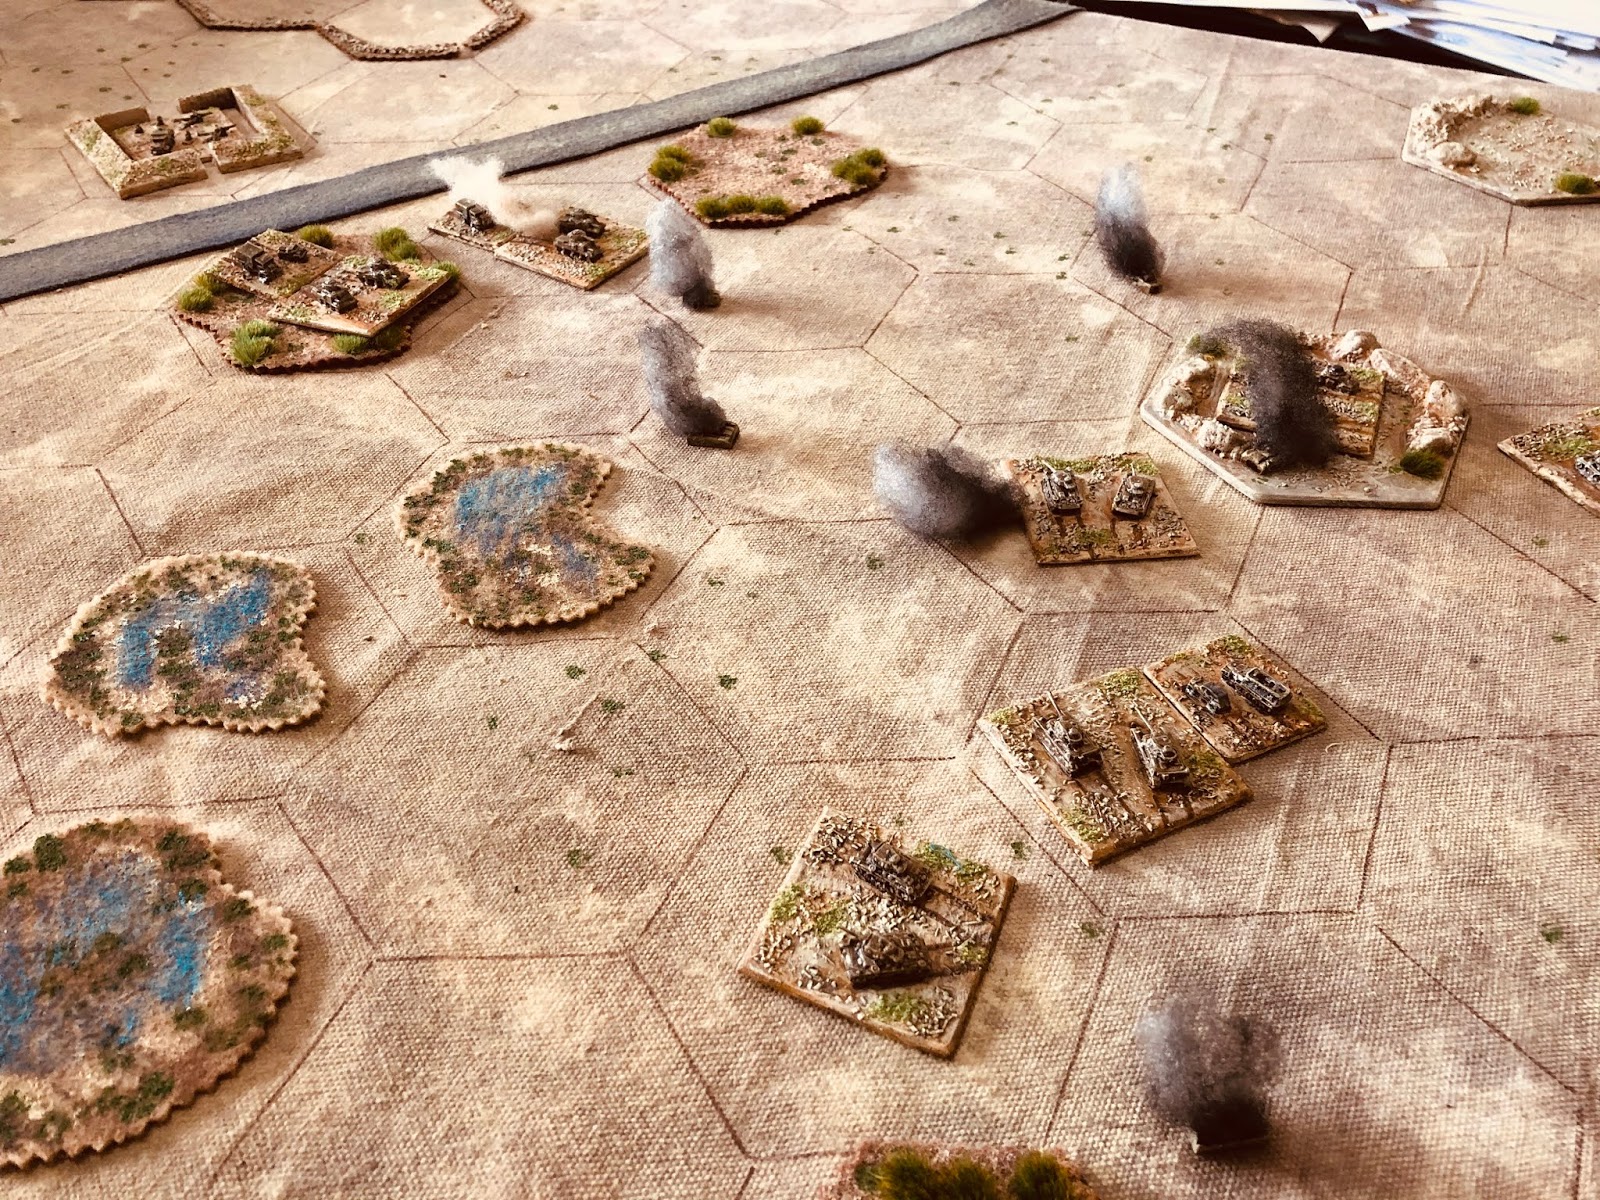
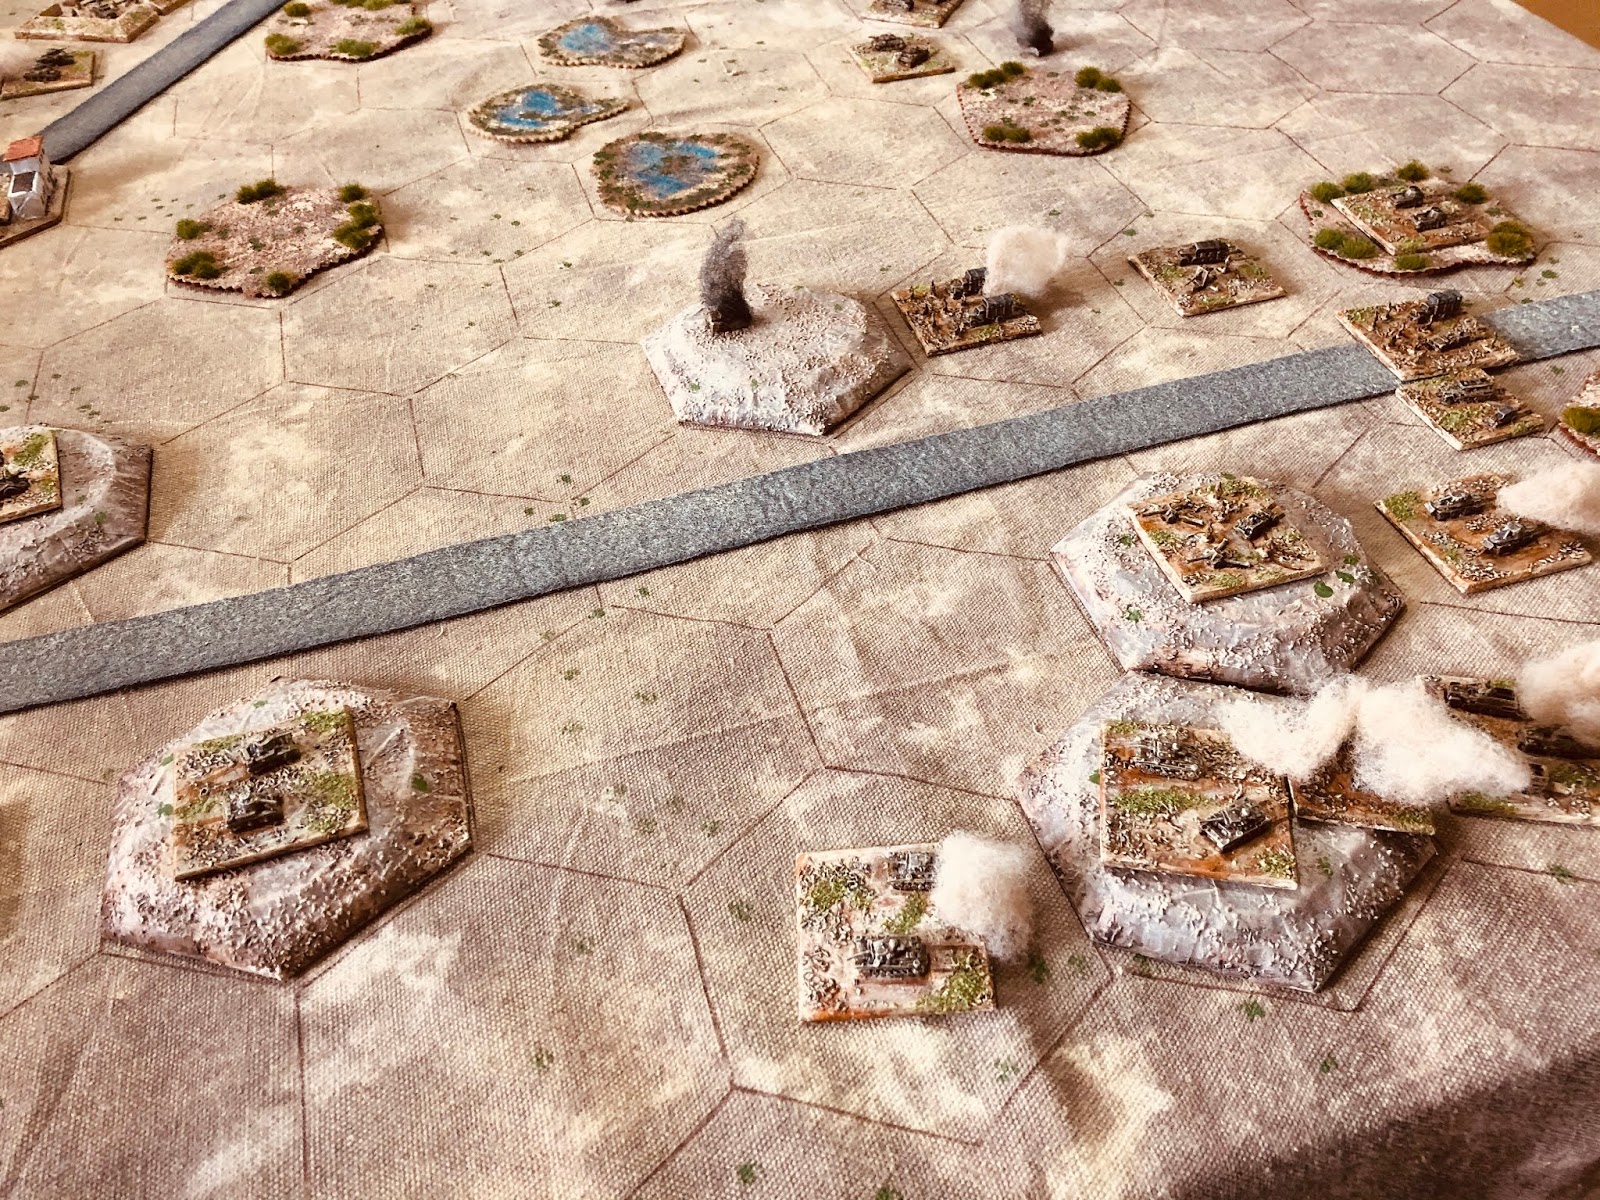
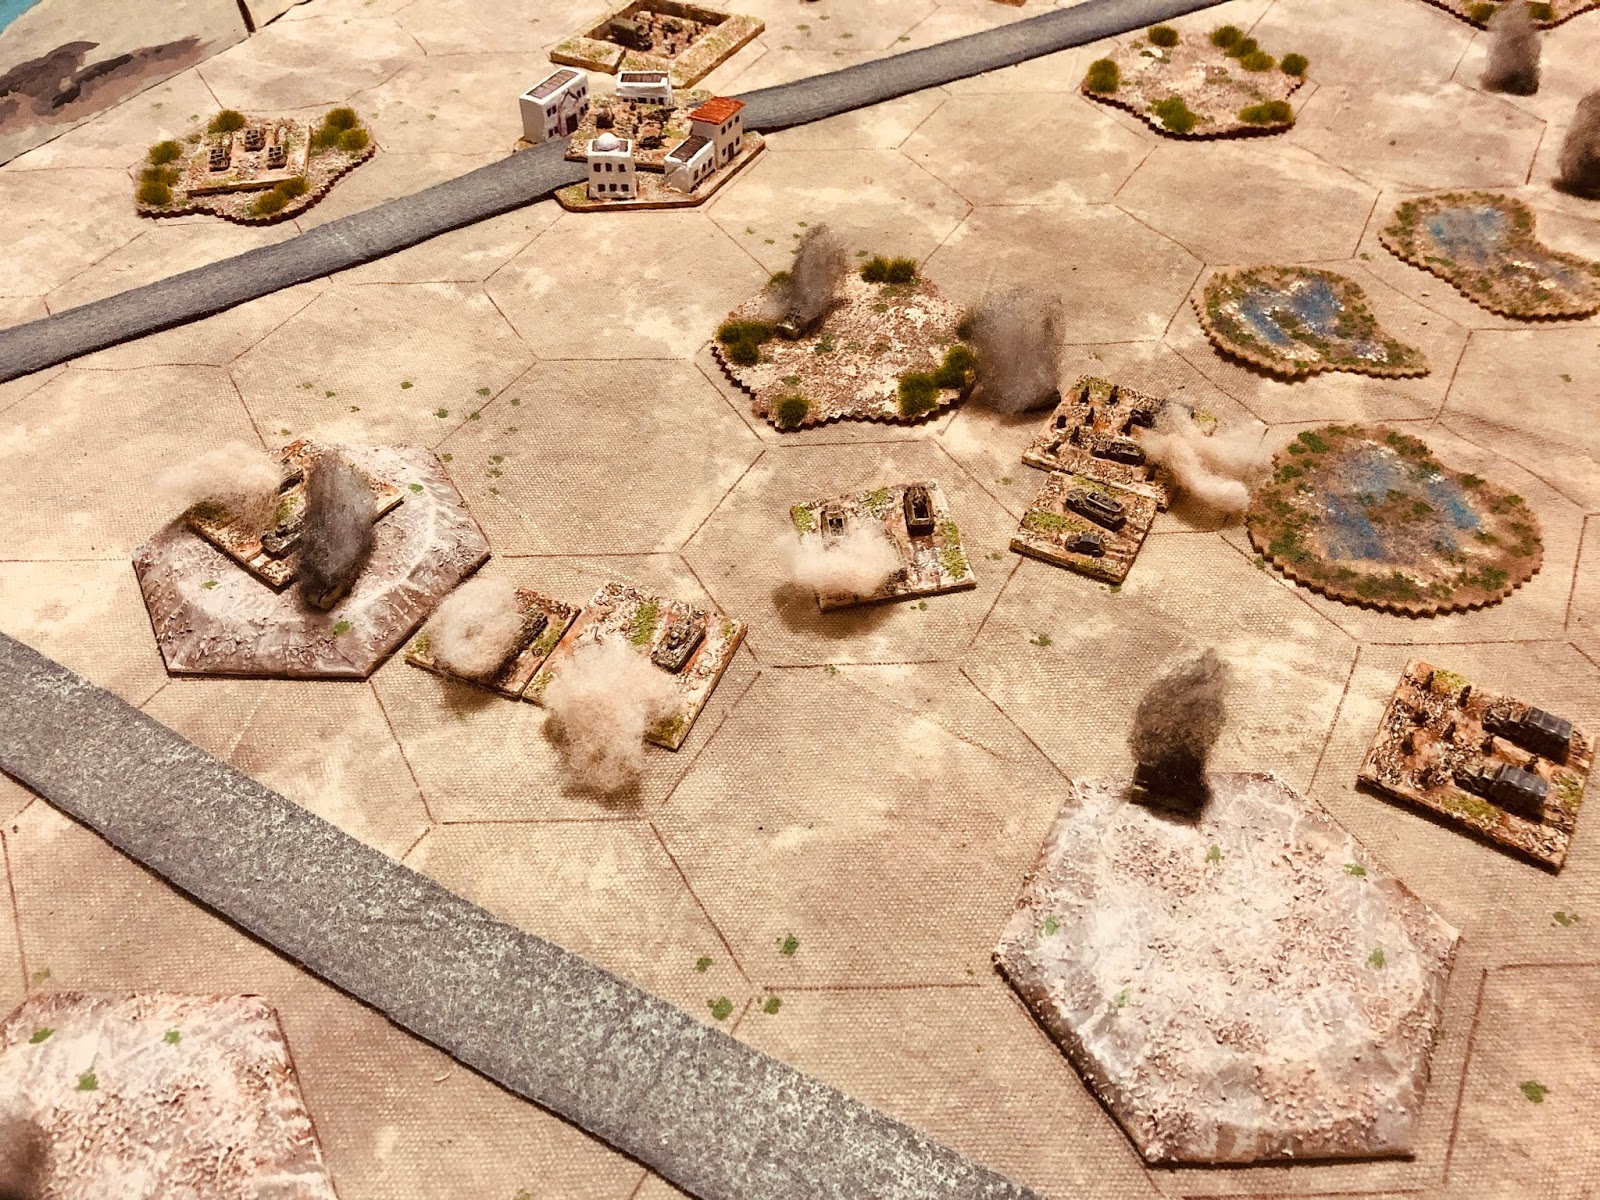
Once the two engaged divisions are known the battle moves to the tabletop. Divisions have a defined order of battle which are deployed, minus any lost units from previous battles which have not yet been reequipped. The tabletop is setup ready for a game using terrain cards (which I have yet to make). Where a player has directed their supplies to improving their positions all their infantry, AT and artillery units can be in improved positions and 6 hexes of minefields used in their defences.

Units in prepared positions behind minefields.
After each battle unit losses are recorded on the division’s order fo battle. Both the winner and loser can attempt to recover and reorganise lost units. These are diced for immediately after the game. Allied and Italian divisions can recover a unit with a 5+ on a D6 dice. While German divisions recover units with a 4+ on a D6, representing better recovery abilities throughout the campaign.

Regardless of the result, the attacking player players chooses the next division to be involved in the next battle. This maybe the same division that fought previously. The same process applies as before when setting up the battle. Note: a defending division which has lost a battle and is attacked again cannot deploy improved positions and minefields.

Up to three games can be played during the campaign turn. If the attacker wins two games they advance one step on the campaign map the loser retires one step. As soon as a defender wins two games the attack is called off and neither side moves on the campaign map.

These are draft rules, but they are at a point where I can soon start my campaign and tidy them up as I go along.

Wednesday 11 March 2020

Airfix guides arrive in the post

Today some Airfix guides arrived in the post...


The guide "8th Army in the Desert" by John Sanders and "Afrika Korps" by Bruce Quarrie will be quickly read as I am planning my next campaign where I can use my 1/300 scale WW2 Allied, German and Italian armies. They were completed more than 12 months ago and have been on and off the tabletop a few times since completion. I have been using the Tank on Tank boardgame rules with adjustments for the smaller caliber guns and less well armoured tanks.

As I work through the campaign ideas. I am trying to work in supply as an influencing factor without having to do too much recording of information.

Monday 9 March 2020

Wood blocks for Sci-Fi buildings

My interest in creating wargaming terrain using wood continues. Having created a number of warehouses out of wooden blocks for my St. Nazaire game. I decided to take a similar approach with some sci-fi buildings for a Necromunda style game. One of the reasons I like the wooden block approach is they are easy to stack and store with no concerns about breakages.

Various sized block are cutout with a mitre saw. They are then painted grey.
The challenge with just using a block of wood is all features have to be painted on. This can become time consuming depending on the level of detail required. To help speed up the process of adding detail I purchased a print and construct kit for a Sci-Fi cardboard building. Printing the necessary pages I required, I carefully cut out all the required doors, vents, widows, etc. These were then stuck on another sheet of grey painted paper, and were photocopied.

Details from the paper kits are cutout and stuck to paper for photocopying.
The wooden blocks are cut from a 90mm x 90mm square length of timber. After sanding they are painted grey. I used chalk pastels to colour the block to make them look old and rusted. The required doors, ladders and windows from my photocopied sheets were cut out and stuck onto the block. Finally, everything is sealed with a coat of PVA glue.

A completed single storey habitat block.
I took the same approach with some cut MDF to make walkways for upper floors.

A similar detailing approach for a walkway.
The idea is I can build up several floors to a building and eventually add walkways between buildings as I progress with this terrain project.

The second storey is added. Models added for scale.
The advantage of using wooden blocks rather than using the paper model kits, as nice as they are, is the wood is solid and less likely to be knocked over or nudged and cause models to topple over.

I have quite a few buildings to do over the coming weeks.


Wednesday 4 March 2020

Final ECW campaign game

The final game of the English Civil War campaign was not going to stop the Royalist cause from winning. However, it would determine whether the winning margin would be a solid victory (8 regions controlled to 5 regions) or a convincing victory (9 regions to 4 regions).

Action during the game
Campaign map showing Parliament's move on the Royalist held West Midland region.
As the weaker force Royalist forces had the choice of deploying first and opted to secure their left flank by occupying the village and pool all their cavalry together beside the woods that split the battle field. Parliament had secured both hilltops with infantry.

Map of unit deployments
Left side of Parliament's forces
Right side of Parliament's forces
The initial battle moves had Parliament push forward their dragoons to engage their Royalist counterparts. On the other flank they pushed forward their infantry and began bombarding the village. Royalist forces countered and the commanded shot moved through the woods and engage Royalist forces at range.
Dragoons on both sides pushed forward in the fields and were soon engaged in musketry.
Royalist Dragoons occupy the woods
Initial moves on the village
Parliament quickly responded to the appearance of the commanded shot in the woods, moving forward units to quickly suppress the threat.

Royalist commanded shot are quickly engaged.
Once the Royalist commanded shot were suppressed the attack on the village was able to begin in earnest. Forcing the Royalists to commit their infantry reserve to support those forces in the village.

The attack on the village begins in earnest.
With the ever increasing threat to the village the routing of the Royalist Dragoons, the Royalist commander opted to let loose his cavalry in a last bid to turn the battle's tide. The cavalry charged forward into the Parliamentarian dragoons, cavalry and infantry on the hill.

Royalist cavalry charge forward.
The Royalist cavalry with the bit between their teeth swept away the dragoons and launched themselves into Parliament's cavalry who put up a brief resistance before routing. After regrouping there were sufficient units to turn their attention to the few remaining Parliament infantry positioned on the hill.

Royalist cavalry charge gains momentum.
The cavalry charge had swept away their opposition. 
While both forces now on the cusp of losing force resolve. The shock loss of Parliament's left wing and roaming Royalist cavalry was sufficient for the Parliamentarian commander to call off all attacks and cede the field.

It was most exciting seeing the cavalry charge unfold and change the course of the battle which up until that point had been favouring Parliament's forces.

Map of unit movements
A Royalist victory leaves them in control of 9 regions in the campaign and gives them a convincing win. After some 28 battles the campaign comes to a close.

Final campaign map

So what would I do differently if setting up this campaign again?

1) I would introduce leaders into the campaign and allow them in increase their standing with each victory, or reduce their standing with losses. A higher standing would allow additional units to be fielded.

2) Some regions would be of greater value if held. For example, London and the Thames Valley and the West Midlands and Oxford. Holding these regions would also increase the likelihood of fielding a larger force.