![]() |
A planned purchase. |
![]() |
A few test miniatures painted. |
![]() |
An impulse buy. |
![]() |
One completed Priest |
![]() |
Early stages of the FIW game. |
![]() |
I finally get to use the Sloop for a landing in the game. |
![]() |
Latest books to add to the collection. |
![]() |
A planned purchase. |
![]() |
A few test miniatures painted. |
![]() |
An impulse buy. |
![]() |
One completed Priest |
![]() |
Early stages of the FIW game. |
![]() |
I finally get to use the Sloop for a landing in the game. |
![]() |
Latest books to add to the collection. |
Currently, I have my 20mm WWII collection set up on the tabletop as I am testing out some rule changes for combat and activation mechanics. A few photos from one of the test games below.
On the subject of rules, I recently picked up “The Fundamentals of Tabletop Miniatures Game Design - A Designer’s Handbook” by Glenn Ford and Mike Hutchinson. The book arrived the day before Christmas and I am treating it as a present to myself.
![]() |
A recent purchase |
Rather than reading it cover-to-cover I am dipping into different chapters to read about specific design aspects that catch my interest or areas where I’m seeking ideas. The book has 235 pages and is organised into three main sections:
Each section contains multiple chapters that discuss various elements of game design along with their advantages and disadvantages. Examples of games using the discussed mechanics are often provided. At the end of each chapter, there’s a helpful summary along with suggested experiments to try out with the rules. The chapters are listed below and give an idea of what is covered:
Section 1 Miniatures as Medium.
Section 2 The Raw Materials.
Section 3 Miniatures Rules Systems.
I have probably dipped into a third of the chapters so far. I have found them all easy to read and clearly written, averaging 8-10 pagers per chapter.
The authors of the book also have a YouTube channel where they have quite a list of videos where they discuss many of the topics covered above (https://www.youtube.com/@RuleofCarnage). I find I generally listen to them while painting.
This World War II game report is inspired by the scenario Pont-de-la-Croix from Gavin Lyall's "Operation Warboard" book. There have been some modifications to the forces compared to the book's scenario.
The rules used in this game are a set of draft rules I've been experimenting and tinkering with for the past few weeks. They are briefly covered here, but there have been recent changes to include scatter dice for artillery and armour can be immobilised, which all sounds a bit old school.
![]() |
Allied infantry approaching the bridge come under artillery fire. |
In this game scenario, a reduced German force defends the village Pont-de-la-Croix against the advancing Allies. The Allies' objective is to secure both the bridge and the town if feasible. While the Germans, if unable to halt the Allied progress, aim to inflict sufficient damage to the advancing Allied force to delay their march forward.
![]() |
One of my favourite book covers |
![]() |
A photo from the book of the scenario in progress. |
There are a few wooded areas on the tabletop and have used green wool to show the wood boundaries, a method I am trying instead of using green felt to mark the area (see post here).
![]() |
A view of the tabletop. |
The German setup on the tabletop features artillery support placed behind the town’s church. They've deployed two companies: one company defends the southern town area and nearby hedges, supported by an assigned AT gun, the second infantry company holds the right side of the town and a small wooded area. West of the river, a pillbox stands as the sole German presence. Positioned on the north road from the town are a platoon of Panzer IVs.
![]() |
The German positions. |
The Allied force is on the move from the western side of the river, advancing towards the town. The river, which is fordable, requires a full move to cross from one bank to the other. Flanking the advance are two tank platoons, each accompanied by infantry companies. Simultaneously, a mechanised infantry company progresses along the road, while mortars are positioned behind the woods as support.
![]() |
Allies preparing to advance. |
The battle begins slowly as the Allies push forward, their tank platoons flanking each side accompanied by infantry support. The mechanised infantry in carriers cautiously move down the road towards the bridge, when they get a rude welcome from a defending pillbox. Swiftly dismounting, they look for cover amidst hedges and nearby woods.
With the pillbox's position exposed, the southern tank platoon swiftly swing to their left and targeted it. Momentum is halted as the mechanised company and tanks focus their fire on the pillbox. Things quickly heat up with the arrival of a German anti-tank gun which immobilises one of the Sherman tanks. The tanks divert their fire, dealing with the new threat. After some intense exchanges, the German gun falls silent, but both Shermans are immobilised from the damage they sustained. Despite this setback, they continue their bombarding the pillbox to aid the infantry.
![]() |
The Allied left flank moves into positions in the woods. |
![]() |
The pillbox is engaged while a German AT gun prepares to open fire. |
As the assault on the pillbox rages, on the opposite side of the road, the Allies have advanced into the woods and their tanks have reached the river's edge. As they move cautiously out of the woods to cross the river, gunfire erupts from the small woods, this is quickly followed by artillery barrages. Realising the urgency, the tanks forge across the river while infantry return German fire, successfully suppressing and then eliminating the German infantry in the woods.
With the tanks now on the far side of the river, two Panzer IVs emerge and engaged the Shermans. The tank duel commences on equal footing, initially favouring the Germans as one Sherman sustained severe damage but persists in returning fire.
![]() |
The Allies advance to ford the river. |
![]() |
German tanks appear. |
![]() |
An evenly matched battle. |
![]() |
Finally the pillbox is knocked out. |
![]() |
Infantry advance to secure the bridge. |
Both forces met their victory conditions: the Germans successfully causing significant damage to the attack while the Allies secured both the bridge and the village. The pillbox posed a considerable challenge for a while, yet once knocked out, the Germans found their options restricted. They chose to withdraw, understanding that the Allies would halt their advance, awaiting the arrival of fresh tanks before resuming it.
![]() |
The tank in the foreground is immobilised - marked by a thrown tank. |
I found the easiest and fastest way to create a thrown track marker was using felt and add some drawn lines with a permanent marker. I might look at some other materials for this purpose in the future.
![]() |
The plain cut felt on the left and marked up on the right with a permanent marker. |
I have tried some brown corduroy material which seems to work better for the tracks.
![]() |
Brown corduroy material seems to work better. |
![]() |
I will probably dry brush some sand colour paint onto the corduroy. |
In my recent WW2 games I have been using playing cards to determine the sequence of units shooting. they are first placed face down during the movement phase, then flipped over later in the shooting phase. While effective, they do add a level of clutter to the tabletop and spoil the general appearance. I was considering buying some smaller playing cards, but then I recalled reading in John Sandars' book "An Introduction to Wargaming," where he used buttons with numbers for his wargame activations.
![]() |
My original approach of using playing cards to determine the order units shoot. |
Buttons, featuring a raised edge, allow for identification by touch when drawing them unseen from a bag, ensuring they are placed with the numbered side facedown. After sifting through my wife's button collection, I found sufficient identical and suitably coloured buttons, onto which I glued bits of circular cut paper on the raised side before numbering them.
![]() |
I was able to find 12 identical grey-green buttons to be used as counters. |
![]() |
All the buttons have a raised edge, allowed for identification by touch when pulling them from the bag, ensuring they are placed with the numbered side facedown. |
![]() |
A piece of paper is cut and stuck to the side of the button with the raised edge. Once dry these are numbered. |
The buttons are significantly smaller than the playing cards and are far less obvious when placed on the tabletop. Their grey-green colour is unobtrusive until they're flipped over to indicate the shooting order of units.
![]() |
Buttons placed by units that are able to shoot. |
![]() |
The buttons are revealed to show the order of unit shooting. |
As an alternative to using a bag from which to draw buttons, I place the buttons facedown and gently swirl them on a flat surface to shuffle and randomise their order. Then, I pick them as needed during the game.
This battle report is of a game to test some WW2 rules (see the previous post for full details). In summary, combat possibilities are categorised as poor, average, or good. A D6 to hit roll of 6+ is required for poor odds, 5+ for average, and 4+ for good opportunities. The advantages and disadvantages are tallied up. If there are more advantages than disadvantages, it's a good combat opportunity. If it's the reverse, it's poor. When they balance each other out, it's considered an average opportunity.
During the movement phase, any unit that stays still or moves less than half of its designated movement allowance can engage in combat. Units permitted to shoot are assigned a face-down playing card beside them during the movement phase. In the combat phase the card's are revealed and determine the shooting order of units.
In the autumn of 1944, amidst the sweeping retreat of German forces through Northern France. A small rear guard was hastily assembled, their mission to defend the crucial bridges and impede the advancing Allies relentlessly chasing them.
German forces:
British forces:
![]() |
An overview of the tabletop in the opening turns of the game. The units and their bases are circled. |
![]() |
An early setback for the flanking mechanised infantry company. |
The British continue to press forward, focusing their advance on the centre and targeting the Stug III, which erupts, and begins to billow oily smoke. Yet, their initial triumph was swiftly dampened as another of their tanks was disabled, accompanied by heavy losses to the northernmost platoon. The German Forward Observation Officer is seen hastily withdrawing as the British infantry advanced toward their position in the central wood.
![]() |
The British press forward with their attack towards the northern farm and bridge. |
![]() |
The loss of the Stug III was a set back for the defending Germans, but they were inflicting casualties of the attacking British infantry and tanks. |
A veteran crew manning the German AT gun target the two remaining Sherman tanks which become engulfed in flames, and the infantry company make a hasty retreat from the scene. The northern assault which had looked promising, falters and fails. However, the southern advance proves to be more fruitful. The mechanised company pushes on with mortar support guided by their FOO and successfully seizes control of the southern farm and secures a river crossing.
![]() |
The advance on the north bridge and nearby farm are called off with heavy losses. |
![]() |
Success for the flanking mechanised infantry who capture the southern bridge. Support from their mortars was critical to their success. |
With one bridge now in British hands, the remaining German units withdrew. However, the success of gaining a crossing point came at a steep cost for the advancing British forces, necessitating a pause as they await reinforcements before resuming their march forward.
During recent months, I've been reading (re-reading) some of Donald Featherstone's WW2 rules from his various books, and also delving into Charles Grant's book "Battle - Practical Wargaming”, which was one of my favourites when I first started wargaming with my Airfix WW2. Reading the rules from these books have got me playing a series of small WW2 games where I tested a few rule adjustments with the aim of:
![]() |
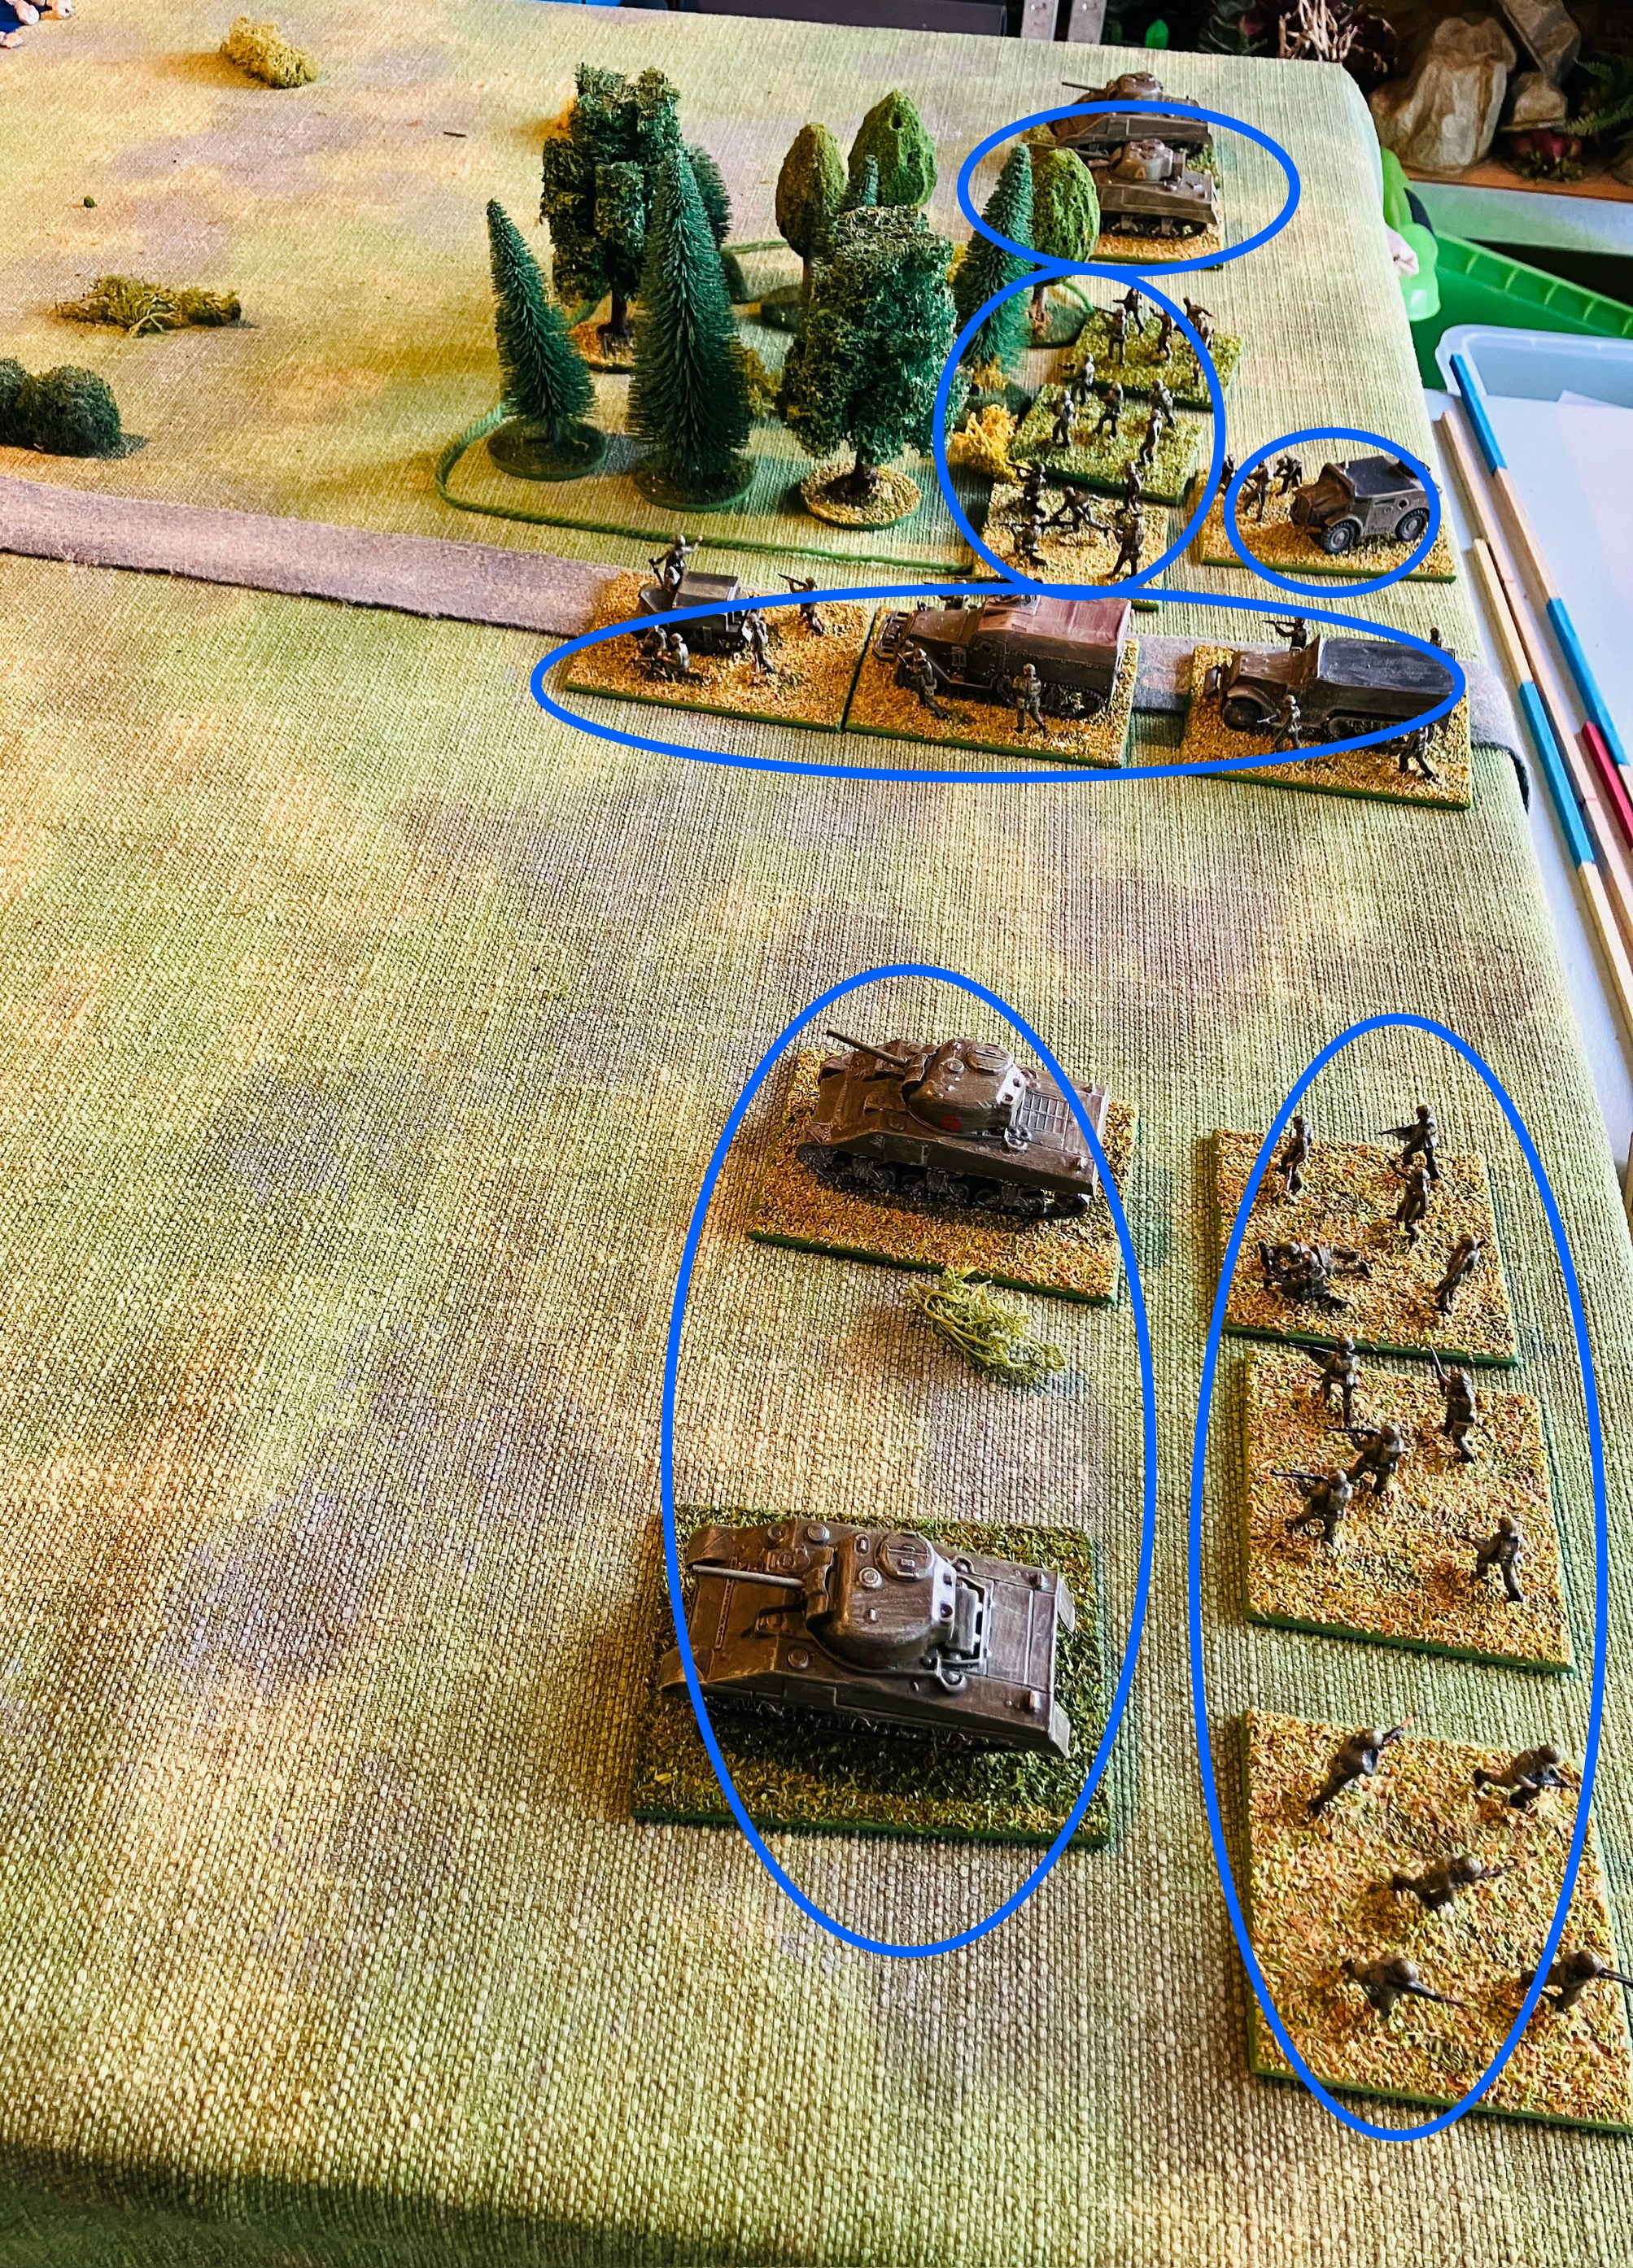
One of the test games about to start. |
The alterations in rules prompted me to reorganise how I structure my units. In previous games, each figure base or tank represented an individual unit. However, my units now typically consist of 2-4 bases, or what are better thought of as sections. The exceptions generally being with any Headquarter (HQ) units, artillery/mortar units, and Forward Observation Officers (FOO). Weakened units might only comprise two bases, and infantry units could be supplemented with Anti-tank guns and when combined function as a single unit. Here are a few of examples where the organisation has been influenced by ideas from “Battle - Practical Wargaming”:
![]() |
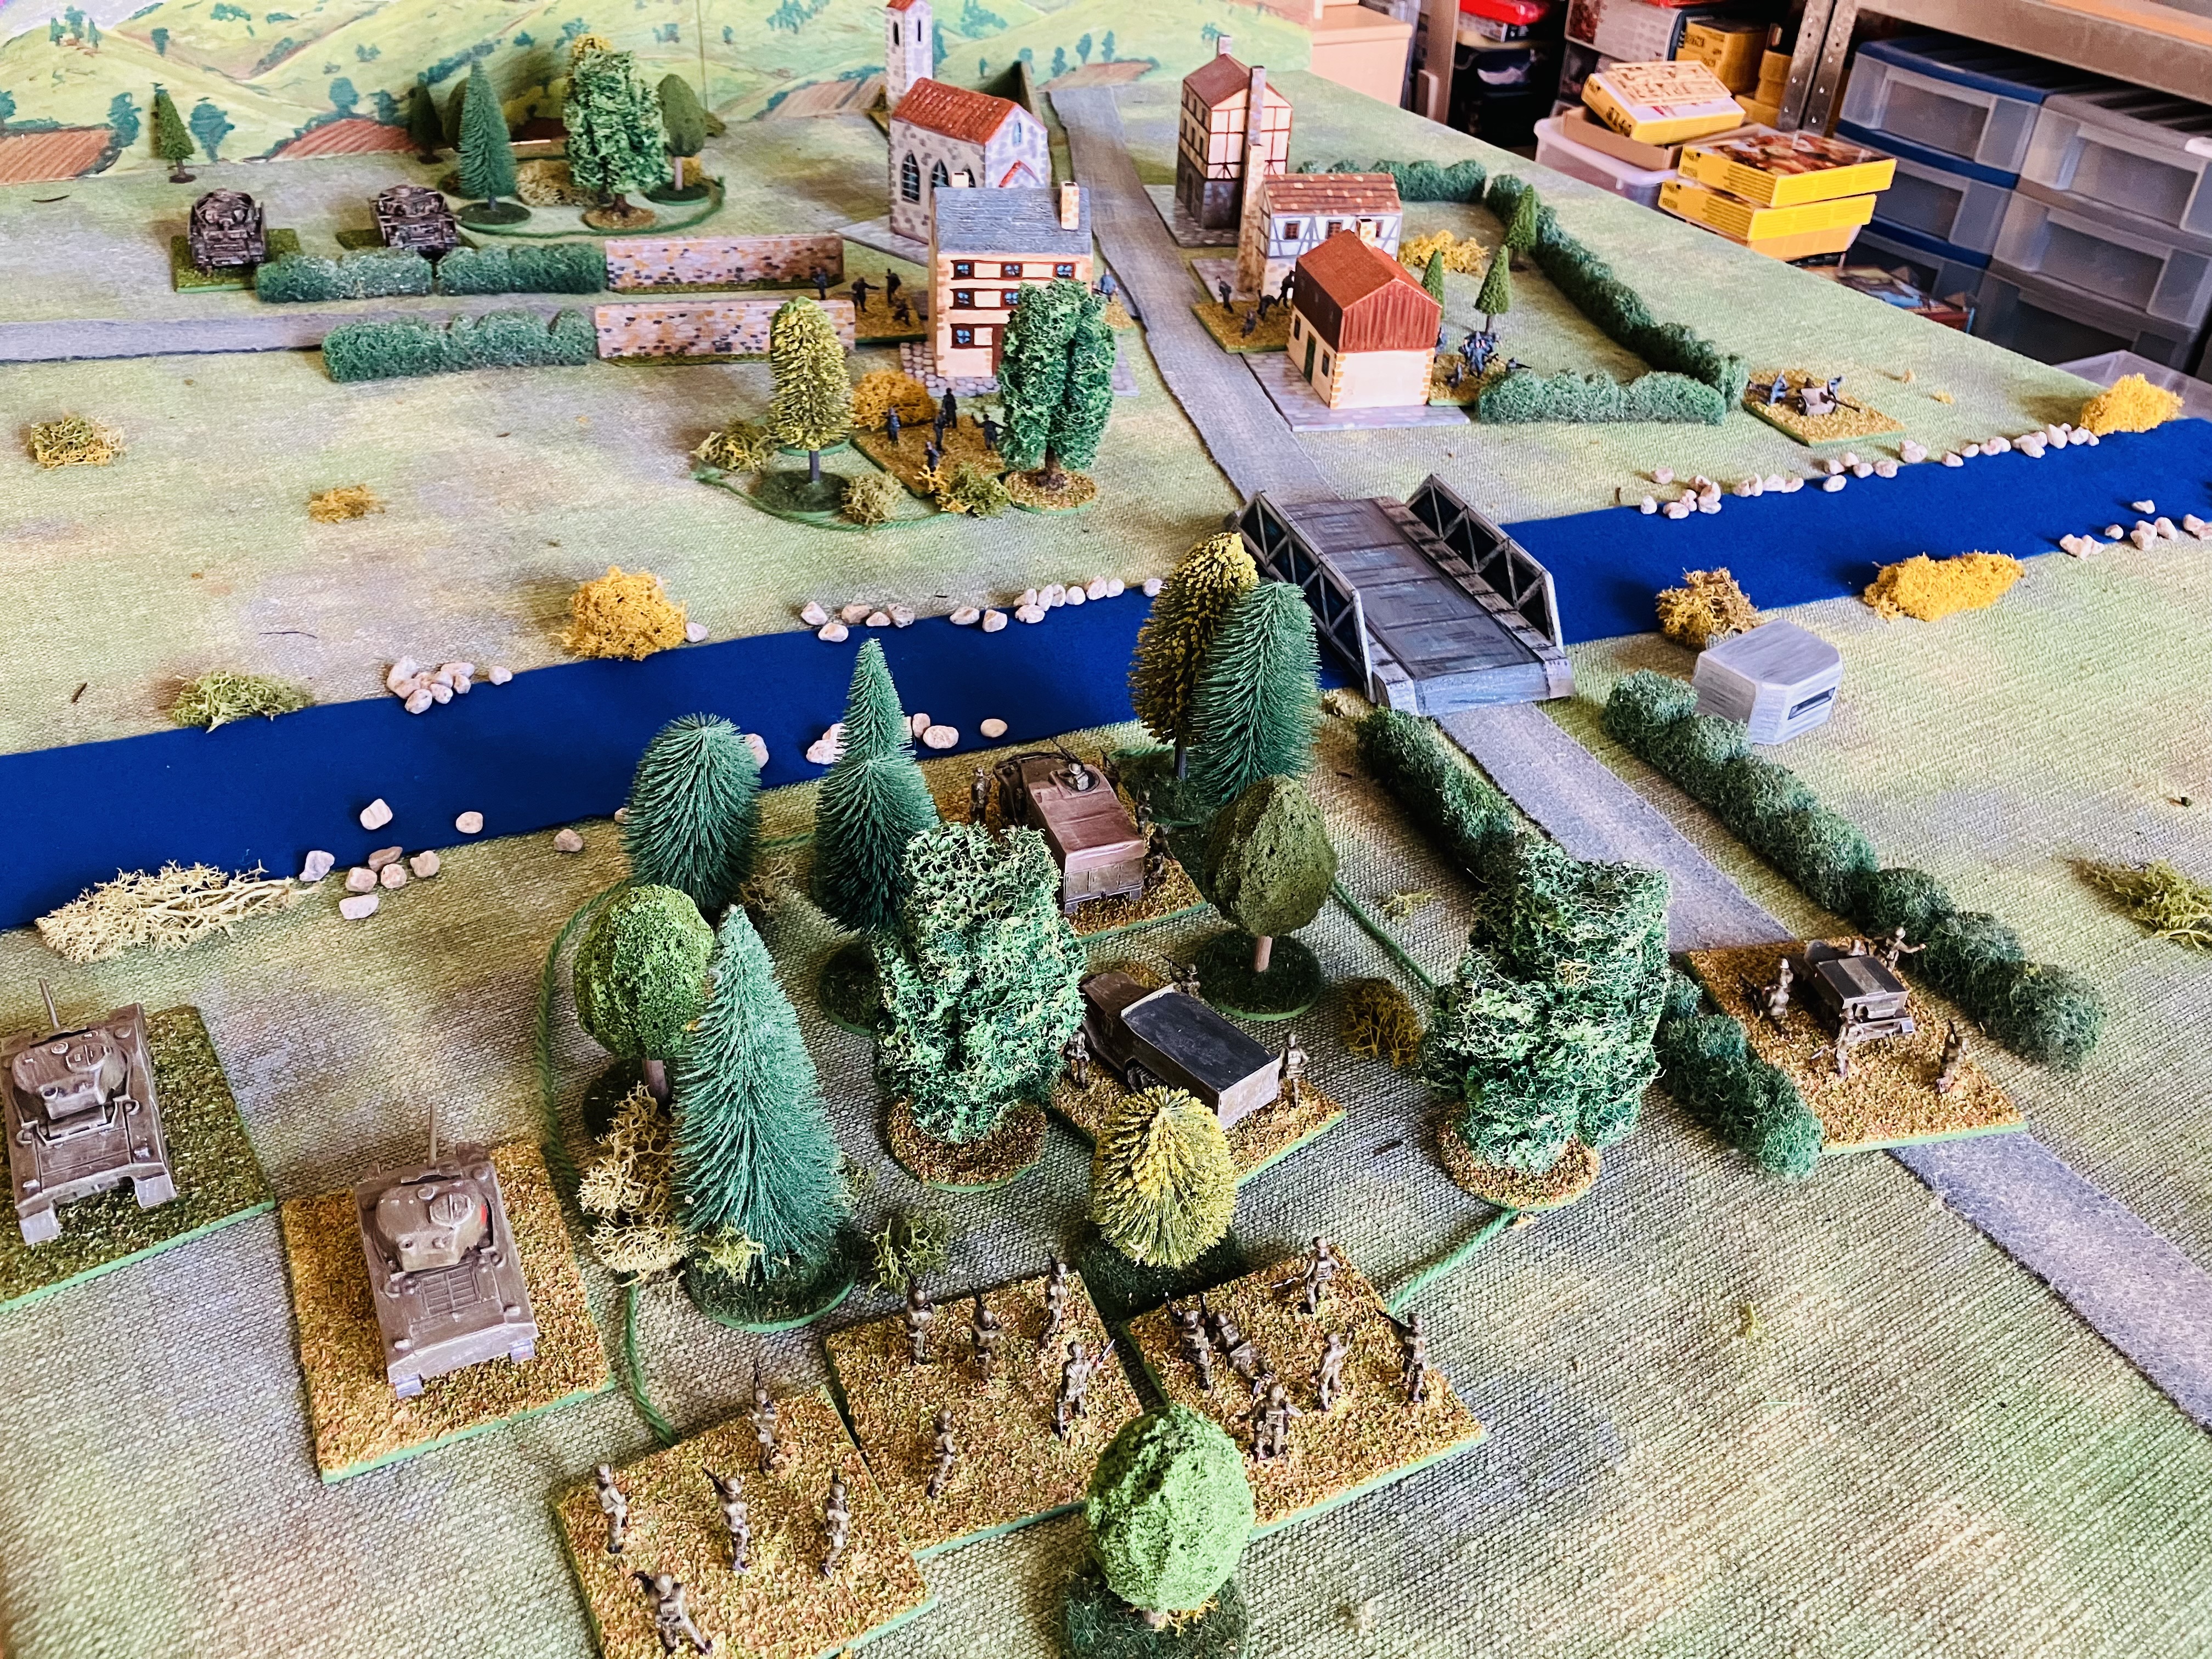
A British company with AT support defending a farm. |
Organising units containing multiple sections offers a distinct advantage when it comes to using a random shooting order. I will typically have 5 to 6 units per side in a game, executing actions for all a unit’s sections at once, rather than having to randomly actions for 20 or more individual bases.
Before diving into the combat details, here's a brief overview of the movement phase. It's kept straightforward: both sides roll a D6, and the player with the highest score chooses to move first or second. Each player then proceeds to move their units in the agreed-upon order, making sure a unit retains its coherency with all sections within 8 inches of at least one other unit section.
Examples of movement allowances:
Once movement commences, any unit that remains stationary or moves less than half of its movement allowance can engage in combat. Units permitted to shoot have a playing card placed face down beside them. If any base within a unit moves more than half of its allowed movement, the entire unit forfeits its shooting opportunity. This final rule can create problems for units where their bases are strung out and they lose coherency forcing a base to move its full movement allowance to retain coherency. Although I do allow for the base to be abandoned and removed from play.
Once both players complete their movement, reveal the playing cards. The unit with the highest card value (Kings to Aces, then in the order of Spades, Hearts, Diamonds, and Clubs) gains the chance for their bases to shoot first. Eliminated units are then removed from play.
![]() |
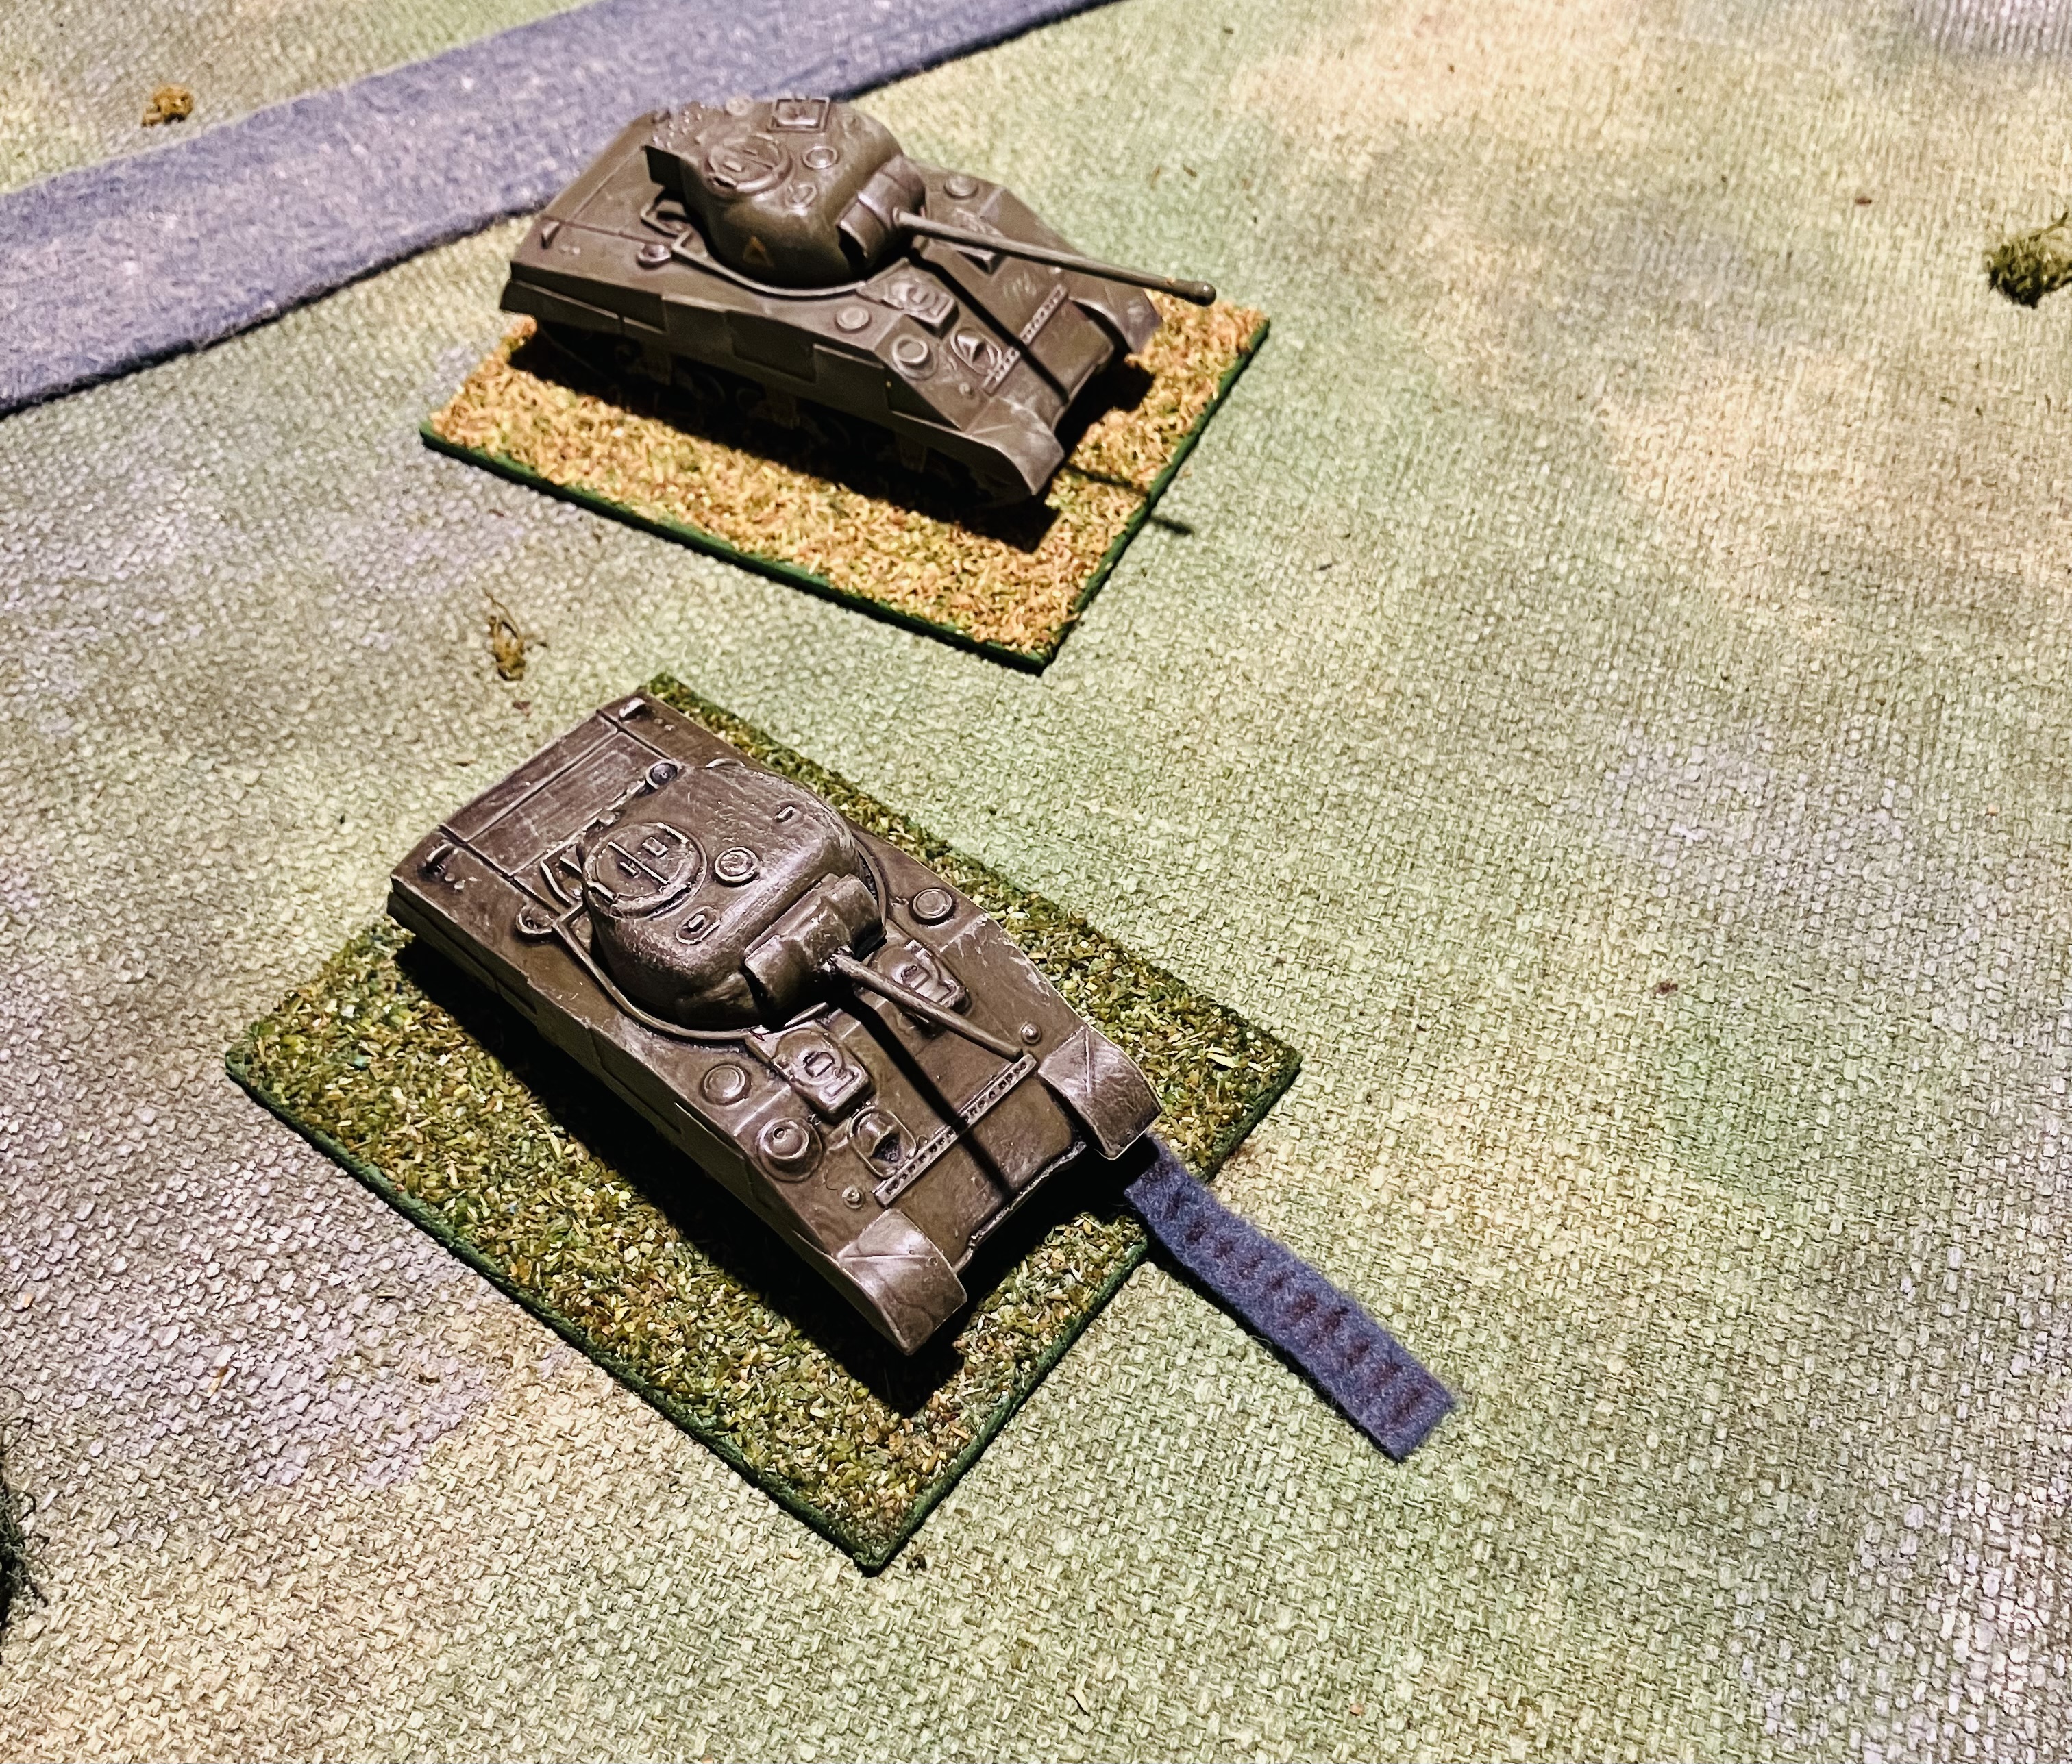
A troop of Shermans will get the important first shot against the Panzer IV’s. |
The combat ranges have been kept simple with all units having a direct fire range of 16 inches and indirect artillery unlimited. This mirrors the approach taken in Neil Thomas's One-Hour Wargaming WW2 rules where units have limited ranges, emphasising the visibility constraints rather than a weapon's theoretical range. Given that my games are set in North-East Europe, this approach seems to make sense to me. Moreover, it proves advantageous when gaming with 1/72 scale models on a 6 by 4-foot tabletop.
For determining hits, I like to have a simple method than I can easily remember. I categorise chances as poor, average, or good. A D6 to hit roll of 6+ is required for poor odds, 5+ for average, and 4+ for good opportunities. To categorise the combat situation, identify which of the advantages and disadvantages listed below apply.
Advantages:
Disadvantages:
Tally up the advantages and disadvantages. If there are more advantages than disadvantages, it's a good combat opportunity. If it's the reverse, it's poor. When they balance each other out, it's considered an average opportunity.
Note - Tanks have a choice of weapons. They can either use their hull mounted machine guns or their main AT gun.
Given that I typically play solo wargames, I follow these shooting priorities for both sides during a game:
In recent weeks I have been painting up some of those odd models which were brought to add to existing collections because they are interesting or useful for expanding an army, but for one reason or another have remained on the shelf. One of those kits was a Churchill AVRE with a box girder bridge. The kit was enjoyable to build, and I was relieved that the small track wheels were not separate, unlike the Airfix kit, which was so fiddly to make. I did have to make some adjustments to the girder bridge and attachments so it could be removed easily for wargaming purposes.
![]() |
The recently completed Churchill AVRE. |
![]() |
The girder bridge can be removed for gaming purposes. |
To continue with the WW2 theme of recent posts, I set up Bridgehead scenario 5 from One-Hour Wargames so I could use the recently completed Churchill AVRE bridge model. Another reason for continuing with gaming WW2 is to try out some quick rules loosely using the approach from the rules used in the commando raid game, but with the result being destroyed or suppressed. A suppressed unit has fewer actions, as it takes one action to reorganise itself before it can move or shoot.
The bridge was in place, and the British infantry advanced across the river crossing. British Sherman tanks supported the bridgehead as German defending units arrived, taking position on the hill north of the crossing. A single British infantry unit held off German infantry moving through the woods from the west.
![]() |
British infantry advance across the bridge. |
![]() |
A British armour support arrives to confront German defenders. |
![]() |
German infantry moving through the woods are held up by a single British infantry unit. |
![]() |
Accurate British shooting stymie the German attack |
Accurate fire from the Sherman tanks dented the German attack, but fresh German defenders arrived in the form of Stug III self-propelled guns supported by infantry. The British units blunted the attack, but suffer casualties and destroyed tanks from a German tank positioned on the hill.
![]() |
Stug III’s supported by infantry advance. |
![]() |
A German tank on the hilltop remains a threat. |
![]() |
The bridgehead is held. |
The British victory was a costly one, but with the bridgehead secure, British forces could now move across the river and continue their push into enemy territory.