Yesterday, I had the chance to play a remote Wars of the Roses (WotR) game hosted by Jon of Palouse Wargaming Journal, using his beautifully painted armies. This was the second (or possibly third) WotR game I have played with Jon using his "Blood n Roses" rules.
The scenario, provided by Jon, was based on the Battle of Mortimer’s Cross, fought on 2 or 3 February 1461. As there is limited historical detail available this is Jon's interpretation of the battle.
All the photographs in this post are courtesy of Jon, as I somehow managed to lose all my screenshots taken during the game.
 |
| A close-up of the action early in the game, featuring Jon’s beautifully painted armies. It is hard to fully appreciate them when playing remotely. One of the downsides of remote gaming. |
For the game, I chose Edward IV and the Yorkist army. There is little difference between the two armies, as both were deployed in the typical three Battles consisting of men-at-arms, billmen, and bowmen. The centre Battle in each army was reinforced with a group of household knights.
 |
| The starting positions. |
Pre-game activities...
Before the game begins, both players roll to determine their commanders’ attributes and priorities. For my commanders, the dice decided that Edward was inspiring and motivated by rewards for good service, while both Herbert and Devereux were brave and focused on winning the battle. I cannot recall Jon’s commanders’ traits, other then I do remember that Tudor (I think) was intent on simply surviving the battle.
These attributes grant re-rolls during the game, which can be very useful in a close fight and may just tip the balance. The priorities help play a role in determining the overall winner.
At the start of each game turn, each Battle is secretly assigned an order by its player. Once both players have made their choices, dice are rolled to determine whether each order is successfully issued. If not, the Battle retains its previous order. The available orders are:
- Defend – cannot close with the enemy, but may reorganise to remove hits and improve combat effectiveness.
- Manoeuvre – must make a movement and may not close with the enemy.
- Engage – must attempt to close with the enemy for hand-to-hand combat.
Getting your orders right, and successfully changing them when needed, is crucial to success. Poorly timed or failed orders can result in Battles advancing too soon and exposing themselves to a well-timed counterattack, or not being ready to engage the enemy to take advantage of a situation. This is where re-rolls (granted by commander attributes) become very useful, improving your chances of successfully issuing key orders.
Initiative is given to the army with the most Engage orders, allowing them to activate one of their Battles first. If both sides have an equal number of Battles with Engage orders, then a dice roll decides initiative. Once initiative is used, coloured dice are drawn from a tin to decide the activation order of the remaining Battles.
Let battle commence...
Both armies opened the battle with a general advance and closed the distance. The Yorkist army seized some early momentum.
On the Yorkist left, Herbert’s Battle forcing Tudor’s troops to give ground. Despite fierce resistance, Herbert was able to hold his position.
In the centre, Edward led his troops forward. At first, his advance made good ground, pushing the Lancastrian centre back and threatening a breakthrough. But his eagerness to press the advantage proved costly. Over extended, Edward’s Battle was struck hard by a counterattack from Pembroke. The fighting was fierce, Edward’s men-at-arms were cut down, and he was nearly captured or killed. Only by going on the defensive and withdrawing spared his troops and allowed his Battle to regroup and recover.
Meanwhile, on the right, Devereux initially gained ground, pushing Wiltshire back. However, the effort drained his troops. Lacking the strength to consolidate or recover, his exhausted men could not hold. Wiltshire seized the moment driving Devereux’s Battle back.
By mid-battle, the tide had begun to turn, and the early Yorkist success had been lost as both armies struggle for an advantage.
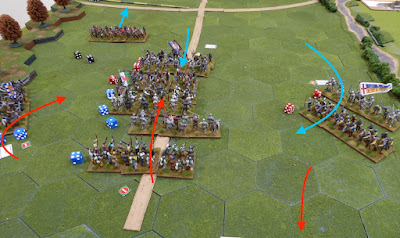
 |
| The flow of the battle. |
By this stage of the battle, both armies were battered and worn out, each side pausing to take defend orders to regroup and reorganise before engaging in the next wave of attacks.
When the attacks resumed, it was Herbert who struck a decisive blow. His Battle shattered Tudor’s already weakened force, sending the Lancastrian right into disarray. Wasting no time, Herbert wheeled his troops around, threatening the exposed flank of the Lancastrian centre. A dangerous position for the enemy.
On the opposite flank, however, the tide had turned against the Yorkists. Devereux's Battle, worn down and unable to recover from their earlier exertions, finally broke under renewed pressure. The Lancastrian left, now victorious, pivoted ready to strike the vulnerable flank of Edward's position at the centre.
But luck favoured the Yorkist army and Edward at this crucial point in the battle. Orders for Pembroke to engage Edward's Battle failed to be carried out. This delay proved costly. With both Herbert and Edward under Engage orders, the Yorkists seized the initiative for the next turn, ready to act while the Lancastrians faltered.
 |
| The flanking Battles pivot to engage the centres. |
With the initiative firmly on with the Yorkist side, Herbert pressed his advantage. He led his troops in a charge into the exposed flank of the Lancastrian centre, striking Pembroke’s Battle just as Edward, leading his remaining Household knights, launched a determined frontal assault.
Caught between two forces, Pembroke’s forces fought bravely in a prolonged and savage melee, but the pressure proved too great. Pembroke’s troops began to falter, then flee. The centre Battle collapsed, broken and routed.
With both Tudor’s and now Pembroke’s Battles shattered, the Lancastrian army’s resolve crumbled. What remained of their army began to leave the field of battle. A victory to the Yorkist army.
 |
| The attack upon Pembroke. |
After game throughs...
This game was a real arm-wrestle between the two armies and could easily have gone either way. In the end, gaining the initiative at the crucial moment was just enough to tip the scales in the Yorkist favour.
A big thank you to Jon for hosting the game and for providing a set of enjoyable rules that created plenty of tense moments. The order system and the careful use of re-rolls in combat added real decisions to the game, allowing a player opportunities to shift momentum in their favour at key points during the battle.