Showing posts with label Terrain Layout. Show all posts

Saturday, 31 August 2024

Preparing futuristic terrain for a Mech game

While I’m busy preparing for a house move. Packing and getting the house ready for sale, mostly tackling those small tidy-up tasks I have ignored for years. I am still finding slots of time in between tasks for  wargaming related activities. Over the past couple of days, I’ve been working on some terrain for a futuristic Mech game. I recently marked a 4-inch grid on a brown felt mat using dots to mark the corners. Since I plan to use some One-Hour Wargames scenarios for my games, many of which feature rivers, I decided that for my futuristic game set on a mining planet, crevasses could replace the rivers. I found some black suede cloth in my wife’s material stash and cut it into strips to represent crevasses on the tabletop. 

The gaming mat prepared with a square grid, each corner is marked with a dot.

Some crevasses created with black cloth cut up.

I already had some foam hills made up. They have been borrowed from my 6mm WW2 Western Desert game. Details of how I made them here.

Foam hills.

The next steps are to finalise the rules I've been playing around with and begin writing a narrative for the games and campaign I am planning.

Thursday, 12 October 2023

Planning a solo commando raid game - Part 1

Back in January 2020, I played a solo wargame of the St. Nazaire raid using the scenario from Donald Featherstone's book "Battle Notes for Wargamers" as inspiration. In the game, all of the opposing force's actions were determined by the dice. I have added the post of the game report in the featured post section on the right bar of this blog.

Anyway, I was thinking it would be fun to play another solo commando raid game and rather than simply replay the same game, I have decided to create a fictitious raid scenario. In this blog post and a couple of follow-up posts, I will be writing about the background of the raid, introduce a few characters from the raiding party to add some interest to the battle report, and describe the scenario setup along with special rules for using dice when determining the defender's movement and shooting. Finally, I will post a battle report.

RAF reconnaissance run over the target.


The first step in preparing the game was to decide on the setting and background narrative for the raid and I came up with upon the following.

Background

The Germans have been using a small French harbor called Sol-le-Marin as a base and center of operations for their coastal defense units. Sol-le-Marin is responsible for defending an area of the French coast from Allied attacks. In addition, the local French Resistance has reported that a new advanced radar installation is being built on the cliffs above the town.


The purpose of the raid is to destroy the radar installation, damage the railway sheds, disable any coastal defence ships, destroy the gun emplacement on the cliff, and gather intelligence from the coastal defence HQ building.


Aerial reconnaissance photographs

The mission is planned.

Mission

The planned raid, code name “Thunderbolt”, has a small commando force, led by Major John "Houdini" Smith, landing on the coast half a mile north of Sol-le-Marin where there is an area of unguarded marshland. Local Resistance members will then guide them through the marshlands to the harbour, where they will launch their attacks:
  • Objective 1 - Damage the rail shed and search the costal defence HQ building for useful intelligence.
  • Objective 2 - Destroy the radar installation and gun emplacement.
  • Objective 3 - Raid the town and ships.
The commandos will be picked up from the harbour by motorboats, so removing the gun emplacement threat is essential for their safe recovery. Any commandos who are unable to be picked up will attempt to avoid capture and make their way south to Spain.

Commandos undergoing training for the mission.

Raiding Force and Characters

The raiding force is divided into three groups:
  • Group A - Led by Captain William Jones, Group A is responsible for destroying the radar installation and gun emplacement. The group has four units, including a demolition squad.
  • Group B - Led by Captain David Brown, Group B is responsible for raiding the town and ships and holding the road south of Sol-le-Marin. The group has four units, including a demolition squad.
  • Group C - Led by Captain Michael Williams, Group C is responsible for demolishing the rail sheds and searching the Coastal Command HQ, then holding the road to the north of Sol-le-Marin to prevent enemy advances. The group has four units.
  • Raid Commander - Major John "Houdini" Smith, the commander of the commando raid. Smith will also bring a 2-inch mortar. He will attach himself to Group B.
My commando force. The demolition squad in each group is represented by a base of Airfix commando figures.

The Tabletop

I had terrain for most of the features required for the game, but I didn't have a radar installation. I quickly made a scratch-built radar tower using thick card and added a couple of pump houses made for my St. Nazaire game.

Two pieces of 1mm card were used to make the installation and slotted together.

Painted a dark grey and a simple superstructure roughly painted.

A couple of buildings are added to the radar installation positioned near the gun emplacement.

A full view of the tabletop.


Saturday, 6 May 2023

Connecting or mashing up a couple of tabletop layout ideas

A lot of my wargames rely upon scenarios from the book "One Hour Wargaming”, either as one off games or incorporated into campaigns. When setting up the tabletop using these scenarios, I generally end up doing two things: 

  1. Modifying the scenario map so it fits with using a 6x4 foot tabletop. This essentially entails stretching the map which is drawn for a 3x3 foot tabletop into 6x4 foot dimensions.
  2. Adding additional terrain features as the tabletop can look very empty otherwise

As I replay the scenarios, especially my favourites, I am increasingly finding myself adding a number of terrain features to help add a bit more variation and interest, such as small woods or a knoll here and there.

An example of One-Hour Wargames scenario 7 - Flank Attack (2) using Minifigs 15mm ACW figures.

Anyway, Last week I was travelling to New Zealand to visit the adult children, and to keep myself occupied while waiting at the airport or on the flight, I was reading a book about English Civil War battle of Edgehill. The book was recommended in one of the comments from a post a few weeks ago (a quick thank you for the tip). 

Current reading “Edgehill 1642”

One of the interesting chapters in the book is about how they went about trying to interpret and piece together the battlefield and its features using the different sources and written accounts of those at the battle. Often written many years later, these accounts could have different or conflicting views on the battlefield terrain.

This got me thinking about my approach when I’m laying out terrain features on the tabletop for a game, and whether there was a better or more systematic way of doing things. This jogged a memory about a technique used in the book “Programmed Wargames Scenarios” by Charles S. Grant for selecting tabletop layouts.

A very useful book for solo Wargames

Many of the scenarios in the book use an approach where different versions of a battlefield layout are drawn and then decided by the dice. This clever technique creates a geographical “fog of war” when deploying forces, particularly so for earlier periods when armies on a campaign had none or few accurate maps. 

Example from the book with 3 different options for the left, centre, and right sections of the tabletop. 

The scenario maps were divided into three sections: left, centre, and right. Each section has three variations of the terrain which fits with any of the adjacent sections. So a road or river going across the map would always link regardless of the sections selected with a dice roll.

Prior to selecting the left, centre, and right sections. Each army must write orders or draw their deployment. This can create a few problems for players, for example, they find some difficult terrain in front of their cavalry or a an unexpected building which can assist the opponents defence.

So, I thought I would try and apply the Programmed approach to one of the One-Hour Wargame scenarios. I picked the scenario Flank Attack (2) which is one of my favourites. The first step was to take the map from the book which is for a 3x3 foot tabletop and stretch it to a 6x4 foot tabletop.

Scenario map for Flank Attack (2) modified for a 6x4 tabletop

Having drafted a map it is divided into the left, centre, and right sections. Then each section is reworked into three options which are slightly different. In the picture below the centre row (dice 3-4) represents the above map.

One-Hour Wargames scenario Flank Attack (2) map has been modified to create different terrain options using the Programmed Wargaming Scenario approach. After writing down the deployment, roll the dice to decide the tabletop layout.


The left section selected by a 6, the centre by a 2, and the right section by a 5.

I cut out the sections to help show how the selected sections fit together to create the map.

The final tabletop setup

With the tabletop setup determined the next step is to see how the forces are deployed based upon their prior written orders. Using the ACW forces already set up we find few changes with the Union deployment. However, than two of the flanking units find themselves positioned on a hill and the other two facing woods which they will have to navigate. 

The Confederate force deployment is not quite as planned. Their main line is anchored on a small hill (the scenario objective) and the remaining line spread out in the valley with their cavalry now positioned on a second small hill. There is no nice long ridge to defend as expected.

A view of the troops deployed with limited prior knowledge of the tabletop layout. 

A better view of the Confederate troops spread out in the valley between to small hills.

The half the Union flank attack will now have to navigate the woods.

Anyway, the tabletop is now setup and ready for a game. Time to stop posting and play!

Sunday, 11 April 2021

Ancients Project - Setting up a game (part 1 - terrain)

When setting up an ancient game I want to use a rule mechanism for determining the setup of the tabletop. Part of my reasoning for doing this is I will be setting up a quick 2nd Punic War campaign in the next couple of months and will need a mechanism for campaign games. This post covers the procedure for setting up terrain on the tabletop.

A tabletop setup using terrain cards

For the tabletop setup I am using terrain cards as they proved successful with my English Civil War campaign (see here). The ECW approach uses a deck of hand drawn terrain cards which are shuffled and six are drawn for my 6 x 4 foot tabletop, one for each 2 x 2 foot square area. This is fine for ECW terrain, but with ancient battles fought in more arid regions with few terrain features, a slightly different approach is required.

Making of terrain cards - 12 cards in all are required.

The approach I decided upon was to have four blank cards (representing open terrain) which are set aside. Then each player selects two terrain cards a piece from the remaining eight cards. The player's selected cards are added to the blank cards and shuffled. This allows players to select terrain to hopefully suit their army.

The Carthaginians (top) selected a river and town features. While the Romans (bottom) have selected a large hill and rocky broken terrain features.

Having shuffled the cards they are laid out in two rows of three to represent my 6 x 4 tabletop. In most cases this will work fine, but there are some additional rules for rivers. Rivers when placed will run North-to-South or East-to-West, depending how they are placed down (no peeking when you are placing them down). When a river's flow is blocked due to hills (they can flow through all other terrain features) they have to be rotated towards another square to avoid the hill. If there are two options, then use the dice to determine direction or allow the player who selected a river to choose the direction.

Terrain cards are laid out. The flow of the river will need to change due a blocking hill.

A river card's direction is adjusted to avoid a hill.

At the moment I have chosen to go with:

  • 4 x open terrain
  • 1 x river which is fordable
  • 1 x large hill
  • 1 x small hill
  • 2 x woods
  • 2 x broken terrain (fields and rocky terrain)

The approach will on occasion throw up four pieces of terrain, but will for the most part will deliver two or three terrain features. Additional blank cards could be added to the card deck for more arid regions when running a campaign, or reduced for more fertile regions.

A tabletop with terrain setup to reflect the cards.

Terrain setup with armies deployed.

Next up will be deciding the armies and their deployment.


Sunday, 5 January 2020

St. Nazaire Raid terrain completed

A very brief post as I have a few jobs to do today, but yesterday I painted the docks and made a few pillboxes to complete the terrain for my St. Nazaire Raid game. I now need to add some ships and a few Airfix commandos to my British WW2 forces.

My first game could be in a few weeks once a few units and ships are added
Here are some pictures of the tabletop laid out...

The tabletop for St. Nazaire Raid
The Old Mole and re-embarkment point
The target dock
The winding house and pump house, targets for demolition. If you look closely you can see a few lines drawn on to show the build up areas.

Thursday, 27 December 2018

ECW Campaign Cards and Terrain Cards

Today I mainly stayed inside and avoided the heat outside. This time has allowed me to complete the campaign chance cards I will be using for the next stage of the English Civil War campaign. When a  battle occurs both sides will draw one card. Some cards are specific to Parliament or Royalist. If they are picked by the opposing side they are ignored and treated as a blank card.

Campaign Chance Cards all prepared
As the campaign progresses I will most likely add more cards when they get shuffled for a new campaign year.

When a battle is to occur I will be using terrain cards to determine the tabletop terrain features. I have shown these in past posts, but have not explained how they are applied when laying out terrain on the tabletop. I was also recently asked a question as to whether the orientation of the cards matter.

All the terrain cards
To start off I have 18 cards made up which reflect my available terrain: 2 large hills, 2 smaller hills, 5 woods, 1 town, 2 farms, 1 river, 1 fordable river, along with and 1 open terrain card. I do remove cards to reflect the area being fought over. For example, I would remove one of the large hills if doing battle in East Anglia. That way the terrain will more likely reflect the terrain an area would have.

My tabletop is 6x4 foot so each of the cards represent a 2x2 foot segment of the tabletop. After shuffling and turning the cards during the shuffle, 6 cards are selected and placed to reflect the tabletop. The orientation of the terrain feature will be reflected in the placement on the tabletop. The exception is for rivers, which I will come to later.
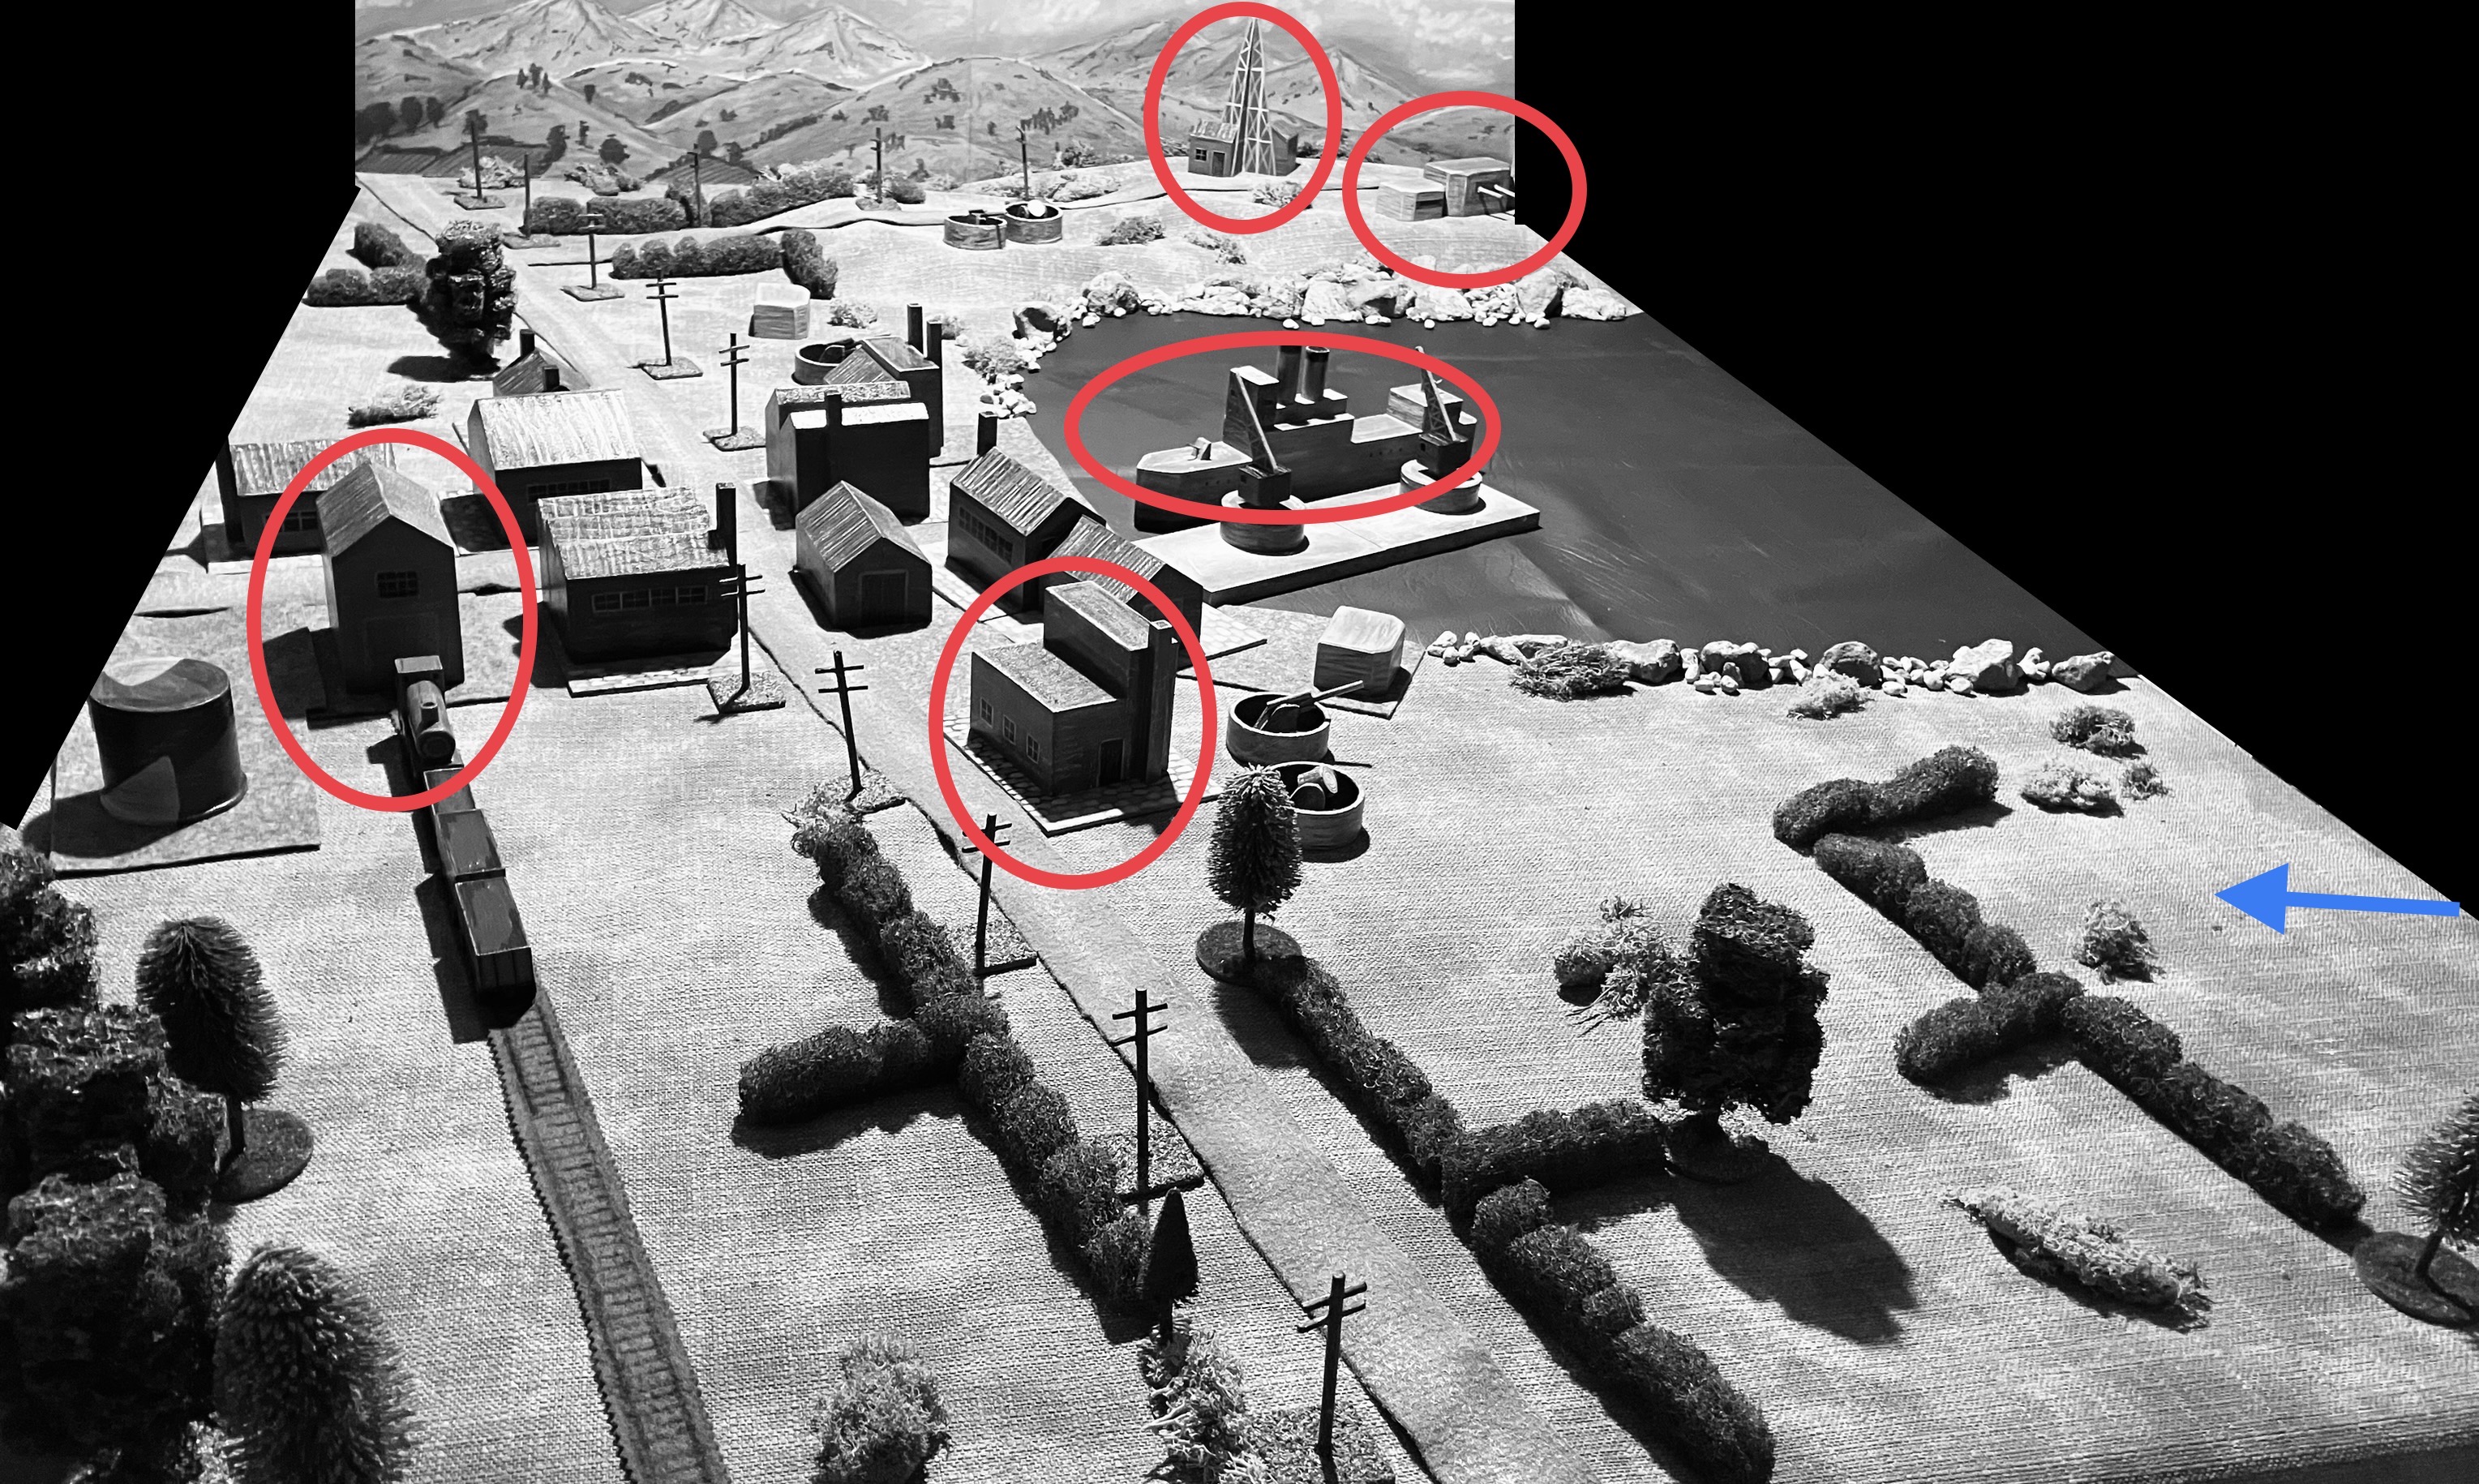
The two wood features will merge into a large wood based upon their orientation. There will be an open terrain (top right corner)
After I placed the features on the tabletop I then add roads that make sense (to me anyway). With ECW games one road must go across the between the long sides, it is assumed the armies are marching on the road before deploying. Roads will always be placed to pass next to buildings and through open terrain.

How the above cards will appear on the tabletop
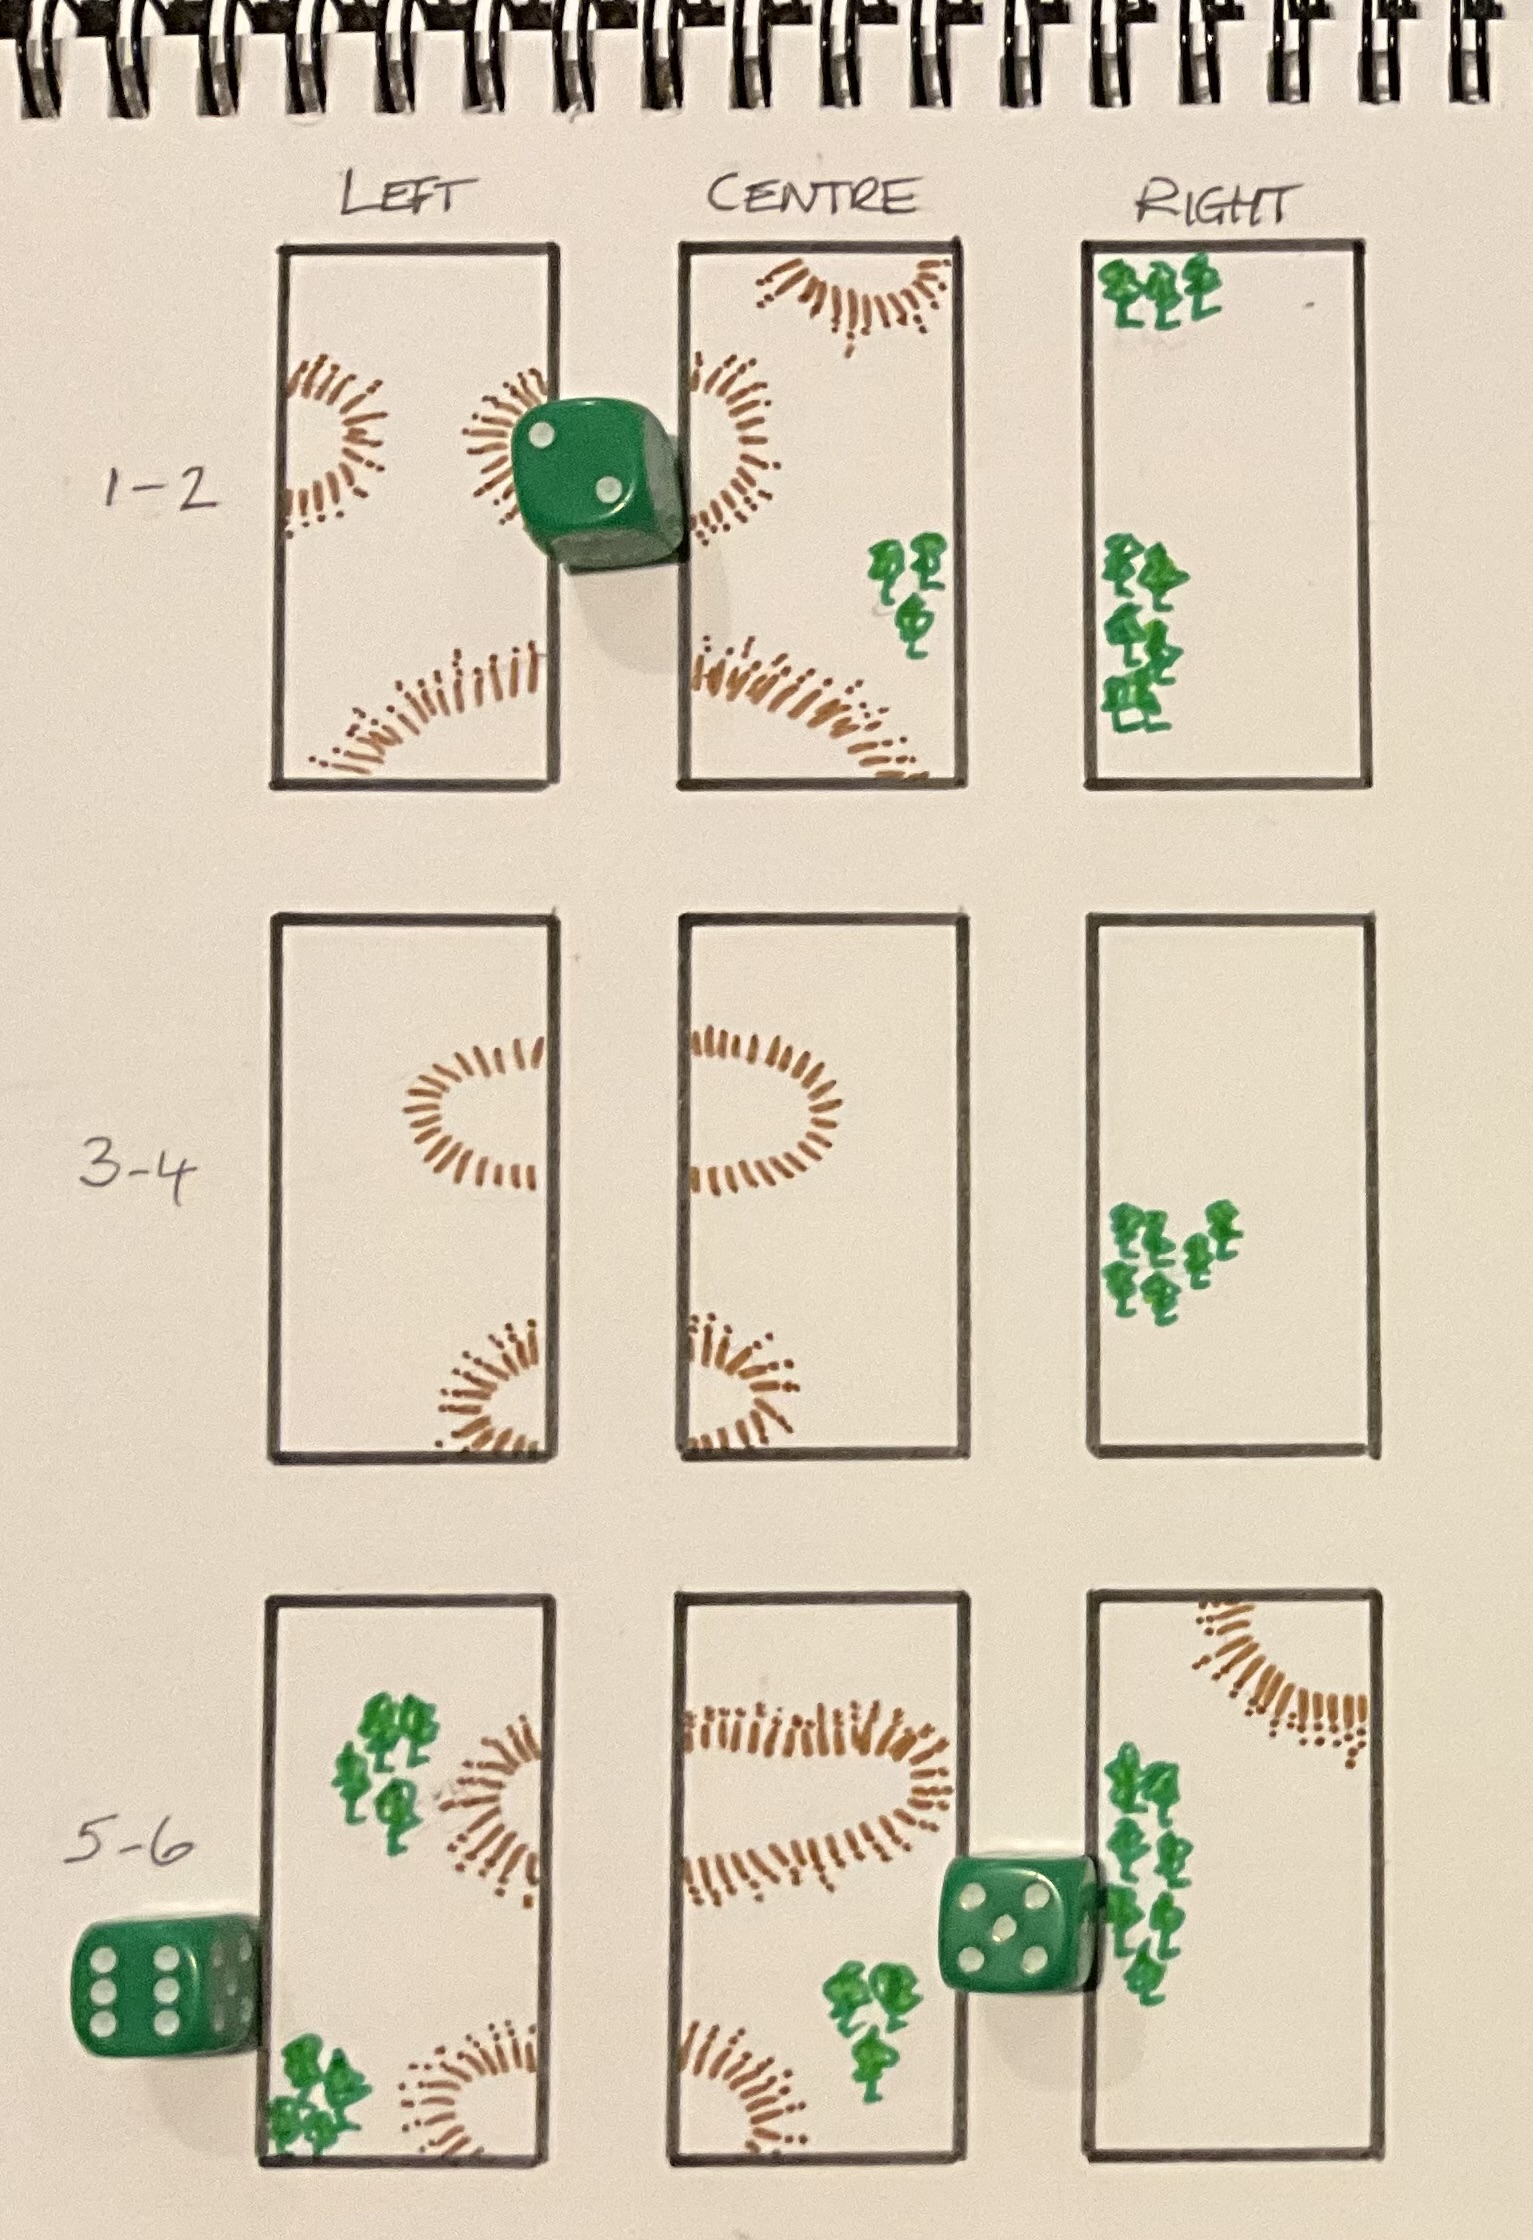
Things get a bit more messy when a river card is selected, because the river will run either across the tabletop or top to bottom depending on the card orientation, and will have two crossings, bridges or fords. The card with the river will be treated as open terrain while the river position is calculated using dice.


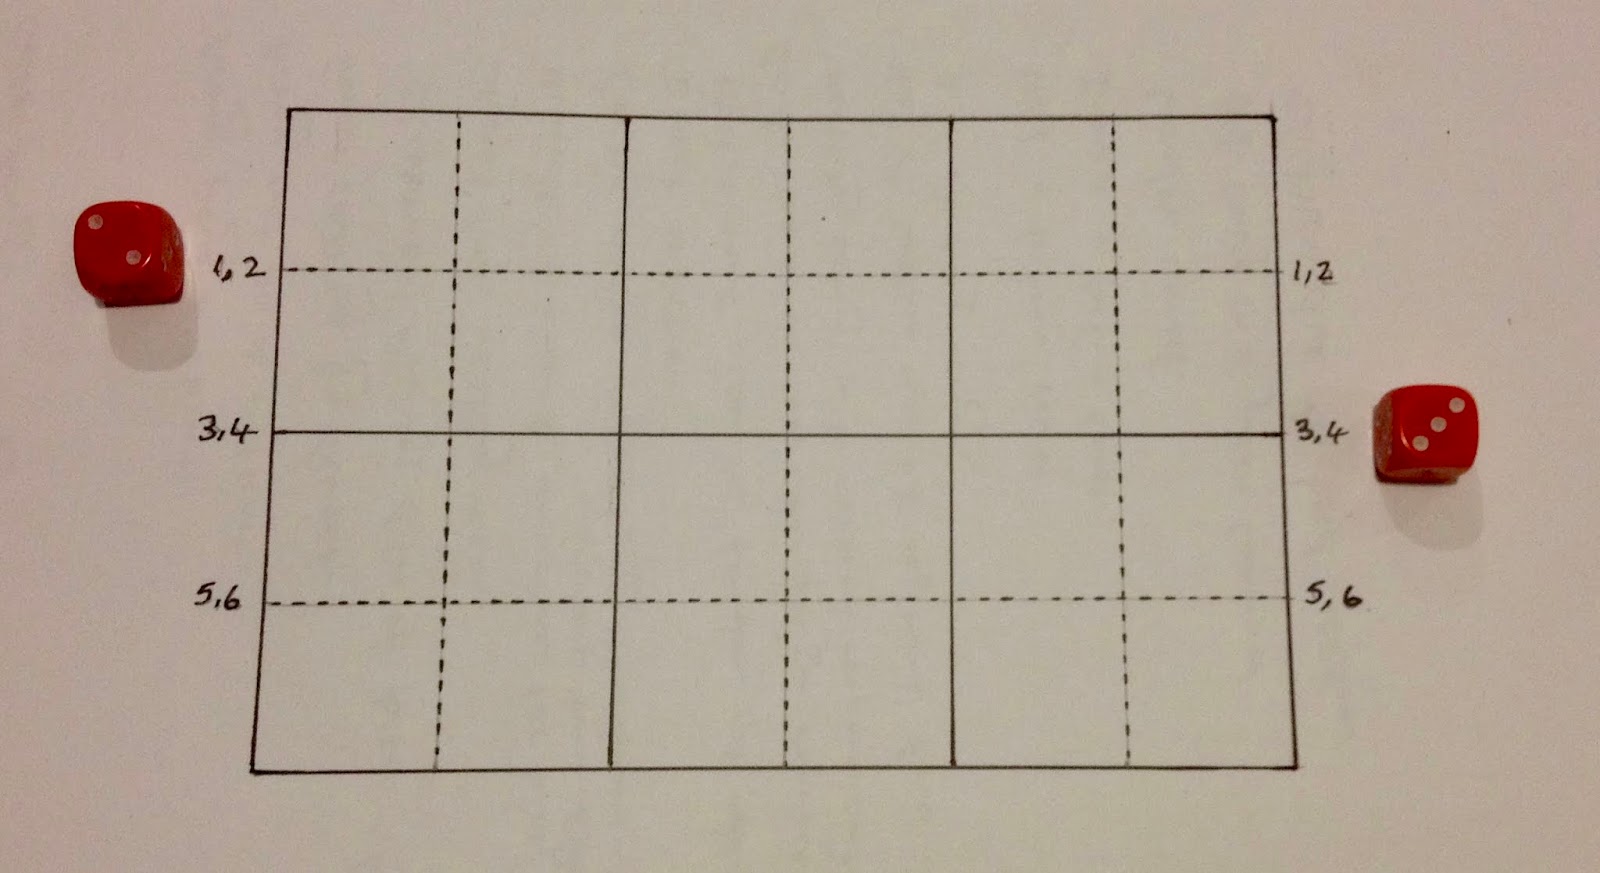
Depending on the river direction roll a D10 for the long edge or D6 for a short edge. For the above cards a 5 is scored and the river is placed. Any blocking terrain, in this case fields, are split or moved to one or the other side using the dice to decide.

The positioning of the river is determined with a D10 dice score - in this case a 5 is rolled. Should the river have been across the board a D6 dice would be used.

Occasionally anomalies do occur, particularly with the larger hills which if moved to one side will clash with some other terrain. Then I use to smaller hills on either side of the river.

Friday, 28 September 2018

WW2 unit and preparing for ECW campaign games

My painting effort is dawdling along, something which often happens after finishing a project. But  while I am in-between projects I am continuing to fill the void with finishing off a few WW2 units. This week saw the completion of a Sd.Kfz. 250/10 using one of a pair of Sd.Kfz. 253 I have and a spare Pak36 found in the bits box.

The half-track and some WW2 Airfix Germans 
Armoured infantry unit
This weekend I plan to play game 3 of my English Civil War campaign. The preparation of a game starts with the selection of the terrain for the tabletop. The approach I am using in this campaign is to divide the tabletop into 6 squares each 2x2 foot (I have a 6x4 foot table). Each of these squares will contain a piece of terrain.

When choosing the terrain I use some homemade cards with terrain features drawn on them. These are shuffled and six are selected for each of the 2x2 foot squares. Some of the features are deliberately offset and not centred to show placement within the 2x2 square.

The current set of cards
If a river square is drawn, then that particular square will be treated as open terrain and the position of the river will need to be calculated. Rivers flow across the tabletop longways. Two dice are rolled, one for either side of the table (see diagram below).

An example of 6 cards drawn and placed starting left to right top row first then second.
Calculating a river's position - Dice are rolled for opposite sides and the river flows between the two marks
Once the river is in place the other selected terrain is positioned. Occasionally it may be necessary to adjust a terrain features position to accommodate the river. Then roads/tracks are added, I generally try to have two roads which avoid terrain features excluding towns, and help identify where to place any bridges.


One final note on the rivers there are two cards, one with an unfordable river and one which can be treated as fordable.

Thursday, 16 February 2017

Planning for some WW1 games

I am starting to plan out another set of games for the 6x6 challenge this time set in the WW1 period 1917-1918. I plan to use One-Hour Wargames (OHW) rules with a few modifications to add tanks and aircraft, which I used with much enjoyment about a year or so ago.

WW1 Peter Laing figures on a large base 3x4 inches
An infantry unit defending from their trenches
For units in trenches I used some quarter round wood to show units in trenches. They served their purpose, but don't really look very trench like. As I had some surplus brown felt left over from making fields I thought I would try out a different way of representing trenches.

Cost felt used to show trenches
The felt was cut out and duckboards quickly drawn on with a black marker pen as though you are looking down on the trenches. Also communication trenches can be shown.

With old trenches placed at the front
I recon I will just use the felt trenches without the old trenches (see below). Cheap and easy to make which is always a bonus for me.

A German Infantry unit occupying trenches
One rule adjustment which I intend to applying to OHW rules is reducing the number of hits you have to track. I am going to still roll the D6-2, D6 and D6+2 but for every two scored on the D6 deduct 1 hit rounding down. So a roll of 5 on a D6 would cause 2 hits. That way on the 7th hit the unit is eliminated, rather than the 15 in OHW.  Then units in cover require 3 to be scored for a hit (eg. a roll of 5 on a D6+2 = 7 and 2 hits).