Showing posts with label Space Marines. Show all posts

Saturday, 2 September 2023

Time for a Sci-Fi game - Tyranids vs. Space Marines

It's been a while since I've had some sci-fi miniatures on the tabletop. I think the last time was when my daughter visited and we played a Necromunda-style game using the One-Hour Skirmish Wargames rules.

Anyway, the purpose of this game was to test an activation approach using cards to order activations for a larger skirmish game where figures are grouped together into units. I chose scenario 8 (Melee) from the One-Hour Wargames book. This is a scenario that I enjoy, in which a small detachment tries to defend a hill against a couple of waves of attackers while waiting for their reserves to arrive.

The game is played the game on a 4x4 foot table, the two key features positioned in the centre of the tabletop are the hilltop and the nearby petrified woods. 

The tabletop setup with hill and petrified woods.

If you are wondering what the woods are made from, they are made from dried seaweed I found washed up on the shore after a storm. 

A unit of Space Marines and Dreadnought are assigned the task of defending the hill.

Order of Battle

The Space Marine force consists of:
  • 1 x space marine squad (10 figures)
  • 1 x Dreadnought
  • 1 x Assault squad (10 figures)
  • 1 x Landspeeder
  • 1 x Rhino
  • 1 x Command squad (3 models)


Space marine reserves arriving on turn 3 and 6.

Tyranid force arriving in two waves on turn 1 and 3.

The attacking Tyranid Behemoth force consists of:

  • 1 x Gaunt Brood (20 figures)
  • 1 x Hormagaunt Brood (20 figures)
  • 1 x Gargoyle Brood (20 figures)
  • 1 x Warrior Brood (5 figures)
  • 1 x Carnefex
  • 1 x Hive Tyrant with 2 Guards

For the game I was using some home-brew rules based upon OHW rules which allows for different sized units. Units with little armour can be larger using their number rather than armour to survive.

The Game

I managed to take a good number of photographs of the game as it progresses.

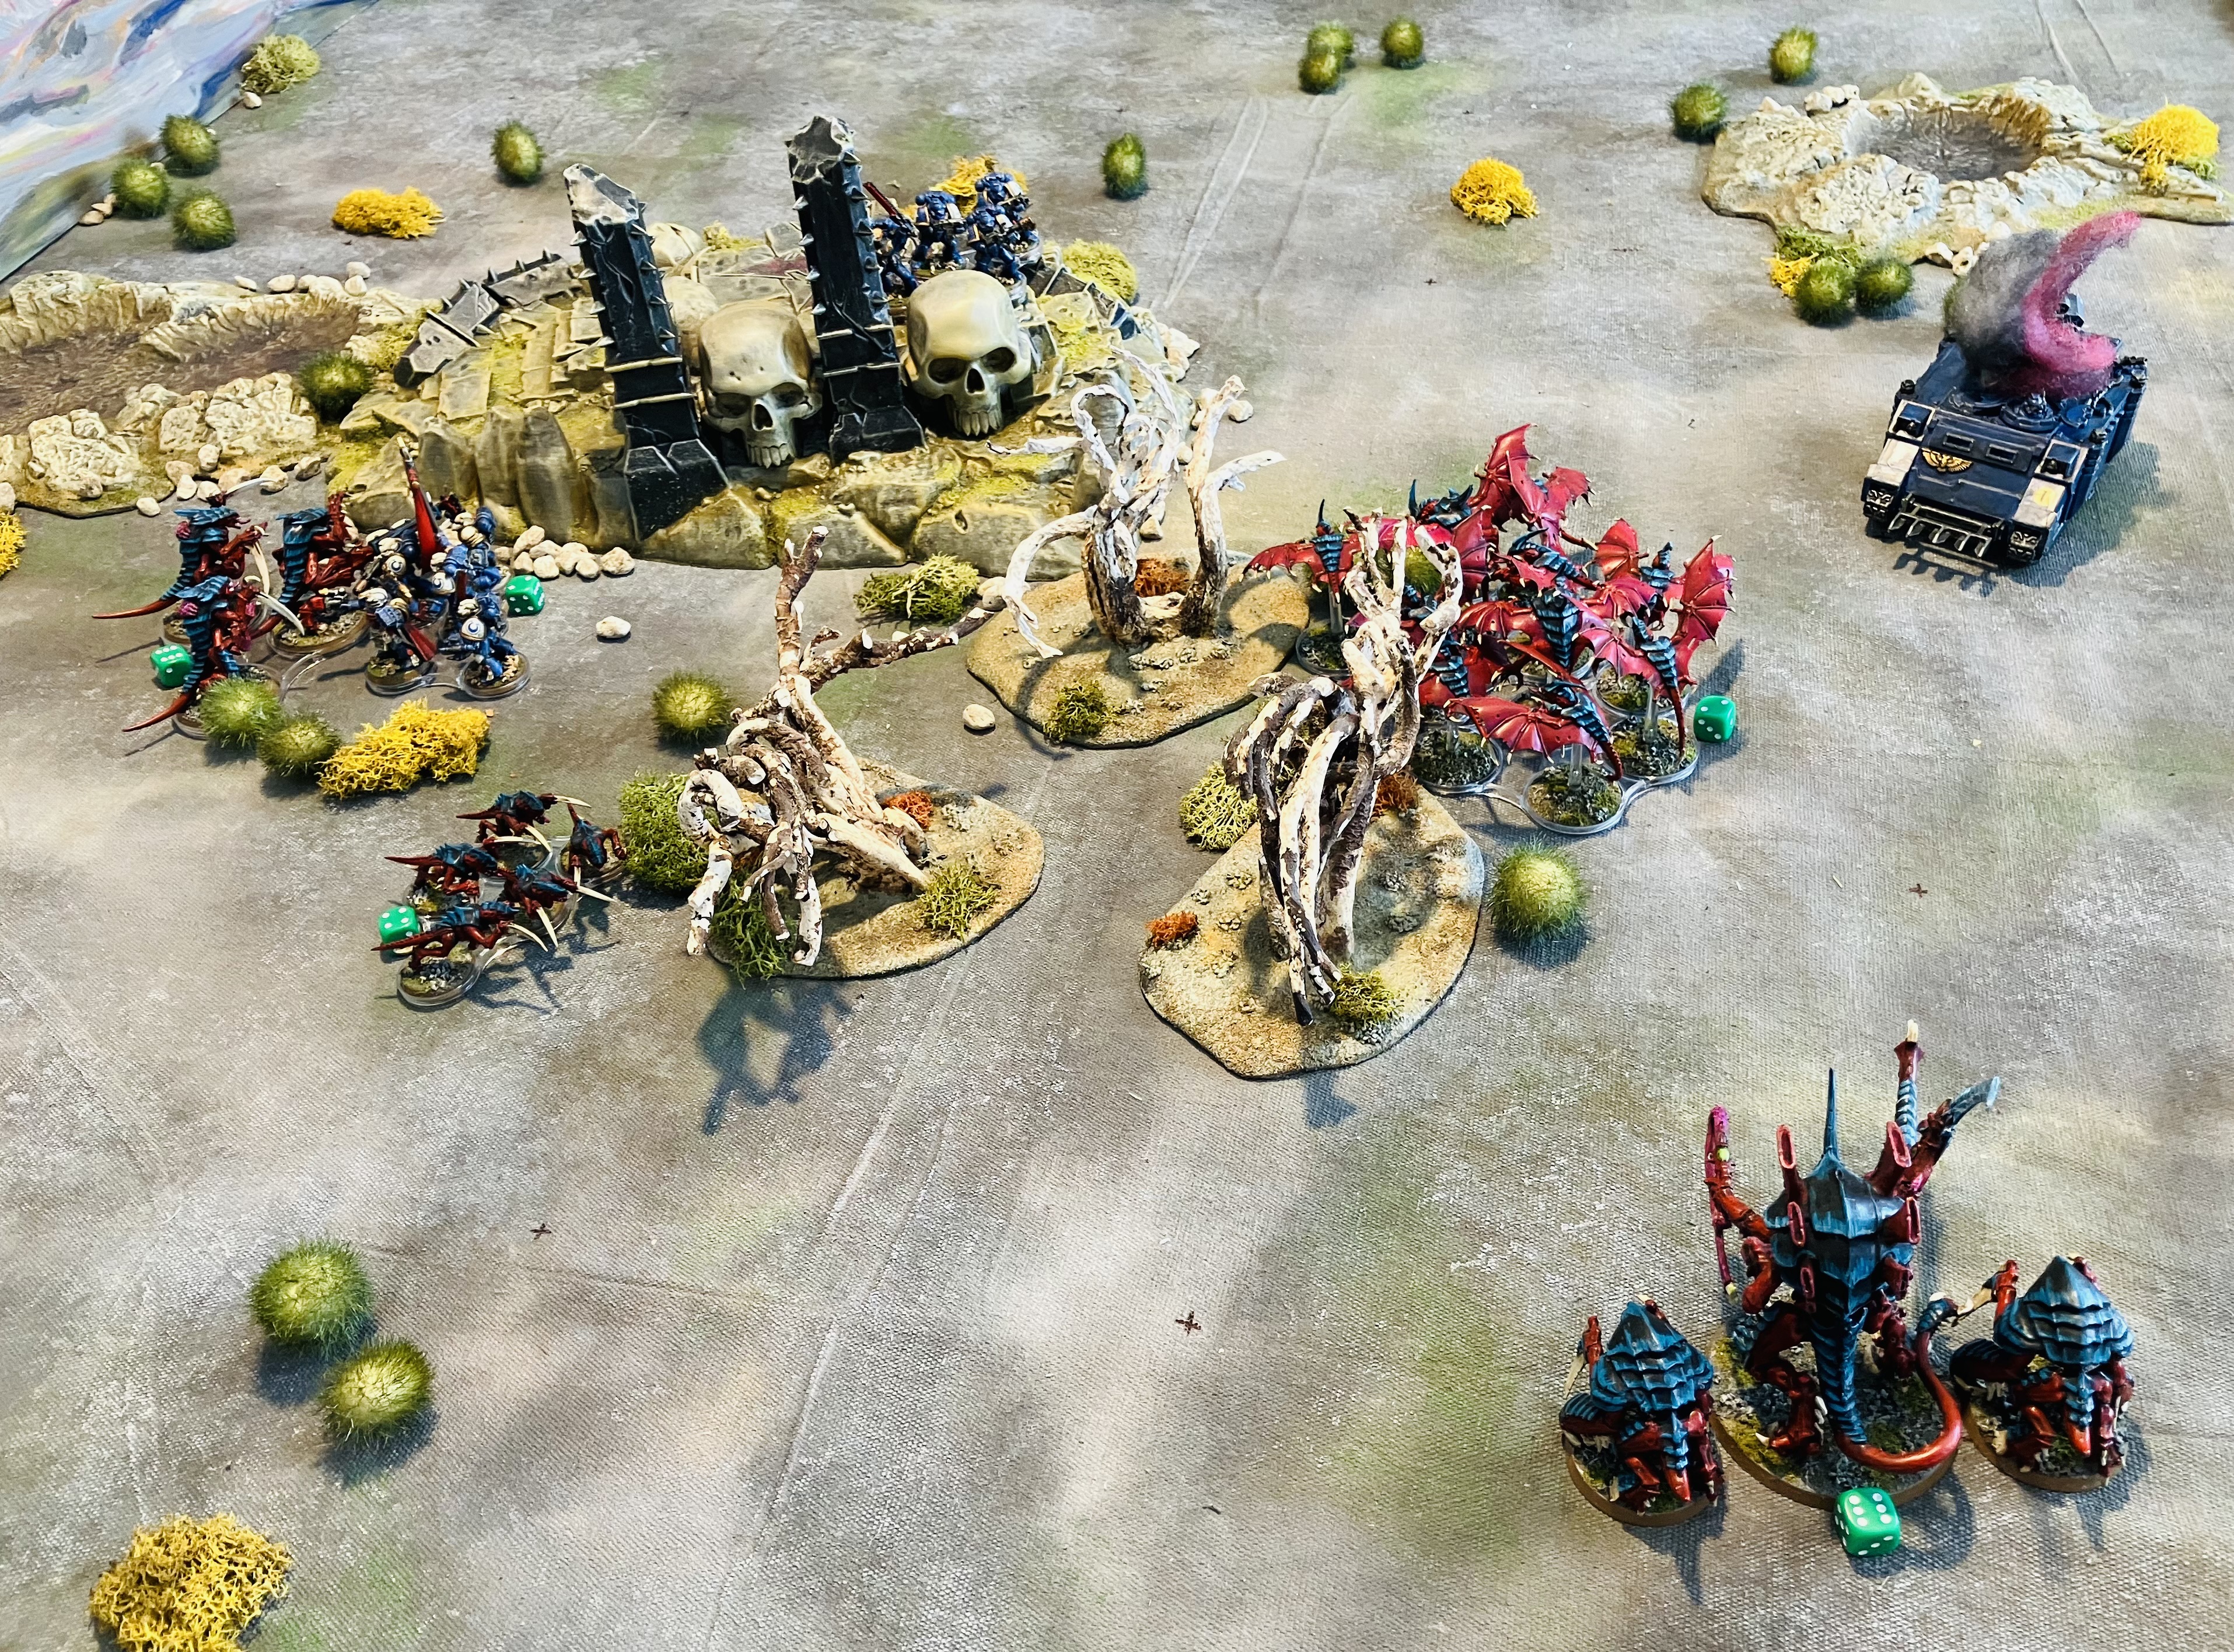
The first wave of Tyranids arrive headed by a Carnefex and led by a Warrior brood seen in the rear.  

The first set of Space Marine reserves arrives just in time as the Tyranids start their assault of the hill.

The second wave of Tyranids has arrived. Since units cannot pass through other units unless they are fliers, this is causing a lot of congestion as the larger front units are getting activated after the rear ones. The Assault Marines can be seen charging into the Carnifex, their chain swords whirring.

The Tyranids seem to have sorted out their traffic jam with the bulk of their forces moving towards the hilltop. 

The Carnifex was brought down and eliminated by the Assault Squad's chainsaws, but not before it had slain half the squad. The Hive Tyrant looms large in the foreground, preparing to enter the fray.

Hormagaunts swarmed over the Dreadnought, their scything talons scraping its armor, searching for any weakness. In the background, the Command Squad can be seen preparing to charge into the woods and engage the Gaunt brood in close combat.

The Hive Tyrant and the Rhino clash. The Rhino fired its twin-linked lascannon, but the Hive Tyrant's chitinous carapace shrugged off some of the shots. The Hive Tyrant retaliated with its Venom cannon spitting acid and venom across the Rhino’s armour. Meanwhile, in the center of the battlefield, the Space Marines were locked in close combat with the Tyranid warriors. The Space Marines were outnumbered, but they are fighting with determination and are slowly gaining the upper hand, hacking and slashing their way through the Tyranids.

It seems like the Tyranid force has gained the advantage in this battle. The Rhino eventually met its demise, dissolved into a seething pool of acid, but not without inflicting significant damage to the Hive Tyrant, leaving it considerably weakened.

The surviving Tyranid forces are readying themselves for an assault on the defenders stationed atop the hill, while the Space Marine Command squad remains occupied, clearing up the remaining Hormagaunts.

In the climax of the battle, the Space Marine Command squad makes a decisive charge against the remaining Tyranid forces, successfully eliminating the Hive Tyrant to win the game.

The Activation Approach

The activation approach draws a card from a shuffled deck and assigns a single card to each unit. Units are then activated based on the cards they hold, following the hierarchy from kings to aces, with the suit hierarchy being Spades, Hearts, Diamonds, and Clubs. As a solo gamer, I've find this approach to be effective, introducing an element of unpredictability and infusing the game with a controlled chaos that seems to suit a large-scale skirmish game. 

The card deck gets shuffled with the used cards when the cards run low.

The start of a turn with all cards assigned to each unit on the tabletop and any units expected to arrive from reserves.

Time to get another game in this weekend and test out the rules.

A close up of the action to finish up on.


Friday, 10 February 2023

A little bit of this and a little bit of that

This past week I have been flitting between periods on the tabletop and painting table. On the tabletop, earlier in the week, I had my older Warhammer 40K Ultra Marine and Tyranid armies out using some simple rules with an activation approach. 

Messing around with W40K armies.

These sci-fi game was later replaced with a WW2 game using Tank on Tank board game rules using free movement instead of hexes.

WW2 Game

On the painting table are orcs riders and samurai. I was short one orc rider and found enough spare bits to create another rider with the addition of some green stuff to create the missing boar leg and some ears.

Enough pieces were found and with a little green stuff the missing front foot and ears were made.

The finished model with 3 previously painted orc riders

I purchased a few more MiniFig S Range Samurai from Caliver Books which arrived this week. The S Range are an old range and the horse models are unavailable due to missing moulds. As an alternative I have used the horse from a set of 1/72 plastic samurai cavalry. It is possibly a fraction smaller but is not noticeable. My aim is to add a few additional units to my current armies.

Recently completed samurai cavalry. Very simple block painting and gloss finish.

1/72 plastic horses are used

A combination of samurai cavalry, arquebuses, and spearmen to be added to the samurai armies.

Arquebuses and cavalry unit

Thursday, 16 June 2016

Playing around with Swatters rules

A few weeks back I had a game of Swatters, a set of rules from Ganesha Games, which provides an enjoyable game between Tyranids and Space Marines. The rules are geared towards bugs vs. marines, but there are suggestions for using the rules in other settings. So this week I have been playing around with Orks vs Space Marines and introducing vehicles.


The area of the rules I am playing around with are combat and shooting. Here is a quick list of ideas I'm trying out...

All units get to roll 2D6 when shooting regardless of unit size. Any 3+ removes a partially armoured figure, 4+ an armoured figure, and 5+ a heavily armoured figure. Any 6 that is rolled allows the shooting unit to select the figure removed.

  • Maximum shooting is range 24"
  • Intensive Fire activation add 1D6.
  • Minus 1D6 for cover or if attacking a vehicle.

If the unit has other weapons, then only one of them can be used.

  • Support weapons add 2D6 against non-vehicles (heavy bolters, assault cannons, etc)
  • Missile Launchers add 1D6 regardless of troops or vehicles
  • High Power (AT) weapons add 2D6 against vehicles

Vehicles and monstrous creatures are hit on a 5+ and lose a hit point. Their size determines the number of hit points.

Reactive fire at the shooting unit is allowed after casualties are removed and a successful activation.

Combat (assaults) occur when units are within 6" and have successfully activated. Both sides roll  2D6 simultaneously and the side with the most number of casualties retires one move and the attacker moves into the vacated space. Any ties, then repeat the process.

  • If the unit is armed with close combat weapons add 1D6 (unless assaulting a vehicle)
  • If the unit makes a powerful attack activation add 1D6 (unless assaulting a vehicle)
  • If the unit has a flamethrower add 1D6
  • If the units has power weapons add 1D6

I am keeping the same unit size and rules for when a unit only has two models, but whether you have 3,4 or 5 models does not influence the D6 rolled.

Whether or not I do much more with these rule modifications I'm not sure, but I will be using the rules again for Tyranids vs Imperial Guard or Space Marines. A worth while investment for the PDF rules (about the cost of two coffees).


Saturday, 13 February 2016

Mini Sci-Fi Campaign - Battle 4 Part Two

The battle was fought using scenario 6 from One Hour Wargames by Neil Thomas. The layout was modified for a 6' x 4' table with a 12" grid for use with my Sci-Fi Grid-Based rules, a variant on rules from One Hour Wargames.

The Tyranid battle plan was quite simple. Leave a couple of Hormagaunt units to defend the Habitat and the rest to be used in an all out assault on the road crossing of the lava flow. The combined Space Marine and Planetary Defence Force (PDF) of the Imperium had plans to hold the crossing and counterattack on the flanks, using gaps in the flow that only they knew about and could use in the game by Imperial forces.

Battle Report

The Tyranids threw themselves against the barricaded crossing, which was treated as broken ground from a rules perspective. They lack of distance shooting capability meant the quicker they engaged the better.
The Tyranid in full swing and supported by sep-striking gargoyles
Deep-striking Raveners quickly eliminated the Basilisk within a turn of its arrival. A good start for the Tyranid hordes.

A surprised Basilisk assaulted by Raveners
A second wave of Imperial support arrived on the flank using a gap in the lava flow. Far away at the road crossing the beleaguered Imperial forces were standing firm and starting to take a toll on the attacking Tyranid units.

Imperial Support arrives on the flank (the Sergeant on top of a vehicle indicates the Tactical Squad are passengers) 
The counterattacking forces arrive with the fast Motorcycle unit attacking with all support guns blazing, thinning out the Tyranid attackers.

Space Marine units head for the Tyranid flank and Habitat objective
As the Tyranid assault was faltering under a hail of fire, the Assault Marines swooped in using their deep-strike ability to engage and eventually dispatch a Carnifex. The threat of the assault was gone.

Assault Marines put the final nail in the Tyranid's coffin
The Space Marines attempt to achieve the game's second objective of the ruined habitat. While the Warrior Prime was left trying to extract itself from the assault on the road crossing. Only to be run to ground and eliminated by Terminators and Assault Marines.

A Tactical Squad attempt to take the Habitat

Space Maine units hunt down the Warrior Prime
The Habitat was eventually taken as additional weapons were bought up to support the assault. The game ended with both objectives, the road crossing and habitat, occupied by the Imperial forces.

The final moments before taking the Habitat

Unit of the Game

The Space marine Motorcycle squad was for me the unit of the game, arriving just in time and with effective flanking fire to end any opportunity of a Tyranid victory. I almost went "Brroooom! Brroooom!" as I moved them across the table ;-)

Brooom! Brroooom!

Summary

While not the most exciting game once it became apparent the Tyranid assault was going to fail. There was interest as to whether the Tyranid Prime could extract itself and escape. However, this game prompted me to look at the attack rules and the pinning of units. As a result I updated the rules (see link on top left) to:

  • use half the number of dice for cover rather than having to roll a higher dice score; 
  • modified the to hit scores for full and heavily armoured troops; and
  • the removal of unit pinning so a double 6 on hits now stops a unit immediately counterattacking as a reaction to the attack.
This changes worked ok in the next battle which I now need to write up. It takes longer to write up the battle report than it does to play a game.

Wednesday, 30 December 2015

One-Hour Wargames for a W40K universe

While my interest is turning to historical wargaming for WW1 and AWI using house rule variations of One-Hour Wargaming (OHW). I do still like gaming with my W40K armies, but not using existing GW rule sets. I had one game of AWI with my visiting Son (which he won) and he suggested a W40K battle. So we adapted the OHW rules to a W40K universe (click here for link to the one-page rules). We found our challenge was to decide upon a unit's primary weapon and single ability which help define the use of the unit in a game. Here are some sample units defined using the rules for our Tau vs. Space Marine games...

Space Marine Tactical Squad


Unit type - Troop
Movement - Normal ground unit
Combat - Tactical weapons
Defence - Armoured troops
Ability - Veteran Leader

Dreadnought


Unit type - Medium Non-Troop
Movement - Walker ground unit
Combat - High Force (anti-tank)
Defence - 3 armour point
Ability - Veteran Leader

Jetbike


Unit type - Light Non-Troop
Movement - Fast Skimmer
Combat - High Force (anti-tank)
Defence - 2 armour points
Ability - Deep-strike

Tau Pathfinders


Unit type - Troop
Movement - Normal ground unit
Combat - High Force (anti-tank)
Defence - Lightly Armoured
Ability - Stealth

Scouts


Unit type - Troop
Movement - Normal ground unit
Combat - Tactical weapons
Defence - Lightly Armoured
Ability - Sniper

Tau Battlesuits


Unit type - Troop
Movement - Walker ground unit
Combat - Support weapons
Defence - Heavily Armoured
Ability - Droids

Whirlwind


Unit type - Non-Troop
Movement - Fast Ground Unit
Combat - Ordinance
Defence - 4 armour points
Ability - None

Kroot


Unit type - Troop
Movement - Normal ground unit
Combat - Combat weapons (hand-to-hand)
Defence - Lightly Armoured
Ability - Stealth

I found I quite enjoyed the game and we soon added some Psychics, Characters and Warlords. Treating them as non-troop units so they didn't get killed off too quickly and could influence the game, but forced to be attached to a unit of troops (followers/bodyguards) for their movement.

I'm now thinking about a mini sci-fi campaign after reading "The Solo Wargaming Guide".

Thursday, 5 November 2015

AWI Unit and Orks

This week I have been able to paint up some figures and decide upon the basing of my AWI armies. The figures are Peter Laing miniatures which I purchased some 30 years ago. They are finally getting painted after all this time. I'm going with 18 figure units based on 4" by 2" stands so I can use them on a 6" grid.

Peter Laing - British AWI figures
I found my old copy of "Wargamers Handbook of the American War of Independence" by Donald Featherstone, and published 1977. In a 100 or so pages it provides information on the armies, their uniforms, battle reference charts and details for re-fighting 10 battles from the war. There are some rules in the back, but I suspect I will end up creating some house rules based around Neil Thomas's Napoleonic rules from One-Hour Wargames or Introduction to Wargaming.
My current reading
This last week I've been playing a few sci-fi games and introducing out some new game mechanics like a game clock. Most of the other house rules seem to be working ok and give an enjoyable solo game.
Pre-battle orders to space marines before going planet side

Monday, 20 July 2015

Caracalla Campaign Finale

The campaign on Caracalla was drawing to a close with the Sons of the Sword (Space Marines) closing in on the Orc stronghold.


The assault begins with an exchange of fire with first blood going to the Orcs.


Space Marine reserves start to arrive and begin to take a toll on the Orcs.


The arrival of air support and a terminator unit provided a timely counter attack.


The Orcs threw their reserves into a flank attack.


While the battle appeared to be in the balance, the fire power of the Marines was the decisive factors and won the day for them.


With this battle and the taking of the Orc stronghold was the end of the campaign.