Saturday 30 November 2019

ACW mini campaign opening moves

Just a quick post this weekend as I am writing this on my phone having run out of time during the week before jumping on to a fight to Wellington, NZ, to see my Daughter and old work colleagues from when I lived there.

The opening campaign moves were made and the first action is setup and waiting for my return.

First action of the campaign waiting to be played. 
I did revamp the campaign counters to better reflect an ACW theme and uniquely identify each division with the commander’s name. Division identification is required to track the unit composition as the battle unfolds and the division become exhausted.

A reminder of the starting positions with counters now uniquely identifying divisions. 
This is a solo campaign and this time I am picking the attacking union forces. In my last solo campaign I was the defending WW2 British so it was time to switch.

The approach I am taking is to write down the orders for each side. For the union side I only write one set of orders which will be applied. For the Confederates I write two sets of orders: a likely set of orders and a less likely set (which may be the more riskier approach). All orders must include the sequence the orders are applied to the divisions.

Once all orders are written, then I dice for which confederate orders are applied. Rolling a D3 dice the most likely orders are applied on a 1 or 2, and the less likely on a 3.

The campaign battle map after orders are applied. 
When applying the orders I dice to see which side moves their first division. Then roll a D3 and the division can move that many squares (no diagonal moves allowed). This process is repeated with each side alternatively moving one division at a time. A division must cease movement if adjacent to an enemy unit. When this occurs and the enemy is blocking the intended move, the action is transferred  to the tabletop for a game.

Another book arrived during the week, which will be read this weekend.

Recent secondhand arrival


Tuesday 26 November 2019

ACW mini campaign

Now that the ACW rules are starting to come into some semblance of order and the changes are less frequent it is time to string together a few games with a mini campaign. The plan with the campaign is to keep the games small and on a 4x4 foot tabletop.

As inspiration I flicked through War Game Campaigns (Donald Featherstone) and found in chapter 23 a small campaign for the Franco-Prussian War which would seem well suited for being repurposed for a mini ACW campaign. It has a Confederate force of 4 divisions defending the North side of a river with four bridges, and 4 Union divisions trying to force a crossing.


The bridges at coordinates B5 and D3 can be crossed by all units. While the rail bridge D4 and a partially destroyed bridge F1 can only be crossed by infantry. Additionally, the river may be fordable and Union forces can also attempt to construct a pontoon bridge.

The hope is the campaign will provide a series of actions which can be viewed a one battle fought over 1-2 days which each campaign turn representing a third of a day.

Taking a lead from the book "History shows that few armies seem to go into war with accurate maps". Each map square is a tabletop and is an indication of the terrain which will be determined using terrain cards stacked with cards to fit the likely terrain.

Each side has four divisions which start the game laid out as in the picture below.


During a campaign turn (a third of a day) both sides take turns to alternatively move one division at a time until all divisions have had an opportunity to move. When moving a division roll a D3 dice (1,1,2,2,3,3) to determine how many squares a division can move. Diagonal moves are not allowed and units cannot stack or move through other units. When a unit tries to move into an enemy occupied square the action moves to the tabletop.

When an action is going to be played the make up of a division is determined with dice and recorded. A division will start the campaign with 6 units.

When a game is being played on the tabletop one reserve unit from any adjacent division can enter the game. If there are two adjacent units there is an opportunity to call upon two reserve units.

Finally, the post arrived with a recent secondhand book purchase. I have always wanted to own a copy of The War Game by Charles Grant since borrowing a copy from the school library when it was first published.


Sunday 24 November 2019

Game report and more felt and pastels terrain

Having livened up most of my ACW army bases (see previous post) it was time for a quick game to test out some modifications to the One Hour Wargames (OHW) ACW rules variant I am using.

The game has Union forces making a morning attack on Green's Farm where Confederate forces have taken up some hurried defensive positions to block the Union advance.

All ready for a game
The tabletop was decided using terrain cards and allowed both sides to add a small hill to their side of the tabletop. The order of battle was diced for using the force composition tables from OHW.

Confederate

  • 2 Commanders (1 on-table and another 1 off-table ready for promotion rule)
  • 1 Cavalry unit
  • 1 Artillery unit
  • 4 Infantry units
Union
  • 3 Commanders (2 on-table and another 1 off-table ready for promotion rule)
  • 5 Infantry (a Zouave unit is part of the 5 units and is why Union forces have 3 commanders)
  • 1 Cavalry unit
The Union plan was quite simple. Push up into the central woods and move the cavalry around the flank to keep as many Confederate units in position while making the main assault on Green's farm with the remaining 4 infantry units.

Planned Union moves
The Union assault progressed well. While one unit was disordered and retreated the gap was quickly filled by reserve infantry lead by a commander. Soon the combined shooting from two commanded units took its toll on the defenders of Green's farm who retired disordered, only to be replaced by infantry reserve with commander. 

The Confederates desperately wanted a rally command event, but instead got additional moves and shooting. While extra shooting and moves are always helpful in a defence, it did not stop their disordered units retreating off the tabletop and into the elimination pile.
 
Early stages of the assault
Confederate reserves quickly move up to fill the gap caused by disordered units retreating.
An extra command event move allowed Confederate artillery to move up into canister range and shoot in one turn. Rallied union units can be seen entering the assault again.
On the Union right flank a swift advance had allowed the Union cavalry to race forward and surprise their Confederate counterparts. Soon the Confederate cavalry were under pressure which drew in infantry from the nearby woods. This action quickly escalated with Union infantry emerging from the centre woods to join the action.

Union cavalry occupying and distracting Confederate forces
Action in the Union middle and right flank where infantry charge out of the central wood.
By noon Union forces had successfully taken Green's farm. It had not been easy and required a number of assaults. Being able to rally their disordered infantry before they retreated off the tabletop allowed then to be used again later waves of attack on the farm. On the right flank Union forces eventually forced back the defenders around the woods.

A Union victory.

This game was the third time I had played this tabletop setup and has resulted in sorting out the disorder and rally rules to a point where I hope the balance is right.

Green's farm is taken
Confederates retire
As I was preparing the tabletop it soon became evident the roads I have were too wide for 15mm units. So out came the oil based pastes again to spruce up the roads (see previous post on use of oil based pastels). 
Comparison of roads with and without oil based pastels
There were a couple of questions about the use of these pastels and whether they rub off? In the short time I have been using them I have found it takes a bit of rubbing to have the colour come off onto my hands. However, with all my felt terrain I often give the felt a light spray of a varnish/sealer to reduce the likelihood of bases catching on the felt. This also has the effect of stopping any colour getting rubbed off from the felt.

Example of oil based pastels on wooded areas...
...with trees


Thursday 21 November 2019

Livening up some old ACW bases and rules

My old ACW figures were based some 30 years ago. Over the years they have lost their green colouring and become quite dark, and needed some livening up. I did consider removing the figures from their bases and creating new bases, but they do seem to be very well stuck on with the risk a breakages during the removal process.

After a little bit a trial and error I have ended up painting the bases with a heavy dry brush of green following by a lighter dry brush a brown. While not perfect is good enough for my eye when deployed on the tabletop.

Original bases are looking drab and tired and look too dark on the tabletop
Over the last week I have been testing out a One Hours Wargaming ACW variant using D3 dice, having units retire and rally with random command events, and commanders to improve unit performance. These can be found on a tab at the top.

Bases livened up with dry brushed paint
I will be doing a game write up of one of these games next, and hope to finish all the bases this weekend. However, this week seems to be slipping away with work and the lead up to the end of year.

Saturday 16 November 2019

Rivers and an ACW game

This week I pulled out my old Minifig 15mm American Civil War (ACW) figures which rarely get a look in on the tabletop. For some reason, and I have no idea why, I decided it was time for an ACW game. Possibly as I an certainly in a Horse and Musket frame of mind at the moment with my recent Napoleonic gaming.

The week began with playing a game using the ACW rules from Neil Thomas's "Wargaming and Introduction", then moved to the One Hour Wargames version, and finally to a variant of the two which I will be posting after I have written up my notes.

A game set up and ready to play. I could not resist a black and white photo as I have been browsing Airfix Guide - American Civil Wargaming by Terence Wise since pulling out the ACW figures.
However, the purpose of this post is about rivers. Or more precisely sprucing up my blue felt rivers. As a general rule I like my terrain to be practical to use and easily made. So for a long time I have been using cut strips of blue felt to represent both rivers and streams. As I laid out the river on the tabletop for the next game I had an idea on how to hopefully make it look better with little effort.

My current river terrain
I recently purchased some oil pastels to help with modelling a St Nazaire project (which is still progressing slowly as I trial terrain options) and I thought I could use the pastels to break up the flat blue look of felt river. The oil pastels once applied don't easily come off the felt. If you remember ever having to remove crayon marks (drawings) on the walls made by your kids - that is how well the colour stays applied.

Oil based pastels are used (not the soft caulk type)

Here are some photos of the steps which took me all of 15 minutes.

A light blue is drawn in random lines. A bit of fluff is generated when applying the pastel and is easily removed when all colours are applied.
Additional brown and green is applied mostly around the river edges and to help the river look a bit murky in places. Finally white dashes are applied (see next photo) 
The final result with the white dashes added to make it look like a flowing river.
The game is now setup to play scenario 12 (an unfortunate event) from One Hour Wargames on a 4x4 foot tabletop.

All ready for action


Monday 11 November 2019

ECW Campaign - Battle of Oakham Hill

The opening battle of the 1646 campaign year has Royalists forces marching on the East Midland region which is currently under control of Parliament. The Parliamentarian cause is under pressure with their forces only controlling a few south eastern regions.

The forces clashed near Oakham Hall. The Parliamentarian commanded has a smaller force and took up a defensive position on Oakham hill keeping his units behind the stream. The stream is crossable, but will be treated as a obstacle and cover in a melee situation for defenders. The Royalist commander drew up his forces with cavalry on the left flank and artillery on the right flank.

Tabletop setup and unit deployment
Map of forces and their opening positions
The opening moves in the battle had Royalists push their infantry forward and in the centre and right wing with their artillery in support. In response Parliament split their cavalry to support both bridges.

As the Royalist centre pushed forward Parliament crossed the bridge and engaged with both infantry and cavalry. This thrust across the stream caught the Royalist advance off guard and a unit was diverted from the centre to counter the threat. The treat was eventually eliminated, but not before the loss of units, including artillery.

While the centre attack having had a unit diverted was unable to dislodge Parliament's infantry positioned on the hill. They soon deciding to retire as losses mounted.

Royalist centre and right flank advance
Parliament units hold firm on the hill, while their unexpected trust across the bridge diverts units
A depleted Parliament cavalry unit successfully charges the artillery before being eliminated.
Having failed to take the hill the Royalist threw forward their dragoons and cavalry on the left flank. Parliament's dragoons after putting up a reasonable fight defending from the across the stream were soon routed by Royalist cavalry. The Parliamentarian commander used his reserve cavalry to bolster the flank as Royalist cavalry forded the stream.

In the centre the Royalist was trying to organise his units supported by dragoons to push forward as a diversion. However, he was having difficulties with command jealousy (which from a game perspective reduced his activation ability) and failed to organise any meaningful attack.

Royalist cavalry attack.
Parliament's dragoons defend the stream, but were soon routed. 
Parliament's reserve cavalry support the defence.
Elsewhere the royalist commander having failed to organise any diversionary attack in the centre, and with his cavalry having a hard time making any headway called off the attack.

Parliament successfully hold their line fo defence.
Battle movements
A solid Parliamentarian victory as they were able to hold their defensive line and effectively used their cavalry to plug any gaps that opened up. With this victory they hold on to the East Midland region.

Sunday 10 November 2019

Napoleonic game gives way to ECW game

This weekend I have been able to get some Napoleonic ensigns painted up to give the units a bit more interest. It seems like it has been a long time since I painted any figures. Anyway, for the ensigns I used some spare 17th Century Grenadier figures I had stashed away, converting them by cutting away the musket and adding a standard.
Converted Grenadiers
Now I am using two bases for infantry with my rules and the units certainly look better with an ensign out in front.
My Napoleonic units are a mixed bag of figures, all Spencer Smith, but not necessarily all Napoleonic. These for example are converted ACW figures.
I was going to add some mounted officers and convert their hats, but I soon found a number of these plastic models had become brittle. Always frustrating when this happens. So no officers at this time.

Always unfortunate when some figures are brittle.
I will be trying to add a few officers and ensigns to the cavalry next. These figures have no purpose from a rules perspective and are just there to look good. My desire to add these figures was after seeing the photographs from "Charge!" where there are lots of mounted and foot officers along with drummers and ensigns seen with the units.

My full collection of Spencer Smiths
My Spencer Smith Napoleonic collection is loosely based on the 3rd Coalition. It is about the right size for my 6 by 4 foot tabletop with both sides having the following units: 7 infantry (of 2 bases), 3 light infantry, 3 artillery, and 3 cavalry (of 2 bases). Not too big... Not too small... Just right!

The Napoleonic armies were finally packed away and the tabletop setup for the next English Civil War game. Huzzah!
ECW game setup
Game underway
All being well I will finish the ECW game tonight and post the game report during the week.

Wednesday 6 November 2019

Messing around with OHW Napoleonic rules

The next English Civil War campaign game did not make it onto the tabletop this weekend. It was meant to, but I was happily messing around with some Napoleonic rule modifications the One Hour Wargame Horse and Musket rules. This included play testing the rules using the scenario Action at Blast-off Bridge from CHARGE!

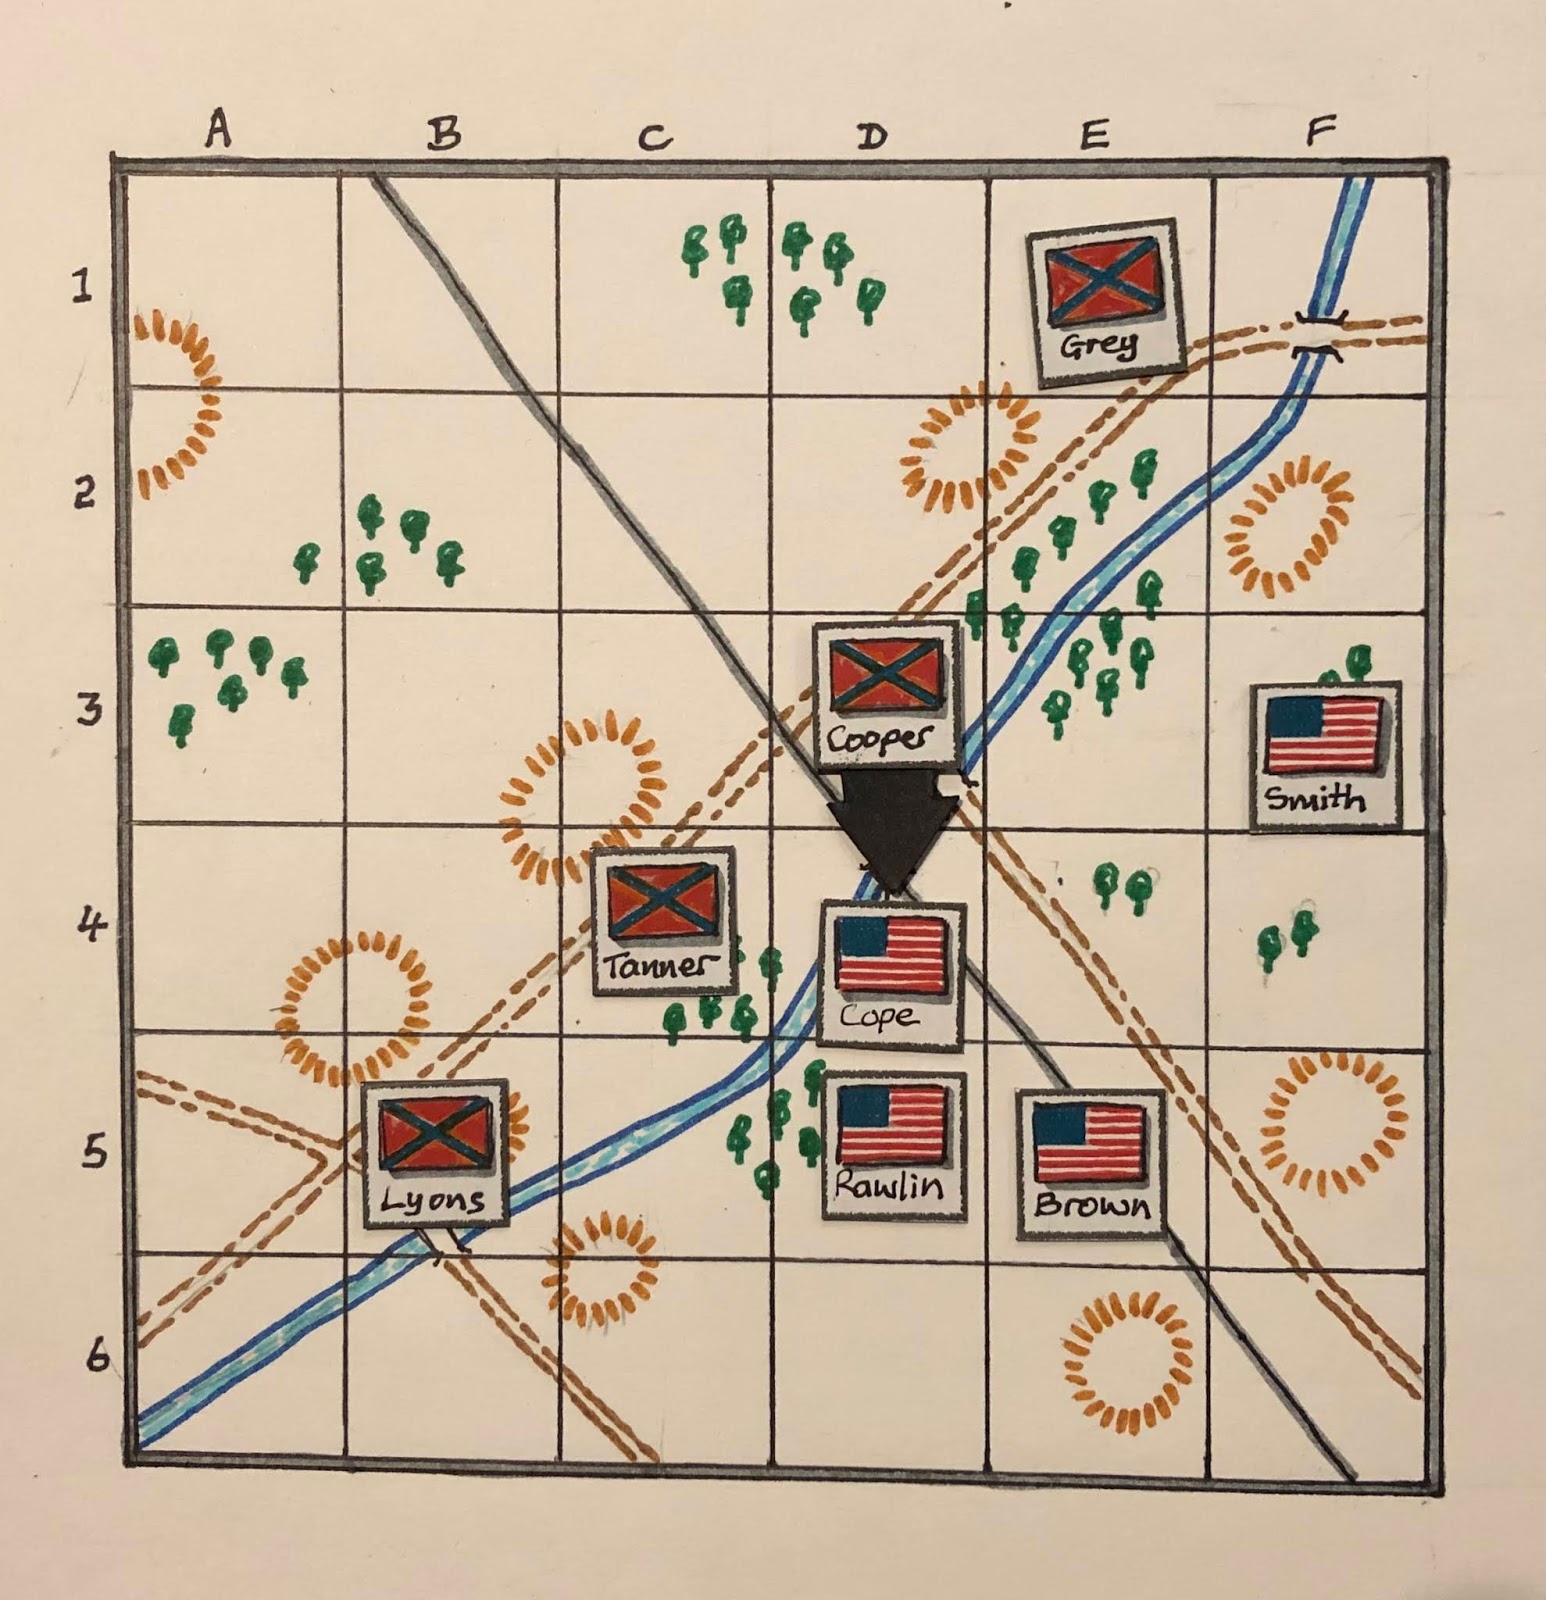
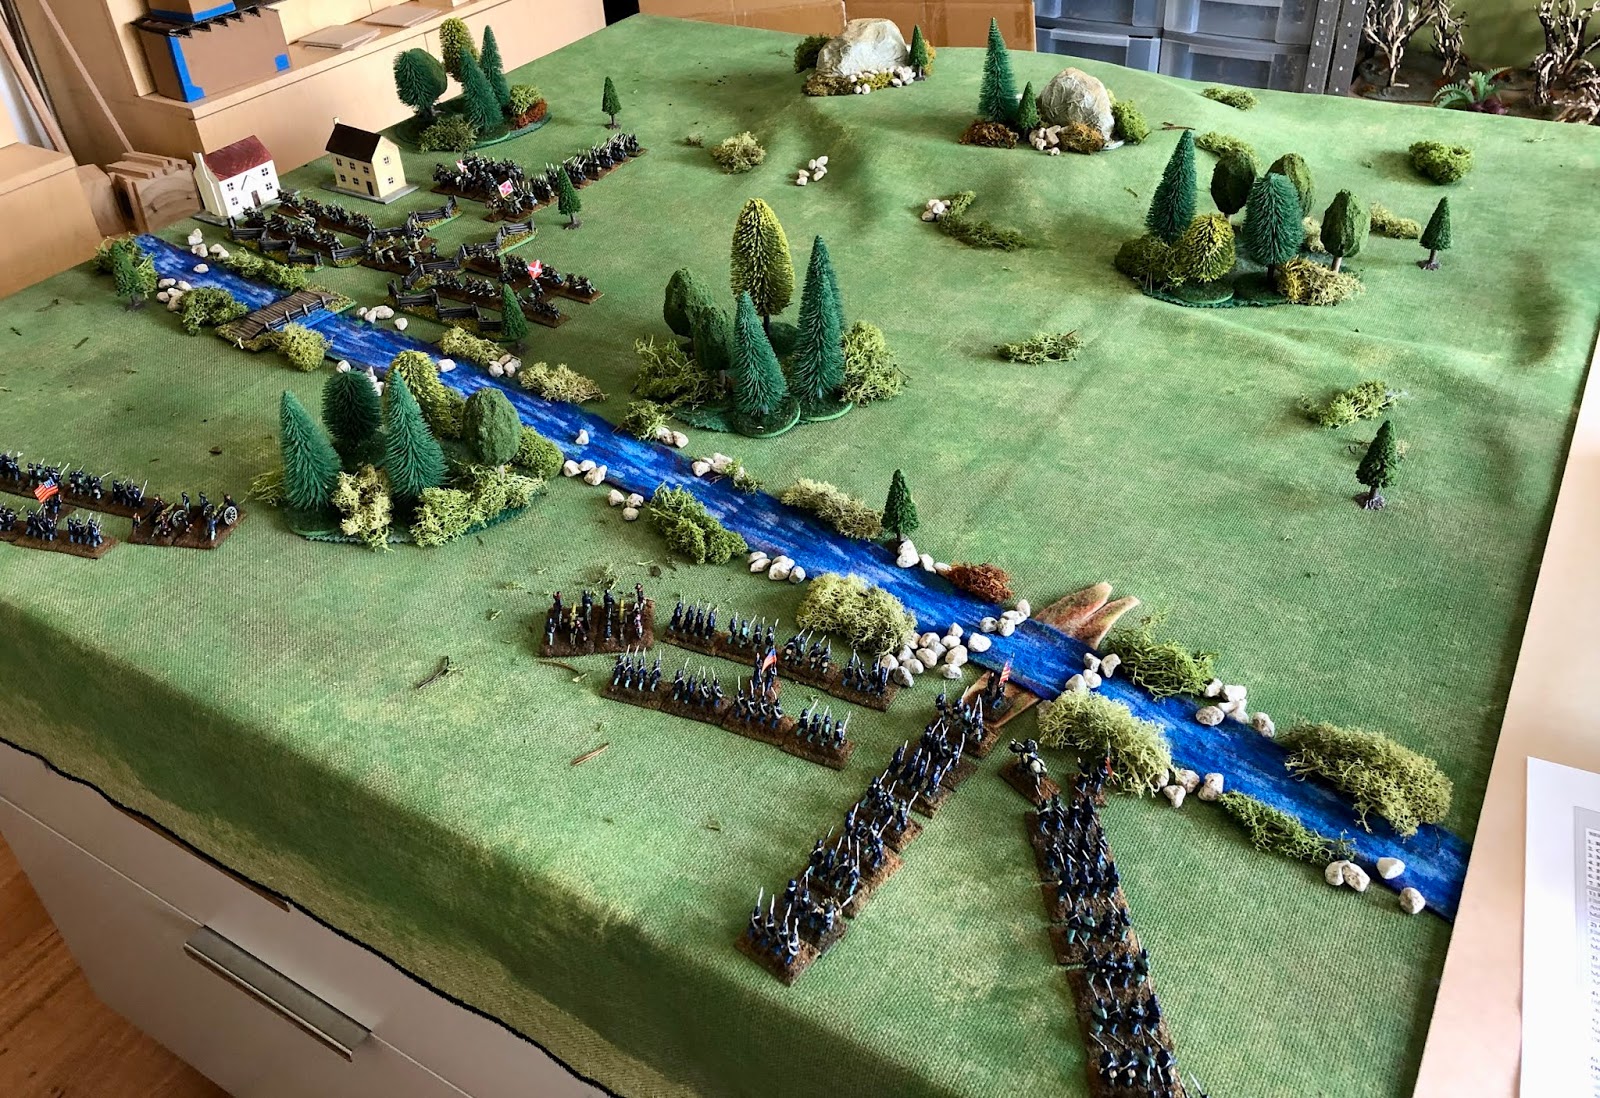
A game using the scenario Action at Blast-off Bridge
Some of the variations to Neil Thomas's OHW rule set include:

  • D3 dice (1,1,2,2,3,3) are used to provide only three combat values: below average, average, or above average.
  • When in cover the number of hits a unit can take before elimination are increased, rather than reducing the effectiveness of shooting. Hopefully forcing a commander to commit units to holding a position or pullout early.
  • A reduction in movement for infantry units after losing one base, which is trying to inhibit the movement of exhausted units and hopefully encouraging the use of reserves.
  • Combat for cavalry charges is simultaneous with the defending unit being able to shoot or  counter charge if cavalry.
  • Dicing for random battle events to create “friction” during the game. Inspired by the solo gaming chapter of the OHW book.

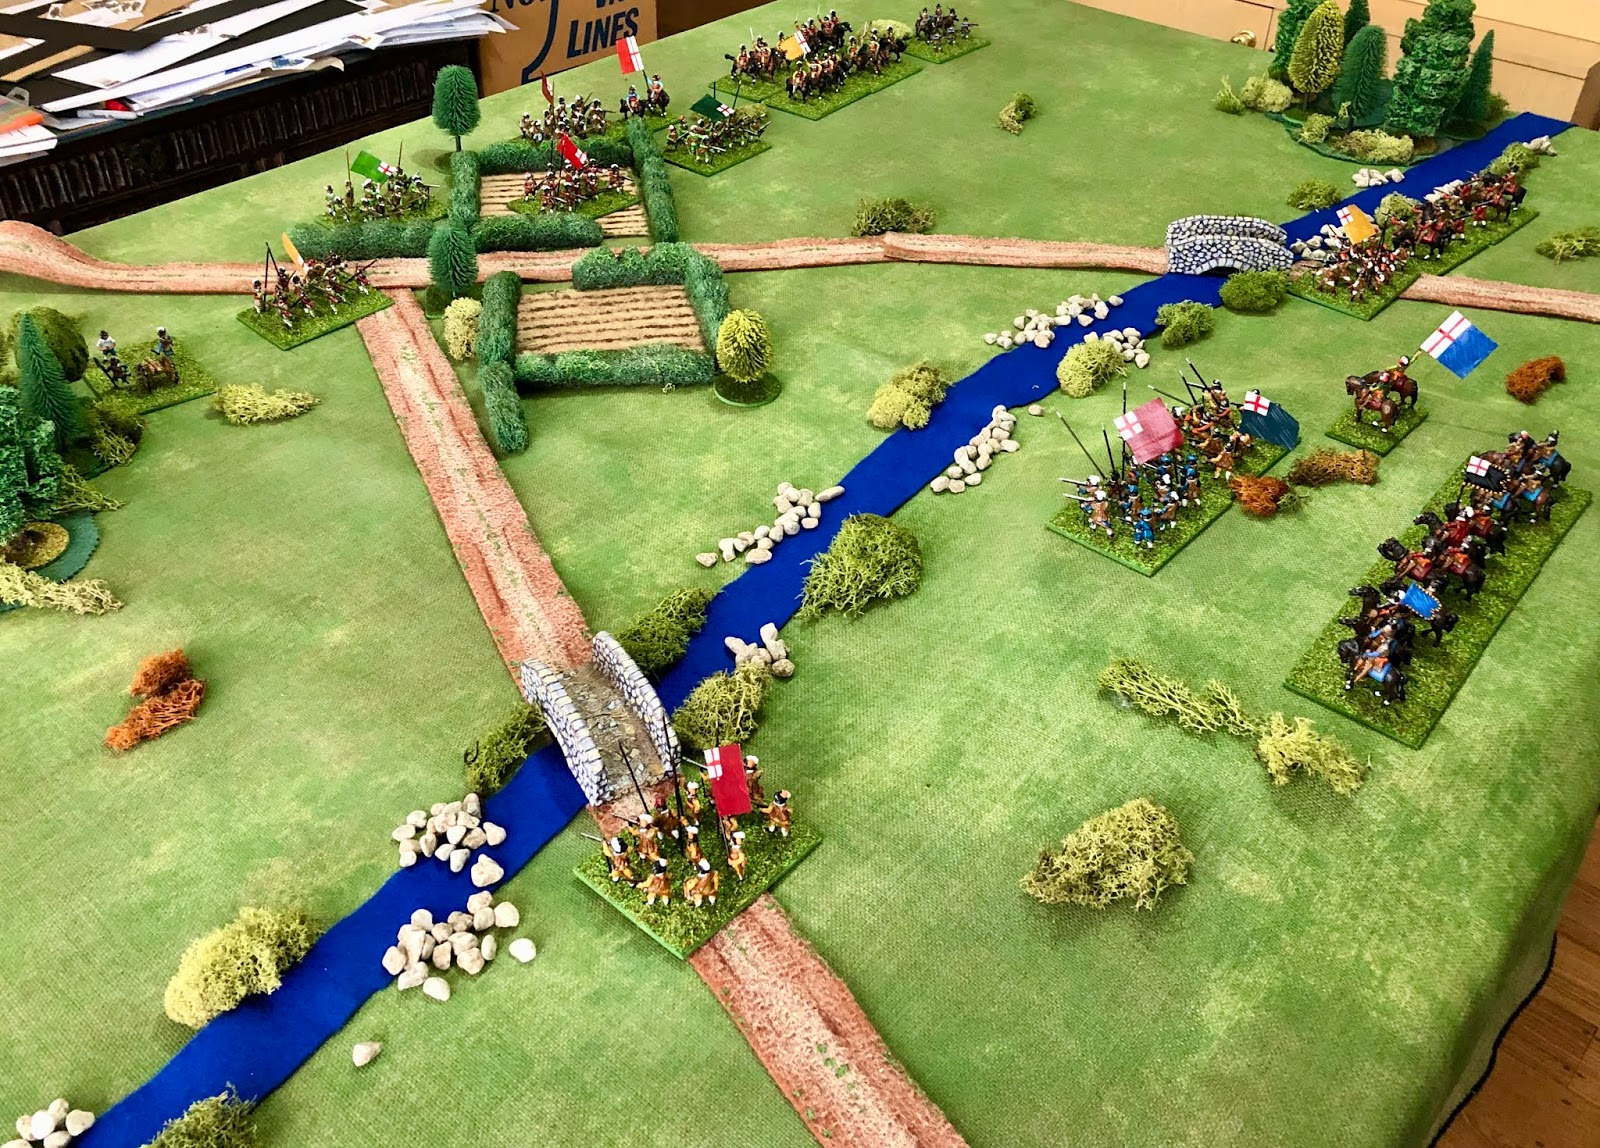
A close up of the shiny Spencer Smiths

Units

The game has the following units:

Infantry: Close formed with 2 bases
Skirmishers: Light infantry with 1 base
Cavalry: 2 bases
Artillery: 1 Base
Commander: 1 Base

Some units have 2 bases which are placed one behind each other when deployed.

Unit Resolve

A base is removed after taking 4 hits. If the unit is in cover, then remove after 6 hits.

Note - shooting is not effected by cover. Instead a unit’s resolve is increased. If a unit leaves cover the hits are applied immediately which may mean a unit is eliminated.

Optional rule - veteran units have a resolve of 5(7) hits and levy units 3(5) hits. The numbers in brackets are used when in cover.

Sequence of Play

Players take turns activate all or some of their units during their turn. During a turn a player follows the steps below:

  1. Battle events
  2. Movement
  3. Shooting
  4. Charges
  5. Eliminating units

Battle Events

Battle events are unexpected opportunities or challenges a commander faces during the game. Each turn roll a D6 and compare the result with the events below:

  1. Confusion - no units can move or charge. Units are only allowed to shoot or turn.
  2. Initiative - a unit within 12” of commander can make two actions (move twice, move and shoot, shoot twice, or move and charge)
  3. Ammunition Shortage - artillery cannot shoot
  4. Rally - Reduce hits by D3 hits for one base within 12” of commander
  5. Demoralisation - one infantry or cavalry unit which has lost a base must retire a full move this turn.
  6. Reserves - bring on a reserve unit. If no reserves left, then no event takes place.

Battle events last for the duration of a player’s turn.

Movement

Units may move up to the distances listed below during their turn.

Artillery and Infantry (1 base): 6”
Infantry (2 bases) and skirmishers: 9”
Cavalry and Commanders: 12”

Turning: Units may pivot on their central point at the start and/or end.

Woods - Only skirmishers can enter.
Towns - only Infantry & Skirmishers may end a move in a town.
Marsh/Lake - impassable.
Rivers - Can be only crossed via bridges & fords. It takes a full move to cross.
Streams - cannot be crossed by artillery. All other units take a full move to cross.
Difficult terrain - only Infantry & Skirmishers can enter.
Hills - all units can move onto hills.

Interpenetration: only Skirmishers can pass through other units and vice-versa.

Shooting

Units that have moved cannot shoot, and cavalry cannot shoot. The procedure for shooting is as follows:

Check field of fire - units can only shoot at a single unit within 45 degree of their frontal facing side. Units in towns have a 360 degree field of fire.

Measure the range - infantry and skirmishers have a range of 6” and artillery 24”.

Assess hits - units roll a D3 dice when shooting with the following adjustments:

Infantry 0” to 6” roll a D3
Artillery (canister) 0” to 6” range roll a D3
Artillery 6” to 24” range roll D3-1
Skirmisher 0” to 6” roll a D3-1

Artillery cannot fire on other artillery units unless positioned on a hill.

All units deployed in towns always shoot D3-1.

Cavalry Charges

Only cavalry units may charge into combat with the following restrictions:

  • Can pivot up to 45 degrees before charging.
  • Can only attack a single unit.
  • Cannot charge infantry formed in a square or any form of cover.

Combat is simultaneous with the defending unit shooting providing they are allowed, or if cavalry counter charging forward 3”. Cavalry units roll D3 dice with the following adjustments:

  • Minus 1 from the score if the target is cavalry or is uphill.
  • Add 1 if the attacking cavalry unit has two bases.

If cavalry are attacking the flank or rear of a unit, or attacking a skirmish unit. Then the number of hits are doubled.

After the hits are applied. If the defending unit is not eliminated, then cavalry retire 6”.

Infantry Square

Infantry with 2 bases may form square. Cavalry cannot charge infantry in squares.

Artillery

Artillery deployed within 1” of infantry cannot be charged by cavalry, but can be shot at.

Artillery units cannot shoot at other artillery units.

Reserves

Reserve units are lined up in the order they will arrive. They are placed on the table top from the players base edge whenever a player rolls a 6 on battle event list.

As a “rule of thumb” between a third to half of a player’s force should be in reserve. When playing scenarios from OHW, I have added one artillery, infantry and cavalry unit as reserves to those already on the tabletop.

Having looked at the old photos in CHARGE! I now really want to increase the number of officers and ensigns in Napoleonic forces. Not for any wargaming reason, but just for the look.


Saturday 2 November 2019

Preparing for the final ECW campaign year

My English Civil War campaign has now progressed into its final year. Starting the year 1646 Royalist forces are in a very strong position controlling 10 regions, while Parliament forces control 4 regions. It is technically possible for Parliament to win from this position should there be a battle each month and they win them all. However, this seems unlikely. So my plan is to continue with the battles until it is technically impossible for the Royalist cause to lose. Then move from having a battle to playing a siege game instead, and continue until the 1646 campaign year runs out. Then the campaign will be over.

Campaign map for 1646 showing the initial move by Royalist forces
To determine which side begins the campaign year both sides roll a D6 dice and add their controlled regions. With a lead of 6 regions Royalist forces were always going to be the first to march. They chose to begin where they left off in 1645 and marched again on the East Midland region.

The campaign cards were drawn and they certainly benefit Parliament. Who continue with the excise tax to fund their armies and their opposition's command structure has some problems which will hinder their activation during the game.

Campaign cards for the game. Parliament's card will benefit them throughout 1646.
The first battle of 1646 will take place near Oakham Hall. The orders of battle are:

Royalist Forces

  • 4 Foot units
  • 4 Horse units
  • 1 Dragoon unit
  • 1 Gun
  • 1 Elite Pike unit
Parliamentarian Forces
  • 4 Foot units
  • 3 Horse units
  • 2 Dragoon units
Terrain cards were drawn for the game. Neither side wanted to swap or rotate the cards and Parliament will defend the edge with the hill and will also benefit with a stream running across the board.

Terrain cards
I cannot show the tabletop yet, as I have to finish the Napoleonic game currently occupying the tabletop.

Currently occupying the tabletop