Wednesday 31 May 2023

An Ancient Campaign - Part 5

This game report is of the second campaign battle from the hypothetical invasion of Luminaria. The game setup is based upon scenario 12 - An unfortunate oversight - from One-Hour Wargames. The rules used are also from the book with modifications for Gaul warbands and elephants. I do use event cards with the games to create opportunities and create friction (disappointment) during the game.

The Game Report…

Witnessing the Carthaginian army cunningly bypassing the city of Cassiopeia and effortlessly crossing the river through an unguarded ford, the Roman commander, Marcus, swiftly recognised the gravity of the situation. With a surge of urgency, he rallied his troops, spurring them onward towards a significant hill to defend against the flanking move.

Roman forces react to the Carthaginian's advance towards the hilltop. 

A view from the Roman position around Cassiopeia.

Seeing the importance of the hill, Mago, the Carthaginian commander, hurriedly ordered his cavalry forward to secure the hilltop. They were closely followed by the imposing presence of the war elephants. Simultaneously, Gaul warbands move through the woods and along the hillside, embarking on a flanking manoeuvre. Following behind, the heavy infantry advanced in formation, marching steadily behind their allies.

The battle is well underway as Carthaginian heavy infantry cross the river.

Gaul warbands can be seen moving through the woods in an attempt to flank Roman units.

Roman units react to the appearance of the Gauls.

Upon discovering the hill to be occupied, the Roman heavy infantry surged forward, ascending its slopes to confront the Carthaginian cavalry. By now battle was occurring in various sectors, but the hill remained the focal point. The Roman infantry made notable progress against the mounted enemy, yet their advances were hindered by the supporting elephants.

Roman heavy infantry having defeated the cavalry now prepare to face the elephants.
The game is still in the balance with only a few turns remaining.

Despite managing to establish a foothold on the hilltop, the Romans were ultimately repelled by the arrival of the Carthaginian heavy infantry. The struggle for control of the hill unfolded with alternating fortunes, but in the end the Carthaginian’s held the hilltop securing them a victory on this day.

Victory to the Carthaginian commander, Mago, and his army which take control and hold the hilltop.

As mentioned in earlier posts regarding this campaign, I have been using ChatGPT, an online AI, to help with the narrative in these posts. Some readers have asked in the comments about the process. Here are the steps I take:

  1. I quickly type my notes
  2. I copy and input the notes into ChatGPT with the instructions to reword in a set number of words.
  3. I finally copy and modify ChatGPT’s response to suit my needs.

Input to ChatGPT and its response.

The screenshot above is a bit small to read, so below is the example of my notes, ChatGPT’s response, and the my final modifications.

Tuesday 30 May 2023

An Ancient Campaign - Part 4

Turn 2 of the campaign sees the Carthaginian army at Mariposa. They choose the coastal road and roll a 5 landing on the “River Unguarded” square allowing them to move an additional 2 squares and landing on Cassiopaea. The Roman battle readiness token moves up 1 for each campaign turn. As Carthaginian forces have landed on a city square a battle will now be fought.

At the completion of turn 1.

At the end of turn 2.

Note - The objective of this campaign is to engage in 4 to 5 games, culminating in a final decisive battle. In this final battle, victory for either army will secure their overall success. Carthage gains advantages for this decisive battle by winning the lead up battles, so the successful defence of Mariposa by Roman forces prevented Carthage from gaining an advantage. While each campaign turn will enhance the battle readiness of the Roman army for the ultimate showdown. For further information on the campaign rules, please refer to the previous posts.

Picking the scenario

Looking the the situation I have chosen from the One-Hour Wargames book scenario 12 - An unfortunate oversight. As it seems to fit the campaign situation quite well.

Here is the campaign narrative….

After skillfully stalling the Carthaginian vanguard's advance at Mariposa, the Roman commander, Marcus, made the strategic decision to withdraw his forces to Cassiopeia. 

The Carthaginian forces having fully disembarked from their fleet, including some elephants, now faced a critical decision on their path to conquest. Mago Thalassar, their seasoned commander, contemplated two routes. The coastal road, while quicker, posed a risk due to its intersecting rivers, potentially impeding his progress. On the other hand, the inland approach to Aurelia offered a safer alternative, albeit at the cost of additional time.

Mago weighed the options, considering the potential rewards and dangers that lay ahead. Ultimately, he made a daring choice, opting for the coastal road. With his gaze fixed on victory, he led his army down the coast, aware of the gamble he was taking.

Mago determined to make up for lost time, had pushed his troops relentlessly along the coastal route. They arrived at Cassiopeia, catching the Roman defences by surprise as the Carthaginian army descended upon them using an unguarded ford.

Setting up the game

The game is played on a 6 by 4 foot tabletop. The objective for both armies are to control the hill.


Orders of battle…

Rome:

  • 5 Heavy Infantry units
  • 3 Light Infantry units
  • 1 Catapult unit
All units must be positioned within 12 inches of the city of Cassiopeia.

Carthage:

  • 3 Heavy Infantry units
  • 2 Cavalry units
  • 2 Gaul War-band units
  • 1 Elephant unit
  • 1 Light Infantry unit
All forces must start on the opposite side of the river.

The next post will be the battle report.

Monday 29 May 2023

An Ancient Mini Campaign - Part 3

This is part 3 of an Ancient campaign covering the invasion of Luminaria by Carthaginian forces and covers the first battle of the campaign. Luminaria is a hypothetical client state of Rome. 

Note - To help speed up my posts I am using the free online AI tool ChatGPT to help create the battle narratives from my brief descriptions. The process is I quickly write up my notes, copy them into ChatGPT asking it to reword as a narrative. I then get back a narrative which I do need to modify, but does provide a good framework which speeds up the writing. See what you think…

After a delay for reconnaissance the Carthaginian forces advance.

See the previous post for the setup of this game and the orders of battle.

Battle Narrative

Commander Marcus, leading the Roman forces, made a tactical decision to divide his heavy infantry, stationing them between the defense of Mariposa and the adjacent hill that provided a commanding view of the city. Positioned between the two, the light infantry stood ready to advance through the fields and orchards.

Hanno the Carthaginian commander, after a brief pause for reconnaissance, observed the advance of his forces. The primary assault would be led by the heavy infantry against the city, while the Gaul war-bands were tasked with clearing the challenging terrain of the fields and orchards.

The attack by Gauls in the centre is well underway as the Carthaginian heavy infantry slowly advance, coming under fire from catapults in the city. 

The assault on Mariposa is well underway.

The Roman light infantry fiercely defended their central position, delaying the advancing Gauls, while the defenders of Mariposa soon found themselves under intense pressure, prompting Marcus to deploy supporting troops to counter the relentless assaults on the city.

The Gauls are finally making good headway in the fields and orchards, pushing back the Roman light infantry.

Supporting troops arrive in an attempt to divert the attentions of the attackers.

Despite their valiant efforts, the Roman light infantry eventually succumbed to the relentless onslaught of the Gauls. The fields and orchards were cleared, and the victorious Gauls regrouped, then joined the assault on Mariposa.

With darkness descending upon the battlefield, the Roman forces managed to hold onto Mariposa by a narrowest of margins. Marcus had executed a commendable defense, successfully delaying the invaders. However, with additional Carthaginian reinforcements en route, he made the wise decision to withdraw his forces and regroup.

The fields and orchards are cleared.

The assault on Mariposa almost succeeds only to be thwarted on the final turn.

The next post will return to the campaign map.

The next campaign turn to be played.


Sunday 28 May 2023

An Ancient Mini Campaign - Part 2

After completing the campaign map, I quickly set it up and rolled the dice. I rolled a one, so the Carthaginian advance one square towards the city of Mariposa. Once a Carthaginian token reaches or passed through a city or town, the campaign transitions to the tabletop for a battle.

The campaign map as a game board. All the tokens are setup at the start and on the tables (all identified with red circles)

A 1 is rolled and the Carthaginian token moves one square to the city of Mariposa. I also moved the Roman token on their Battle Readiness table up 1 rung. This happens with each roll of the dice (see the rules in the previous post)

Looking at the map, I searched through the One-Hour Wargaming scenarios for a suitable option. Scenario 14 - Static Defence - appeared to be fitting. The objective has the defending Roman forces attempting to hold and occupy both the town and strategic hill nearby. Instead of using woods in the central area, as indicated in the scenario, I chose a terrain feature of fields and orchards, which will be treated as difficult terrain where light troops would have their melee hits reduced by half. The Carthaginian force would enter from the south.

The Romans deployed and waiting for the invading Carthaginians to arrive.

The orders of battle…

Rome:

  • 5 Heavy Infantry
  • 2 Light Infantry
  • 1 Cavalry
  • 1 Catapult

Carthage:

  • 3 Heavy Infantry
  • 2 Gaul War-bands
  • 2 Light Infantry
  • 2 Cavalry

I will be using One-Hour Wargames Ancient rules for this game with modifications for the war-bands and catapults.

The start of the game - more on that in the next post.

The game report will be in the next post, but for now I will leave you with the campaign narrative so far. It has been created by first listing out roughly what is happening and the commander names, then using the ChatGPT online AI tool, where I asked it to create a narrative in less than 100 words based on my brief notes, one for the Roman commander and another block for the Carthaginian commander. I did then have to do a little bit of tailoring to what it created. Anyway, here is the campaign narrative from the different sides.

Campaign Narrative - Turn 1

Mago Thalassar, a seasoned Carthaginian commander, set his sights on landing near the city of Cassiopeia but encountered treacherous coastlines. Sailing further along Luminaria’s coast, he steered his fleet towards Mariposa, where the shores offered safe haven for his fleet and army. To assess Mariposa's defences, Mago dispatched his trusted companion Hanno Magid and a select force. With determination and a keen eye, Hanno ventured forth, probing the city's fortifications.

News of a looming invasion reached the ears of Marcus Aemilius Tullius, a resolute Roman commander. With urgency, he swiftly assembled his troops stationed in the city of Mariposa, renowned for its sprawling fields and bountiful harvests. Though Mariposa lacked imposing city walls, Marcus tasked his soldiers with fortification improvements, determined to bolster their defenses. Meanwhile, he strategically positioned the remaining forces atop a neighboring hill, granting them a commanding view over the city of Mariposa. With diligence and strategic foresight, Marcus prepared his troops for the imminent threat, ready to protect the cherished agricultural hub from any encroaching enemy.

Saturday 27 May 2023

An Ancient mini-campaign - Part 1

After completing a remote World War I Palestine game, I found myself in a rather lazy mood. So instead of tidying up the tabletop, I decided to have a quick Punic War game using my plastic, mainly HAT, armies. After playing a couple of enjoyable solo games during the week I decided a short campaign consisting of 4-6 games ending in a decisive set piece battle would be fun. The question was - how should I approach this?

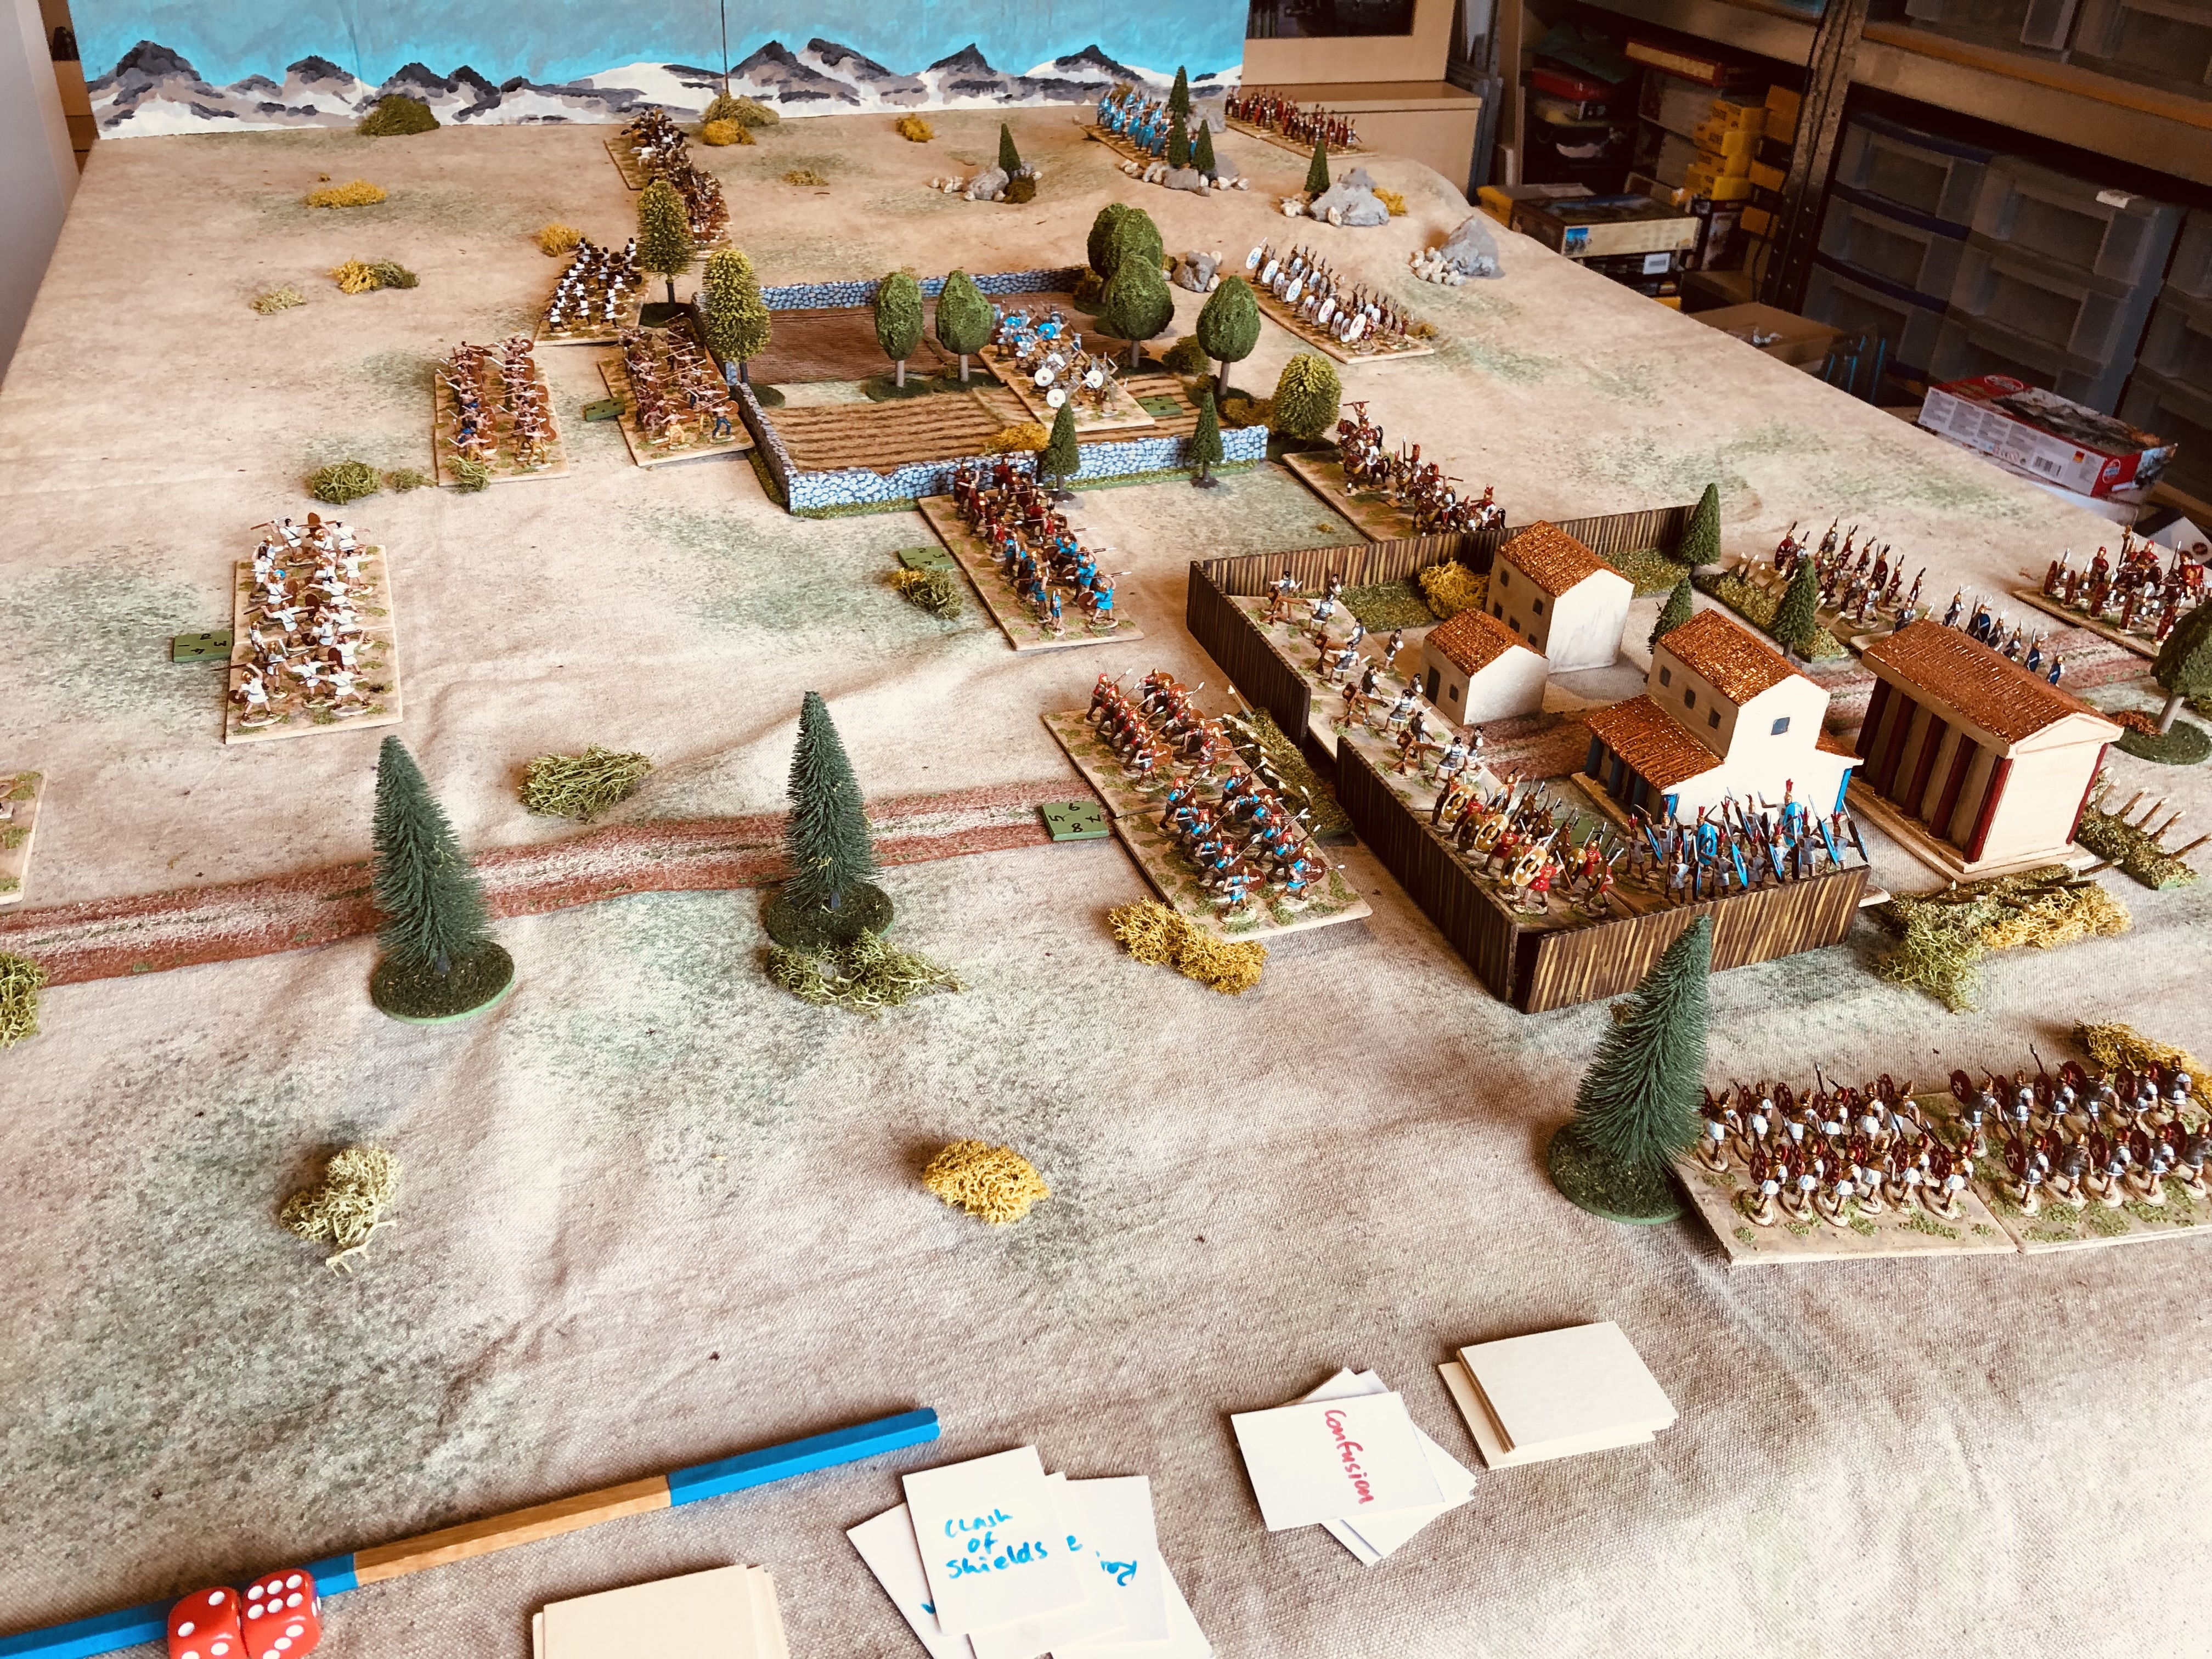
A Punic War themed game about to start.

The idea of leveraging game approaches used in family games has always remained with me after reading a post on Wargaming Miscellany back in 2019. In the post Bob Cordery proposed the idea of drawing inspiration from children's games for campaigns (link here). Previously, I have adapted the Snakes and Ladders game for a Jacobite 1745 campaign (see here). However, this time, I wanted to take a slightly different approach – something that would allow me to create a map board with narrative prompts on the map, thereby eliminating the need to use chance cards or dice rolls on chance tables.

I decided to look at the “race to the finish” style game format, which features a game board designed as a track with a starting point and a finish line. Traditionally, players would roll the dice, moving their tokens forward based on the result. However, in this case, there would only be one player – me.

An example of a “race to the finish” game

The remainder of this post is about how the mini campaign is set up. 

  • Background and the reasons for conflict
  • Creating a map board
  • Writhe rules

There will be following posts on how the campaign progresses.

1) Background and Reasons for a Conflict

The first step was to create a campaign background along with reasons for the conflict. To help I used the ChatGPT AI tool and asked the question “Create a background and reasons for a Roman army to be facing a Carthaginian army.”

To this question ChatGPT provided 5 reasons and I opted for “Alliance Disputes” where the complex network of alliances and client states in the Mediterranean often sparked conflicts between Rome and Carthage. The campaign would have a Roman client state being attacked by Carthaginian forces, prompting Rome to intervene militarily to protect its interests.

So with my reason decided, the next step was to decide upon a historical state or create a hypothetical client state. I opted for the latter and went to ChatGPT again and asked the question “Create a description of a hypothetical country on the Mediterranean coast in 200 BCE. Name at least 15 cities in this country.”

I am not sure why I asked for 15 cities, but it did provide a variety of descriptions for 15 cities from which to choose from when creating a map. All very helpful and time saving for me.

2) Creating the Campaign Map

To begin with I roughly sketched out how I saw the map, then I played a test game using opposing dice rolls to replace the tabletop battles. 

The sketched out map being used for a play test. The paper is art paper for water colours and is very think, needing to be weighted down.

Following a reasonably smooth play test, it was time to try something new and draw the map using water colour pencils. Water colour pencils are pencils with a pigment core that dissolves in water. They can be used like coloured pencils then activated by a wet brush. With the brush you can achieve washes, gradients, and textures. I also used a black pen for the text and outlining where it was required to sharpen the drawings (the buildings for example).

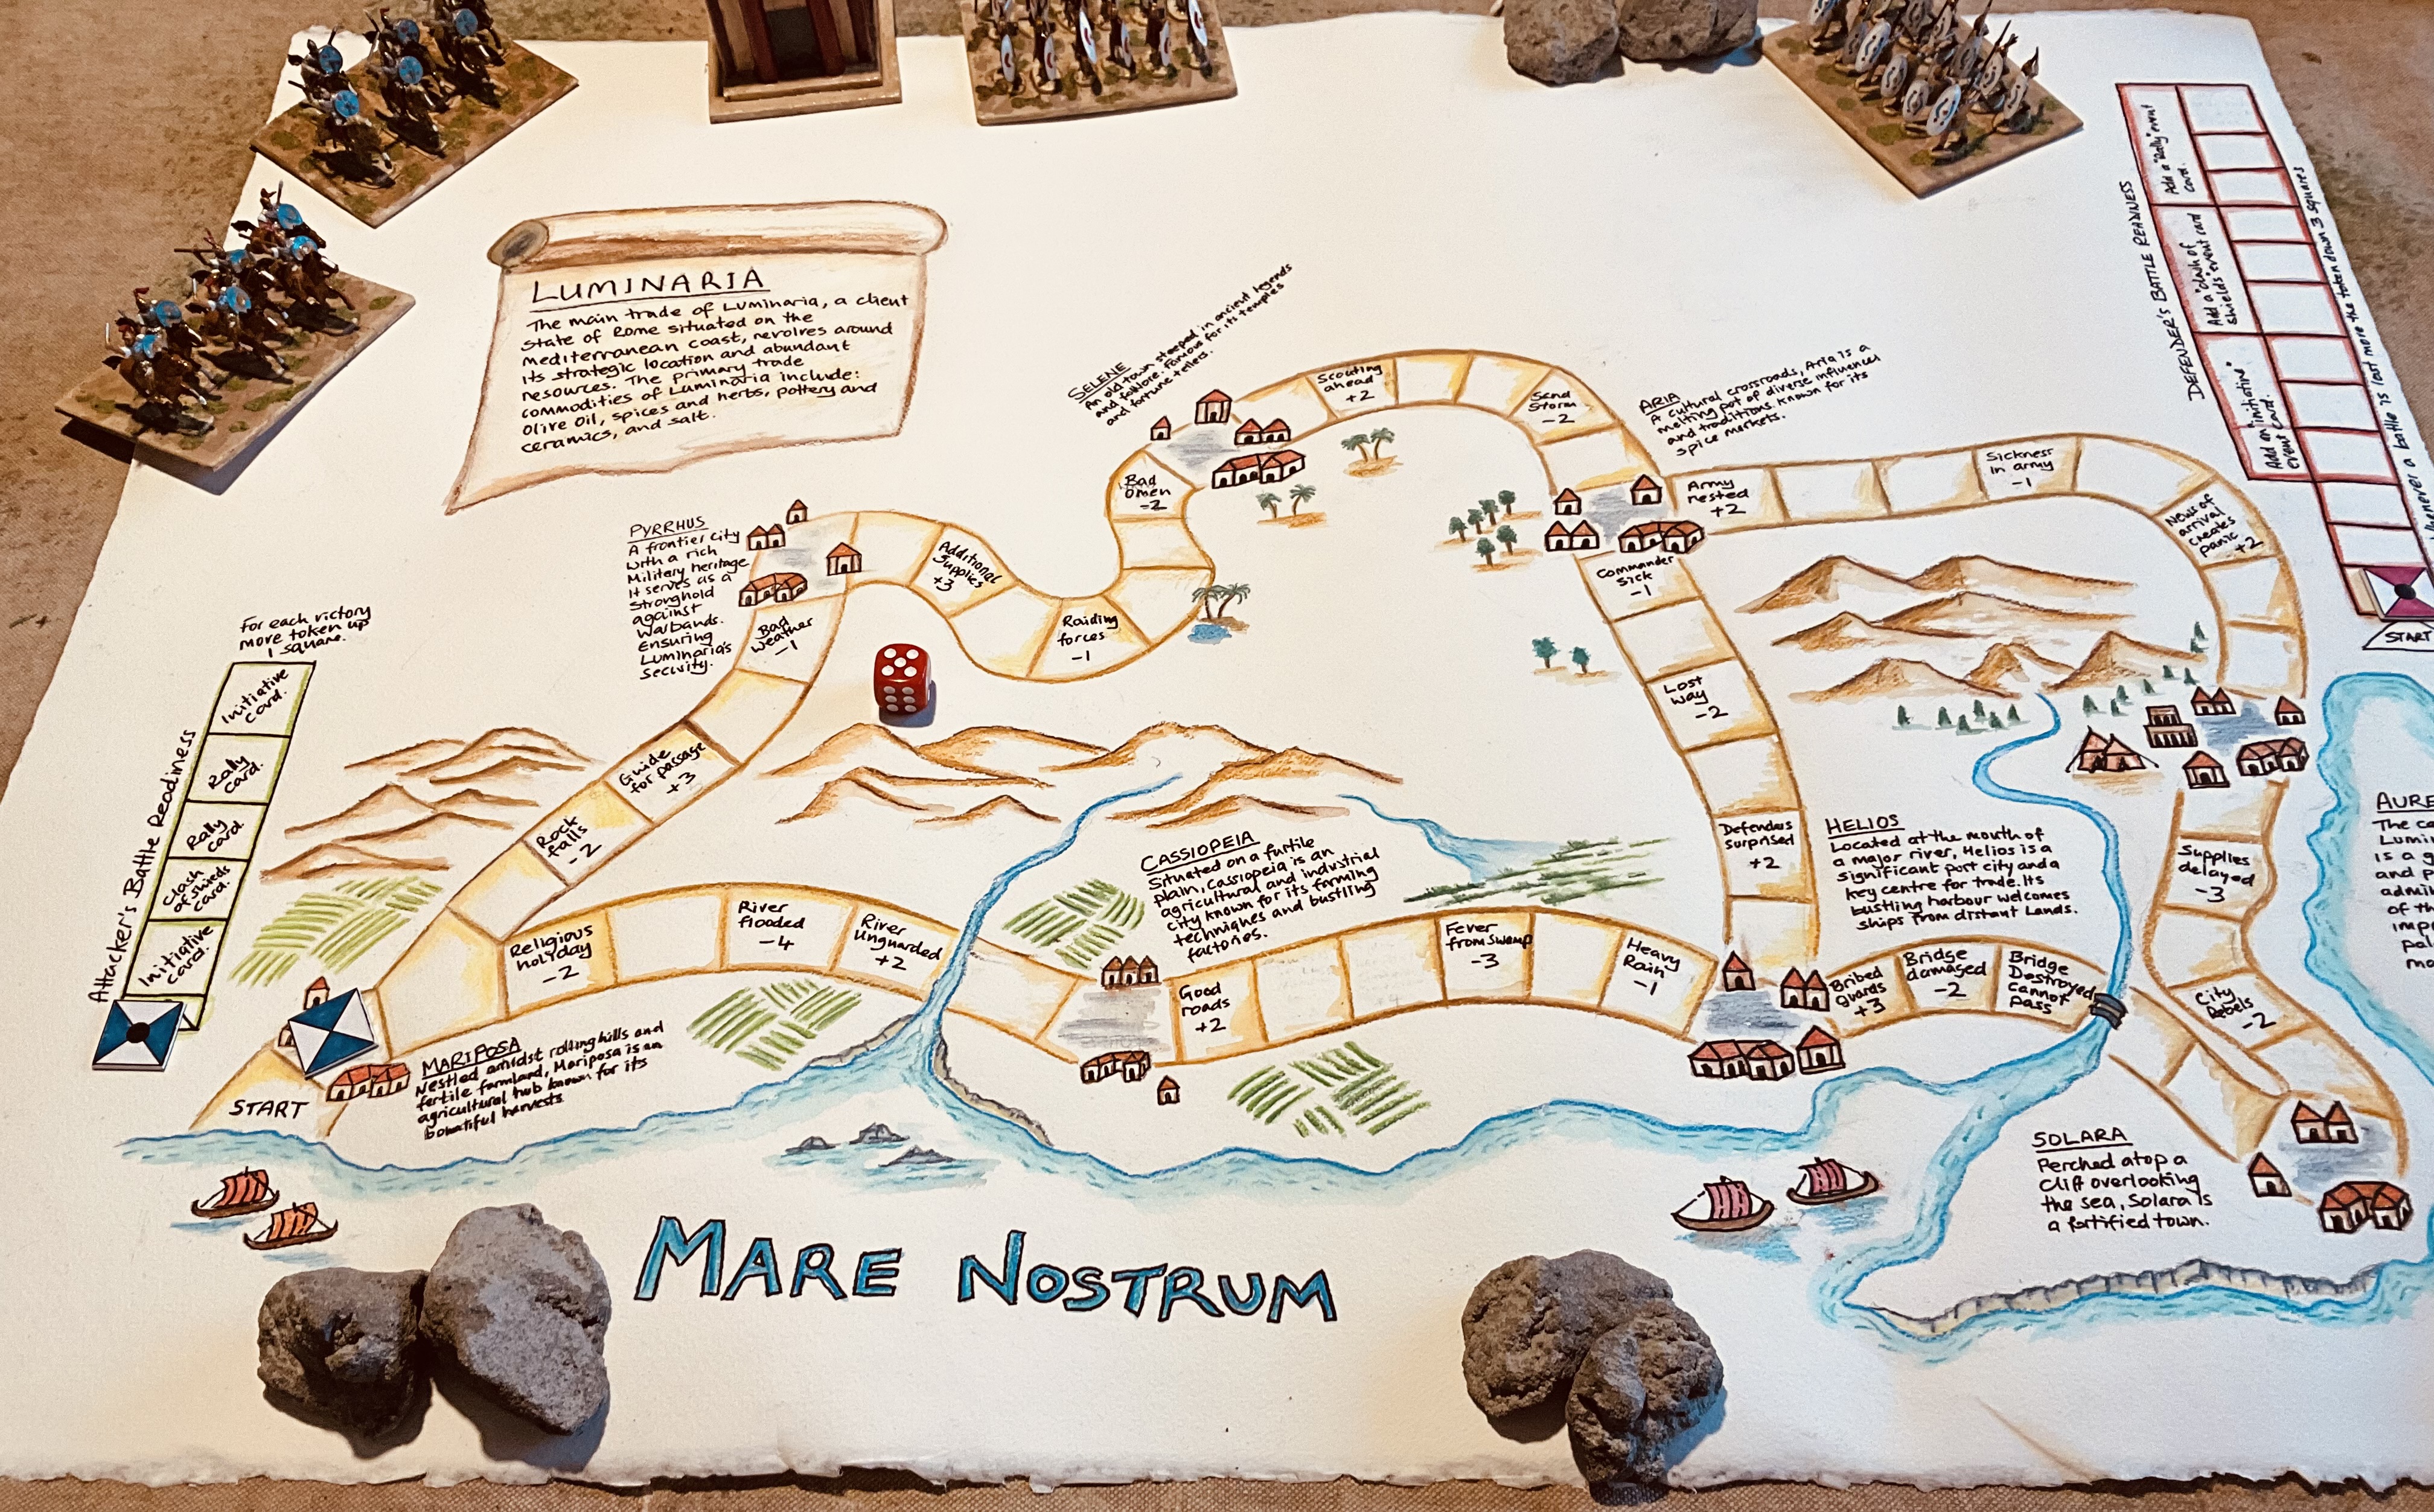
The map drawn using water colour pencils.

A closer look at the map. The narrative elements are written into the squares and beside the towns and cities.

Around the side of the map are a couple of tables which are used in the campaign to track the attackers and defender’s battle readiness. More on this in the rules and how these tables influence the decisive last battle fought on the tabletop.

Attacker’s battle readiness table.

Defender’s battle readiness table.

3) The Rules

Objective:
The goal of the game is to move the attacker's token from its starting position to the capital city of Aurelia and engage in a final tabletop battle.

Setup:
  • Place the attacker's token on the start square.
  • Set up other tokens on the battle readiness tables for both the attacker and defender.
Gameplay:
  1. The attacking player starts and rolls a dice (D6) on their turn. They move their token forward the number of squares indicated by the dice roll.
  2. After each roll, the defender moves their token up one square on their battle readiness table, which can impact the decisive tabletop battle once the city of Aurelia is reached.
  3. Certain squares on the game board offer advantages if the player finishes on them, allowing them to advance their token. Other squares are disadvantages, forcing the player to retreat their token.
  4. When the attacker passes through a town or city square, a tabletop battle takes place using a scenario from the book One-Hour Wargames.
  5. The tabletop battles are played out, and if the attacker wins, the defender moves their token down 3 squares on their battle readiness table and moves the attacker's token up 1 square on their battle readiness table.
  6. The attacker then rolls the dice and moves again, continuing the cycle.
  7. Once the attacking token reaches the capital city square, a final decisive tabletop battle occurs, where both players can utilise the advantages from their battle readiness tables.
Victory:
The game ends when the attacker engages in the final decisive tabletop battle in the capital city of Aurelia. The outcome of this battle will determine the winner of the game.

Note: 
  • The specific rules and mechanics of the tabletop battles and battle readiness tables are separate.
  • The last decisive tabletop battle will be a set piece scenario.

News of a Carthaginian landing has reached the local commander.

The next few posts will continue with the setup and playing of this mini campaign.

Sunday 21 May 2023

WW1 Railway Attack Scenario

After a brief break from remote gaming due to various non-wargaming engagements, Jon (of Palouse Wargaming Journal) and I returned with a WW1 Palestine game. In our recent sessions, Jon has achieved good success while commanding the Turkish forces. However, this time around, we decided to switch things up a bit, giving Jon the chance to command an Arab Rebellion attack on a train.

This photograph is not from the game. I just set it up for fun after the game.

I decided to revisit a scenario I had previously played, inspired by C.S. Grant's "Scenarios for Wargamers." The chosen scenario is number 23, titled "Railway Attack" (pages 58-59), which I have set in WW1 Palestine. In this scenario, the Arab Rebellion forces launch an assault on a Turkish train. To impede the train's progress, the Arabs have erected a barricade of rocks that the train cannot break through. The objective of the game is for the Arab Rebellion force to capture the train within 15 turns before Turkish cavalry arrives to investigate the delayed or missing train.

Scenario Map.

Some time ago, I created this map, and since I'm am now using a 6-inch gridded tabletop for my games, you will notice in the game photograph's that the tabletop is oriented in a slightly different North-East orientation. It's important to note that all rough terrain, buildings, and palm trees on the map serve as cover and hiding spots for the Arab forces during their setup.

The forces involved in the game are:

Turkish forces

  • 3 infantry units
  • 1 infantry unit with machine gun
  • 1 machine gun mounted on the train (which cannot disembark)
  • 1 artillery unit

Arab forces:

  • 2 infantry units
  • 1 infantry unit with machine gun
  • 2 cavalry units
  • 1 armoured car unit

The set up requires that all Arab units are in hidden out of sight behind hills or in cover when the train arrives. The train arrives from the north and must travel forward one square each turn until the Arabs reveal themselves, then it can stop and start, but it cannot reverse. Up to two units can be unloaded from the train each turn.

Units embarked on the train are treated as being in cover. The Turkish player can distribute any hits on the train to units still embarked. The machine gun at the front of the train is in cover and cannot disembark.

For the rules, we continued to use the WW1 Rules used throughout the WW1 Palestine campaign, which are a variation on OHW WW1 rules with activations added.


A tabletop setup with 6 inch grid. The rocks and vegetation are used for remote games as the subtle crosses on the game mat do not show up on the camera. Note - Over the last couple of WW1 games Jon and I have been playing using a square grid, so the above map had to be reworked to fit a grid.

The game report…

The train arrives and quickly comes under fire from Arab units positioned in cover on the hill. While the armoured car emerges from its hiding spot in the buildings.

The rocks blocking the track are spotted and the train stops to disembark two units as Arabs appear from their cover to begin their assault on the train.

The train continues up the track with the aim of disembarking more troops and putting some distance between itself and the Arab forces that have emerge from their cover. Meanwhile, those Turks already disembarked are taking some punishing fire from the Arabs.

The train comes to a halt at the barricade, and the situation appears bleak for the Turks. As the game’s host, I was relieved that I had chosen to play as the Turks, as it seemed like the game was effectively over for them, with an easy victory in sight for the Arabs.

The Arab forces start closing in on the now stationary train, which is now defended solely by a machine gun and an artillery piece. One noteworthy event during the turns was the breakdown of the armored car. In a few earlier games, my tanks suffered breakdowns due to rolling a 1, and this time it was Jon's turn to experience unfortunate luck as he rolled a 1.

During the last few turns, the Arab units encountered difficulties in activating and eliminating the remaining Turkish defenders. It was only on the final turn of the game that they managed to successfully capture the train.

This game was a thrilling contest that remained undecided until the very end. That the game went down to the wire was quite surprising considering that halfway through the game, an effortless victory seemed within reach for the Arabs. What turned the tide? Although the Arab units managed to eliminate the defending Turkish forces, they sustained hits that hindered their ability to activate effectively. This, in turn, obstructed the movement of fresher units, preventing them from engaging the remaining defending Turks. Congratulations to Jon for securing the victory, and overall, it turned out to be an incredibly enjoyable remote game.

You might be wondering how this game fits into the ongoing WW1 Palestine campaign I've been running. Well, it doesn't currently align with the campaign, but I'm considering incorporating it and offering some advantages to the Egyptian Expeditionary Force. This would give them a final chance to capture Damascus within the designated timeframe of their campaign objectives. (See the featured post for details of the campaign).


Saturday 20 May 2023

ACW game report

This week I've been busy testing morale rules in a few American Civil War (ACW) games and playing a remote WW1 Palestine game with Jon. In the next post, I'll share a report on the WW1 Arab rebellion attack on a train in that game.

Fog of war?

In one of my recent ACW test games, I tried out the “flank attack (2)” scenario from the One-Hour Wargames book. However, I added a twist by incorporating Grant's tile approach from Programmed Wargame Scenarios to create different tabletop layout variations. I little bit more information on this approach can be found in a previous post here.

The centre row has the original flank attack layout split into left flank, centre, and right flank. The top and bottom rows are possible variations.

The left flank, centre, and right flanks are determined using dice.

The final tabletop layout is decided for a 4 foot by 6 foot tabletop.

Using these tiles as a guide the tabletop is setup and the troops deployed using the following order of battle. Both sides begin the game with one reserve cavalry unit.

Union:

  • 3 x Infantry
  • 2 x Veteran Infantry
  • 1 x Artillery
  • Reserves - 1 x Cavalry

Confederate:

  • 4 x Infantry
  • 1 x Veteran Infantry
  • 1 x Artillery
  • Reserves - 1 x Cavalry
The tabletop all setup for a game.

A small portion of the Confederate force faces a larger Union force positioned on a hill.

The remaining Confederate force is positioned on the Union flank.

The game will consist of 15 turns, and the main objective is to gain control of the large hill that is currently occupied by the Union force. Both sides have their own deck of shuffled event cards, and each turn one card is revealed. These event cards can either provide advantages or pose challenges for a side. Among the cards in the deck is the Reserves card, which, when revealed, signals the arrival of the reserve cavalry.

Event cards are used in the game

Here is the battle report in pictures…

Confederate forces begin their advance on the flank and in the centre. Union forces react to the flank attack and look to counter in the Confederate in the centre by advancing.

On the flank Confederate forces press forward trying to take advantage their surprise arrival on the Union left flank.

In the centre Confederate forces retire, partially due to failed morale dice rolls and also discretion.

Union forces are under pressure on the flank as Confederate artillery support their flank attack.

Some Union units are forced to retire and attempt to regroup.

The Confederate attack is progressing well as Union forces are trying to reorganise a second line of defence.

The Union defence is struggling to hold.

The attacking Confederate units are starting to accumulate hits, increasing the likelihood of forced retirements. 

Confederate reserves arrive in the form of cavalry.

All Union forces have now retired to defend the hill.

Confederate attacking units are forced to retire before regrouping and entering the fray again. Union infantry are putting up a good defence.

With their flank attack losing its effectiveness, the Confederate centre begins to advance supported by their cavalry reserve which have arrived on the left flank.

All Confederate forces are pressing forward.

Union units are trying to reorganise and fill the gaps in their defensive line.

A much thinned down line is still holding on.

Things are looking pretty grim for the Union defenders with a few game turns remaining.

Units on both sides are depleted close to the end of the game, but the Confederates still have the greater number of units. 

The arrival of the Union in the penultimate turn allowed the Union to just hold on to the hill at the end of the game. 

The rules used in this game was testing out a variation  of the One-Hour Wargames American Civil War rules. The variation used D3 dice to replace D6 dice so hits are D3+1, D3, and D3-1 rather than D6+2, D6, and D6-2. Unit are eliminated after taking 9 or more hits. Additional morale rules are added so any unit that sustains hits during the shooting phase must undergo a morale test.

The procedure for the test is as follows: 

  • Roll D6 and double the score.
  • If the doubled score greater than the number of hits the unit has taken, it passes the morale test.
  • If the doubled score is less than or equal to the number of hits, the unit must retreat 12" directly away from the enemy. During this retreat, the unit can pass through friendly units and must end up facing away from the enemy.
  • Any unit forced off the tabletop is eliminated.

Any unit that has retreated during the opponent's shooting phase retains the ability to move or shoot during its own player's turn. However, retreating units always end up facing away from the enemy and will have to pivot and move to face the enemy again.