Showing posts with label WW1 Middle East. Show all posts

Thursday, 12 March 2026

Scratch made WW1 wagons and the next wargaming project

I have continued with the WW1 Middle East theme from my last post by making some very simple supply wagons for both the Turkish and British forces. I often end up with spare cavalry figures after painting units, as the HaT 1:72 scale figure boxes usually contain 16 figures while my cavalry units are made up of 12 figures. Rather than leaving the spare figures unused, I decided to put them to use as wagon teams.

The British wagons on the move.

Turkish wagons guarded by cavalry.

The wagons themselves are simple scratch-builds. They made from off-cuts of wood, with balsa-wood shaped to form the canopy. The wheels are made from washers and card glued together. Each wagon is drawn by one of the spare cavalry figures and a horse with the saddle removed. Like much of my WW1 armies, they are very basic models with any detail painted on so they look the part when viewed on the tabletop.

The almost completed wagon. The toothpick axles just have to be trimmed.

The wheels begin as washers glued to card. Once the glue is dry, they are cut out. This approach provides a nice round wheel with a good thickness.

A toothpick acts as the axle.

Any remaining wagon detail is painted on. I will often use a combination of a dark colour and lighter colour when painting details such as the wheel spokes.

Alongside the wagons I also completed a couple of howitzers crewed with some spare Indian figures that were converted and an officer. These will provide the British forces with some more artillery support. Again all the figures and models are HaT 1:72 scale (although the officers may be ESCI - not sure as the come from my spares box).

Indian crewed Howitzers

My next project arrived a couple of weeks ago. A large box with a selection of HaT 1/72 plastic figures for the Anglo-Zulu War. Prior to doing much with these kits, I have been waiting for a couple of second-hand books to arrive. This project was not planned, it was opportunistic, and came about when I saw Hannants.co.uk had a good number of boxes of HaT Zulus boxes available in stock.

The next project arrives.

Some reading.

Possible rules.

More on this project in the coming weeks (and months) as it progresses... 

Sunday, 1 March 2026

WW1 Middle East adding landing boats and Royal Marines

While painting the Indian units for my WW1 Middle East games (see the previous post) I decided to continue with the WW1 theme by adding a few landing boats and a unit of Royal Marines. This will give more options and variety when setting up scenarios, as British naval forces supported a number of land operations during the war, eg, the Dardanelles, Mesopotamia, the defence of the Suez Canal, and Red Sea operations supporting the Arab Revolt.

A unit of Royal Marines are landed ashore.

The Royal Marines are HaT 20mm WW1 British Infantry (Early) simply painted in a dark blue. Although this uniform was replaced by khaki fairly early in the war, but I chose to keep the blue help them stand out from the other British units on the tabletop.

The Marines advance.

After they were painted, I decided to have a go at making some simple landing boats. They were cut from 19mm MDF board into basic boat shapes. For their crews, I used spare HaT WW1 cavalry figures that had previously lost their horses to making some supply units. These figures were cut in half at the waist and glued into the boats. After initially painting them grey, I thought they would look better if I added a second crewman to each boat along with a rudder made from a cut down matchstick.

You can see how simple the models are. Along with an additional crewman I did attach a cut down match stick to the stern to represent a rudder.

The models are very simple, but they are robust and quick to make. Rather than modelling detail, I rely on the overall shape and paint to give the impression of landing boat. I use a rather loose painting style and try to give the impression of detail, rather than painting details themselves. Sometimes this approach works, while other times it does not and the models will get undercoated again until I get the look I want. For models that will not get a great deal of use, and are viewed at three feet, I am quite happy with the results.

A closer view of the model boats shows the loose strokes of paint to give the impression of detail.

A wargamer's view from three feet.

I have a small ship made from wood off-cuts to represent the Campbeltown from when I setup a St.Nazaire game which I can re-use to support the amphibious scenarios.

A basic block ship from which troops are ferried ashore.

The next post will either about adding some more supply wagons to the WW1 collection, or a post about my next planned project which has been recently delivered, and was not on my planned list of things to do in 2026.

Friday, 27 February 2026

Star War Legion and WW1 Middle East painting

Before I became absorbed with painting aircraft for the Blood Red Skies game over the past few weeks, I had been adding a few models and making conversions to my Star Wars Legion forces. Four of these models were straightforward builds, AT Walkers for the Empire and Rebels, along with a couple of Speeders.

AT Walkers painted for the Empire and Rebels.

A couple of Speeders.

The first conversion involved turning a Luke Skywalker figure into Obi-Wan Kenobi. I reversed the pose to give the impression of Obi-Wan deflecting a blaster shot or standing in a defensive guard. This required removing Luke’s head and replacing it with a spare, along with adding a cloak from the bits box. Green Stuff was used to make the hood and also lengthen the shirt to be more robe like.

A comparison between the figures. Obi-Wan on the left and Luke on the right.

A cloak from the spares box proved very useful as when I make them from Green Stuff they lack movement.

A view of Obi-Wan from the front.

The second conversion made use of the spare torso from the AT walker kit. I added an alien head and cloak from the ever-useful spares box and mounted the figure on a cheap plastic dinosaur, which was slightly modified and fitted with reins and a saddle to create a suitably Star War beast rider.

A beast rider

Another spare cloak was added to this conversion.

With the aircraft painting done (for the moment) I am now reinforcing my WW1 Middle Eastern forces with some additional Indian units. So far I have added one unit of Indian cavalry and two units of Indian infantry. All are HAT plastic 1:72 scale figures. A battery of howitzers is also on the painting table, which will be crewed by some converted Indian figures, although they are not yet finished.

Indian Cavalry - HAT Bengal Lancers were used.

Two units of HAT WWI Indian Infantry. The Officers were added from other WW1 kits.

I hope to get these units onto the tabletop for a game soon.

Sunday, 21 May 2023

WW1 Railway Attack Scenario

After a brief break from remote gaming due to various non-wargaming engagements, Jon (of Palouse Wargaming Journal) and I returned with a WW1 Palestine game. In our recent sessions, Jon has achieved good success while commanding the Turkish forces. However, this time around, we decided to switch things up a bit, giving Jon the chance to command an Arab Rebellion attack on a train.

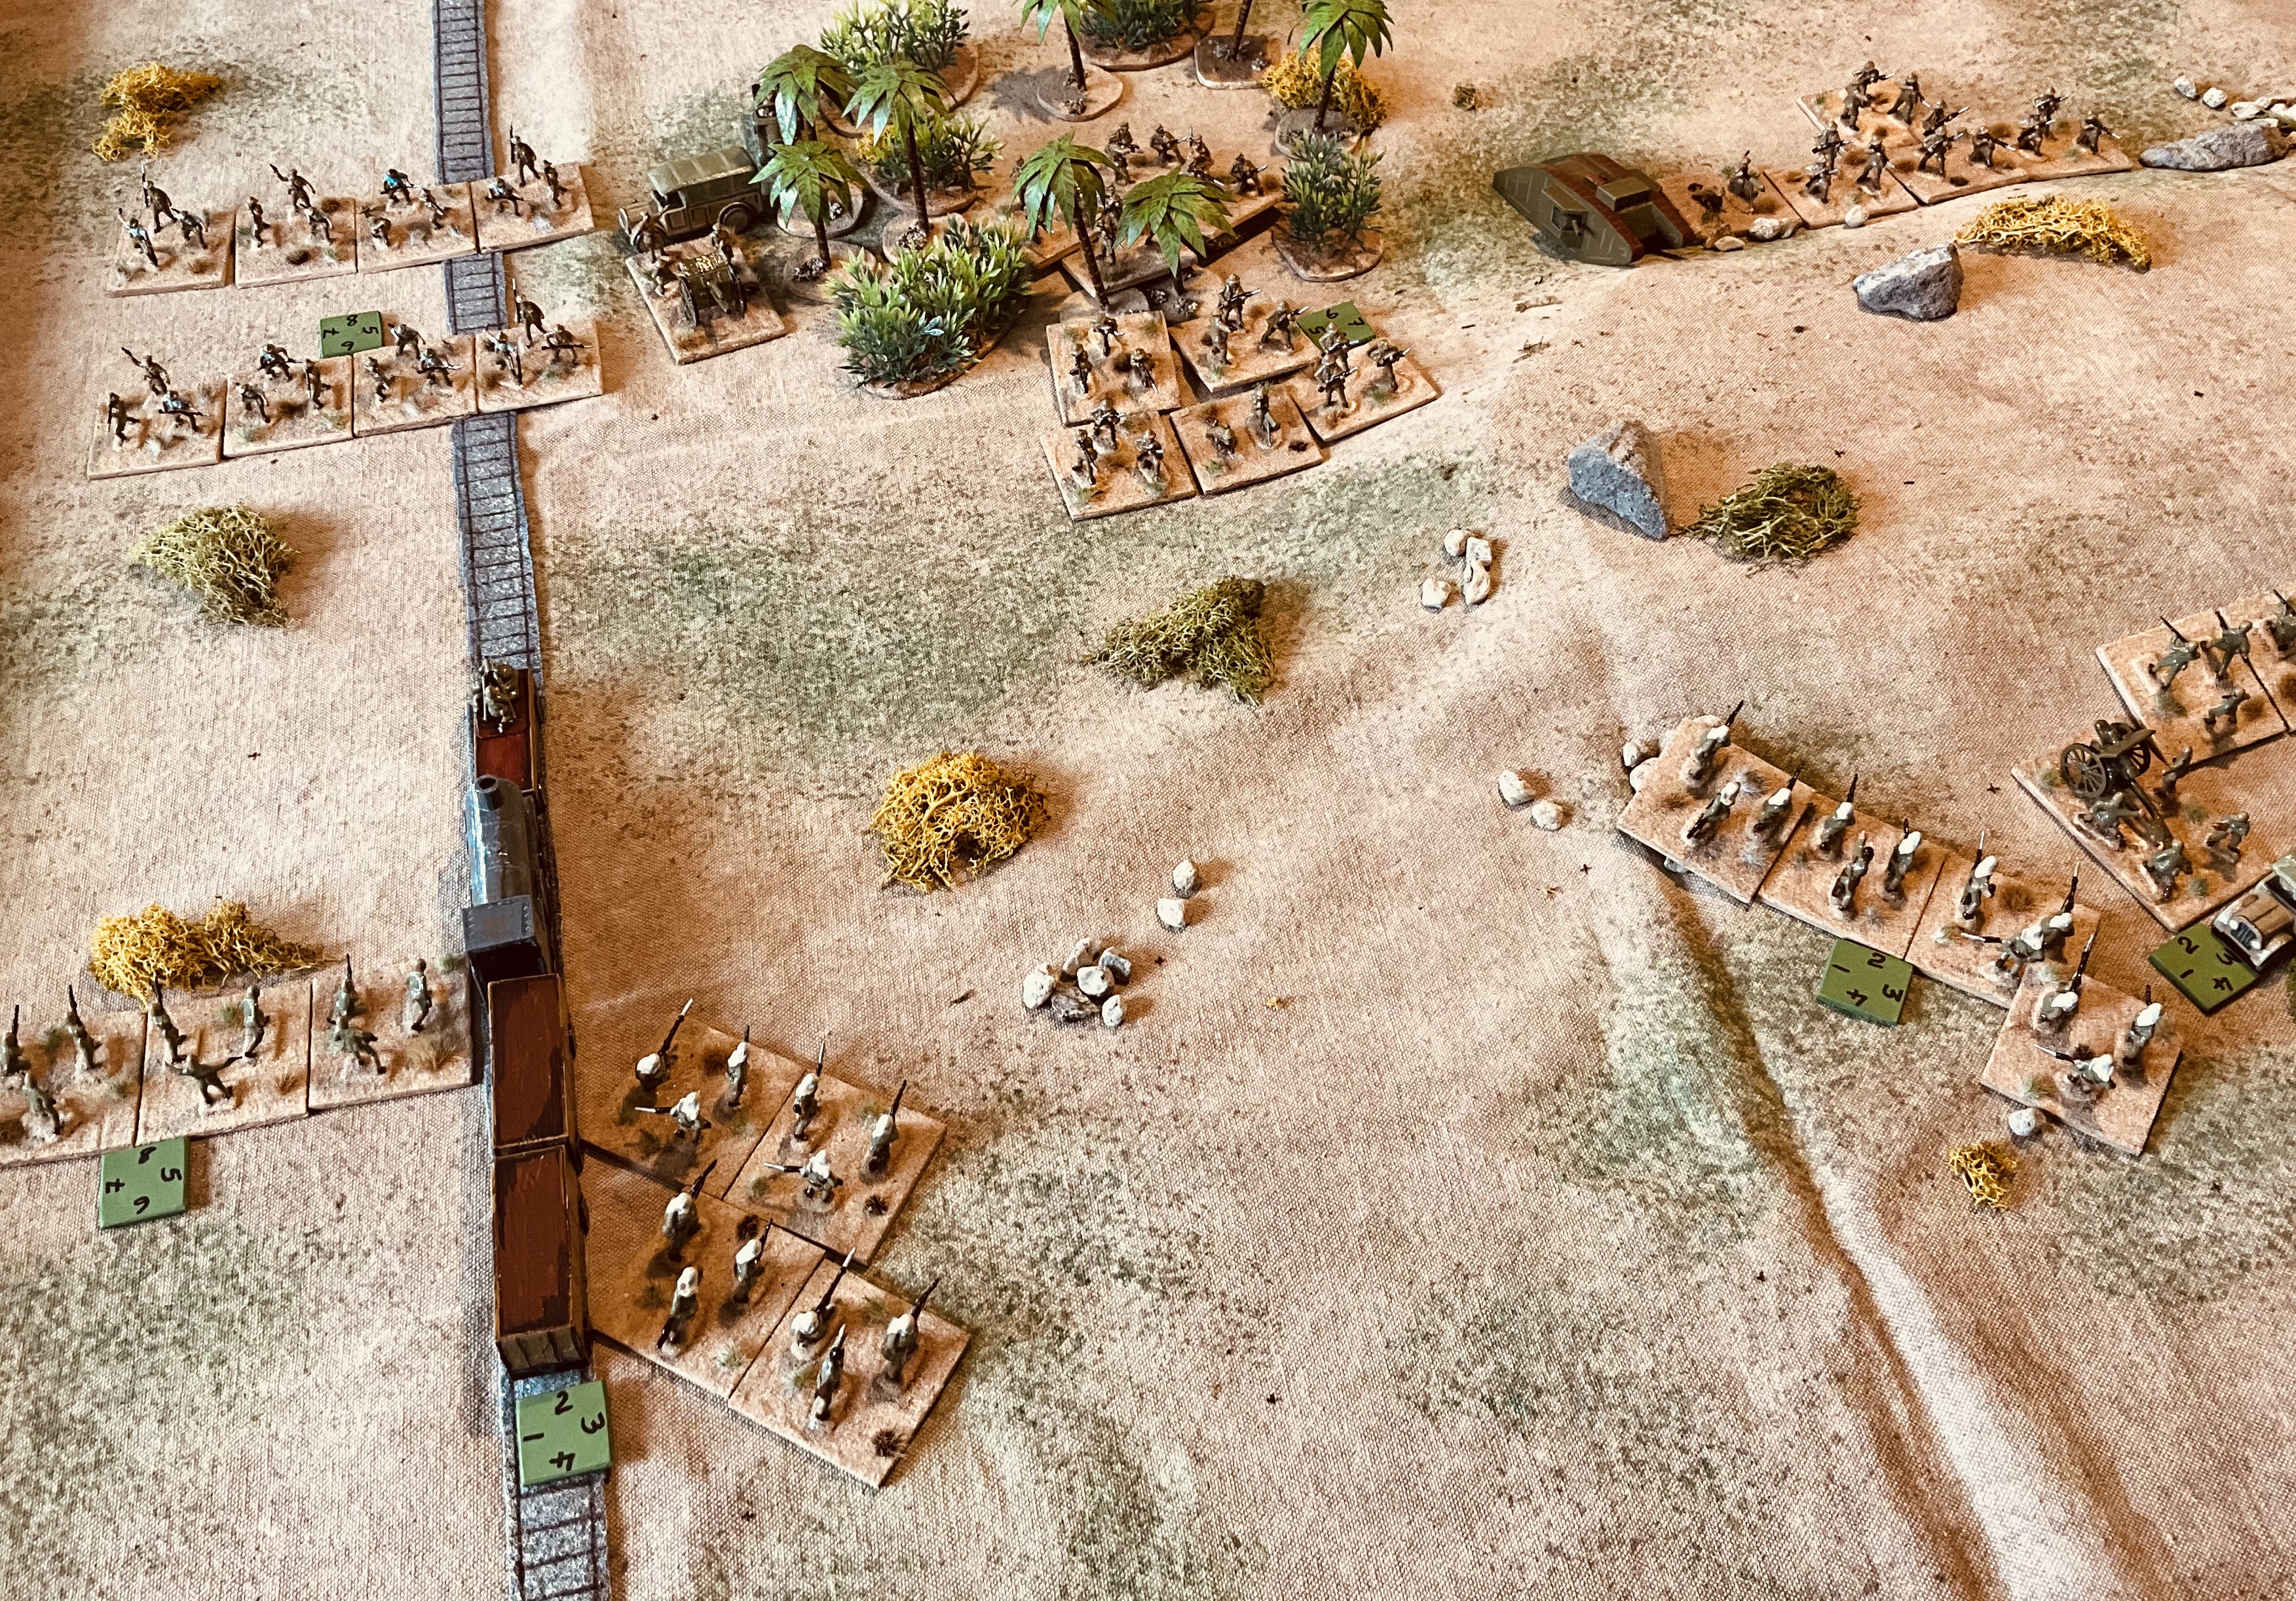
This photograph is not from the game. I just set it up for fun after the game.

I decided to revisit a scenario I had previously played, inspired by C.S. Grant's "Scenarios for Wargamers." The chosen scenario is number 23, titled "Railway Attack" (pages 58-59), which I have set in WW1 Palestine. In this scenario, the Arab Rebellion forces launch an assault on a Turkish train. To impede the train's progress, the Arabs have erected a barricade of rocks that the train cannot break through. The objective of the game is for the Arab Rebellion force to capture the train within 15 turns before Turkish cavalry arrives to investigate the delayed or missing train.

Scenario Map.

Some time ago, I created this map, and since I'm am now using a 6-inch gridded tabletop for my games, you will notice in the game photograph's that the tabletop is oriented in a slightly different North-East orientation. It's important to note that all rough terrain, buildings, and palm trees on the map serve as cover and hiding spots for the Arab forces during their setup.

The forces involved in the game are:

Turkish forces

  • 3 infantry units
  • 1 infantry unit with machine gun
  • 1 machine gun mounted on the train (which cannot disembark)
  • 1 artillery unit

Arab forces:

  • 2 infantry units
  • 1 infantry unit with machine gun
  • 2 cavalry units
  • 1 armoured car unit

The set up requires that all Arab units are in hidden out of sight behind hills or in cover when the train arrives. The train arrives from the north and must travel forward one square each turn until the Arabs reveal themselves, then it can stop and start, but it cannot reverse. Up to two units can be unloaded from the train each turn.

Units embarked on the train are treated as being in cover. The Turkish player can distribute any hits on the train to units still embarked. The machine gun at the front of the train is in cover and cannot disembark.

For the rules, we continued to use the WW1 Rules used throughout the WW1 Palestine campaign, which are a variation on OHW WW1 rules with activations added.


A tabletop setup with 6 inch grid. The rocks and vegetation are used for remote games as the subtle crosses on the game mat do not show up on the camera. Note - Over the last couple of WW1 games Jon and I have been playing using a square grid, so the above map had to be reworked to fit a grid.

The game report…

The train arrives and quickly comes under fire from Arab units positioned in cover on the hill. While the armoured car emerges from its hiding spot in the buildings.

The rocks blocking the track are spotted and the train stops to disembark two units as Arabs appear from their cover to begin their assault on the train.

The train continues up the track with the aim of disembarking more troops and putting some distance between itself and the Arab forces that have emerge from their cover. Meanwhile, those Turks already disembarked are taking some punishing fire from the Arabs.

The train comes to a halt at the barricade, and the situation appears bleak for the Turks. As the game’s host, I was relieved that I had chosen to play as the Turks, as it seemed like the game was effectively over for them, with an easy victory in sight for the Arabs.

The Arab forces start closing in on the now stationary train, which is now defended solely by a machine gun and an artillery piece. One noteworthy event during the turns was the breakdown of the armored car. In a few earlier games, my tanks suffered breakdowns due to rolling a 1, and this time it was Jon's turn to experience unfortunate luck as he rolled a 1.

During the last few turns, the Arab units encountered difficulties in activating and eliminating the remaining Turkish defenders. It was only on the final turn of the game that they managed to successfully capture the train.

This game was a thrilling contest that remained undecided until the very end. That the game went down to the wire was quite surprising considering that halfway through the game, an effortless victory seemed within reach for the Arabs. What turned the tide? Although the Arab units managed to eliminate the defending Turkish forces, they sustained hits that hindered their ability to activate effectively. This, in turn, obstructed the movement of fresher units, preventing them from engaging the remaining defending Turks. Congratulations to Jon for securing the victory, and overall, it turned out to be an incredibly enjoyable remote game.

You might be wondering how this game fits into the ongoing WW1 Palestine campaign I've been running. Well, it doesn't currently align with the campaign, but I'm considering incorporating it and offering some advantages to the Egyptian Expeditionary Force. This would give them a final chance to capture Damascus within the designated timeframe of their campaign objectives. (See the featured post for details of the campaign).


Friday, 7 April 2023

A remote WW1 Palestine campaign game report

The tabletop was briefly cleared of English Civil War figures and green tabletop mat and replaced with an arid looking setting for another WW1 Palestine campaign remote game with Jon (Palouse Wargaming Journal). As usual Jon commanded the Turkish forces.

The early stages of the game played on a grid-based tabletop.

Having a blog titled "Grid-based wargaming - but not always" it is always good to feature a game that is played on grid, in this case a 6-inch gridded tabletop. The grid is very helpful for remote games. I added rocks and bushes to indicate the corners of the squares, normally I rely on discrete crosses marked on the gaming mat, but these cannot be picked up on the camera.

Campaign map

The scenario selected from the campaign rules, which can be found here, is scenario 18, counterattack, from One-Hours Wargames. In the campaign this is the tenth battle and the Egyptian Expeditionary Force (EEF) has been stuck at stage 4 trying to win a battle to continue their advance on Damascus.

Scenario map

Background

As the Egyptian Expeditionary Force (EEF) pushes through the Judean mountains in their bid to capture Jerusalem, the Turks are fiercely resisting, and their defensive lines remain unbroken. EEF faces another challenge in their plan as they attempt to seize control of a vital bridge over Wadi Al-Hamra. Supplies are being bought up and the attack is planned to begin in early June 1918. The Turks have detected their the build up of forces and are now preparing to launch their own counterattack.

Order of Battle

Turkish Forces:
  • 5 infantry units (2 with attached machine guns)
  • 1 artillery unit
  • 1 mountain artillery unit
Egyptian Expeditionary Forces:
  • 4 infantry units
  • 1 Mounted infantry unit
  • 1 artillery unit
  • 1 tank unit
  • 1 Aircraft support

Deployment

The Turks have 1 unit positioned at the start of the game in zone 1 north of the river. Their remaining units will arrive on turn 3 from the northern table edge.

The EEF will deploy all their units (excluding aircraft) along the southern table edge.

Special Rules

The EEF are unaware of the fords and may not use them.

Victory Conditions

Victory is achieved by control of the bridge and occupation of the town on or before turn 15.


Game Report

The early stage of the game. Jon had placed an artillery unit at the bridge and the advancing EEF units came under fire as they moved across the open and towards the bridge.

The Turkish reserve arrives to help defend the bridge and also swing round on the EEF’s right flank crossing at one of the fords.

The tank slowly advances on the bridge to support the attack.

Air support arrived, but was not that effective.

The tank attack fizzles out with a break down. A very frustrating moment for the EEF which was hoping to get the upper hand in the game. A roll of 2+ was required, but not achieved.

The EEF are still battling to take control of the bridge and now have to contend with a Turkish flank attack.

The EEF make a last ditch attempt to storm the bridge. This was repulsed and the Turks just held on.

By turn 15 the bridge remains contested and the town in EEF’s hands. A drawn game.

Thoughts on the game

  • Despite ending in a draw, the game had its ups and downs and kept the players on the edge until the end, especially when the EEF made a final effort to control the bridge. 
  • Previous games in the campaign allowed free movement, but this was the first one that utilized a square grid, which worked out well.
  • The tank failed again with a breakdown just like it did in an earlier game, very disappointing for myself as the EEF player.
  • Capturing the town was a hard ask for the Turks in this scenario.

The Campaign

In this campaign, a draw is as good as a win for the Turks, and it is now impossible for the EEF to meet their victory conditions of reaching Damascus by October 1918. When designing the campaign, the possibility of drawn games had not been considered, and approximately a quarter of the games played so far have ended in draws. Nonetheless, the players will continue with more games involving the Arab Rebellion armies.

Friday, 3 February 2023

WW1 Palestine Campaign turn 4 game 4

The WW1 Sinai-Palestine campaign continues. The Egyptian Expeditionary Force (EEF) has the campaign objective of reaching Damascus by October 1918, but this is now in the balance after three failed attempts to breakthrough the Turkish defences positioned around the Judean Hills.

Campaign turn 4 showing EEF progress.

In the latest attempt to break the deadlock the EEF have moved up a tank unit. Their attack is planned to take place, March 1918, the objective to secure a ridge overlooking a nearby rail line.

Each stage on the campaign has 3 associated scenarios selected from the book One-Hour Wargames (OHW). No scenario can be selected twice unless 3 battles have been lost by the EEF player. As this is the fourth battle one of the scenarios is going to be replayed.

Scenarios selected from OHW for stage 4 on the campaign map

The randomly selected scenario was #8 Melee. As this is a replay, I took the opportunity to switch the road to a railway line and introduce a train of Turkish reinforcements into the Scenario.

A Turkish train with machine gun up front. The train is scratch built from bit or wood and card. 

The EEF will arrive from the south along the rail line on turns 1 and 4. The Turks have two units positioned on the ridge and their remaining mobile reserves will arrive from the north along the rail line on turns 3 and 6.


Layout on a 5x4 foot tabletop

Order of Battle

Turkish Forces:

  • 5 Infantry (1 with supporting machine gun)
  • 1 Artillery
  • 1 Armoured train with machine gun

2 units are to be placed on the ridge. On turn 3 two reserve units arrive, and on turn 6 the 2 units and train arrive.

EEF Forces:

  • 5 Infantry (2 with supporting machine gun)
  • 1 Artillery
  • 1 Tank

The EEF will arrive in 2 waves, 3 units on turn 1 and the remaining 4 units on turn 3.

The EEF have 15 turns to capture the hill.

Battle Report

The game was a remote game with Jon of Palouse Wargaming Journal who commanded the defending Turks. While I am getting better at remembering to take photographs during the remote games, I did forget towards the end of the game when things were getting interesting.

Opening moves

The EEF began their advance along the rail line and occupied the woods. This kept them out of sight from the Turkish infantry and artillery positioned on the ridge. The EEF artillery were positioned to target any Turkish reserves that arrive.

Units engage in and around the woods and EEF units prepare to assault the ridge.

The Turks on the ridge retired to be out of sight from the advancing EEF units. They also pushed their reserves along the rail line under the shelling from the EEF artillery.

Action around the woods and along the rail line as Turkish reserves advance.

While units were engaged in and around the wood. The second wave of EEF units, including a tank unit, were finally positioned to launch their attack, knowing the Turks were ready to open fire as soon as they moved on to the ridge.


The EEF launch their attack on the ridge.

The EEF launched their attack and looked well positioned to take the ridge when disaster struck. The tank after the first round of shelling was destroyed. This allowed the Turkish defenders to focus their shooting on the EEF troops who were eventually beaten off. The EEF rallied there remaining troops and made a second assault on the ridge be the Turks remained steadfast and held the ridge. A victory the the Turns.

An after battle photograph of the Turkish commander reviewing the destroyed tank.

A game well played by Jon. From a campaign perspective the EEF are at risk of failing to achieve taking Damascus by October 1918. With only seven months remaining the EEF will only be able to fight one more game at this stage and win the first scenarios at stages 5 and 6.

The EEF advance is stalling.