Monday, 7 February 2022

A generic scenic backboard

A few weeks back I made a Japanese themed scenic backboard using water colours and caulk pastels. I had a lot of fun making it. This weekend I decided to make another, a more generic scenic backboard which can be used for other games. Using pastels is dusty job best done outside and it was a nice sunny day for being outside. This time I just used caulk pastels on a light grey foam board.

The newly created backboard

A Napoleonic is game underway with the backboard.

An ACW game with the backboard

The backboard uses two pieces of foam board 9 inches by 24 inches. I use masking tape to hold the two pieces together. 

Sunday, 6 February 2022

Napoleonic Battle Campaign Game (Part 5)

This is the third action of the battle which I am running as a campaign. Its has Red's (Austrian) Corps II attacking with support from reserves and their flanking Corps III. Corps II starts the action with:

  • 4 x Infantry (one unit is being used as skirmishers in the central fields)
  • 2 x Artillery
  • 1 x Cavalry

Units are deployed.

The defending Blue (French) Corps III has support from reserves starts the action with:

  • 4 x Infantry (one unit is being used as skirmishers in the central woods)
  • 2 x Artillery
The battle positions with Red (Austrian) Corps II attacking.

This is an important action. If Red Corps II can defeat Blue Corps III they will force them off the map and can claim victory.  The actions use One Hour Wargames (OHW) rules and run for 15 turns. OHW games often don't run to 15 turns, so the feeding in of reserves will be important for Blue to hold off Red attacks before turn 15.

Both forces start the action being under strength (8 units) and quickly bring up reserve units for the upcoming engagement. 

The Red (Austrians) launch their attack in the right flank with their cavalry arriving from Corps III.

Blue (French) forces start feeding in reserves.

Blue (French) decide to advance on their right flank.

Blue (French) forces retire against ongoing cavalry attacks.

Blues (French) attack caused Red (Austrian) to draw upon their reserves to shore up their left flank against Blue's cavalry. 

Red (Austrian) cavalry continue to attack as Blue (French) desperately hang on.

Additional Blue reserves arrive in the nick of time (turn 15) and the position is held.

The battle positions. Red Corps II has retired one step.

Having help off Red (Austrian) attack attention will now focus on Blue's (French) attack with their Corps II. The reserves rule mentioned in the previous post worked well. 

"Reserves did not always arrive in a timely manner. So to create some uncertainty reserves can only arrive when a "no effect" chance card is drawn. I use the 15 chance cards described in One Hour Wargames chapter on solo wargaming when playing these actions. There are 5 "no effect" cards in the chance deck which will allow 5 reserves to arrive providing the 8 unit rule is met.


Saturday, 5 February 2022

Napoleonic Battle Campaign Game (Part 4)

As the battle progresses into late morning. It is Red (Austrian) army's move and they choose to advance the unopposed Corps III on their right flank in preparation for an attack by Corps II. No tabletop action this turn. Blue (French) opted for a similar approach in their campaign turn, pushing forward their Corps I to support any attack by their Corps II.

Both armies move forward their unopposed Corps as support. 

It as now Red (Austrian) army's turn again and they push forward their Corps II. They are hoping to have replacement units arriving on the flank from their unopposed Corps III, while Blue (French) will have to rely on only their reserves. Should Red (Austrian) army win this action, then they will win the battle because they will push Blue Corps III off the map.

Red (Austrians) make an attack pushing forward their Corps II.

The tabletop will reflect the map of the area occupied by both Corps. Both sides are not at full strength (8 units) and replacement units will start arriving in the early turns of the tabletop game.

The map terrain will decide the tabletop. Each square represents 2x2 foot on the tabletop.

Order of battle...

Blue (French)

  • 4 x Infantry (one unit is being used as skirmishers in the central woods)
  • 2 x Artillery

Red (Austrian)

  • 4 x Infantry (one unit is being used as skirmishers in the central fields)
  • 2 x Artillery
  • 1 x Cavalry

Armies deployed on the tabletop.

A view from the Blue (French) side.

An important game and both sides will be relying on reserves, Blue to hold the position and Red to overwhelm Blue and win the action and battle. The rule on reserves allows a reserve unit, or flanking unit from an unopposed Corps, to arrive providing an army does not exceed 8 units on the tabletop. 

Reserves did not always arrive in a timely manner. So to create some uncertainty reserves can only arrive when a "no effect" chance card is drawn. I use the 15 chance cards described in One Hour Wargames chapter on solo wargaming when playing these actions. There are 5 "no effect" cards in the chance deck which will allow 5 reserves to arrive providing the 8 unit rule is met.

Wednesday, 2 February 2022

Napoleonic Battle Campaign Game (Part 3)

This more of an update on the battle campaign and not an action report as I forgot to take photographs as the action progressed. However, it did clarify a couple of the campaign and tabletop rules, more on that later.

A closer view of the French (Blue) advancing.

The opening battle moves had the Austrians (Red) forcing the French Corps III back. It is now the Blue army's campaign turn and they choose to assault with their Corps II supported by their unopposed Corps I. The action is now transferred to the tabletop.

Blue (French) move and they assault with Corps II.

The campaign map determines the tabletop terrain setup.

Setup tabletop and troops deployed.

My single photo of the action.

Not a successful action for the Austrians (Red) with the French (Blue) quickly gaining the advantage early in the game through some timely chance cards. They were able to maintain the pressure on the Austrians who struggled with a poor deployment and having their forces split by a wood in their line. As soon as the losses started to mount their commander opted to retire.

French (Blue) losses:

  • 1 x infantry unit

Austrian (Red) losses:

  • 2 x infantry units
  • 1 x artillery

The loss of an artillery unit being particularly painful for Red. Neither army reserve has artillery. The elimination of units and any movement from the reserve or an unopposed flanking Corps is tracked in the table below the map. The battle campaign and tracking of the order of battle all fits on one sheet of paper.

Red (Austrian) Corps I retires on the battle campaign map

Out of this turn and tabletop game there are two rule updates/clarifications:

  1. On the campaign map a Corps that has just retired cannot move. So in the above map Blue Corps III could not advance as it retired the previous turn.
  2. In a tabletop action a Corps is forced to retire when they have less than 4 units and the opposing force has 5 or more units fielded on the tabletop. This approach allows a corps to hold out for 15 turns by feeding in reserve units. However the risk is in committing too many reserve units is they cannot support other areas of the battle in later actions.

Austrians all lined up ready for the game. Little did they know they would be retiring very soon.

Looking ahead to the next battle campaign move by the Austrians (Red) they have a choice of:

  1. Continue their advance of Corps II with only support of Reserves which will most like be required by their recently retired Corps I. If they can force Blue Corps III back again by reducing them to just three units on the tabletop within 15 moves they win, but Blue can, and most likely will, slowly replace losses from reserves and deny them.
  2. Move Corps III up one step so it can support Corps II and keep their reserves on hand.

Decisions, decisions....

Tuesday, 1 February 2022

A Napoleonic Battle Campaign Game (Part 2)

The battle began with Red army pushing forward their Corps II. It will be able to get support from both the Army Reserve and flanking units from Corps III to replace eliminated units (see the previous post for rules). This action is now transferred to the tabletop using the map section occupied by the two counters. The troops to be initially involved in the action are noted in the order of battle and will be updated as reserves are used and units eliminated.

Campaign map and order of battle.

The area covered by the counters which will be transferred to a 6x4 foot tabletop.

Tabletop setup.

The troops are setup for the action with the attacking Red Army (Austrian) within 12 inches of their base edge and the Blue Army (French) within 24 inches of their base edge. The defenders have to setup first. 

The units are mainly Spencer-Smith Napoleonic figures with a few SYW figures thrown in to make up numbers (all are the old plastic figures).

Troops are deployed for the action.

The main Red (Austrian) attack is on the left and with cavalry support they make good headway.

As casualties mount and units are eliminated. Red (Austrian) army has some cavalry arrive on the right flank from Corps III.

Blue (French) Army have been flanked in this action. An arriving reserve unit is immediately throw into the crumbing line. 

Blue (French) forces opt to retire making sure they take their artillery.

A short and brief action using One Hour Wargames (OHW) rule from the book. The only changes are:

  • Players at the start of the game can change one line infantry unit to light infantry (skirmishers)
  • A commander is attacked to a cavalry or line infantry unit which when attacking rolls 2D6 and select the highest value.

A successful action for Red (Austrians) forces. The Blue (French) Corps III was forced to retire with loses. The order of battle was updated during the game with eliminated units and units moved up from reserve or unopposed flanking units.

The campaign map after the first action.

There is one campaign rule change for the unopposed Corps. They are placed at right angles to show they are the unopposed flanking forces. They are allowed to have units arrive on the tabletop edge replacing eliminated units where their counter is adjacent (see black arrow below). A player can move a flanking Corps forward one step (red arrow below) at the cost of a campaign move to support other Corps as they press forward.

Campaign rule modification for unopposed Corps.

The next game is set up on the tabletop...

Saturday, 29 January 2022

A Napoleonic Battle Campaign Game (Part 1 - The Preparation)

My tabletop is 6x4 foot and suits me fine for pretty much most of my wargaming with armies of between 6 to 10 units. If find these games perfectly enjoyable, but do not necessarily give you the feel of a big battle. This is particularly true of the Horse and Musket period. Having no desire to make a bigger tabletop or purchase and paint the necessary figures, I decided to try and run a big battle like a campaign. I remembered a chapter called "A Corps Campaign (Napoleonic)" in "War Game Campaigns" by Donald Featherstone. The chapter is a short 6 pages and are the inspiration for these Battle Campaign rules.

The drafted map of the battlefield

This and following posts will detail the campaign rules, the games representing actions in the battle, and any amendments I find necessary as the battle campaign progresses.

Drawing the map

The first step is to draw up the map. The map is divided up into four lanes which are assigned to one of the army corps which can move up and down the lanes, but never side to side. Each army has three Corps and an Army Reserve which never appears on the map. The three Corps start the game in the deployment zones row 2 or 4 and must depending which side of the map they are defending. All Corps must be all adjacent so one lane, lane 1 or lane 4, will remain unoccupied.

Deployment zones and map lanes.

An example of two forces deployed, both with unopposed flanks.

After deployment there is a good chance that each side will have an unopposed flanking force. More on how the unopposed Corps are used later on. During the campaign turn players take turns to move one Corps up or down a lane or take a pass on moving. When two opposing forces are next to each other in a lane the map features transferred to the tabletop and an action is fought.

During Red Army's turn they choose to advance Corps I who make contact with Blue's Corps II. This now has to be transferred to the tabletop.

Moving the counters reveals the terrain to be fought over. Each square represents 2x2 foot on a 6x4 foot tabletop.

The area covered by the counters is transferred to the wargaming table. To assist this the map has dotted lines added which help define a 2x2 foot square on the tabletop.

An example of the above map section transferred to the tabletop.

The action will then be fought using the units available to the Corps involved. As the game progresses additional units can be brought into the game to replace loses from reserves arriving on the base edge or on the flank if there is an unopposed Corps. The over-arching rules are:
  1. A player can never be more than 8 units on the table
  2. Units that arrive to replace eliminated units are never returned and remain with the corps for the remainder of the campaign.
  3. Eliminated units are also lost to the campaign.
Red Corps I can receive reserves and Blue Corps II can receive reserves or flanking units from Corps I. Flanking units can arrive anywhere on the tabletop side and Army Reserves on the base edge. 

The actions on the tabletop are played using One Hour Wargames Horse and Musket rules over 15 turns. The winner of the action remains in position on the campaign map and the loser must retire one step.

In this example action, Red Corps I won the action and remain in place and the losing Blue Corps II retires one step.

The battle campaign is won by forcing one of the opposing Corps off the map. Conserving units in the tabletop games and timely use of reserves will be important to obtaining victory.


Deciding the units for each Corps and Army Reserve

Having drawn the map the next step is to decide the unit make up of each corps and the reserves. This can be decided using dice or creating three lists and randomly assigning them to each corps. The army reserve also needs to be decided and I have opted for an even split of infantry and cavalry units. The constraint I have to apply is the number of units of a certain type I can field on the tabletop.

As with most campaigns there is a level of bookkeeping to track of units eliminated on the tabletop and where units are moved to a corps with from reserves or from an unopposed flanking corps. I am using a table below the map with a square for each unit. When eliminated it is crossed out, and when moved in is also crossed out and a new square drawn on the corps it has joined.

Bookkeeping is done below the map so no loose pieces of paper to worry about.


Campaign Rules
To start the campaign both players write down which three lines they will deploy their corps. The corps must be adjacent to each other. They then place the counters in the deployment rows.

Dice to decide which player moves one unit first. Players then take turns to move one unit as a time. 

Whenever two opposing units in a line are adjacent then the action is taken to the tabletop.

During the game whenever a player has a unit eliminated they have the option of moving up a reserve unit to join the tabletop game. If they arrive from reserves then they are placed on the base edge and if from an unopposed corps they arrive the flank edge.

Any units eliminated on the tabletop are lost to the action and battle campaign.

The loser of the action must retire one step in their map lane. If this pushes them off the map, then the battle is lost. If the action is inconclusive, then the attacking corps retires one step.


In the next post I will cover off what determines whether actions are won or lost on the tabletop.


Friday, 28 January 2022

The Second Battle of Azukizawa - A second remote game

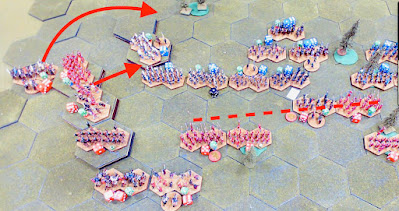
This week I was fortunate to play a second remote wargame with Jon of Palouse Wargaming Journal. We replayed the Second Battle of Azukizawa, except this time we switched sides with Jon taking the Oda army and myself the Imagawa army. 
The remote game in progress using Jon's fine collection of 15mm Samurai.

The Oda clan start the game in a difficult position with the Imagawa army starting the game springing an ambush on their flank. The plan was to hold the centre and right flank and sweep around on the left flank.

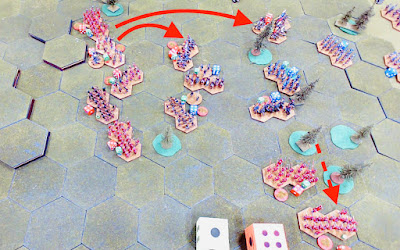
The opening games moves.

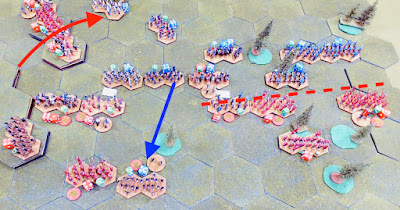
The Imagawa centre gave way to the pressure, but the right flank proved stubborn and bought the time necessary for left flank to move around and threaten the rear of the Oda battle line.

The cavalry charge into the rear of the Oda army and their resolve fails. The large dice show the armies resolve.

This was a most enjoyable game which used Basic Impetus rules modified by Jon for a hex-grid. The game flowed quickly as Jon has an excellent remote setup with cameras positioned on both base edges. I am going to give the Basic Impetus rules a try with my own Samurai games and see if they work as well on a square grid as they do on a hex-grid.