Tuesday, 4 July 2023

The Battle of Ripple Field

This week the English Civil War armies have made it back onto the tabletop again for a small game. A couple of weeks ago I was trying to decide whether to go with fewer but larger units made of two bases or more single base units. From the pictures below of the game you will see I have opted to go with larger units of two bases for infantry and cavalry, while keeping single base units for smaller detachments of dragoons and artillery pieces.

The tabletop all set up for a small ECW game - The Battle of Ripple Field

The game setup is based upon the Battle of Ripple Field scenario from the book “With Pike and Musket”, one of my favourite wargaming books. I am using this game to test out two things:

  • Continue my testing of the solo decision cards (or tables) to which there have been a couple of minor changes to some of the instructions to make them clearer (see here).
  • A couple of changes to the D3 ECW rules I use. These include a change to the sequence of play and differentiating between two base cavalry and infantry units and detachments.

The sequence of play is very much lifted from “With Pike and Musket”. At the start of a game turn each player rolls a D6. The highest scoring player will move first as Player A, re-rolling any ties. The sequence of play for each turn is:

  1. Movement for player A.
  2. Movement for player B.
  3. Both player’s units shooting simultaneously.
  4. Both players' units melee simultaneously.
  5. Remove eliminated units and check for impetuous cavalry.

Additionally, When moving a player may make D3 movement orders. Each order can move 1 infantry or cavalry unit, or all detachments (dragoons and commanded shot). A player is not required to use all their movement orders. For example, a player with a D3 roll of 2 may order the move of: 1 infantry and 1 cavalry unit, 2 cavalry units, 2 infantry units, 1 infantry unit and all detachments, or 1 cavalry unit and all detachments.

If I stick with the rules I will post them up at the top of the blog.

A most useful book and a joy to read.

The Battle of Ripple Field was fought on 13 April 1643. It was a small battle with approximately 2000 men per side. The Royalist force was led by Prince Maurice and the Parliamentarian force by Sir William Waller. 

In the lead up the the battle Waller had marched north from Tewkesbury in an attempt to block Maurice’s force by containing them on the western side of the Severn river. However, Prince Maurice was able to successfully cross the river and marched south to face Waller’s forces who had taken up a defensive position on the hill at Ripple Field.

Battle of Ripple Field game report…

Order of battle

Royalist
  • 2 veteran cavalry units
  • 2 infantry units
  • 1 detachment of dragoons
  • 1 gun
Parliament

  • 3 cavalry units (1 is a veteran unit)
  • 1 veteran infantry unit
  • 1 detachment of dragoons
  • 1 gun

Opening stage

In the opening turns of the Ripple Field game, both armies opted for a hold stance, skirmishing with their detachments of dragoons around the Uckinghall village and exchanging salvos of artillery fire. Both armies quickly shifted to an attack stance, advancing their cavalry on their respective flanks while maintaining the artillery bombardment until, they were out of powder. With the cavalry engaged Weller’s single centre infantry advanced to the edge of the hill.

The opening actions of dragoons skirmishing and artillery shooting.

Cavalry begin their advance.

Cavalry on each flank are engaged in combat.

Middle stage of the game…

During the middle stage of the game, Prince Maurice began advancing all of his centre infantry while the artillery continued shooting until their ammunition was depleted. Initially, infantry from both sides engaged in musket fire at a distance, but this quickly transitioned into close combat involving push of pike.

Meanwhile, the cavalry clashes reached a decisive outcome. The veteran Royalist cavalry on both flanks emerged victorious, routing their opponents. However, the left flank Royalist cavalry pursued the fleeing Parliamentarian cavalry, leaving the flank open to the now unopposed Parliamentarian cavalry reserve.

Parliament’s infantry advance in the centre and their reserve cavalry move up in support.

The remaining cavalry look to attack their opponents centre.

End stage of the game…

The cavalry forces from both forces manoeuvred to attack their opponents infantry centre. While the Royalist infantry held their nerve, the sole infantry unit of the Parliamentarians suffered defeat and routed. Left with only a single cavalry unit and a detachment of dragoons, Weller retired and conceded the field to Prince Maurice and the Royalist force.

Cavalry charge to engage infantry.

The Royalist infantry centre holds firm.

Weller’s remaining forces concede the field.

The English Civil War theme continued this week when a shipment of Hinchliffe figures arrived. Included in the package were a couple of guns and sufficient infantry to complete another infantry unit with two bases.

Recent arrivals.


Saturday, 1 July 2023

The fight for Henry House Hill - an ACW remote game

This week I played a remote American Civil War (ACW) wargame with Jon of Palouse Wargaming Journal. The scenario played was from the First Battle of Manassas (Bull Run) focussing on the fight for Henry House Hill. Over the past few weeks Jon has been playing a number of remote games using various scenarios from this battle which I have been reading with interest (link here).

A close up of the action provided by Jon.

Prior to the game, Jon had sent me through a detailed game briefing along with his ACW version of the Fields of Honor rules. I had the opportunity to use these rules in a previous ACW game with Jon, and they do make for a thoroughly enjoyable game.

An overhead view of the tabletop provided as part of Jon’s briefing notes.

At the beginning of the game, the Union forces have most of their brigades deployed on the tabletop, except for Howard's brigade, which was en route and expected to arrive from the road. While the Confederate forces have approximately half of their brigades positioned on or behind Henry House Hill, and the remaining three brigades are scheduled to enter during the course of the game from their base edge.

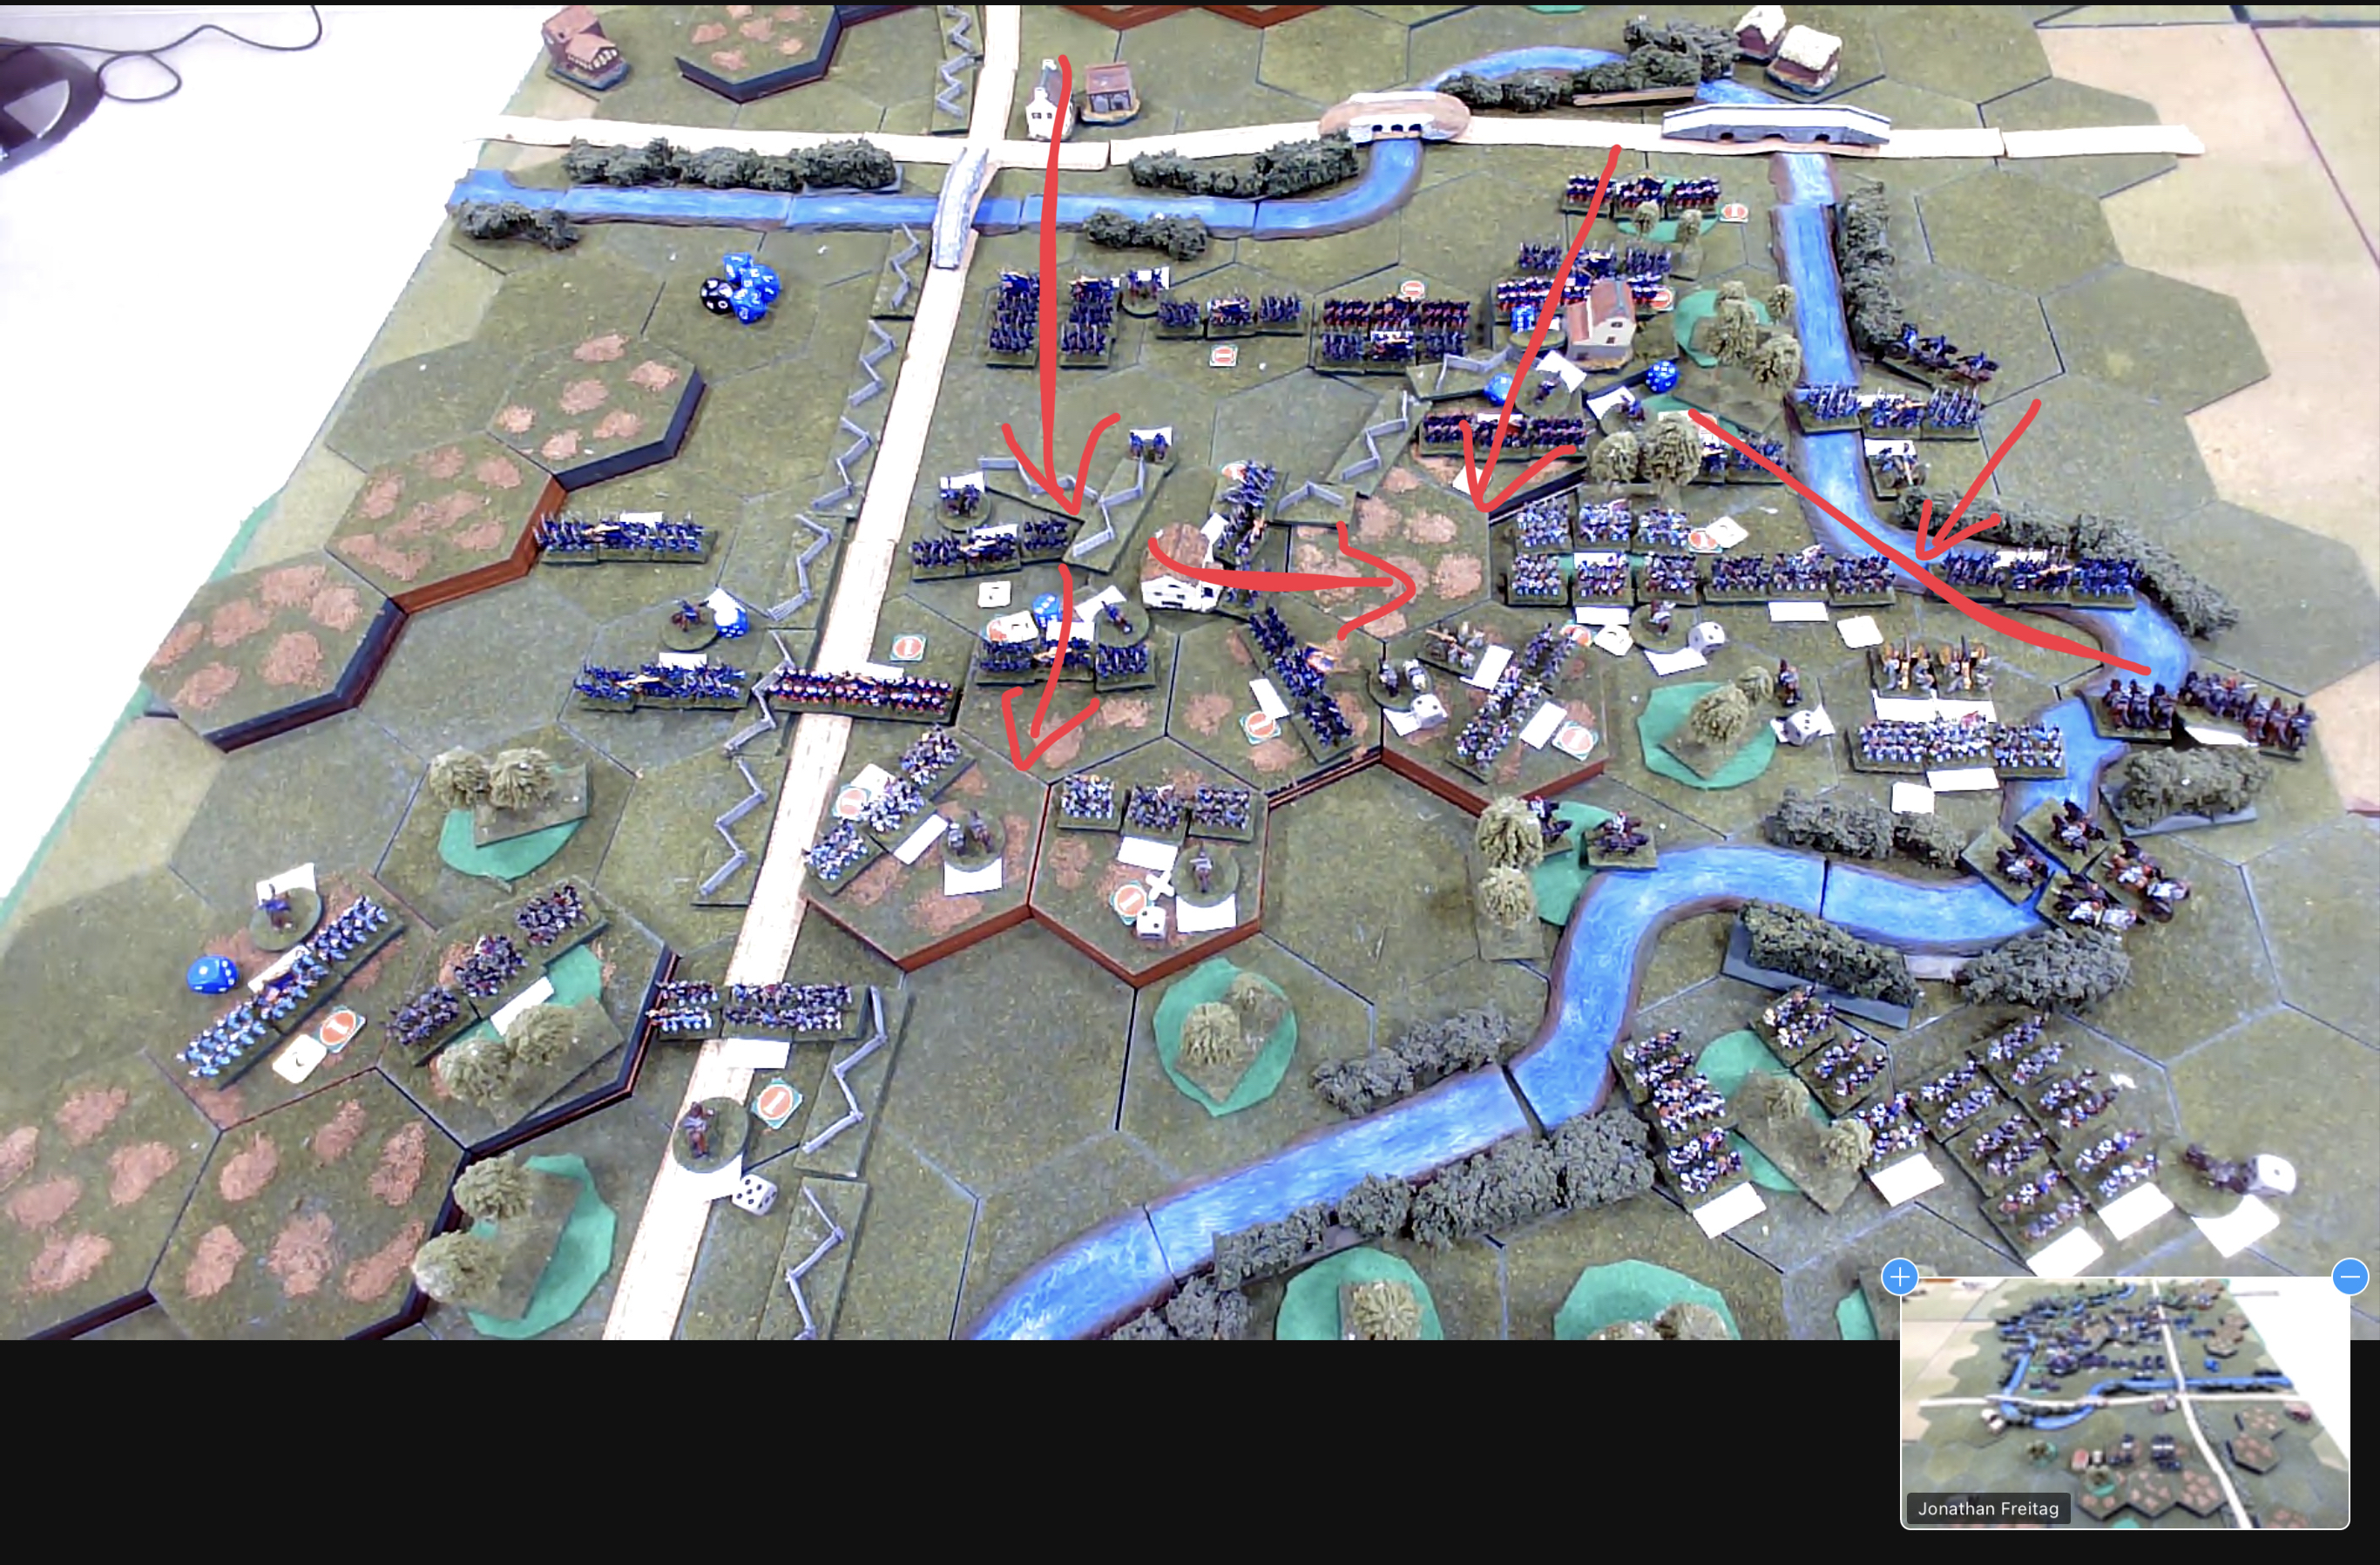
Initially, I didn't have a specific plan in mind other than advancing towards Henry House Hill. However, as Porter achieved some early success in the centre, I did begin to come up with a bit of a battle plan. I opted to launch attacks on both flanks of Henry House Hill. On my left flank I planned to push forward using the river banks for cover, while the right flank attack would take advantage of the road to swiftly advance. Additionally, I positioned all my rifled artillery units on Matthews' Hill to provide support for the assault on the hill.


My plan of attack

Turn 1

With Confederate reserves expected I just pushed the units forward as quickly as possible. There was some early success for Porter’s brigade and I began organising all my rifled artillery on Matthews’ Hill which provided a clear view of Henry House Hill.

Turn 1

Jon has an excellent setup with cameras at both ends of the table allowing the remote players to switch cameras to understand what is happening on the tabletop. As the battle progressed down the table I relied on the view from the camera at Confederate end of the table.

Turns 2 and 3

Early on Porter's brigade managed to establish a foothold on the hill in the centre. However, due to the attrition suffered by most of the units, they were unable to make further advances. Meanwhile, the right flank had made good progress along the road and was engaged in skirmishing with Confederate force positioned on the hill in and around Henry’s house.

Turns 2 and 3

Turn 4

As the battle progressed, Porter's brigades in the centre were tactically withdrawn from the hill before they are worn out. Fresh reserves were then moved forward to support the centre. Meanwhile, on both flanks the Union attacks on the hill began in earnest, marking the start of their concerted efforts to capture the Hill.

Turn 4

Turn 5

At this point in the battle, things were starting to get confused as units from different brigades became entangled and mixed together. This confusion was perfectly emphasised by the rule’s activation system, where brigades were activated individually based on the draw of coloured dice from a can, with blue dice representing the Union and grey representing the Confederates.

On my left flank, Sherman's brigade held a defensive line along the river, effectively impeding the advance of Confederate reserves towards the hill. On my right flank, supported by Union artillery positioned on Matthews' Hill, my units began consolidating their position on the hill through a series charges. Successfully pushing back the Confederate brigades which were becoming worn out.

Turn 5

Turn 6

As fresh Confederate reserves arrive in the form of Early’s brigade, the Confederate position on the hill is beginning to collapse with two of their brigades were worn out and another one at risk of being worn out. At this point in the game, after some 5 hours of play, we decided to call it as a Union victory as they held the majority of the hill and had Keyes reserves arriving to counter Early’s brigade.

Turn 6

Wrap up thoughts

This was a thoroughly enjoyable game. I was engrossed in the game for its 5 hour duration. I would best describe the game as a bit of an arm wrestle with units from both sides getting worn out from battle and fresh ones getting thrown in. The Union forces being the attacking force and with greater numbers initially were able to rotate out worn units more easily and avoid having their brigades treated as broken with impacts to their saving dice rolls.

There were a couple of breaks during the game to make coffee, during which my wife asked how the game was going? In both cases I responded “I think I have a slight advantage” and that was the nature of this game, just as you feel you are making good progress and find you cannot capitalise on this advantage as your unit’s strength points are dangerously low. Where things worked well for me was my artillery on Matthews’ Hill. They regularly caused hits on Jon’s units position on the hill, and the flank attacks meant there was always clear line of sight for the artillery. I was fortunate with initiative and the drawing of dice from the tin, which on more than one occasion allowed my right flank forces to get combined attacks on the defenders and caused unit losses. It was only right at the end (turn 6) did the the victory seem at hand.

Many thanks to Jon for putting on this most enjoyable game with his wonderful collection of 10mm armies.

The game is played on a hex grid with 10mm figures. Photo by Jon.


Tuesday, 27 June 2023

A Sci-Fi wargame campaign in a day

Whenever my daughter visits us from New Zealand she is kind enough to play a wargame. Our go-to game choice is One-Hour Skirmish Wargaming by John Lambshead which she enjoys playing. It's a rapid-paced and simple skirmish game that involves commanding 5-10 figures on a 4x4 foot tabletop. The rules use a card deck instead of dice for variables and game turn lengths are uncertain, ending when a joker is revealed.

A game in progress.

The rules used

Due to the fast-paced and fun nature of these games, we often find ourselves playing multiple games throughout the course of an afternoon. On this occasion, we decided to setup a small campaign using a Necromunda theme as most of my figures are from Games Workshop. The choice of campaign was a variation of the snakes and ladders game I have used before for a Jacobite Rebellion game (see here) and is also described in the Portable Wargame Compendium. However, instead of going up the board, the players had to descend into the depths of Hive Quartus. 

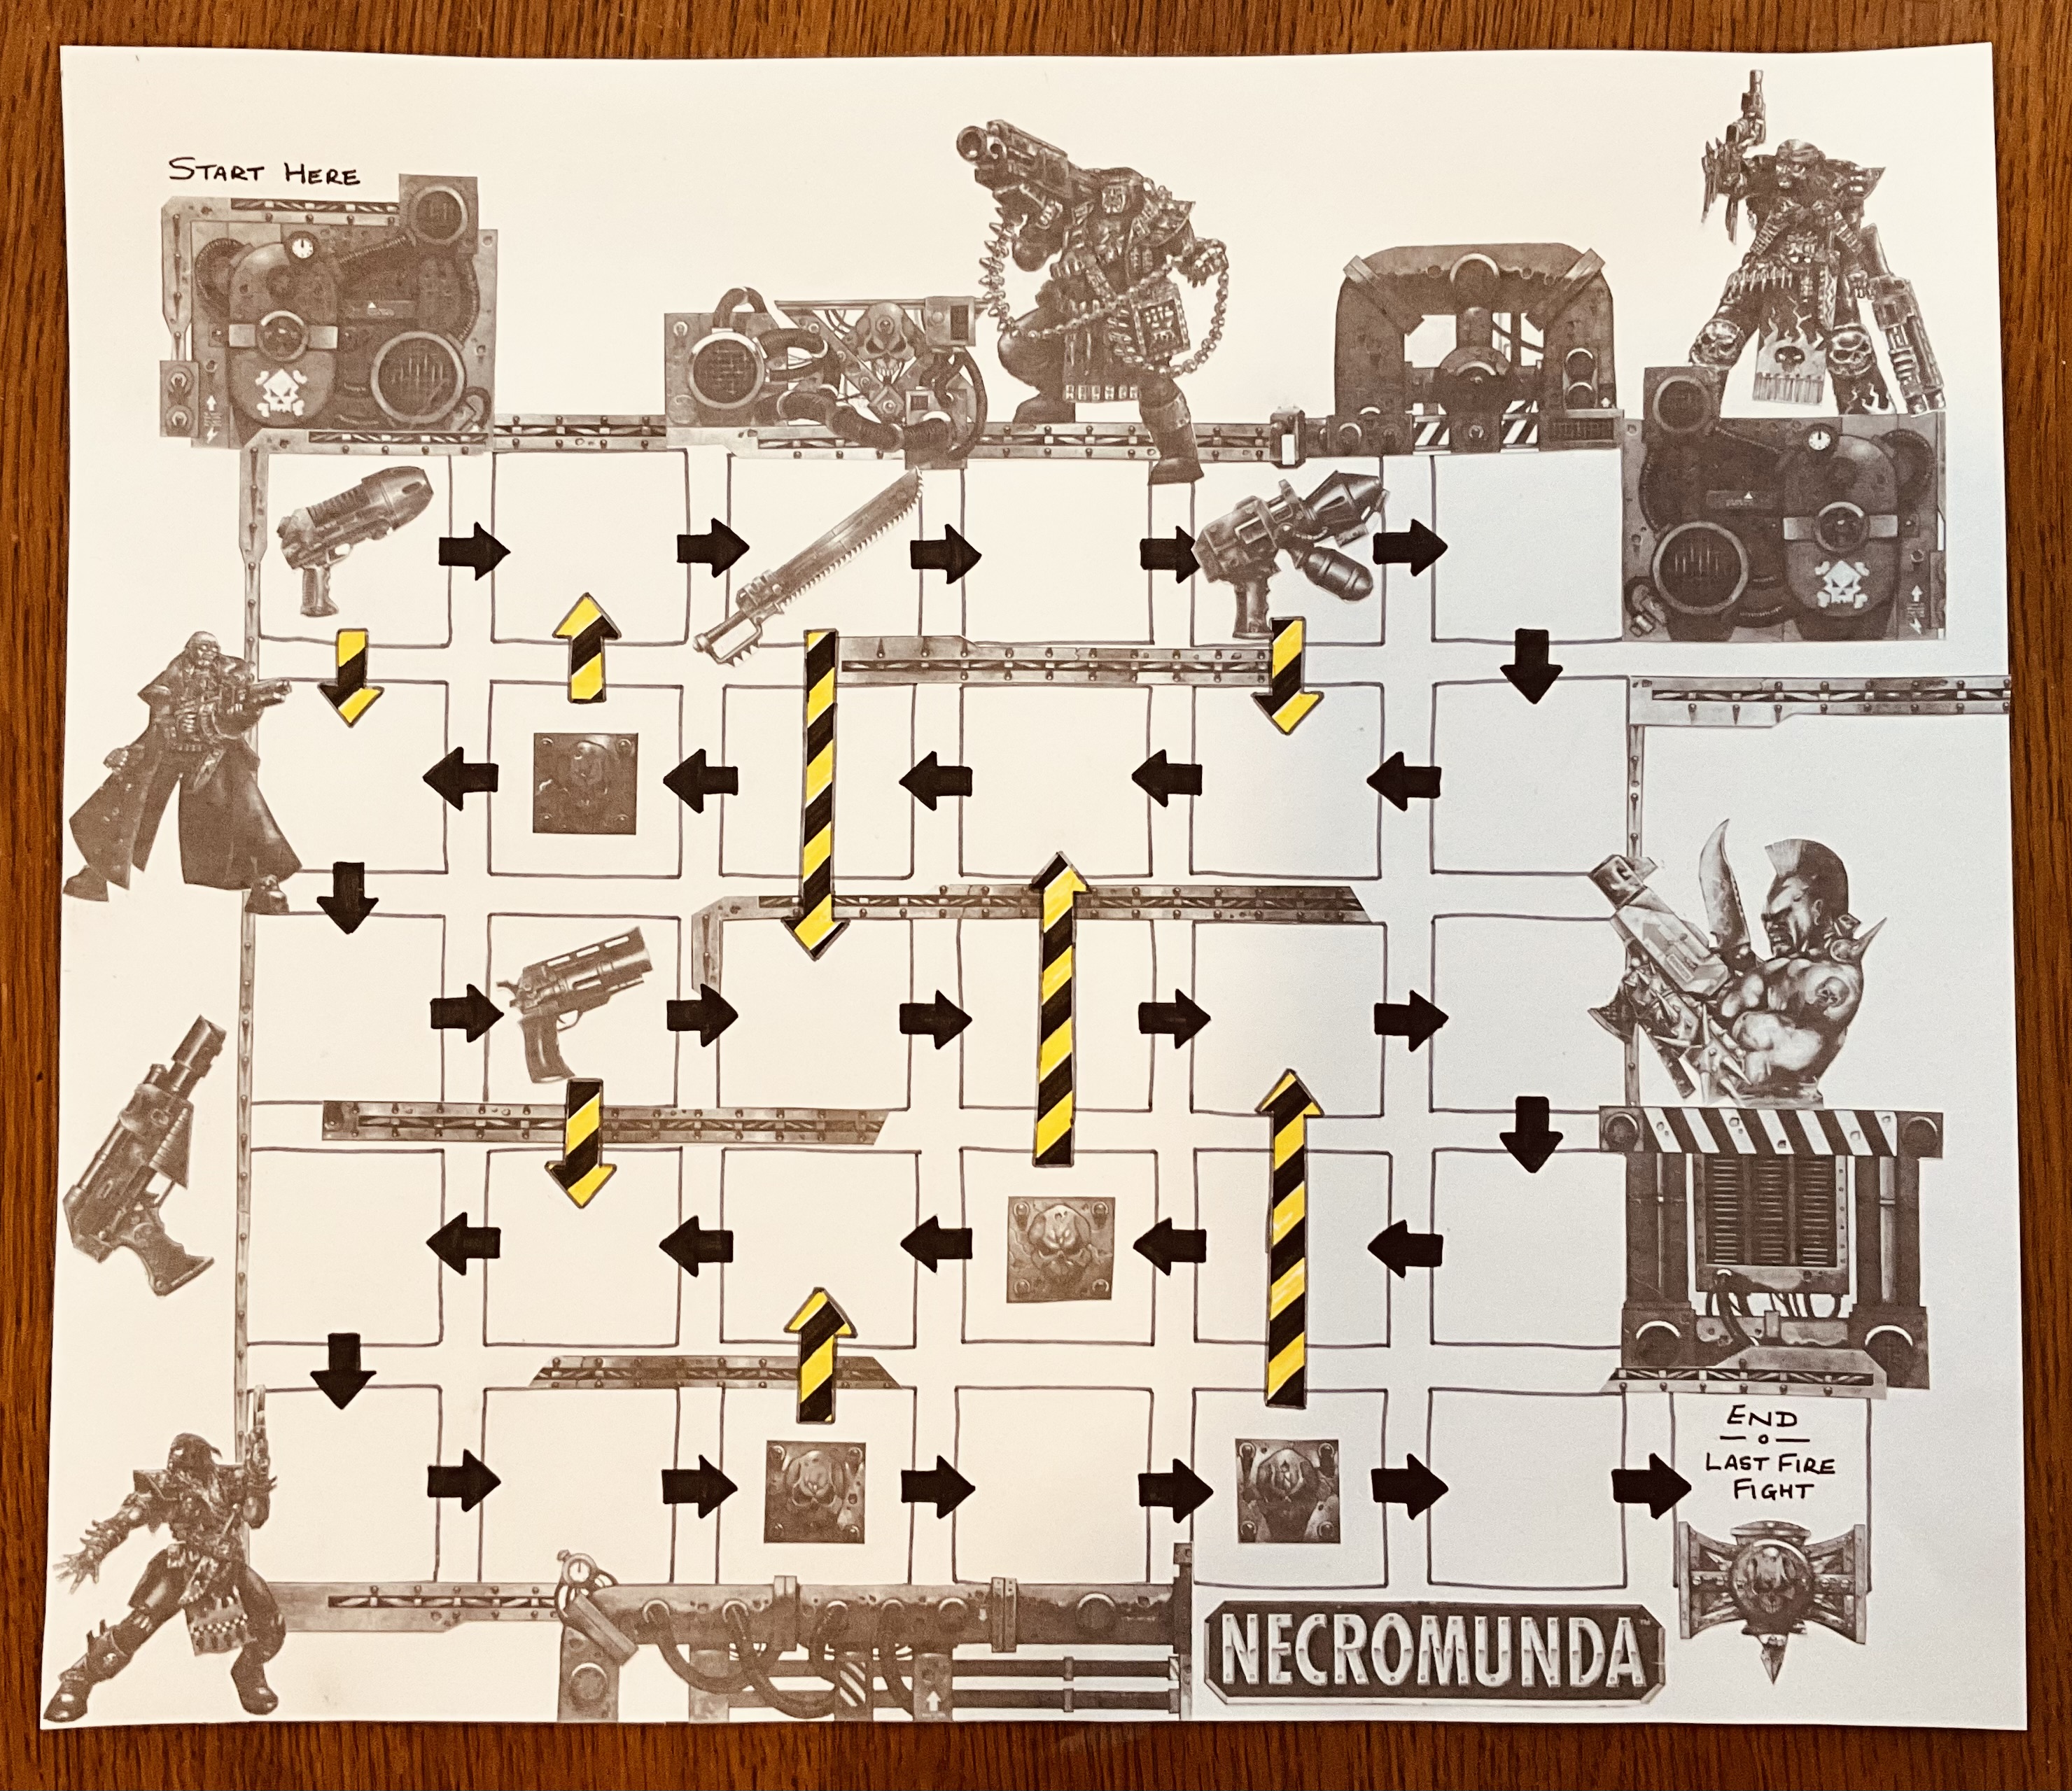
The campaign board.

To help immerse ourselves in the campaign we decided to create the campaign board using a collage approach of sticking pictures from the original set of rules which I had downloaded and printed. The board represents Hive Quartus and the objective of the campaign is for a player to get their gang from the top left corner to the bottom right corner.

Hive Quartus is a hive city built upon the remains of an ancient hive destroyed in a cataclysmic event. The ruins of the previous hive serve as a foundation for the new hive, with remnants of crumbling spires and shattered walkways interspersed with newly constructed structures. The hive is a testament to the resilience and resourcefulness of its inhabitants, who have built a thriving community amidst the ruins. Gangs in Hive Quartus often emerge as scavengers and explorers, venturing down into the unexplored sections of the destroyed hive in search of hidden treasures, forgotten technologies, and the remnants of the past.

The making of the campaign board.

As we embarked on our quickly setup campaign, we began with a basic set of campaign rules that served as a starting point. However, as we progressed with the campaign, delving deeper into the depths of Hive Quartus, we found ourselves modifying one or two of the rules to better suit the campaign and narrative. The rules written below are the final rules with all the modifications we made along the way. 

The Shadow Syndicate gang moving forward cautiously.

The Campaign Rules

In this board game, both players have the opportunity to create and name their gangs. Each gang consists of 7 figures, including one designated leader, who should also be named. The game begins with both players placing their gang token on the starting point of the campaign board.

During each campaign turn, a player can choose between rolling a dice to move their gang token forward a number of squares equal to the dice score or staying in place to recruit a new gang member as a replacement for a figure lost during a skirmish game. It's important to note that a gang cannot exceed 7 figures.

If a player lands on a square with a hazard symbol (depicted as a yellow and black arrow), they must follow the arrow and move their token to the indicated square.

Whenever a gang token moves down to a new level (not upwards), a skirmish game is triggered. The opponent in the skirmish game depends on the following situations:

  1. If there is another gang token on the same level, a skirmish game is fought between the two gangs using all their available figures.
  2. If there is no other gang token on the level, an opponent needs to be created. Before starting the game create various pre-designed gangs to choose from, such as cultists, local law enforcers, Mechanicus explorers, or hell spawn. The opposing gang which can be randomly selected from the available opposition will consist of the same number of figures as the player's gang.

Skirmish games are best played using predefined scenarios or custom-made scenarios.

After a skirmish game, any figures removed from play will have a dice rolled to determine if they survived. On a dice score of 3 or higher, they recover and rejoin the gang. Otherwise, they are considered dead. A player can recruit new gang members my choosing not to roll to move his token during his campaign turn.

If a leader is lost during the game, a new leader must be selected and given a name.

If a gang wins a skirmish game, they have the opportunity to promote one of their gang members to a veteran attacker or a crafty defender. These traits provide combat advantages in either attacks or defence. In the One-Hour Skirmish Wargames rules we used, the promoted figure is allowed to draw an additional card during combat for defence or attack depending on their choice.

After each skirmish game, players return to the campaign map for another turn.

The first token to reach the end square is the winner.

Local law enforcer may have met his match.

A Campaign Run Through

We both decided upon our gang names and leader names. My daughter’s gang was called the Shadow Syndicate lead by Gregor and mine were the Rust Reapers lead by Vorrik. We each selected 6 followers to make a total of seven gang members.

Gang tokens placed on the board at the start.

Turn 1

The Shadow Syndicate rolled a score of 4, allowing them to move their gang token 4 squares on the board. Similarly, the Rust Reapers rolled a score of 6, enabling them to move their gang token 6 squares. As both gangs have reached a new level, a skirmish game will take place between them.

Campaign turn 1

During the skirmish game between the gangs, the Shadow Syndicate emerged as the victors. As a result, they promoted one of their gang members to the status of a veteran attacker. However, they did suffer a loss as one of their gang members was eliminated during the game and failed to recover, rolling less than 3. 

On the other hand, the Rust Reapers may not have been successful in the skirmish, but they did manage to come out unscathed. All of their eliminated gang members successfully recovered and rejoined the gang.

Turn 2

The Shadow Syndicate opted to forgo rolling the dice, remaining stationary so they could recruit a replacement gang member for the one they lost in the previous skirmish.

Meanwhile, the Rust Reapers rolled a score of 2, granting them the ability to advance their gang token by 2 squares on the game board. As a consequence of descending to a new level, a skirmish game is triggered between the Rust Reapers and a randomly chosen gang of equal size.

The Rust Reapers advance 2 squares and the Shadow Syndicate stay put to recruit a replacement.

During their skirmish with a gang of Cultists, the Rust Reapers were unable to achieve victory and suffered a loss. Unfortunately, their gang member fails to roll a 3+ to recover and rejoin the gang. They are now down to 6 members.

Turn 3

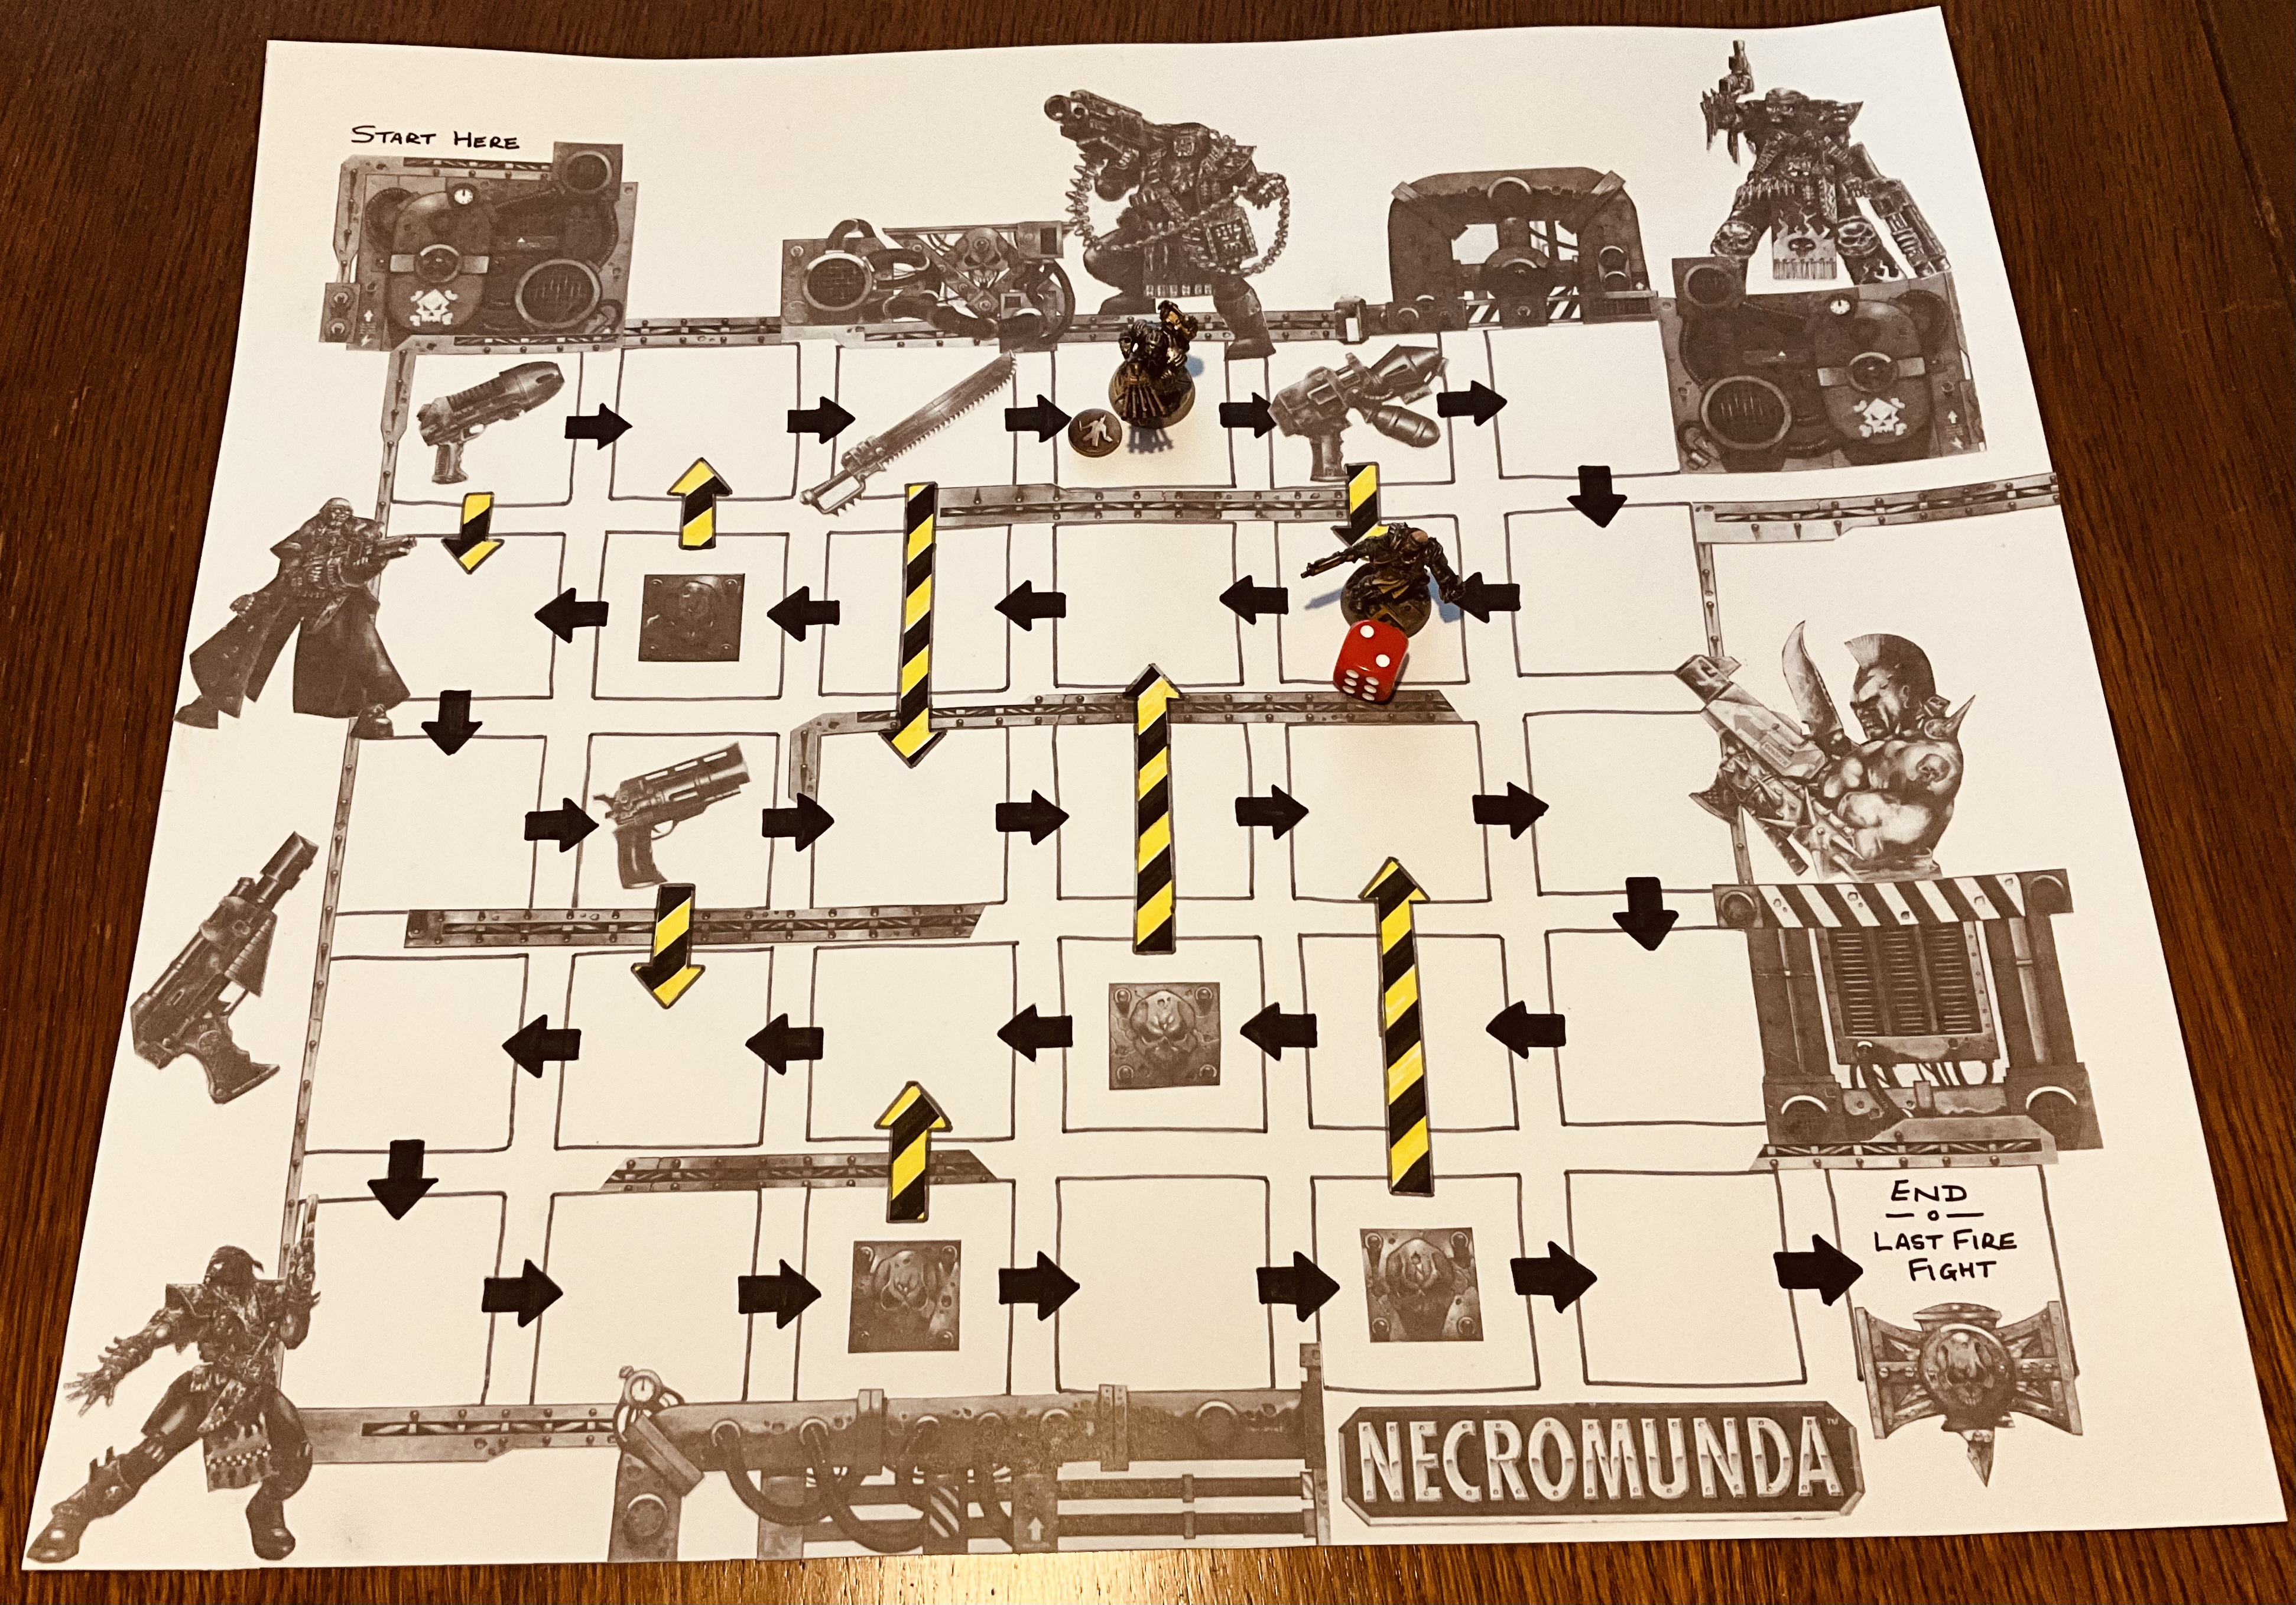
With a roll of 3, the Rust Reapers successfully advanced their gang token by 3 squares on the board. Unfortunately, they landed on a square with a hazard arrow, which compelled them to move back to a higher level. 

On the other hand, the Shadow Syndicate rolled a score of 2, enabling them to move their gang token 2 squares.

Since neither gang descended to a new level, the Rust Reapers merely returning to a previously visited level, there was no skirmish game taking place this turn.

Campaign turn 3

Turn 4

The Rust Reapers made the decision to dedicate their turn to recruiting and chose not to roll the dice for movement.

While the Shadow Syndicate rolled a score of 4, granting them the ability to move their gang token 4 squares on the board.

As a result of the Shadow Syndicate descending to a new level, a skirmish game takes place between them and a randomly selected gang of equal size.

Campaign turn 4

In their skirmish, the Shadow Syndicate encountered a gang of Cultists, possibly the same ones who had previously clashed with the Rust Reapers. Unfortunately, the outcome remained unchanged, with the Cultists emerging as the victors. However, there was a bright side with the Shadow Syndicate managing to successfully recover all their lost gang members following the skirmish.

Turn 5

The Rust Reapers rolled a score of 2, allowing them to progress by 2 squares on the board.

The Shadow Syndicate rolled a score of 3, enabling them to move their gang token 3 squares downward to a lower level.

As the Shadow Syndicate descended to a new level, a skirmish game takes place between them and a randomly chosen gang of equivalent size.

Campaign turn 5

During the skirmish, the Shadow Syndicate faced off against a group of local law enforcers. Fortunately, the Shadow Syndicate emerged as the victors in the clash, without suffering any losses. As a result of their victory, a second member of their gang will now benefit by having a veteran attacker trait.

Turn 6

The Rust Reapers achieved a roll of 5, allowing them to advance their gang token by 5 squares, ultimately descending to a lower level.

While, the Shadow Syndicate rolled a score of 4, allowing them to move their gang token 4 squares, but still remaining on the same level.

Due to the Rust Reapers descending to a new level, a skirmish game is fought between them and a randomly selected gang of equivalent size.

Campaign turn 6

During the skirmish, the Rust Reapers confronted a gang of Cultists (they are everywhere). Despite emerging victorious, the Rust Reapers suffered a significant loss as their leader, Vorrik, fell in battle.

Turn 7

The Rust Reapers made the decision to focus on recruitment and selecting a new leader after losing Vorrik in their previous turn.

On the other hand, the Shadow Syndicate rolled a score of 6, so they progressed their gang token 6 squares and descend to a new level.

As a result of the Shadow Syndicate descending to a new level, a skirmish game takes place between them and a randomly chosen gang of equal size.

Campaign turn 7

The Shadow Syndicate came across a group of Mechanicus explorers scouring the depths of the hive for ancient technologies. In the ensuing skirmish, the Shadow Syndicate emerged as the victorious gang, achieving the win over the explorers without suffering any losses. As a result, another member of the gang was chosen to acquire the veteran attacker trait, enhancing their combat capability.

Turn 8

The Rust Reapers successfully rolled a score of 6, enabling them to progress by 6 squares on the board and descend to a lower level.

Similarly, the Shadow Syndicate rolled a score of 2, allowing them to move their gang token 2 squares and move to a new level below.

As both gangs have descended to a new level, two skirmish games are fought between each gang and a randomly chosen gang of equal size.
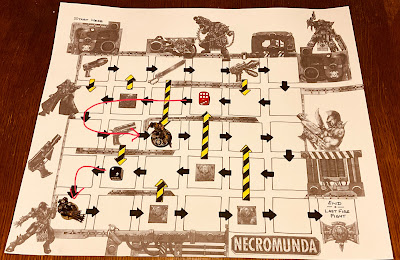
Campaign turn 8

The Shadow Syndicate encountered a group of Hell Spawn, creatures that dwell in the depths of Hive Quartus. These fast-moving have monsters have razor-sharp talons and teeth, making them formidable opponents in close combat. In the skirmish against the Hell Spawn, the Shadow Syndicate emerged as the victors without suffering any losses. Another member of their gang was chosen to acquire the veteran attacker trait, making them a very formidable gang.

A couple of levels above, the Rust Reapers, now under the leadership of Loric, battled a unit of law enforcers who they managed to successfully defeat, but unfortunately lost one of their own gang members in the process.

Turn 9

The Shadow Syndicate achieved a high roll of 6, which enabled their gang token to be advanced 6 squares and to reach the end of their journey as they discovered hidden treasures and ancient technology. A  victory for both the Shadow Syndicate gang and my daughter. Congratulations on their success!

Campaign turn 9

End of Game

The campaign was wrapped up in one day and provided 8 enjoyable skirmish games against a range of opponents and in a variety of scenarios. Throughout the campaign, the opposing player took on the role of the opposition whenever random gangs were encountered.

Initially, the plan was to have a final showdown between the gangs upon one of them reaching the end. However, we decided that simply reaching the end itself was a significant achievement, making it a satisfying conclusion to the campaign.

A member of the Shadow Syndicate.

My daughter and I set aside an entire day to gaming. The morning was devoted to creating the campaign board, and the games themselves were fought throughout the afternoon and evening with breaks for tea. Although we were both tired by the end, we found it to be a most enjoyable day.

Saturday, 24 June 2023

English Civil War unit basing decisions and face-to-face sci-fi games

I recently painted two cavalry bases for my English Civil War (ECW) armies. This will provide each side has an equal number of cavalry units which will allow me to use units consisting of two bases. Further details on the whys and wherefores of this idea are explained below. 

A Royalist cavalry base.

It has been quite some time since I last painted ECW figures and I had to remember my painting approach, which involves block painting initially, followed by adding highlights of a lighter colour to clothing, armour, and horses as needed and to breakup the blocks of colour. This works well providing there is no close scrutiny.

A cavalry base for the Parliamentarian army

I have cleared the tabletop in preparation for some face-to-face sci-fi skirmish games with my daughter, who is visiting for a week. However, before starting the tabletop tidy up I was trying to decide whether I prefer gaming with fewer larger units consisting of two bases or more smaller units made up of a single base. I treat the larger units as brigades, while still keep the independent units like dragoons and artillery as single bases. These independent units are eliminated with half the hits compared to the larger two base units.

A game setup using the larger bases representing brigades of infantry and cavalry. Dragoons and artillery are still single bases and take half the hits before elimination.

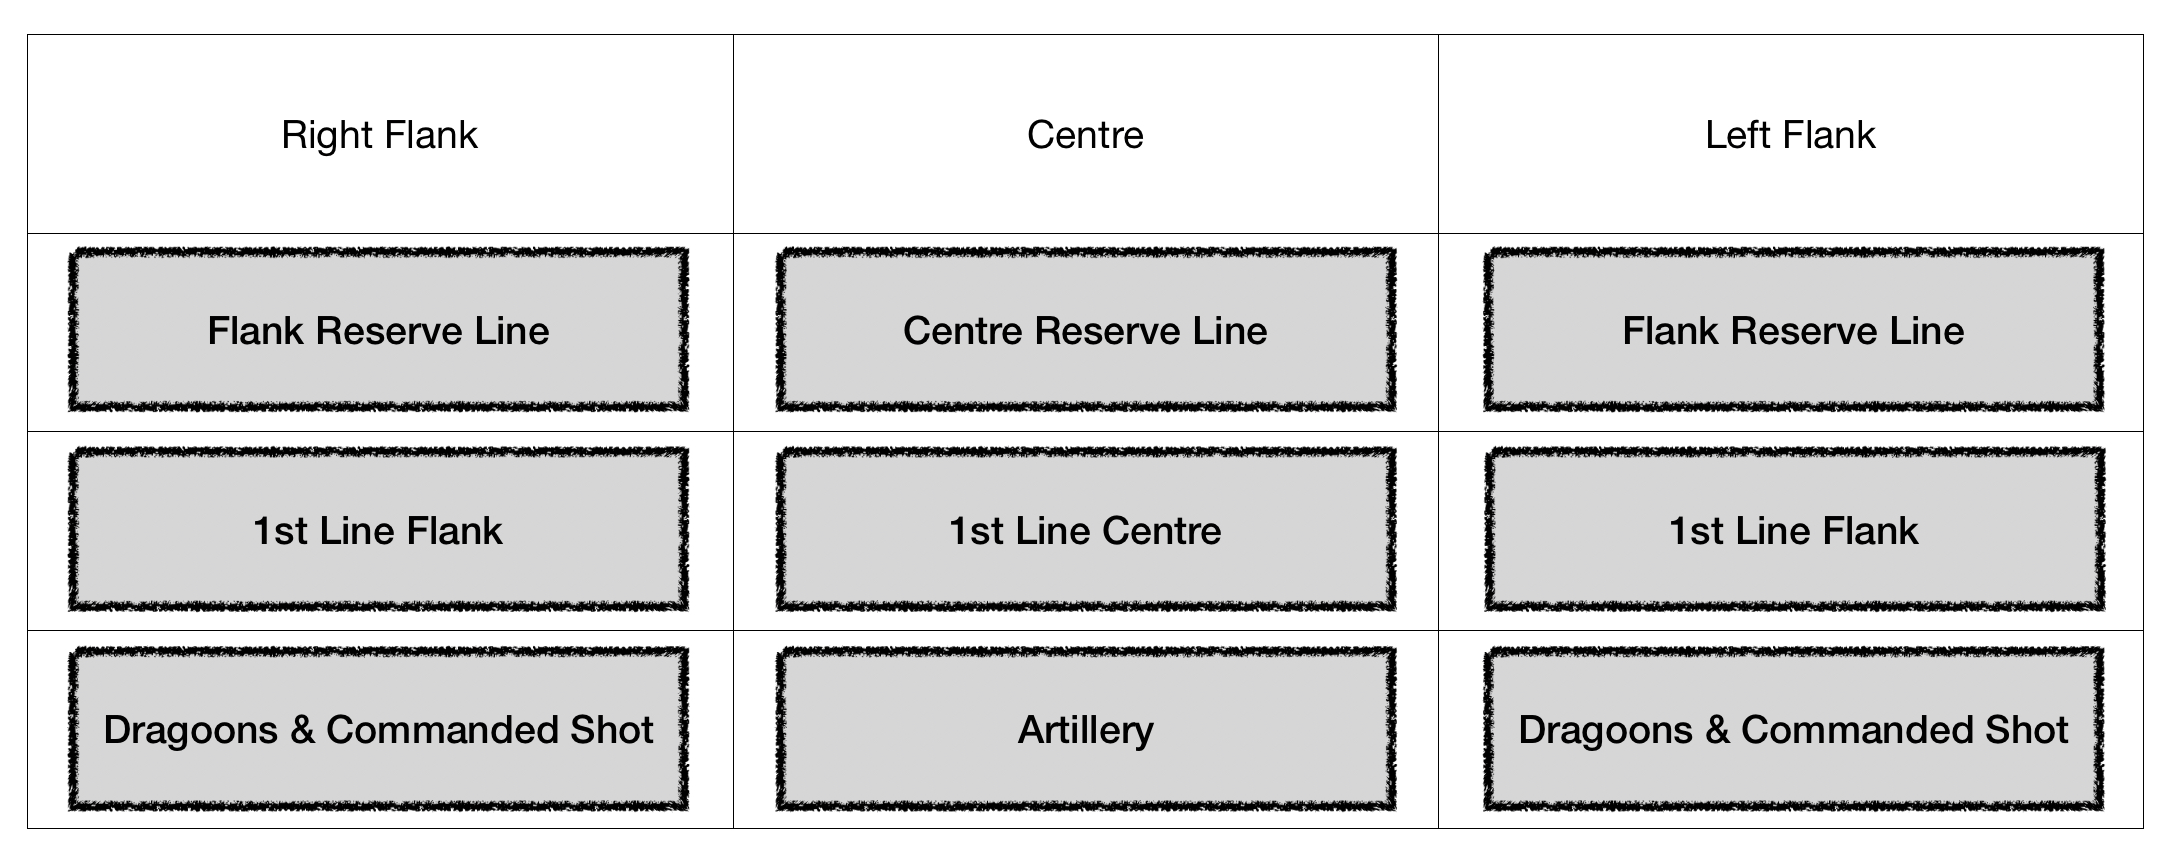
The use of two base units aligns well with the army’s deployment of flanks and centre units, with their first lines, reserve lines, and independent dragoons and artillery positioned in front.

An army’s deployment zones.

However, when using individual base units, I have added a rule where the units in a line, the first line centre for example, must be of the same type and must remain within 3" of another unit. Essentially, I am treating them as one unit for the purpose of movement orders and unit cohesion. However, they still engage in combat separately.

An example of Brigades using single based units.

Here are some pros and cons I have discovered so far for the different unit basing options:

  • With larger units there is a clear distinction between single base independent units like dragoons, commanded shot, and artillery, and the two base cavalry and infantry brigades.
  • Fewer units speed up the shooting and combat phases.
  • Having a greater number of units with single bases allows for additional rules to be added for unit qualities, such as Raw, Trained, and Veteran. 
  • When using the solo wargaming decision cards I am developing, having fewer units does help simplify things.
  • I have a slight preference for the aesthetic of single based units, when I look at some of the old engravings and paintings.

Engraving of the battle lines at Naseby.

Another view

For the moment I have put all these considerations aside as I now prepare to play few face-to-face sci-fi games.

A very different tabletop from the lush green fields of England from the 1640’s.

Lots of sneaking around in the sci-fi game.


Saturday, 17 June 2023

Some painting and ECW games

Following the conclusion of a two-week-long Ancients mini-campaign with some 13 odd posts, this week has been somewhat less hectic, allowing me to shift my focus towards painting some units. I have a number of completed armies, they being the: Samurai, English Civil War, and Ancients (Punic War) armies, and over the past year I have purchased a few extra figures so I may to add extra units to these armies.

Some simply painted plastic Gauls. A combination of Italeri and HaT origin.

My plan is paint these extra units in small batches of one or tow units. While I find painting to be an  enjoyable aspect of the wargaming hobby, it can be one I easily lose momentum with and lose the painting habit. I am hoping with picking off a variety of units will get me back into the swing of painting. 

The first figures to be pulled out of their storage container were some Gauls from which two Skirmisher units were added. A quick could have unpainted Gauls showed I should have enough spare plastic 1/72 scale figures to complete a small army when combined with the Gauls I have already painted in the Punic army.

An ECW game setup.

Next up will be some ECW figures as an English Civil War game is setup on the tabletop as I revisit my solo gaming decision cards.

Sunday, 11 June 2023

An Ancient Campaign - Part 12 - Wrap up notes

This is a wrap up post on the ancient campaign I have been playing over the last two weeks. It involved  creating a campaign map, narrative background, and playing a total of five tabletop games as the campaign progressed.

The questions I will try to answer are:

  • How effective was the campaign structure and whether it provided the necessary prompts for crafting a background narrative for the games played?
  • How the use of the AI tool - ChatGPT - helped with generating the narrative both for the games and the campaign details?
  • How did the modifications to the One-Hour Wargames Ancient Rules work out?

A quick recap…

The campaign used a game format similar to a children's "race to the finish" style board game, as shown on in the photograph below. The objective was for the Carthaginian army to get from the starting point to the finish at the city of Aurelia by rolling a dice and advancing their army token along the road squares. The number of turns they take to reach Aurelia, impacted the readiness of the Roman army for a final and decisive battle. 

Whenever the Carthaginians passed through a city, a tabletop battle game would be played. A Carthaginian victory in these battles would enhance their army's readiness in the decisive battle. Along the road to Aurelia, fate could intervene through various advantages and disadvantages triggered by specific road squares. 

Upon reaching Aurelia, the campaign outcome would be decided by a final tabletop game where each armies’ readiness would come into play.

Campaign map setup at the start of the campaign.

In order to create the background for the campaign, including the names of the Roman client state, cities, and commanders, I used the free online AI tool, ChatGPT. I also used ChatGPT to take my brief game notes from each of the tabletop game and help write a battle narrative.

This mini campaign had a total of five tabletop games, including the decisive final game, connected by a campaign narrative to help set the scene for each game. One-Hour Wargames scenarios were selected based upon the narrative where possible, else a straightforward pitch battle was used.

A game underway

The tabletop games were played using the Ancient Rules from the book “One-Hour Wargames” by Neil Thomas. These included additional rules for: War Elephants, Gaul Warbands, and veteran units, along with modifications to movement rules.

Did the campaign help to provide a narrative for the games?

The campaign structure certainly helped to provide the narrative and context for when battles were transferred to tabletop games. There were three areas where I found it useful:
  • Adding specific details about the hypothetical client state of Rome, Luminaria, such as its cities and their individual characteristics, helped contribute to setting the scene. This context added depth to the games, giving them a purpose beyond simply achieving a scenario’s objectives.
  • The process of designing the campaign map, apart from being enjoyable, helps to reinforce the connection between the narrative and games.
  • Adding fate squares with descriptions, such as “Army Rested” advance 2 squares, introduced an element of unpredictability to Carthage’s campaign march, and in some cases influenced the selection of scenarios from One-Hour Wargames.
The second game underway.

A couple of adjustments were made to the campaign rules. While not being specifically related to the campaign narrative, it is worth noting them:
  • Initially, the rules allowed for additional chance cards for both armies to be used during the final decisive battle. However, I thought this might be too chaotic in the games. So instead, a number of units would be designated as veteran units, thereby providing advantages in the final battle.
  • Another modification involved the decision not to reduce the Roman battle readiness by 3 steps following any loss. Since the Carthaginians had already gained one veteran status unit for each game they won. It seemed unnecessary to impose an additional penalty on the Roman forces.

Did the AI tool - ChatGPT - help with generating narrative?

I used ChatGPT for: 
  1. Creating the campaign background and the hypothetical country of Luminaria.
  2. Writing the campaign narrative as each map turn progresses.
  3. Writing battle reports.
ChatGPT proved to be a very useful resource for creating background for Luminaria, its cities, and the underlying cause of the conflict. I simply requested a hypothetical Mediterranean country from 200BC and a list of 15 cities, the tool generated the information within a matter of minutes. Similarly, when seeking names and backgrounds for the commanders, it delivered a list of 5 names from which I could pick the ones I liked best. Although some rewriting (retyping) of the generated text is necessary, the process is straightforward and significantly reduced the time and effort required to develop the campaign background.

A remotely played game in progress.

The approach used for writing the campaign narratives and battle reports was slightly different. Initially, I write a series of statements outlining a campaign turn’s progress or actions when describing the tabletop games. These statements are copied and inputted into ChatGPT, where the tool is asked to reword the content. Adjustments were always necessary to refine the generated text. However, this approach did reduce the time I typically require for writing up a game report. I also think the overall quality is an improvement on what I would typically produce. 

Anyway, definitely time saving and useful for developing narrative backgrounds.

Did the modifications to the OHW Ancient Rules work out?

I opted to use OHW Ancient rules for the games as I often use these, or variation of the rules, with my games. They are my favourite rules. However, certain additions were necessary to the book rules to accommodate War Elephants, Gaul Warbands, and Catapults. 

While the answer to the question is yes, it is worthwhile just listing down the rule additions for those interested:

Gaul Warbands: These units have a movement range of 9 inches, and can move through woods and difficult terrain. In combat, Gaul Warbands roll a D6+2. They are considered unarmored.

Catapults: These are allocated to infantry units, and can shoot up to 36 inches distance. When determining hits, roll a D6+2 and ignore armour. However, once the infantry unit they were assigned to moves or is engaged in combat, they are removed from play.

War Elephants: These units have a movement range of 9 inches. They cannot move through woods or difficult terrain. In combat, they rolled a standard D6, and they ignore armour. Elephants are considered armoured. Upon elimination, War Elephants may go berserk. This was determined by rolling a D6:
  • A result of 1 or 2 results in an immediate charge against the nearest friendly unit within a 12-inch radius, inflicting D6 hits before being removed from play.
  • A result of 3 or 4 results in an immediate charge against the nearest enemy unit within a 12-inch radius, inflicting D6 hits before being removed from play.
  • A result of 5 or 6 results in no berserk action, and the elephant unit was removed from play like any other unit.
Other non-unit changes I made include:

Movement: Any unit that makes a pivot at the beginning and end of their movement will have their overall movement reduced by 3 inches. No deductions for just one pivot.

Veteran units (Only for Heavy Infantry and Cavalry) - Whenever a veteran unit is involved in combat with a non-veteran unit, they will roll two dice and choose the highest scoring dice, discarding the lower scoring one. This modification aims to reflect the enhanced skill and effectiveness of the veteran unit in battle.

Note - a quick thank you for comments on the veteran rule. I had originally always used the higher dice, but it was highlighted that out two opposing veteran unit would be over too quickly. The suggested option to only apply the rule when a veteran opposes a non-veteran unit works very well.

A photo from the first game.

I also used chance cards to introduce unpredictability. Each chance card is resolved during the turn it is drawn and cannot be carried forward to subsequent turns. The 15 cards are:

  • 5 x No Event. Nothing happens
  • 3 x Confusion. A player’s units cannot move, but are allowed to pivot.
  • 1 x Clash of Shields. All combat this turn can re-roll the D6, but must accept the second result.
  • 1 x Darken the Skies. A player’s units when shooting this turn add 2 to their D6 scores.
  • 2 x Initiative. One unit immediately makes a move, shoots, or conducts a round of combat if already engaged in combat. The unit can still be activated as normal later.
  • 2 x Rally. A player halves one unit’s hits round up (eg. 9 hits reduced to 5). The same unit cannot be rallied twice in a game.
  • 1 x Panic. The unit with the most hits takes another D6 hits. Where there is more than one unit to choose from, the player chooses.