American War of Independence Wargaming Rules
These rules are based around rules from the book One-Hour Wargames by Neil Thomas.They are for designed for play on a 6” gridded tabletop. If you prefer free movement convert each square to a 6” distance for measuring.
 |
| Tabletop set up with dice (D6) and matchsticks as hit markers |
Equipment Required
A few standard dice (D6) and tokens or matchsticks to track unit hits.A 4x4 foot or 4x5 foot wargaming table marked into a 6” square grid and terrain. (a 4x5 table gives a tad more width for flanking moves).
Units
Each unit has a movement allowance, combat factor and hits shown in brackets as (movement-combat-hits). Hits indicate how many hits a unit can absorb before becoming ineffective, although terrain and commanders can change this number.- Line Infantry (1-2-6) representing British infantry, Hessian Infantry and Continental Infantry.
- Skirmishers (2-1-5) - representing light infantry and other skirmishing units.
- Shock Troops (1-2-7) - representing British and Hessian Grenadiers
- Cavalry (3-3-5) - Light cavalry and Dragoons
- Artillery (1-1-4) - Represent the light 12 pounder guns commonly available to British and American artillery batteries.
- Commander - representing command influence and not the commander themselves
- Militia (1-2-4) - representing America Militia and Loyalist Infantry units
- Frontiersmen (2-1-4) - American skirmishers with rifles
Line Infantry
Infantry played a vital role in the American War of Independence due to the limited availability of artillery and cavalry. They employed linear techniques and traded volleys. Once formed in line their movement was limited.
 |
| British line Infantry (all models are from the old Peter Laing range) |
Skirmishers
Light infantry were tactically important on the battlefield providing manoeuvrability to the armies who often fought in the difficult terrain.
 |
| British Line Infantry |
Shock infantry
The British who formed Grenadier units from their line infantry Grenadier companies to create an elite units.
 |
| British Grenadiers |
Cavalry
Both sides used light dragoons for scouting and raiding in conjunction with skirmishers. In set battles cavalry were often positioned on the wings and used to follow up successful attacks or provide a rear guard.
 |
| American Cavalry |
Artillery
The use of artillery was hampered by the rough terrain. Both sides generally used civilian drivers and teams to move their guns, who were reluctant to become involved once the shooting started. To reflect this artillery must cease movement for the reminder of the game after their first shot.
 |
| American Artillery Unit |
Commander
Commanders are not really units. Instead they represent the focus of commands and are placed anywhere adjacent to any friendly unit.
 |
| American Commander in the same square as Continental infantry unit |
Militia
Both sides used Militia (Provincial units in the case of the British) who which lacked the well drilled disciple of line infantry. Provided they were well supported or able to use available cover they could prove very capable.
 |
| American Militia |
Frontiersmen
Often excelled at skirmishing and were skilled riflemen. While they did not have the discipline and cannot take too many hits, they do benefit from re-rolling failed shooting hits.
 |
| American Frontiersmen |
Sequence of play
Each complete turn comprises two player turns. Each player follows the sequence listed below in their turn:- Orders
- Rally
- Movement
- Commander Movement
- Combat (shooting and charges)
- Eliminating units
- Commander’s Resolve
Orders
A player rolls 1D6 to determine how many order points (OP) they are allowed for the turn. Using these OPs a player decides which units need to be moved. It costs 1OP to move a unit in the same square or any adjacent squares to the commander and 2OPs for a unit 2 or more squares away from a commander.A player does not have to use all OPs, but unused OPs cannot be carried forward and are lost at the end of a players turn.
Note - The positioning of your commander and use of OPs reflects some of the difficulty in coordinating movement often in difficult terrain.
Movement
A unit’s movement allowance is the number of squares they can move. To move a unit must expend 1 or 2 OPs depending upon their distance from their commender (see Orders).- Line Infantry, Shock Troops, Artillery and Militia - 1 square
- Skirmishers and Frontiersmen - 2 squares
- Cavalry - 3 squares
As part of their movement units may enter an enemy unit’s zone of control. However, they may only exit a zone of control if they have a greater movement allowance than the enemy unit(s) they are in contact with.
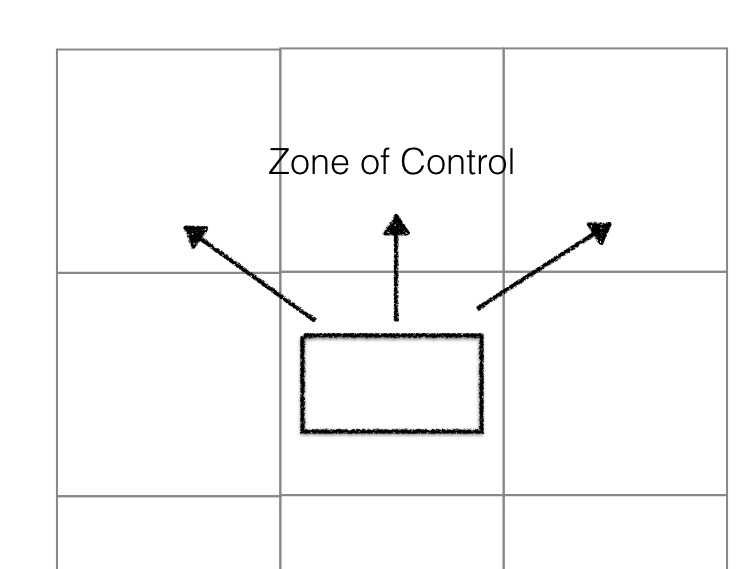 |
| Units must face a square side and exert a 45 degree forward facing zone of control |
A commander exerts no zone of control and is removed and returned in the player next turn if an enemy unit moves into the same square.
 |
| Frontiersmen move 2 squares, line infantry 1 square and cavalry 3 squares |
 |
| Line infantry move forward 1 square at 45 degrees |
Note - Once engaged in combat it was difficult to extract troops from that engagement unless they are cavalry, frontiersmen or skirmisher type units, and providing the unit being disengaged from is slower only these units may disengage.
Turning
Units that do not move are able to turn at no OP cost to face an enemy unit or threat, but will not be able to engage in combat for that turn. |
| Frontiersmen treated the flank of British line infantry |
 |
| At on OP cost British line infantry can turn to face treat |
Terrain
Terrain effects units in the following way:- Woods - only Skirmisher and Frontiersmen units can enter and get cover
- Towns - only Infantry and Skirmishers may end their move in a town, and only one unit may occupy a town.
- Marsh/Lakes - impassable to all units.
- Rivers - impassable except at bridge/ford.
- Roads - Artillery get 1 free square move if any part of the movement is along a road.
- Hills - Artillery can re-roll failed to hit D6 rolls.
- Rough Terrain (including Fields and Fences) - American Militia, Frontiersmen and Light Infantry get cover.
- Entrenchments - all infantry and artillery units may use entrenchments. They get a cover and must remain static.
Interpenetration
Only Skirmisher, Frontiersmen and Cavalry units may move through other units.Commander Movement
After all unit movement is complete, the commander may move to a new position on the table. The command unit cannot be placed adjacent to any square occupied by an enemy unit, unless the square is occupied by a friendly unit.A Commander does not count as a unit and has no combat capability. If a square with a commander in is occupied by opposing units then they are removed and can be placed back on the table at the next commander movement, which means no OP will be available on the next turn.
Note - A commander can return anywhere on the table and with the commander move being after normal unit movement, units will miss the opportunity to move. This reflects the confusion when a commander gets caught up in the action.
Combat
Units may not engage in combat if they have moved. Combat takes for form of shooting or charges. Only cavalry and shock troops are allowed to charge.Note - cover is not dealt with in the combat sections, but is instead managed through increasing the number of hits a unit can take (see Eliminating Units).
Shooting
Units (excluding cavalry) roll 1 D6 for each combat factor. All D6 rolls hit on a 4+ when shooting and units have a 45 degree field of fire, unless they are infantry of any type occupying a town, then they have a 360 degree field of fire.When there are multiple units a unit can shoot at, infantry of all types must target any enemy unit directly in front of them.
Artillery - when shooting roll 1D6 and have a shooting range of 4 squares on a 45 degree angle from the square side they are facing. If firing from a hill artillery can re-roll any failed to hit rolls. Artillery may shoot over other units.
Line Infantry, Militia and Shock Troops - when shooting roll 2D6 and have a range of 1 square on a 45 degree angle from the square side they are facing.
Skirmishers and Frontiersmen - when shooting roll 1D6 and have a range of 1 square on a 45 degree angle from the square side they are facing. Frontiersmen armed with rifles are allowed to re-roll a failed to hit rolls.
Note - Frontiersmen are allowed to re-roll misses to reflect their skirmishing ability and marksmanship.
Charging
Only Cavalry and Shock Troop units can charge. Like shooting charges hit on a 4+, but all hits scored in a charge are doubled and failed hits result the hit being upon the attacking unit (but they are not doubled).Cavalry - when charging roll 3D6 and have a range of 1 square on a 45 degree angle from the square side they are facing.
Shock Troops - when charging roll 2D6 and have a range of 1 square on a 45 degree angle from the square side they are facing.
 |
| British cavalry charge a Militia unit. They roll two 4+ which are doubles to inflict 4 hits on the Militia unit. However, they fail to hit with one D6 and as a consequence of the charge take 1 hit. |
Note - charges can be quite devastating, but can come at a price with units become disorganised after performing a charge. To reflect this units failing to hit the enemy unit take hits themselves.
Flank and rear attacks
Any shooting or charge attacks are doubled if the attack is on the flank or rear of a unit.
 |
| American line infantry case 1 hit and their Frontiersmen counterparts roll a 6 which is doubled to 2 hits because they are attacking the flank. |
 |
| The blue arrow shows the unit facing direction. The red arrows show where flank and rear attacks would be directed from. |
Eliminating Units
A hit represents a combination of casualties, exhaustion and disorder caused to a unit by combat. Units are eliminated when they exceed their maximum number of hits (which can increase if in cover).- Artillery, Militia and Frontiersmen Unit = 4 hits
- Light Infantry = 5 hits
- Cavalry and Line Infantry = 6 hits
- Shock Troops = 7 hits
If a unit is in cover, the number of hits they can take increases by 2. This create a situation where a unit cannot leave cover if it has taken more than its standard number of hits. For example a Militia unit has taken 5 hits while in a town, if it were to leave the cover of the town it would immediately be removed from play. The commander would have to rally (remove hits) before it could safely leave the town.
Note - The reason for the approach of changing the number of hits a unit can take when in cover, rather than reducing the likelihood of a hit, is to encourage units to either hold a specific terrain area or take hits and retire after delaying enemy units.
Rally
A commander can attempt to rally any unit with 1 or more hits. To do this the commander must use all of their OPs and remove 1 hit from any unit in the same square or adjacent squares. The number of OPs rolled does not matter, they are all sacrificed to remove 1 hit from a unit. |
| The British commander uses all their OPs to remove 1 hit from the line infantry |
Commanders Resolve
At the end of a players turn they add 1 resolve point for each key terrain feature occupied during that turn. These key terrain features must be agreed at the start of the game. As a rule of thumb generally hills, bridges, fords and towns are treated as key terrain features.Then check for unit losses. Players lose 1 resolve point if any of their units are eliminated during a turn. If they have 2 unit loses they still only lose 1 resolve point.
Commanders start the game with 1 resolve point for every 3 units under their command. Ignore and remainders.
The game ends when a commander has no resolve points left. When playing with a set number of turns the commander with the most resolve points wins. If they are even, then the battle was a draw.
Hi Peter, Happy New Year! Thanks for posting these rules, I think they look great. There are some neat features in them such as the charge combat results. Very inspiring, thanks!
ReplyDeleteJay
Thanks Jay - The One-Hour Wargaming rules provide a great foundation for creating and adding house rules. All the best for 2017.
DeleteQ1: Where is a commander returned to if it is removed from the board due to ending in an enemy's zone of control?
ReplyDeleteQ2: To be clear, it takes 1 OP for EACH unit that wishes to move (and is in the same square as or adjacent to a commander), correct?
Q3: The statement "Once engaged in combat it is difficult to extract troops from that engagement unless they are cavalry and skirmisher" is not a rule. Is it supposed to be? Is the rule that only cavalry and skirmishers can move out of a square that is within the zone of control of an enemy unit?
Q4: Units taking a free turn cannot combat, but if ordered (using 1-2 OP) can they combat? Or is it that turning is considered movement and that is why they cannot combat?
Q5: If only Infantry and Artillery can use Entrenchments, are you classifying the Patriots at Bunker Hill as Infantry or are you saying that they would simply get no cover benefits? ;)
It is hard to know sometimes when you are referring to infantry generically, such as with the above rule, and when you mean Line Infantry. Consider not using the term "infantry" unless you say "all infantry".
Q6: What is the effect of "disorganization" after completing a charge? Or is this a euphemism for the attacker also taking hits?
Q7: Which squares do you consider being a unit's flanks and rear? How about a diagram?
Really interesting set of rules.
Dale
dalehurtt at gmail
Hi Dale,
DeleteThanks for the questions. I am replying one question at a time and updating the rules to help clarify.
Peter
Q1: Where is a commander returned to if it is removed from the board due to ending in an enemy's zone of control?
A1: A commander can return anywhere and because the commander move is after normal unit movement, other units miss the opportunity to move. This reflects the confusion when a commander gets caught up in the action.
Q2: To be clear, it takes 1 OP for EACH unit that wishes to move (and is in the same square as or adjacent to a commander), correct?
DeleteA2: Yes you are correct. I have tidied up the text describing this.
Q3: The statement "Once engaged in combat it is difficult to extract troops from that engagement unless they are cavalry and skirmisher" is not a rule. Is it supposed to be? Is the rule that only cavalry and skirmishers can move out of a square that is within the zone of control of an enemy unit?
DeleteA3: It is not a rule. Just noting that only these units have the ability to disengage from units which move slower then themselves.
Q4: Units taking a free turn cannot combat, but if ordered (using 1-2 OP) can they combat? Or is it that turning is considered movement and that is why they cannot combat?
DeleteA4: Yes, the turning of a unit is considered a move and so they cannot engage in combat.
Q5: If only Infantry and Artillery can use Entrenchments, are you classifying the Patriots at Bunker Hill as Infantry or are you saying that they would simply get no cover benefits? ;)
DeleteA5: Updated as per suggestion as I was being generic when saying infantry. It covered all types.
Q6: What is the effect of "disorganization" after completing a charge? Or is this a euphemism for the attacker also taking hits?
DeleteA6: Yes. I have added to the note - To reflect this units failing to hit the enemy unit take hits themselves.
Q7: Which squares do you consider being a unit's flanks and rear? How about a diagram?
DeleteA7: A diagram has been added
Thanks for your interest in the rules and helpful comments. Cheers, Peter
DeleteHi Peter,
ReplyDeleteI have spent some time taking a detailed look at your rules and your clarifications above. My plan is to do a hex grid conversion and use the rules to play OHW scenarios. Your rules are so sound that I won't need to make any significant changes to them. I'd prefer to do a complete set of rules for my own reference (with appropriate and glowing credits to your good self). I just wanted to check with you before doing anything as it would usually end up on my blog. If you'd prefer me just to do a conversion kit for posting that would be fine too. Either way, happy to share with you in advance. I appreciate that playing about with other peoples projects may be a bit sensitive.
All the best
Jay
Hi Jay,
ReplyDeleteBy all means use the rules as a complete set - modify and post them as you see fit. I will wait with interest to see what modifications may arise as you work through them and convert to hex.
Thank you for checking in before using, but I would not have minded. Its always good knowing another wargamer may have got some use or enjoyment from the rules we blog about.
Regards, Peter
Hi Peter,
ReplyDeleteThat's great, thank you. I'll let you know how it goes. Hopefully I can do some of it over Easter.
regards
Jay
Hi Peter. After you came back to me we tried your FIW ruleset and it had a quick enjoyable game so thank you. THose rules threw up a few oddities around flanks and targeting which we would like to overcome and which we thought would be better done by doing a simple conversion from this set to the FIW period. We think this set deals well with those aspects and has the same general period feel. I have one query on the AWI set as it stands. What do you think of adjusting the OP dice roll where it suits the amount of units. I am thinking that if you had only D6 OPs with say 12 units it would make it a bit too slow and frustrating - we want to run a multi player game with a 2-3 units each in one session and don't want players doing nothing too many turns in row. Would extra commanders be a better solution do you think? Grateful for any thoughts.
ReplyDeleteHi Mike, I am glad to hear the FIW rules provided an enjoyable game. You raise an interesting challenge with the OPs and forces with larger numbers of units. One quick way is to have a commander with a rating 1-5 say, which is added to the D6 dice roll. I am not sure this would help with your idea of having multiple players with 2-3 units to command. One possible option is they roll a D6 halved and rounded down for their individual OP points.
ReplyDeleteI am currently looking at some WSS rules for my paper armies and am thinking of having a commander with a rating 1-3 say. Then to order a unit they must score a 3+ on a D6. Each failure is counted and once the failures exceed their rating, then no more orders are given for the turn. If an order fails with a unit, the commander can still issue the same order again and hopefully be successful, or keep reissuing the order until failures exceed their rating. This way they should get their priority orders executed and would be uncertain of how many other orders they will achieve.
One final idea for your multi-player game. They can always move one unit, 3+ to move a second, and 5+ to move a third unit. Any failure and their turn ends.
I hope this answer helps.
Regards, Peter
Excellent thanks Peter some good options there - I'll have a think!
ReplyDelete