Tuesday 27 June 2023

A Sci-Fi wargame campaign in a day

Whenever my daughter visits us from New Zealand she is kind enough to play a wargame. Our go-to game choice is One-Hour Skirmish Wargaming by John Lambshead which she enjoys playing. It's a rapid-paced and simple skirmish game that involves commanding 5-10 figures on a 4x4 foot tabletop. The rules use a card deck instead of dice for variables and game turn lengths are uncertain, ending when a joker is revealed.

A game in progress.

The rules used

Due to the fast-paced and fun nature of these games, we often find ourselves playing multiple games throughout the course of an afternoon. On this occasion, we decided to setup a small campaign using a Necromunda theme as most of my figures are from Games Workshop. The choice of campaign was a variation of the snakes and ladders game I have used before for a Jacobite Rebellion game (see here) and is also described in the Portable Wargame Compendium. However, instead of going up the board, the players had to descend into the depths of Hive Quartus. 
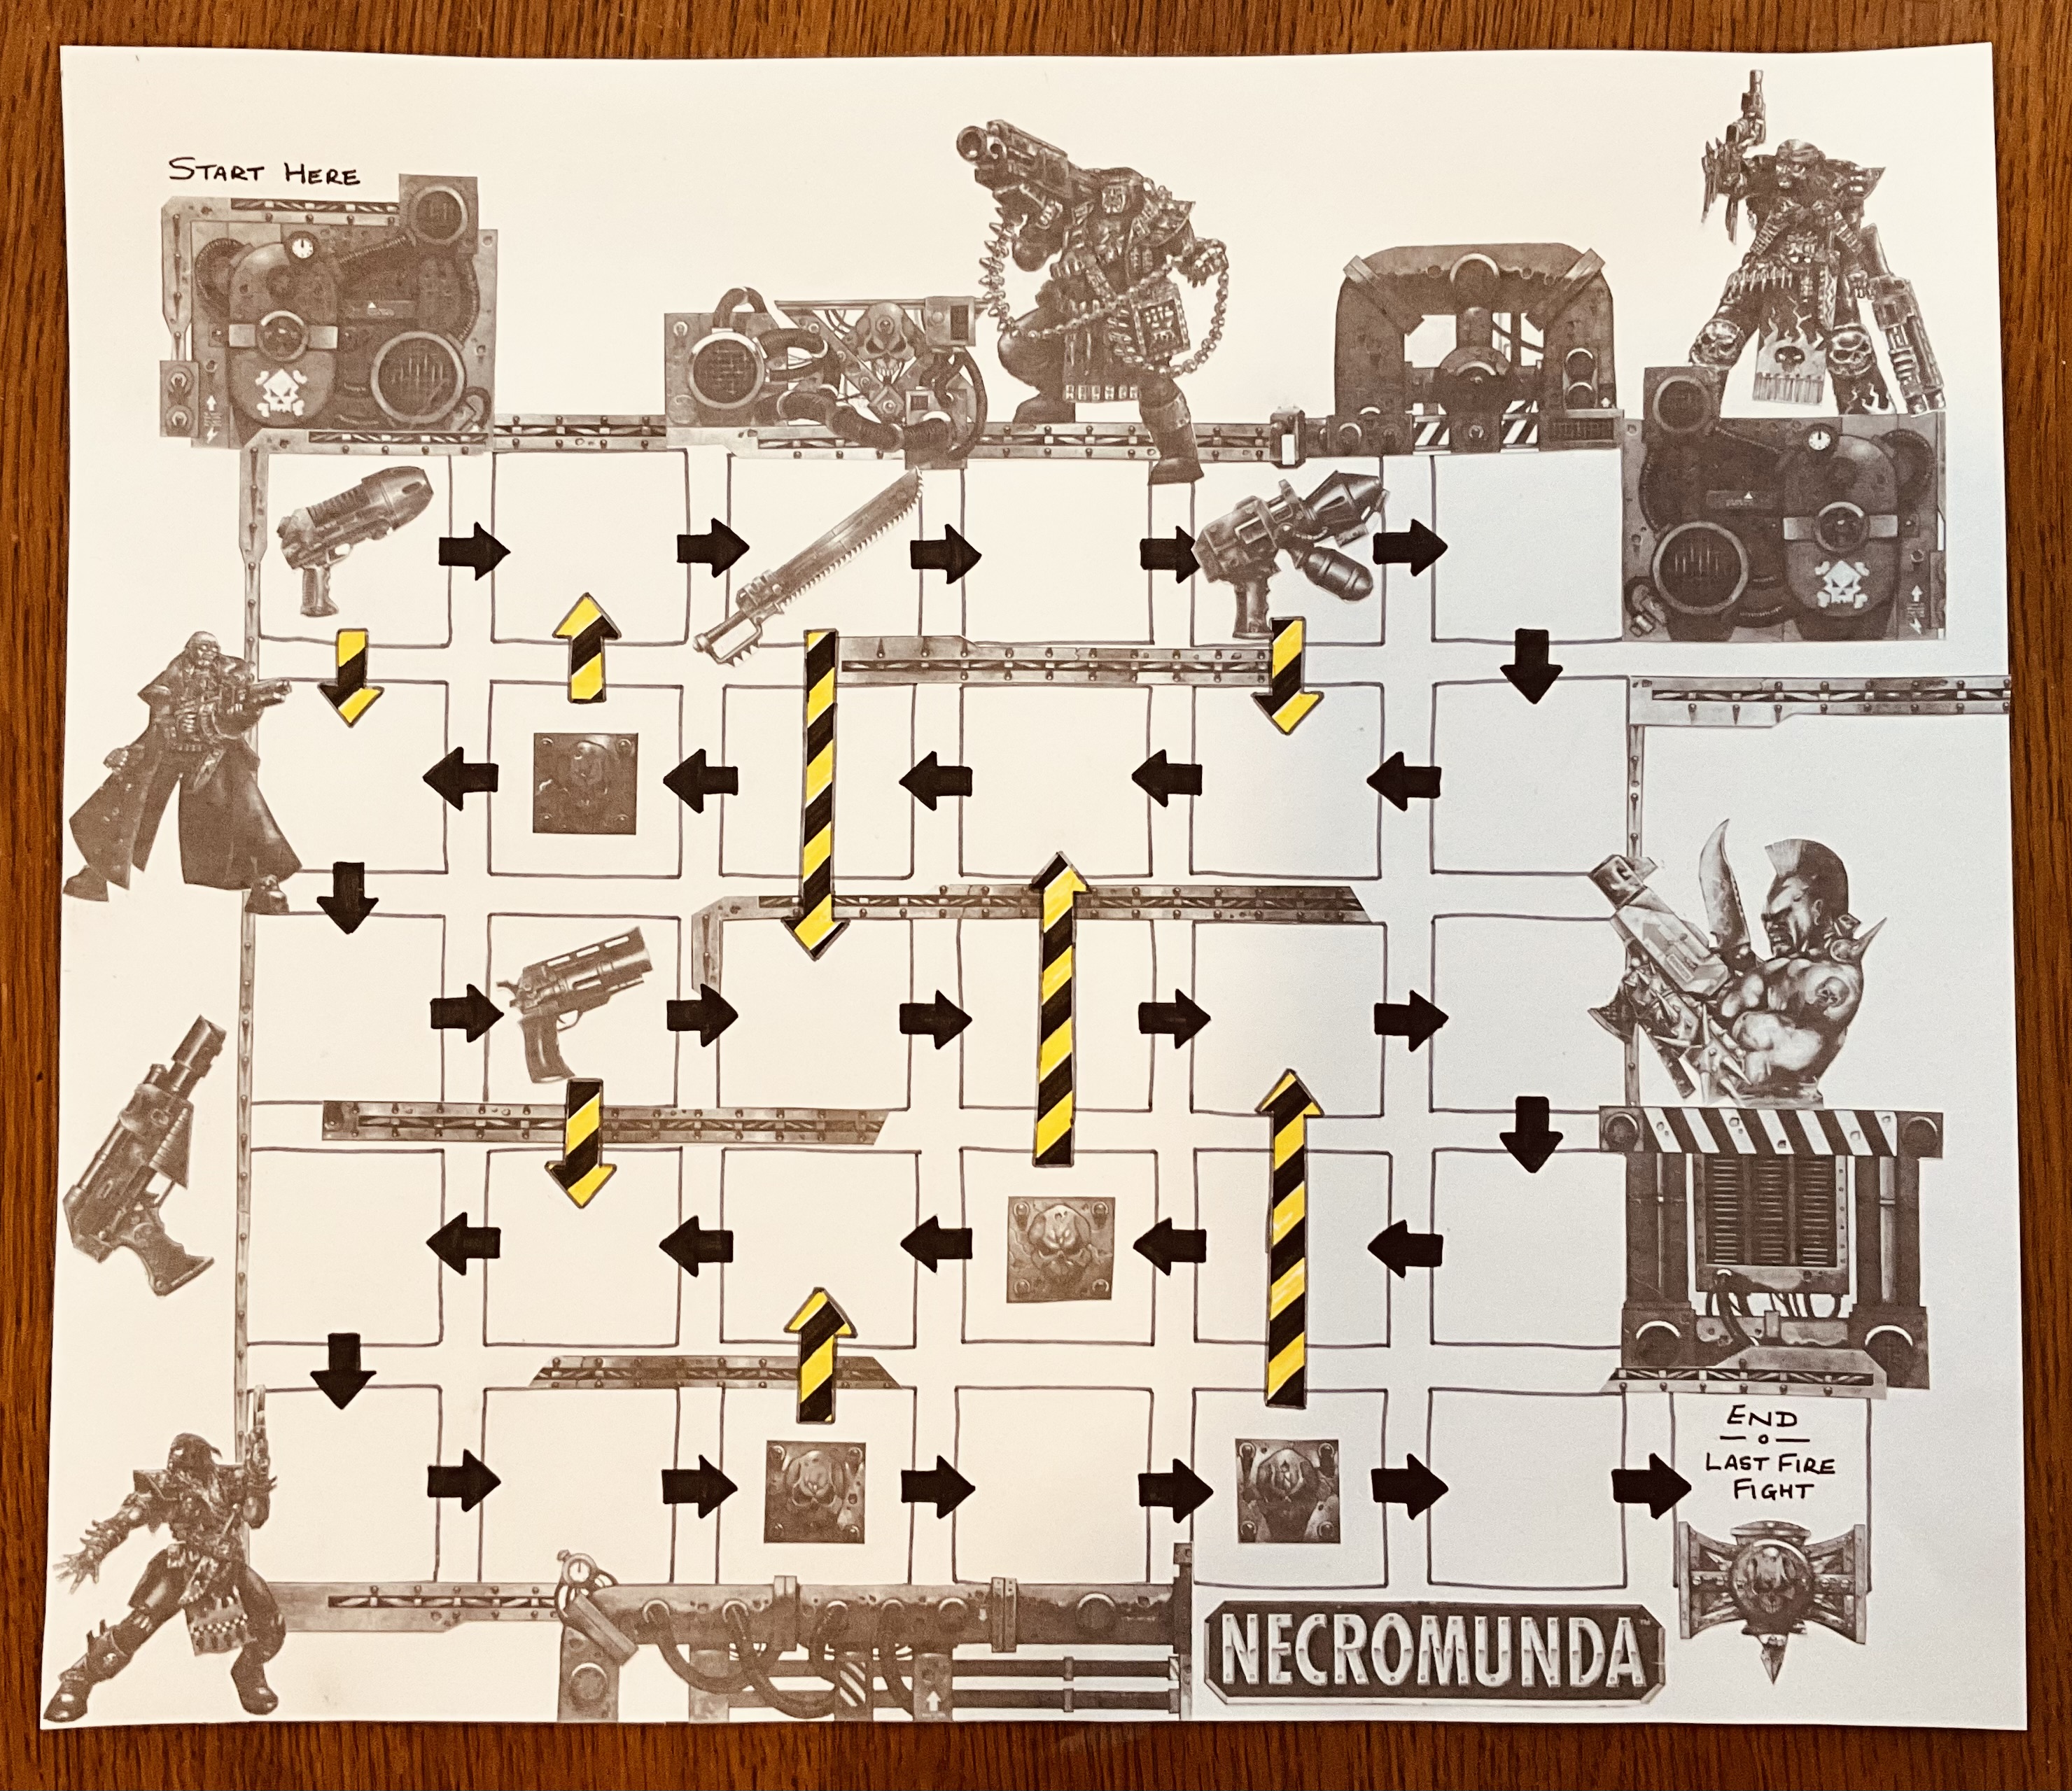
The campaign board.

To help immerse ourselves in the campaign we decided to create the campaign board using a collage approach of sticking pictures from the original set of rules which I had downloaded and printed. The board represents Hive Quartus and the objective of the campaign is for a player to get their gang from the top left corner to the bottom right corner.

Hive Quartus is a hive city built upon the remains of an ancient hive destroyed in a cataclysmic event. The ruins of the previous hive serve as a foundation for the new hive, with remnants of crumbling spires and shattered walkways interspersed with newly constructed structures. The hive is a testament to the resilience and resourcefulness of its inhabitants, who have built a thriving community amidst the ruins. Gangs in Hive Quartus often emerge as scavengers and explorers, venturing down into the unexplored sections of the destroyed hive in search of hidden treasures, forgotten technologies, and the remnants of the past.

The making of the campaign board.

As we embarked on our quickly setup campaign, we began with a basic set of campaign rules that served as a starting point. However, as we progressed with the campaign, delving deeper into the depths of Hive Quartus, we found ourselves modifying one or two of the rules to better suit the campaign and narrative. The rules written below are the final rules with all the modifications we made along the way. 

The Shadow Syndicate gang moving forward cautiously.

The Campaign Rules

In this board game, both players have the opportunity to create and name their gangs. Each gang consists of 7 figures, including one designated leader, who should also be named. The game begins with both players placing their gang token on the starting point of the campaign board.

During each campaign turn, a player can choose between rolling a dice to move their gang token forward a number of squares equal to the dice score or staying in place to recruit a new gang member as a replacement for a figure lost during a skirmish game. It's important to note that a gang cannot exceed 7 figures.

If a player lands on a square with a hazard symbol (depicted as a yellow and black arrow), they must follow the arrow and move their token to the indicated square.

Whenever a gang token moves down to a new level (not upwards), a skirmish game is triggered. The opponent in the skirmish game depends on the following situations:

  1. If there is another gang token on the same level, a skirmish game is fought between the two gangs using all their available figures.
  2. If there is no other gang token on the level, an opponent needs to be created. Before starting the game create various pre-designed gangs to choose from, such as cultists, local law enforcers, Mechanicus explorers, or hell spawn. The opposing gang which can be randomly selected from the available opposition will consist of the same number of figures as the player's gang.

Skirmish games are best played using predefined scenarios or custom-made scenarios.

After a skirmish game, any figures removed from play will have a dice rolled to determine if they survived. On a dice score of 3 or higher, they recover and rejoin the gang. Otherwise, they are considered dead. A player can recruit new gang members my choosing not to roll to move his token during his campaign turn.

If a leader is lost during the game, a new leader must be selected and given a name.

If a gang wins a skirmish game, they have the opportunity to promote one of their gang members to a veteran attacker or a crafty defender. These traits provide combat advantages in either attacks or defence. In the One-Hour Skirmish Wargames rules we used, the promoted figure is allowed to draw an additional card during combat for defence or attack depending on their choice.

After each skirmish game, players return to the campaign map for another turn.

The first token to reach the end square is the winner.

Local law enforcer may have met his match.

A Campaign Run Through

We both decided upon our gang names and leader names. My daughter’s gang was called the Shadow Syndicate lead by Gregor and mine were the Rust Reapers lead by Vorrik. We each selected 6 followers to make a total of seven gang members.

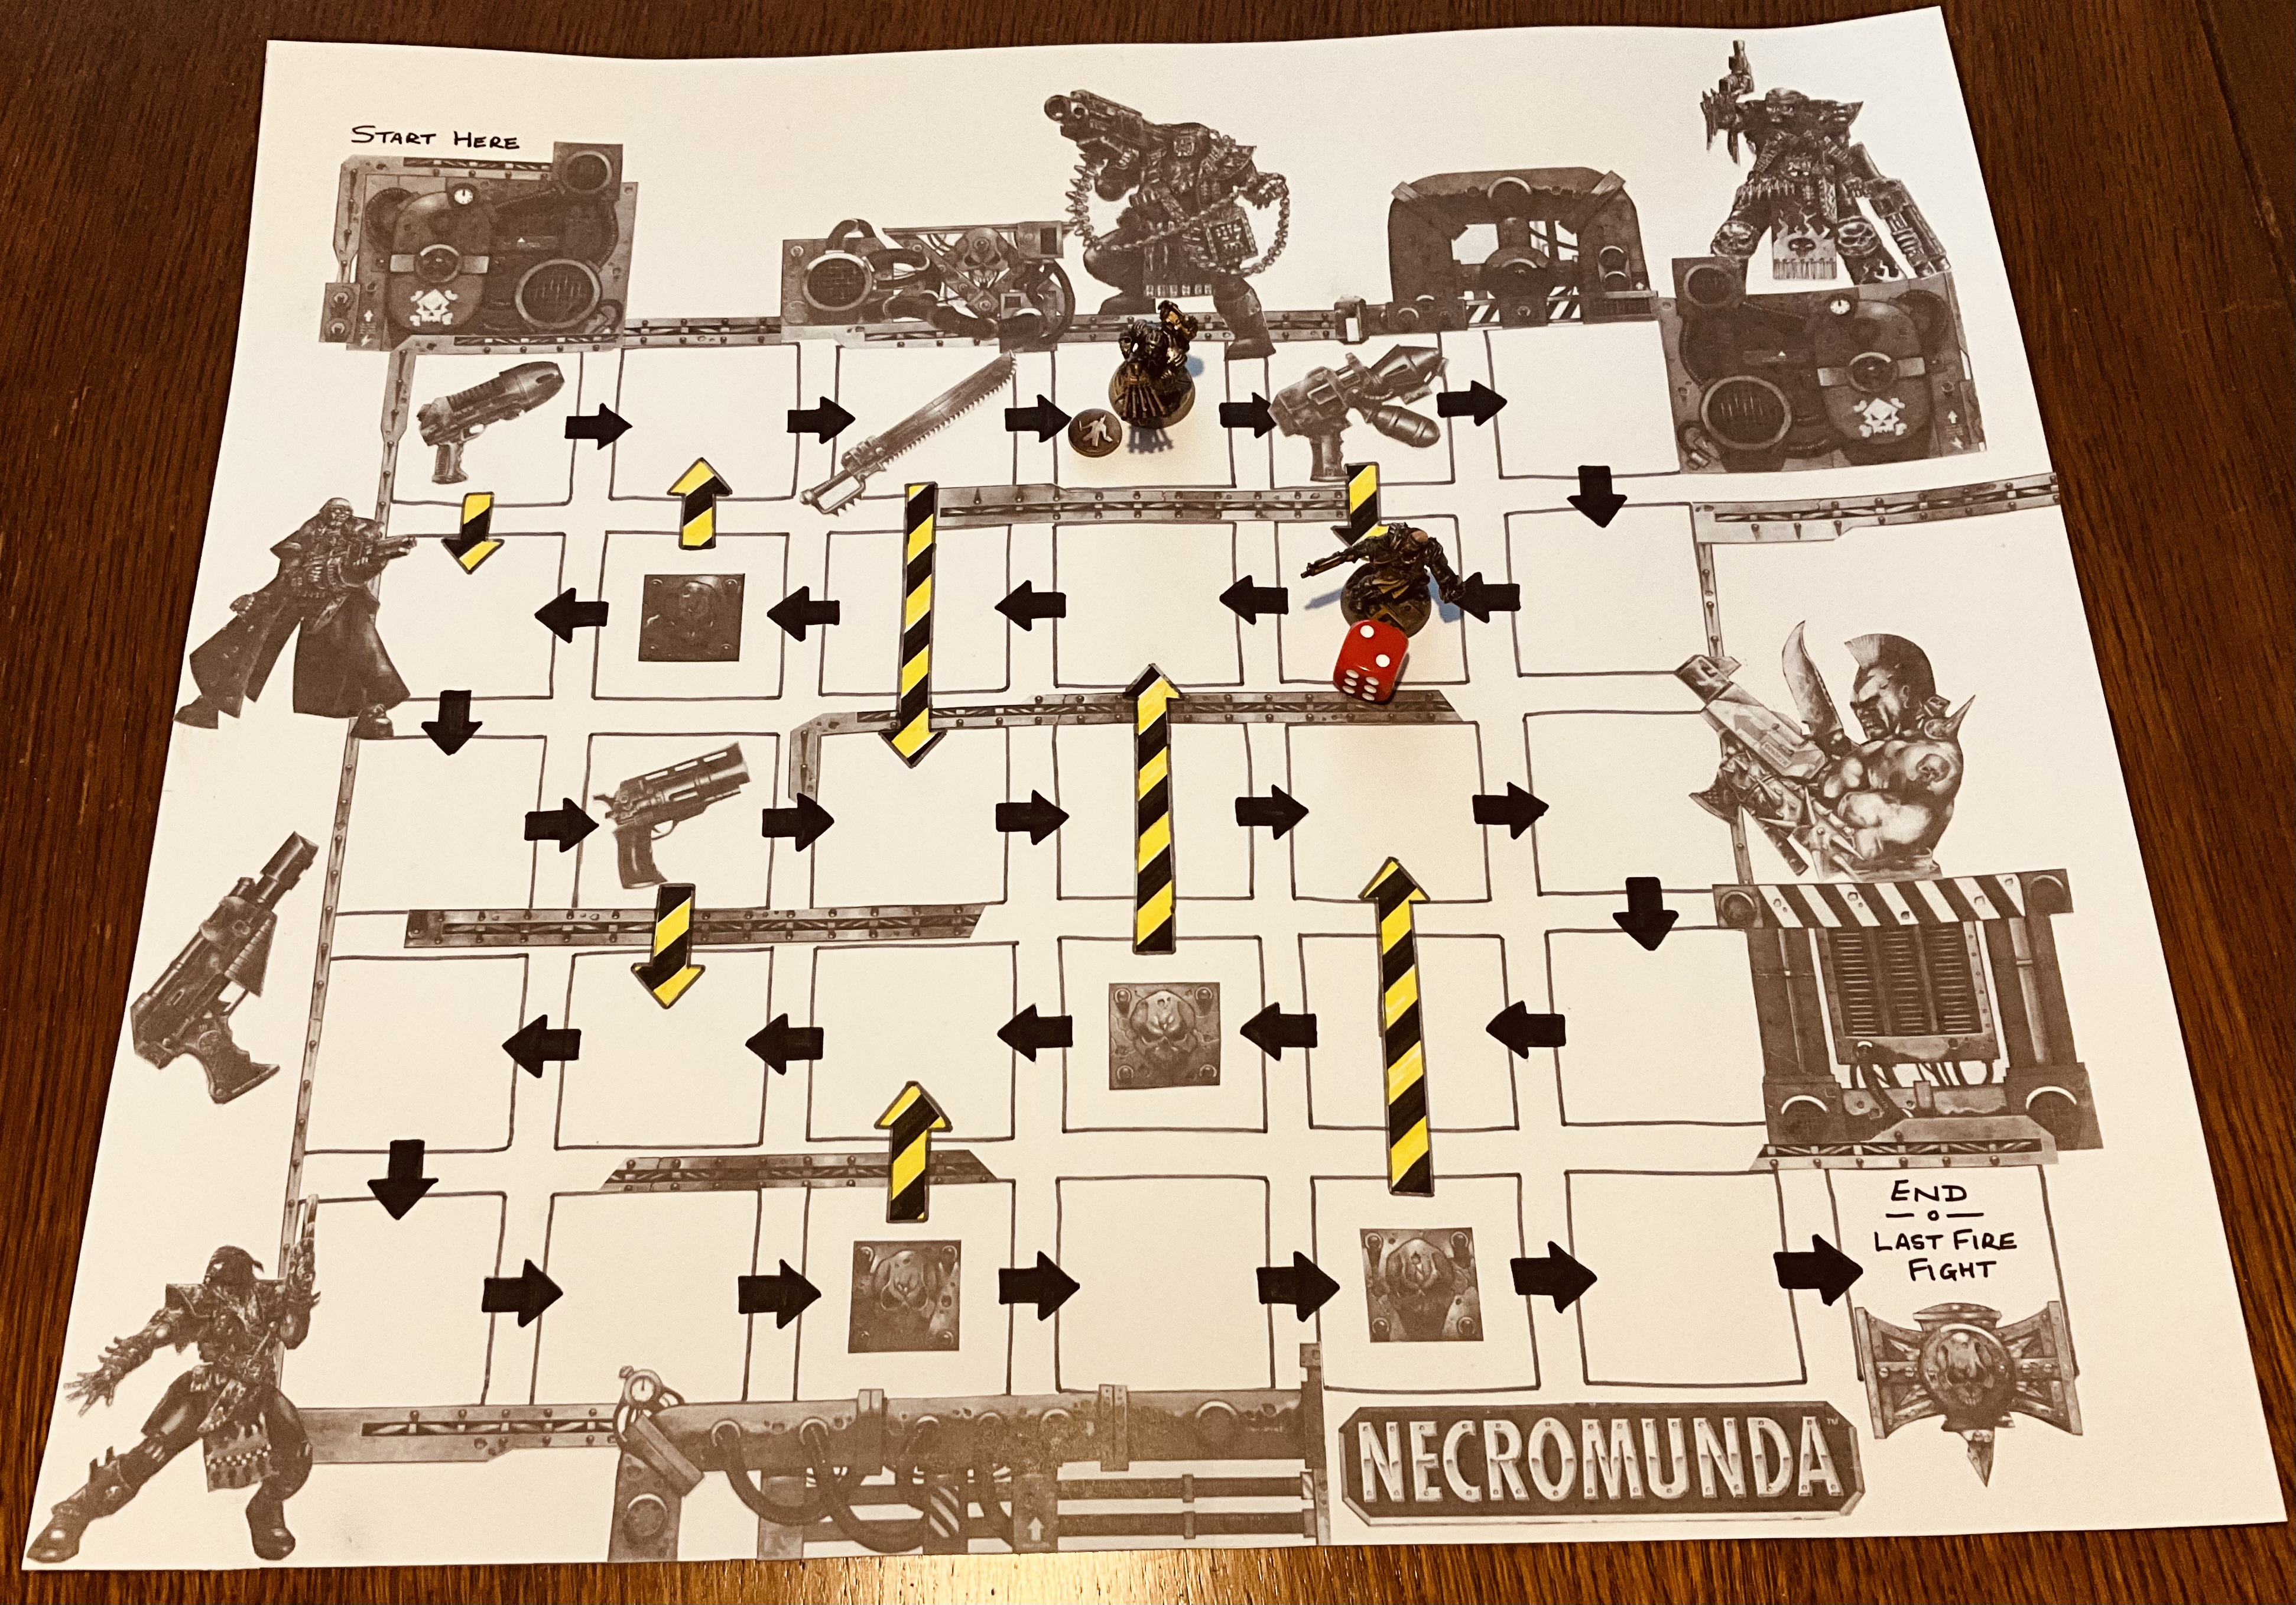
Gang tokens placed on the board at the start.

Turn 1

The Shadow Syndicate rolled a score of 4, allowing them to move their gang token 4 squares on the board. Similarly, the Rust Reapers rolled a score of 6, enabling them to move their gang token 6 squares. As both gangs have reached a new level, a skirmish game will take place between them.

Campaign turn 1

During the skirmish game between the gangs, the Shadow Syndicate emerged as the victors. As a result, they promoted one of their gang members to the status of a veteran attacker. However, they did suffer a loss as one of their gang members was eliminated during the game and failed to recover, rolling less than 3. 

On the other hand, the Rust Reapers may not have been successful in the skirmish, but they did manage to come out unscathed. All of their eliminated gang members successfully recovered and rejoined the gang.

Turn 2

The Shadow Syndicate opted to forgo rolling the dice, remaining stationary so they could recruit a replacement gang member for the one they lost in the previous skirmish.

Meanwhile, the Rust Reapers rolled a score of 2, granting them the ability to advance their gang token by 2 squares on the game board. As a consequence of descending to a new level, a skirmish game is triggered between the Rust Reapers and a randomly chosen gang of equal size.

The Rust Reapers advance 2 squares and the Shadow Syndicate stay put to recruit a replacement.

During their skirmish with a gang of Cultists, the Rust Reapers were unable to achieve victory and suffered a loss. Unfortunately, their gang member fails to roll a 3+ to recover and rejoin the gang. They are now down to 6 members.

Turn 3

With a roll of 3, the Rust Reapers successfully advanced their gang token by 3 squares on the board. Unfortunately, they landed on a square with a hazard arrow, which compelled them to move back to a higher level. 

On the other hand, the Shadow Syndicate rolled a score of 2, enabling them to move their gang token 2 squares.

Since neither gang descended to a new level, the Rust Reapers merely returning to a previously visited level, there was no skirmish game taking place this turn.

Campaign turn 3

Turn 4

The Rust Reapers made the decision to dedicate their turn to recruiting and chose not to roll the dice for movement.

While the Shadow Syndicate rolled a score of 4, granting them the ability to move their gang token 4 squares on the board.

As a result of the Shadow Syndicate descending to a new level, a skirmish game takes place between them and a randomly selected gang of equal size.

Campaign turn 4

In their skirmish, the Shadow Syndicate encountered a gang of Cultists, possibly the same ones who had previously clashed with the Rust Reapers. Unfortunately, the outcome remained unchanged, with the Cultists emerging as the victors. However, there was a bright side with the Shadow Syndicate managing to successfully recover all their lost gang members following the skirmish.

Turn 5

The Rust Reapers rolled a score of 2, allowing them to progress by 2 squares on the board.

The Shadow Syndicate rolled a score of 3, enabling them to move their gang token 3 squares downward to a lower level.

As the Shadow Syndicate descended to a new level, a skirmish game takes place between them and a randomly chosen gang of equivalent size.

Campaign turn 5

During the skirmish, the Shadow Syndicate faced off against a group of local law enforcers. Fortunately, the Shadow Syndicate emerged as the victors in the clash, without suffering any losses. As a result of their victory, a second member of their gang will now benefit by having a veteran attacker trait.

Turn 6

The Rust Reapers achieved a roll of 5, allowing them to advance their gang token by 5 squares, ultimately descending to a lower level.

While, the Shadow Syndicate rolled a score of 4, allowing them to move their gang token 4 squares, but still remaining on the same level.

Due to the Rust Reapers descending to a new level, a skirmish game is fought between them and a randomly selected gang of equivalent size.

Campaign turn 6

During the skirmish, the Rust Reapers confronted a gang of Cultists (they are everywhere). Despite emerging victorious, the Rust Reapers suffered a significant loss as their leader, Vorrik, fell in battle.

Turn 7

The Rust Reapers made the decision to focus on recruitment and selecting a new leader after losing Vorrik in their previous turn.

On the other hand, the Shadow Syndicate rolled a score of 6, so they progressed their gang token 6 squares and descend to a new level.

As a result of the Shadow Syndicate descending to a new level, a skirmish game takes place between them and a randomly chosen gang of equal size.

Campaign turn 7

The Shadow Syndicate came across a group of Mechanicus explorers scouring the depths of the hive for ancient technologies. In the ensuing skirmish, the Shadow Syndicate emerged as the victorious gang, achieving the win over the explorers without suffering any losses. As a result, another member of the gang was chosen to acquire the veteran attacker trait, enhancing their combat capability.

Turn 8

The Rust Reapers successfully rolled a score of 6, enabling them to progress by 6 squares on the board and descend to a lower level.

Similarly, the Shadow Syndicate rolled a score of 2, allowing them to move their gang token 2 squares and move to a new level below.

As both gangs have descended to a new level, two skirmish games are fought between each gang and a randomly chosen gang of equal size.

Campaign turn 8

The Shadow Syndicate encountered a group of Hell Spawn, creatures that dwell in the depths of Hive Quartus. These fast-moving have monsters have razor-sharp talons and teeth, making them formidable opponents in close combat. In the skirmish against the Hell Spawn, the Shadow Syndicate emerged as the victors without suffering any losses. Another member of their gang was chosen to acquire the veteran attacker trait, making them a very formidable gang.

A couple of levels above, the Rust Reapers, now under the leadership of Loric, battled a unit of law enforcers who they managed to successfully defeat, but unfortunately lost one of their own gang members in the process.

Turn 9

The Shadow Syndicate achieved a high roll of 6, which enabled their gang token to be advanced 6 squares and to reach the end of their journey as they discovered hidden treasures and ancient technology. A  victory for both the Shadow Syndicate gang and my daughter. Congratulations on their success!

Campaign turn 9

End of Game

The campaign was wrapped up in one day and provided 8 enjoyable skirmish games against a range of opponents and in a variety of scenarios. Throughout the campaign, the opposing player took on the role of the opposition whenever random gangs were encountered.

Initially, the plan was to have a final showdown between the gangs upon one of them reaching the end. However, we decided that simply reaching the end itself was a significant achievement, making it a satisfying conclusion to the campaign.

A member of the Shadow Syndicate.

My daughter and I set aside an entire day to gaming. The morning was devoted to creating the campaign board, and the games themselves were fought throughout the afternoon and evening with breaks for tea. Although we were both tired by the end, we found it to be a most enjoyable day.

Saturday 24 June 2023

English Civil War unit basing decisions and face-to-face sci-fi games

I recently painted two cavalry bases for my English Civil War (ECW) armies. This will provide each side has an equal number of cavalry units which will allow me to use units consisting of two bases. Further details on the whys and wherefores of this idea are explained below. 

A Royalist cavalry base.

It has been quite some time since I last painted ECW figures and I had to remember my painting approach, which involves block painting initially, followed by adding highlights of a lighter colour to clothing, armour, and horses as needed and to breakup the blocks of colour. This works well providing there is no close scrutiny.

A cavalry base for the Parliamentarian army

I have cleared the tabletop in preparation for some face-to-face sci-fi skirmish games with my daughter, who is visiting for a week. However, before starting the tabletop tidy up I was trying to decide whether I prefer gaming with fewer larger units consisting of two bases or more smaller units made up of a single base. I treat the larger units as brigades, while still keep the independent units like dragoons and artillery as single bases. These independent units are eliminated with half the hits compared to the larger two base units.

A game setup using the larger bases representing brigades of infantry and cavalry. Dragoons and artillery are still single bases and take half the hits before elimination.

The use of two base units aligns well with the army’s deployment of flanks and centre units, with their first lines, reserve lines, and independent dragoons and artillery positioned in front.

An army’s deployment zones.

However, when using individual base units, I have added a rule where the units in a line, the first line centre for example, must be of the same type and must remain within 3" of another unit. Essentially, I am treating them as one unit for the purpose of movement orders and unit cohesion. However, they still engage in combat separately.

An example of Brigades using single based units.

Here are some pros and cons I have discovered so far for the different unit basing options:

  • With larger units there is a clear distinction between single base independent units like dragoons, commanded shot, and artillery, and the two base cavalry and infantry brigades.
  • Fewer units speed up the shooting and combat phases.
  • Having a greater number of units with single bases allows for additional rules to be added for unit qualities, such as Raw, Trained, and Veteran. 
  • When using the solo wargaming decision cards I am developing, having fewer units does help simplify things.
  • I have a slight preference for the aesthetic of single based units, when I look at some of the old engravings and paintings.

Engraving of the battle lines at Naseby.

Another view

For the moment I have put all these considerations aside as I now prepare to play few face-to-face sci-fi games.

A very different tabletop from the lush green fields of England from the 1640’s.

Lots of sneaking around in the sci-fi game.


Saturday 17 June 2023

Some painting and ECW games

Following the conclusion of a two-week-long Ancients mini-campaign with some 13 odd posts, this week has been somewhat less hectic, allowing me to shift my focus towards painting some units. I have a number of completed armies, they being the: Samurai, English Civil War, and Ancients (Punic War) armies, and over the past year I have purchased a few extra figures so I may to add extra units to these armies.

Some simply painted plastic Gauls. A combination of Italeri and HaT origin.

My plan is paint these extra units in small batches of one or tow units. While I find painting to be an  enjoyable aspect of the wargaming hobby, it can be one I easily lose momentum with and lose the painting habit. I am hoping with picking off a variety of units will get me back into the swing of painting. 

The first figures to be pulled out of their storage container were some Gauls from which two Skirmisher units were added. A quick could have unpainted Gauls showed I should have enough spare plastic 1/72 scale figures to complete a small army when combined with the Gauls I have already painted in the Punic army.

An ECW game setup.

Next up will be some ECW figures as an English Civil War game is setup on the tabletop as I revisit my solo gaming decision cards.

Sunday 11 June 2023

An Ancient Campaign - Part 12 - Wrap up notes

This is a wrap up post on the ancient campaign I have been playing over the last two weeks. It involved  creating a campaign map, narrative background, and playing a total of five tabletop games as the campaign progressed.

The questions I will try to answer are:

  • How effective was the campaign structure and whether it provided the necessary prompts for crafting a background narrative for the games played?
  • How the use of the AI tool - ChatGPT - helped with generating the narrative both for the games and the campaign details?
  • How did the modifications to the One-Hour Wargames Ancient Rules work out?

A quick recap…

The campaign used a game format similar to a children's "race to the finish" style board game, as shown on in the photograph below. The objective was for the Carthaginian army to get from the starting point to the finish at the city of Aurelia by rolling a dice and advancing their army token along the road squares. The number of turns they take to reach Aurelia, impacted the readiness of the Roman army for a final and decisive battle. 

Whenever the Carthaginians passed through a city, a tabletop battle game would be played. A Carthaginian victory in these battles would enhance their army's readiness in the decisive battle. Along the road to Aurelia, fate could intervene through various advantages and disadvantages triggered by specific road squares. 

Upon reaching Aurelia, the campaign outcome would be decided by a final tabletop game where each armies’ readiness would come into play.

Campaign map setup at the start of the campaign.

In order to create the background for the campaign, including the names of the Roman client state, cities, and commanders, I used the free online AI tool, ChatGPT. I also used ChatGPT to take my brief game notes from each of the tabletop game and help write a battle narrative.

This mini campaign had a total of five tabletop games, including the decisive final game, connected by a campaign narrative to help set the scene for each game. One-Hour Wargames scenarios were selected based upon the narrative where possible, else a straightforward pitch battle was used.

A game underway

The tabletop games were played using the Ancient Rules from the book “One-Hour Wargames” by Neil Thomas. These included additional rules for: War Elephants, Gaul Warbands, and veteran units, along with modifications to movement rules.

Did the campaign help to provide a narrative for the games?

The campaign structure certainly helped to provide the narrative and context for when battles were transferred to tabletop games. There were three areas where I found it useful:
  • Adding specific details about the hypothetical client state of Rome, Luminaria, such as its cities and their individual characteristics, helped contribute to setting the scene. This context added depth to the games, giving them a purpose beyond simply achieving a scenario’s objectives.
  • The process of designing the campaign map, apart from being enjoyable, helps to reinforce the connection between the narrative and games.
  • Adding fate squares with descriptions, such as “Army Rested” advance 2 squares, introduced an element of unpredictability to Carthage’s campaign march, and in some cases influenced the selection of scenarios from One-Hour Wargames.
The second game underway.

A couple of adjustments were made to the campaign rules. While not being specifically related to the campaign narrative, it is worth noting them:
  • Initially, the rules allowed for additional chance cards for both armies to be used during the final decisive battle. However, I thought this might be too chaotic in the games. So instead, a number of units would be designated as veteran units, thereby providing advantages in the final battle.
  • Another modification involved the decision not to reduce the Roman battle readiness by 3 steps following any loss. Since the Carthaginians had already gained one veteran status unit for each game they won. It seemed unnecessary to impose an additional penalty on the Roman forces.

Did the AI tool - ChatGPT - help with generating narrative?

I used ChatGPT for: 
  1. Creating the campaign background and the hypothetical country of Luminaria.
  2. Writing the campaign narrative as each map turn progresses.
  3. Writing battle reports.
ChatGPT proved to be a very useful resource for creating background for Luminaria, its cities, and the underlying cause of the conflict. I simply requested a hypothetical Mediterranean country from 200BC and a list of 15 cities, the tool generated the information within a matter of minutes. Similarly, when seeking names and backgrounds for the commanders, it delivered a list of 5 names from which I could pick the ones I liked best. Although some rewriting (retyping) of the generated text is necessary, the process is straightforward and significantly reduced the time and effort required to develop the campaign background.

A remotely played game in progress.

The approach used for writing the campaign narratives and battle reports was slightly different. Initially, I write a series of statements outlining a campaign turn’s progress or actions when describing the tabletop games. These statements are copied and inputted into ChatGPT, where the tool is asked to reword the content. Adjustments were always necessary to refine the generated text. However, this approach did reduce the time I typically require for writing up a game report. I also think the overall quality is an improvement on what I would typically produce. 

Anyway, definitely time saving and useful for developing narrative backgrounds.

Did the modifications to the OHW Ancient Rules work out?

I opted to use OHW Ancient rules for the games as I often use these, or variation of the rules, with my games. They are my favourite rules. However, certain additions were necessary to the book rules to accommodate War Elephants, Gaul Warbands, and Catapults. 

While the answer to the question is yes, it is worthwhile just listing down the rule additions for those interested:

Gaul Warbands: These units have a movement range of 9 inches, and can move through woods and difficult terrain. In combat, Gaul Warbands roll a D6+2. They are considered unarmored.

Catapults: These are allocated to infantry units, and can shoot up to 36 inches distance. When determining hits, roll a D6+2 and ignore armour. However, once the infantry unit they were assigned to moves or is engaged in combat, they are removed from play.

War Elephants: These units have a movement range of 9 inches. They cannot move through woods or difficult terrain. In combat, they rolled a standard D6, and they ignore armour. Elephants are considered armoured. Upon elimination, War Elephants may go berserk. This was determined by rolling a D6:
  • A result of 1 or 2 results in an immediate charge against the nearest friendly unit within a 12-inch radius, inflicting D6 hits before being removed from play.
  • A result of 3 or 4 results in an immediate charge against the nearest enemy unit within a 12-inch radius, inflicting D6 hits before being removed from play.
  • A result of 5 or 6 results in no berserk action, and the elephant unit was removed from play like any other unit.
Other non-unit changes I made include:

Movement: Any unit that makes a pivot at the beginning and end of their movement will have their overall movement reduced by 3 inches. No deductions for just one pivot.

Veteran units (Only for Heavy Infantry and Cavalry) - Whenever a veteran unit is involved in combat with a non-veteran unit, they will roll two dice and choose the highest scoring dice, discarding the lower scoring one. This modification aims to reflect the enhanced skill and effectiveness of the veteran unit in battle.

Note - a quick thank you for comments on the veteran rule. I had originally always used the higher dice, but it was highlighted that out two opposing veteran unit would be over too quickly. The suggested option to only apply the rule when a veteran opposes a non-veteran unit works very well.

A photo from the first game.

I also used chance cards to introduce unpredictability. Each chance card is resolved during the turn it is drawn and cannot be carried forward to subsequent turns. The 15 cards are:

  • 5 x No Event. Nothing happens
  • 3 x Confusion. A player’s units cannot move, but are allowed to pivot.
  • 1 x Clash of Shields. All combat this turn can re-roll the D6, but must accept the second result.
  • 1 x Darken the Skies. A player’s units when shooting this turn add 2 to their D6 scores.
  • 2 x Initiative. One unit immediately makes a move, shoots, or conducts a round of combat if already engaged in combat. The unit can still be activated as normal later.
  • 2 x Rally. A player halves one unit’s hits round up (eg. 9 hits reduced to 5). The same unit cannot be rallied twice in a game.
  • 1 x Panic. The unit with the most hits takes another D6 hits. Where there is more than one unit to choose from, the player chooses.


Friday 9 June 2023

An Ancient Campaign - Part 11

This hypothetical campaign is about to come to an end with the final and decisive battle ready on the tabletop. Mago, the Carthaginian commander, who has led his army along the coastline of Luminaria, fighting a series of engagements, has arriving at the very gates of its capital, Aurelia. Will Mago emerge triumphant, securing a resounding victory for Carthage? Or will the resolute Romans, under the leadership of the wounded but unwavering Marcus, prevail against the odds, their ranks bolstered by the arrival of seasoned veteran units? The fate of this campaign hangs in the balance.

Battle Report… Opening Game

The two opposing armies stood poised for battle on opposite sides or a valley. Positioned strategically at the heart of their respective forces, the commanders of Rome and Carthage stationed their Heavy Infantry upon hills. With their opening manoeuvres, both sides swiftly advanced their flanks, seeking to gain an advantage. Carthage's left flank emerged as the strongest, its formidable War Elephants leading the charge, bolstered by the valiant Gaul Warbands and nimble Light Infantry. The mighty Elephants surged forward, crashing into the steadfast ranks of Roman Heavy Infantry, while the Gaul Warbands found themselves locked in a fierce struggle against Roman light infantry. On the opposing flank, the Roman cavalry exhibited remarkable tenacity, standing firm against the onslaught of Carthage's seasoned horsemen, refusing to yield an inch. The stage was set, and the battle raged on.


The armies are deployed and facing each other across the valley.

The elephants spearheaded the Carthaginian left flank attack followed by Gaul Warbands and Light Infantry.

The Roman Light Infantry having delayed the supporting Gaul Warbands allowing the Roman heavy infantry to deal with the War Elephants. 

Battle Report… Mid-Game

As the battle raged on, the Roman commander, seizing a moment of opportunity, gave the order for his Heavy Infantry in the centre to advance. Descended from their defensive position on the hill, their aim clear—to strike at the heart of the Carthaginian forces. Seeing the threat, the Carthaginians responded swiftly, bringing their own Heavy Infantry down from the hill to meet the Roman challenge head-on.

Meanwhile, on the Roman right flank, the mighty War Elephants wreaked havoc, trampling through the Roman ranks with their sheer strength. However, as the combat wore on, the elephants, weakened and disoriented by relentless Roman assaults, succumbed to panic and were forced into a chaotic retreat, leaving behind a trail of losses.

On the opposite flank, the Roman cavalry, closely supported by a unit of veteran Heavy Infantry, had managed to hold their ground and secure a crucial advantage. Their combined efforts ensured the flank remained firmly under Roman control, bolstering their overall position on the battlefield.


Sensing an opportunity the Roman heavy infantry advanced in the centre, moving off the hill.

Seeing the danger in the centre the Carthaginian centre moves forward to counter the Roman threat in the centre. Meanwhile, the Roman cavalry were holding their own against Carthage’s veteran cavalry on the right flank.

The battle lines were starting to see a few units worn out and routing. The battle is well balanced with neither side having a tangible advantage.

The elephants had provided their worth and the Roman right was under pressure and out numbered. Not that all was going Carthage’s way, they were feeling quite vulnerable on the opposite flank and prepared to throw in their reserves.

Battle Report… End Game

As the battle wore on, the toll of casualties began to take its toll on both sides, and the decisive moment loomed closer. The Carthaginian commander, recognising the strain on his right flank, issued orders for them to hold their ground as best they could and, if necessary, make tactical withdrawals. His hopes rested now on the strength of his left flank, which now possessed a numerical advantage over their Roman counterparts. The plan was clear—to outflank the remaining Roman flank units and launch a devastating assault on the rear of the Roman centre.

Although the Roman Heavy Infantry initially held firm, their resilience was soon tested as the attacking Gaul Warbands began to roll up their flank and centre. The Roman forces, realising the futility of further resistance sought to salvage what remained of their units, retreating from the field of battle. The day belonged to the Carthaginians, whose successful manoeuvres and War Elephant units had secured them victory.

Carthaginian forces were retiring on their right flank, hoping to buy time as their left flank swings round to attack Rome’s centre.

The Roman centre starts to collapse as they are attacked from the rear. With their greater numbers and better position it is a Carthaginian victory.

End of the Campaign…

Mago makes an offering at a nearby Temple for Carthage’s victory before entering Aurelia through their city gates with his army.

The campaign has reached its conclusion in quite a short space of time. There will be one final campaign related post looking at answering the following questions:
  1. How effective was the campaign structure and whether it provided valuable prompts for crafting a narrative for the 5 games played?
  2. How the use of the AI tool - ChatGPT - helped for generating narrative scripts and campaign background details?
  3. How did the modifications and changes to the One-Hour Wargames Ancient Rules work out?

Wednesday 7 June 2023

An Ancient Campaign - Part 10

Over recent posts, we have followed a hypothetical Ancient campaign where a Carthaginian force has invaded a Roman client state, Luninaria, and marched on its capital city and administrative centre. Now, we arrive at the concluding map moves, leading us to the ultimate and decisive battle that will determine the fate of the campaign.

Campaign map

After their recent success in the previous tabletop game, the Carthaginians advance their battle readiness token by one step, reflecting their army’s battle readiness. Their goal is to reach the Aurelia city square, they roll the dice for their next map move. The first roll yields a result of 3, moving their token to land on "supply delayed" and causing them to retreat by 3 squares. With their next roll of the dice a 4 is achieved, enabling them to progress 4 squares and position themselves just outside the city of Aurelia. With a final roll of 1, they successfully breach the city's defences. The Roman army’s battle readiness is advanced 3 steps, 1 for each dice rolled. This sets the stage for the ultimate and decisive battle on the tabletop, where the battle readiness tables will come into play. The outcome of this battle will determine the victor of the entire campaign.

A Late Rule Change

When I initially created the battle readiness tables, I had the idea of incorporating advantage cards into the chance card decks utilised by both sides, replacing the no effect cards. However, after some further thinking, I have reconsidered this rule. Including three advantage chance cards for each side would potentially introduce an excessive number of advantages, potentially leading to a very chaotic game. Therefore, I have decided to modify this rule. Instead, for each advantage indicated on the readiness tables, an army can select a unit to be a veteran unit, giving them certain combat benefits during the game.

As I am using the One-Hour Wargames Ancient rules throughout this campaign, the veteran unit rule will operate as follows: 

  • Whenever a veteran unit is involved in shooting or combat, they will roll two dice and choose the highest scoring dice, discarding the lower scoring one. This highest scoring dice will be used to determine the number of hits inflicted during the shooting or combat action. 
  • This modification aims to reflect the enhanced skill and effectiveness of the veteran unit in battle.

The Scenario

The scenario selected is Pitched Battle (1) from One-Hours Wargames.

The armies deployed ready for the final campaign battle.

Order of Battle…

Rome:
  • 6 x heavy infantry (3 will be veterans)
  • 2 x light infantry
  • 1 x cavalry
Carthage:
  • 3 x heavy infantry (2 will be veterans)
  • 2 x cavalry (1 will be veteran)
  • 1 x light infantry
  • 2 x Gaul warbands

Campaign Narrative…

After securing a resounding victory at Solara, Mago, the veteran Carthaginian commander, wasted no time in pressing forward along the coastal road towards his coveted prize, Aurelia. This distinguished city serves as the capital and administrative centre of Luminaria. Mago's local network of spies relayed valuable intelligence, the Romans, recognising the gravity of the impending confrontation, had mustered a formidable army to confront him outside Aurelia's gates. Sensing the need for replenishment and to rest his army ahead of a major battle, Mago made the strategic decision to return to Solara, replenishing his supplies and assembling his largest force for the march towards Aurelia.

Meanwhile, Marcus, the Roman commander, although wounded from the battle at Solara, retained nominal command but had entrusted much of his authority to Lucius Octavius Marcellus, the Governor of Luminaria. Their forces had received a significant boost with the arrival of some veteran units from the frontier city of Pyrrhus, renowned for its rich military heritage in safeguarding Luminaria from local warbands.

As Mago's forces drew within a day’s march to Aurelia, his scouts returned in the waning hours of the evening, bearing crucial news. The Roman army stood deployed, blocking his advance. Undeterred, Mago meticulously prepared his own forces, deploying them across the valley from their Roman counterparts, primed for a decisive battle on the following day.

The next post will cover the decisive battle.

Tuesday 6 June 2023

An Ancient Campaign - Part 9

We have reached the fourth tabletop game and the ninth post of this campaign. The campaign is drawing near its conclusion, with the Carthaginian forces steadily approaching the city of Aurelia, setting the stage for a final and decisive battle. However, before reaching that climactic encounter, the battle of Solara awaits. The question is - can the Roman forces secure a victory and stop Carthaginian forces from securing further advantages in the impending decisive battle?

Recent progress on the campaign map leading up to this battle.

Background

Having bribed his way across the river Aurelia, Mago, the Carthaginian commander, advanced quickly and now faces a small Roman force positioned on a strategic hill that overlooks the coastal road. A Roman relief force are expected soon from Aurelia. Control of this hill will provide victory to either side. 

The scenario is from the book One-Hour Wargames - see previous post for details.

Battle Report…

Upon encountering a strategic hill guarded by a modest Roman contingent during his coastal march, Mago swiftly deployed his forces. With the aim of outflanking the defenders, he positioned his cavalry on the left, ready to strike. On the right, the Gaul warband prepared to exploit the wooded terrain, while the heavy infantry stood behind the light infantry in the center, forming a formidable line of attack.

As the Roman relief force arrived on the scene. Carthaginian cavalry had already manoeuvred to flank the hill's defenders, while in the centre their light infantry pressed forward, launching ranged attacks on the hill. The battle for control of this vital hilltop had begun in earnest.

Carthaginian forces arrive.

The Carthaginian centre advances and their light infantry engage the defenders at a distance. While each of the flanks move forward.

Carthage’s cavalry begin to flank the defenders of the hill.

The Roman relief force arrives.

In a race against time, the Roman relief force swiftly marched to provide support to their commander Marcus and the valiant defenders atop the hill. Their lone cavalry unit charged forward, confronting some of the Carthaginian cavalry that posed a threat to their flank. Meanwhile, their heavy infantry marched towards the hill, their flanks guarded by a protective screen of the light infantry.

The Roman heavy infantry on the hilltop held their ground with remarkable tenacity, fending off the Carthaginian assaults, while some reinforcements arrived just in time to bolster their defence. The Gaul Warbands, having swiftly dispatched the light infantry, wasted no time in engaging the other Roman infantry units trying to reinforce the hilltop position. The battle raged on, with each side fiercely contesting control of this critical position.

Roman relief forces march quickly to support the hilltop defenders.

The assault on the hilltop is in full swing and the Gauls attack the light infantry.

The first of the Roman relief force arrives.

The initial Roman relief units were promptly thrust into the heart of the hilltop defence. Fatigued and on the verge of crumbling, the existing defenders desperately relied on these fresh reinforcements. However, the Carthaginian forces now held numerical superiority, allowing them to exploit their advantage and outflank the Roman units. The Roman position grew precarious, lacking any further reserves to reinforce their lines. In the face of this relentless pressure, the final defenders were ultimately routed. Tragically, the Roman commander, Marcus, suffered injury during the chaotic retreat.

Relief units arrive, but the existing defenders are exhausted.

Carthaginian forces with numerical superiority are able to rout the few remaining Roman defenders.

An entertaining solo wargame, incorporating chance cards that created both challenges and advantages to each side. These cards have been modified from the original ones found in Chapter 22 of One-Hour Wargames. As for the rules, I used OHW Ancient rules with additional rules concerning Movement, Gaul Warbands, and Catapults:

  • Movement: Any unit that executes a pivot at the beginning and end of their movement will have their overall movement reduced by 3 inches. No deductions for just one pivot.
  • Gaul Warbands: These units have a movement range of 9 inches and can move through woods and difficult terrain. In combat they roll a D6 + 2. They are considered unarmored.
  • Catapults: Assigned to an infantry unit, catapults are capable of shooting up to 36 inches. Their attack hits are determined by rolling a D6 - 2, and they ignore armour. Catapults are removed from play as soon as the infantry unit they are assigned to moves or becomes engaged in combat.

In the next post, the focus will shift to the upcoming campaign and narrative.