Tuesday 30 October 2018

ECW Campaign Game 8 Setup

The lead up to game 8 of the English Civil War campaign has Parliament choosing to raise forces and attempt to control the South West region.
During Parliament's turn they decide to move on the South West region
Cards are used as determine the terrain layout which includes a fordable river running East to West across the tabletop. All units, except artillery, can cross the river at any point, but will suffer one hit when fording and not crossing at the bridge or shallow ford.

The selected terrain cards. The river will run East to West and be fordable along its length
Tabletop setup and waiting for units to be deployed.
The Kings supporters had been very active and a strong Royalist force was recruited. Parliament support was not as strong and all promise of support seemed to fad away, even with support coming from the adjacent South Coast region recruitment was poor. So we have the following Order of battle:

Royalist Forces (14 Units)
5 x Cavalry (Gallopers)
4 x Infantry (Pike and Musket)
2 x Dragoons
1 x Commanded Shot
1 x Elite Pike
1 x Artillery

Parliament Forces (9 Units)
3 x Cavalry (Trotters)
4 x Infantry (Pike and Musket)
1 x Dragoon
1 x Artillery

The Parliamentarian commender reluctantly deploys his forces near the small town of Otterly St Mary, and hopes Royalist forces will be slow in deploying allowing for a late start to the battle. A late start may allow Parliament to get away with a marginal loss and escape the battlefield with few losses.

Royalists deployed and Parliament cavalry face them on the right flank
A wider view of Parliamentarian forces (near tabletop edge)
Parliament foot positioned in fields guard a shallow ford
In this game I have incorporated a game clock again. Dice decide the battle was to start to be 3pm (6am plus the score of a D10 dice adding a number of hours). Each game turn takes 1 hour. This late in the day will require Royalists to attack quickly or risk the smaller Parliamentarian forces slip away under the cover of darkness.

Sunday 28 October 2018

A couple of books arrive and a WW2 game

The last couple of secondhand books I had ordered arrived in the post this week. The Napoleonic theme of the books continues on my painting desk with a couple of Austrian units completed. My aim is to increase my Napoleonic armies by about 25 percent. This should keep me occupied while I ponder what is my next project will be.

Recent arrivals
I have already started to read "Napoleonic Wargaming" by Charles Grant. While I will not be creating 40 plus figure units, it is most enjoyable reading how the thinking behind the rules and research that influences the Charles Grant's rules. I found it interesting to read the guiding principles for these wargaming rules are to be:

  • completely workable
  • as accurate a representation as possible of some tactic or manoeuvre
  • and visual satisfying 

In many ways the book follows the same approach as "Battle", his WW2 rules, working through the areas of the rules: infantry, cavalry, musketry, light infantry, melee, artillery, moral, terrain and orders. One thing it does not cover are any game reports which "Battle" did have. So far I am finding it is wonderfully written and packed with lots of details used to help define the rules.

An Austrian Line and Grenadier unit - Spencer Smith models
As a break from English Civil War wargaming I decided to have a quick WW2 game and tryout a couple of rule changes. Using the existing tabletop setup with a few additional fields and woods a game was quickly setup with the Germans trying to force a river crossing against a quickly prepared defensive position.

German forces advance
Reconnaissance units quickly cross the bridge.
On the far bridge British units wait dug in on an overlooking hill.
British HQ in the village coordinates the defence.


Wednesday 24 October 2018

ECW Campaign Game 7 Report

The campaign year 1642 continues with the Battle of Brecknok. Royalist and Parliamentarian forces are deployed ready for battle close to the River Wye which flows nearby.

Forces are deployed - the river is only crossable by bridge
Map of battle deployment
Having decided to introduce a game clock and with the battle starting at 9am. I found my old game clock to track the hourly turns. However, for the narrative of this report I am not sure the precision of a clock is suitable for an English Civil War game. Instead I have gone with: dawn, early morning, mid-morning, late morning, midday, early afternoon, mid-afternoon, late afternoon, early evening, evening, and dusk.

The game clock was used to track time
Midway through the morning after seeing Parliamentarian forces were in no hurry to make a move, the Royalist commander began moving his forces forward in a general advance.

On the Royalist left flank Parliamentarian cavalry quickly engage advancing cavalry. While Royalist commanded shot move forward on the near river bank.
By late morning the first round of cavalry combat is over. Honours going to the Royalists. Their centre continues to advance with difficulty through the fields.

The Royalist centre traverse fields in a rather disorganised manner. Their cavalry have seen off their opposition, but are in a rather disorganised state after the melee.
Parliamentarian dragoons engage the Commanded Shot as they move along the opposite river bank.
Parliamentarian cavalry reserve rout the Royalist cavalry. 
At Midday both sides had their wins and loses on the flanks and all was looking fairly even.

Along the river bank both sides push forward infantry units to support their dragoons
The reserve cavalry from both sides engage on the flank for a second cavalry melee.
By early afternoon the battle is in full swing with centres of both armies closing for the final phase of the battle.

The Royalist centre begins to move forward while the Parliamentarian commander moves his last unit of cavalry reserve across to the right flank.
The Royalist cavalry rout their counterparts and prepare to receive an attack from the last unit of Parliamentarian cavalry.
Mid-afternoon and the powerful Royalist centre begins its attack.

The Royalist centre now organised after clearing the fields engage in musketry fire.
Both centres close as they run out of ammunition and engage in push of pike.

4pm late afternoon after push of pike the larger Royalist centre overwhelm the Parliamentarians.

After a push of pike Royalists are victorious 

A victory to the Royalist cause and Wales is under their control.

Battle movements

Monday 22 October 2018

ECW Campaign Game 7 Setup

After a frustrating Sunday night spent trying out some 19th Century rules. It was with a sense of joy I setup the seventh game of this English Civil War campaign. As 1642 progresses with each side taking turns to contest regions, it was with no surprise the Royalist to choose Wales. After all, they are well positioned to provide support from their Northern base and an adjoining region. This will allow them to re-roll one of their dice when determining recruitment.

Campaign map with controlled areas (Royalist = red and Parliament = Blue)
Both sides recruited well, but the closeness to their Northern base has provided the Royalist cause with a slightly strong force, one particularly strong in terms of infantry.

Parliamentarian forces (12 units)
5 x Cavalry (Trotters)
4 x Infantry (Mixed Pike and Shot)
2 x Dragoons
1 x Commanded Shot

Royalist forces (13 units)
4 x Cavalry (Gallopers)
5 x Infantry (Mixed Pike and Shot)
2 x Dragoons
1 x Commanded Shot
1 x Elite Pike

The forces clash near the town of Brecknok in Breconshire. The terrain cards quickly determine the tabletop layout. They include a couple of hills and a river, which seems quite appropriate for the region.
Cards to determine the location of terrain.
Because of how the river card was laid down, the river will run north to south. Dice are used to determine the river's entry and exit points. I was hoping for the river to be more central or cut across the tabletop more diagonally, but it was not to be.

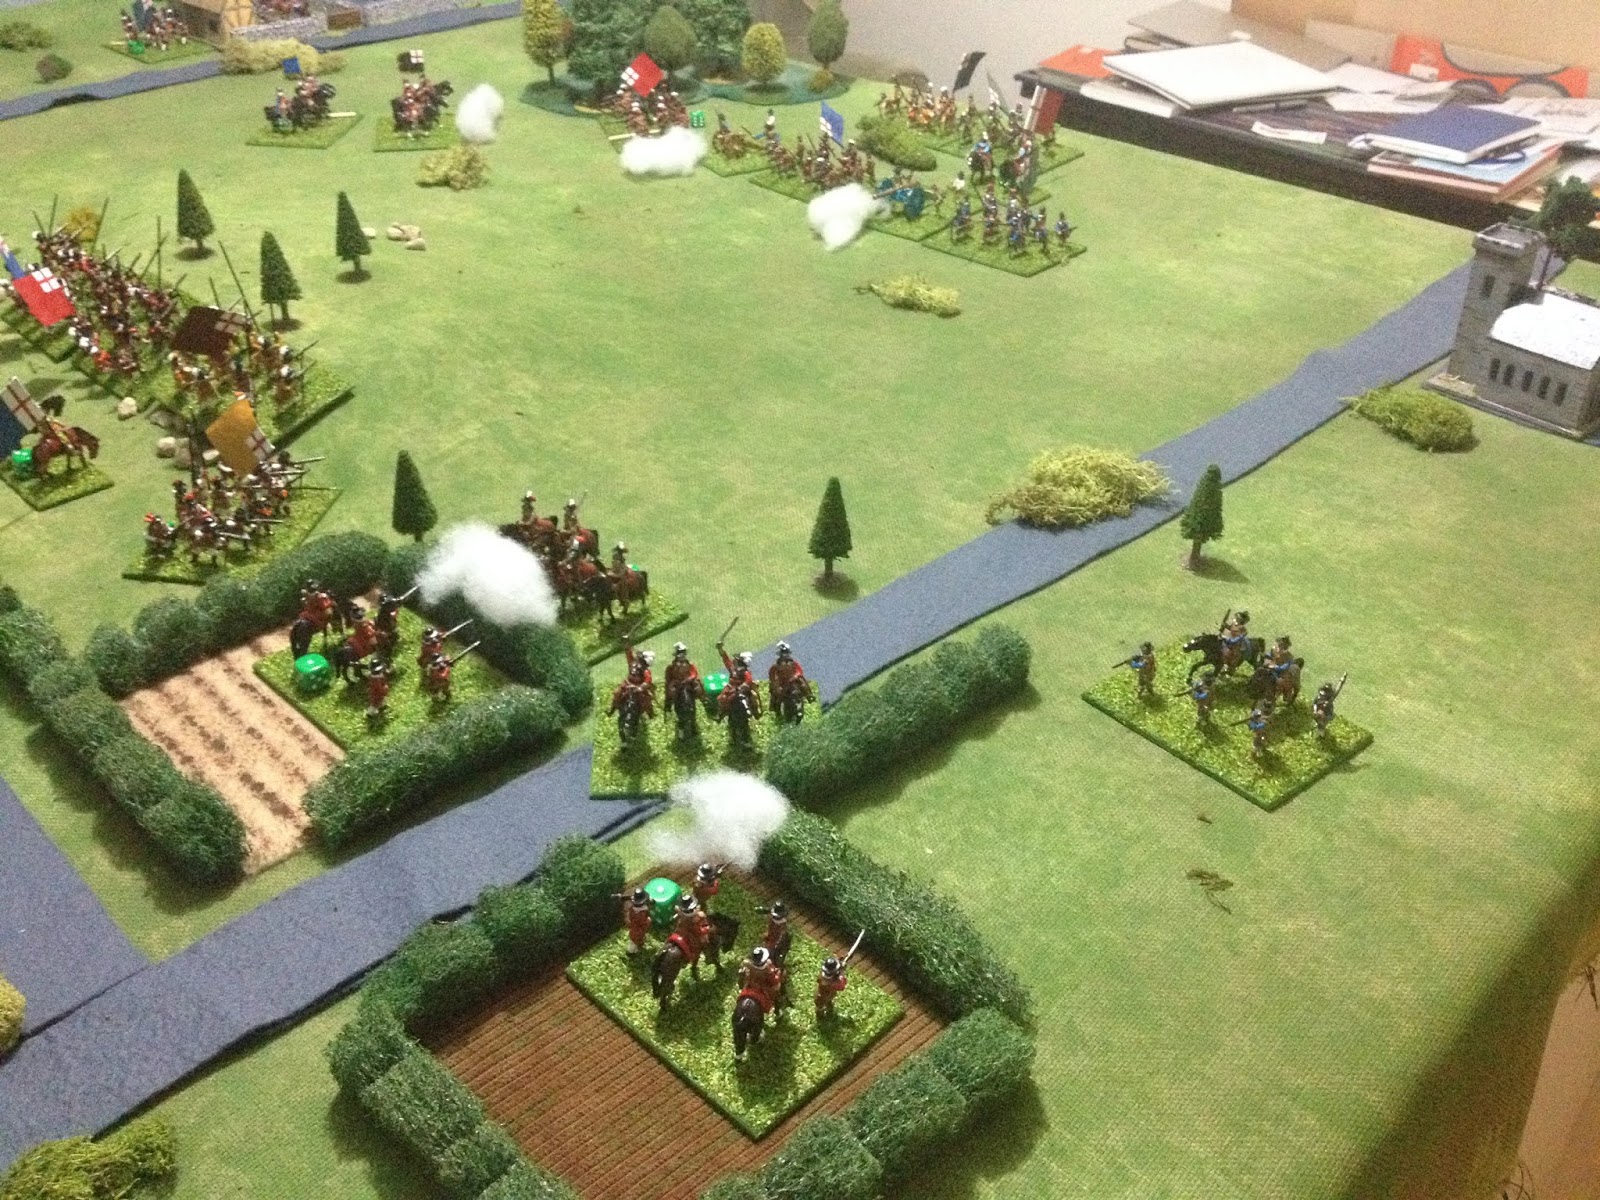
The tabletop terrain layout with a tributary of the River Wye on the far side which can be only crossed at the two bridges.
Having the smaller force Parliament deployed first, followed by the Royalists. After which Parliament declined to make a free move to adjust its position.
Parliamentarian forces deployed 
Royalist units deployed
A view from the Royalist lines with a unit commanded shot across the river
In this game I plan to incorporate a game clock and have the game starting at a set time, with daylight starting at 7am and dusk closing in at 6pm. The battle would start at 6am plus the score of a D10 dice adding a number of hours. A 2 was rolled so the battle would start at 9am (7am + 2 hours) with each game turn taking 1 hour.

Should a battle go until dusk with no decisive result, battle honours will go the to side with the best army resolve. Though that would appear unlikely in this game.


Saturday 20 October 2018

Some secondhand books and models

This week has been very much about secondhand items. I don't have a single painting project at present since finishing my ECW figures. For the moment I plan to: add a few extra Napoleonic units from my stash of secondhand plastic Spencer Smith miniatures, and add to my WW2 1/72 collection with a few recent secondhand purchases.

French Dragoon unit to add to my generic Napoleonic forces. These figures are not Spencer Smith, but I believe are by Segom Miniatures.
On the painting table two Churchills, a flail tank, and some Spencer Smith SYW painted to look like Napoleonic Austrian infantry for my very generic Napoleonic Third Coalition armies

Continuing the secondhand theme of this post. A couple of books arrived in the post this week. Both are in surprisingly good condition given their age and will be enjoyable additions to by collection of wargaming books.


Friday 19 October 2018

ECW Campaign Game 6 report

As both sides contest the South East region their recently recruited forces clash at Lenham Heath, Kent. Parliamentarian forces were able to take up position first, followed by Royalists forces who had been camped near the market town of Lenham.

Initial positions
Royalist forces positioned their artillery in the centre hoping to goad the slightly smaller Parliamentarian into making attacks.

Royalist artillery open fire at visible units. The bulk of the Parliamentarian centre remain behind the crest of the hill to avoid being targets. While on their left the cavalry move forward. 
On the far side of the table Royalist cavalry charge the advancing Parliamentarian cavalry, and on the near flank Royalist dragoons and cavalry move forward against the weaker Parliamentarian flank.
Cavalry on both flanks are fully engaged. Meanwhile Parliament centre remain behind the hill under cover from annoying artillery fire
On the Parliamentarian right the Royalist have gained the ascendancy and part of the infantry centre are moved to shore up the flank.
Royalist cavalry push ahead running into dragoon units positioned behind hedges 
With supporting infantry and dragoons drive off the Royalist cavalry who were in a weakened state from their first clash.
On both flanks Parliament cavalry and dragoons are in control and Royalist forces are retreating except for their centre which remains in place.
At this point the Royalist commander was in a bit of a pickle. He had lost more units than his Parliamentarian counterpart and moving his infantry centre forward would expose both his flanks to the roaming Parliamentarian cavalry and dragoon units. With this in mind I decided the Royalists would retire from the field of battle in order and with their artillery.

A victory to Parliament, probably a minor victory given the field was ceded to them.

A map showing the deployment and thrusts (successful and not so successful) of each side
With the game in the bag, I decided to see if the Royalist commander had made the correct choice to retire in order. So I continued on with the game. Parliament forces moved their infantry forward and while taking casualties and losing units, they routed two more Royalist units and Royalist army resolve failed. All remaining units routed leaving the artillery. The correct decision had been made.

I am currently reading "War Games" by Donald Featherstone and in particular the chapter "How to Start a War Game" has taken my interest. There are some interesting rule ideas for deciding when in the day the battle begins, which then dictates the duration of the game and how forces position themselves for the next day if forces meet late in the day.  I plan to use some similar rules for the next game.

Monday 15 October 2018

Campaign Game 6 setup

As both sides continue to shore up their bases, Royalists to the North and Parliament the regions around London. The next campaign move has Parliament attempting to secure the South East region. The ensuing battle will be the mid-point of the first part of this campaign (the year 1642) where both sides secure regions to their cause, and so far it is turning out to be a pretty even affair.

Campaign map of controlled regions (Royalist = Red and Parliament = Blue)
The terrain for the game was quickly selected using the cards. The hill in the centre may prove influential in the game, and areas of buildings may drive the cavalry action to the centre.

Selected terrain. Each card represents a 2x2 foot square on the tabletop
The layout is transferred to the tabletop and recruitment for both sides proceeds. Parliament will be able to re-roll two of their scores due to controlling two adjacent areas. Recruitment in the English Civil War appears to have been a fairly unpredictable affair, with many towns trying to remain neutral (to maintain trade) and the local populations not necessarily following the local gentry's allegiance to one side or the other.

Order of Battle:

Parliament (12 units)
4 x Cavalry
4 x Infantry
2 x Dragoons
1 x Commanded Shot
1 x Lobsters

Royalst (13 units)
4 x Cavalry
5 x Infantry
2 x Dragoons
2 x Artillery

Tabletop set up and units deployed
Parliament units

Having deployed Parliament units first (they are the smaller force) and Royalist units second (larger force). Then Parliament gets to move some or all of its units to adjust to the second force's deployment.

Parliamentarian units push froward to gain the centre hill
All ready for the next game.