Sunday 27 August 2023

A Remote ACW Game - Hood’s Attack at Gettysburg

During the past week, I had the fortunate opportunity to play in a remote American Civil War wargame. The game was organised and hosted by Jon of Palouse Wargaming Journal

A close up of the action and Jon’s wonderful ACW collection.

Jon had devised a scenario based upon Hood’s attack at 5pm during the Battle of Gettysburg on July 2, 1863. Prior to the game, Jon had provided a detailed briefing outlining the Federal forces but provided limited information about the Confederate forces. I am not overly familiar with the battle, so this provided some “Fog of War” level to the game for me.

An overview of the positions

In the game, I had Hazlett's Battery and Weed's Brigade in reserve and they were to arrive from the north-east via the Millerstown Road. The exact timing of their arrival would be determined by a roll of the dice.

The primary objectives set for the Federal forces in the game were to hold Houck's Ridge and Little Round Top, ensuring that no Confederate troops were present on Millerstown Road to the east of Stony Hill by the conclusion of 6 turns.

My plans were to maintain a defensive along the objectives and positioning the Federal forces in the best defensive locations if possible, which generally meant in wooded areas.

On to the game…
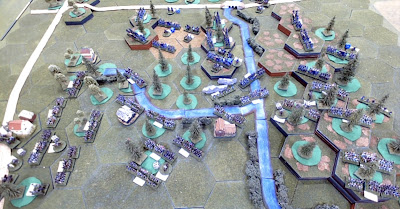
The opening positions on the tabletop

If you read Jon’s account of the game you will see lots of wonderful arrows showing the flow of the game with the Confederate attacks and advances, along with the occasional repulse. As the defending player there may have be the odd counterattack, but for the most part the game was all about holding a defensive line. So in the following photographs, which are just my screen shots of the overall game, I have drawn defensive lines to show the Federal defensive line to help in following the game.

Turn 1

During the opening moves, I had originally thought the Confederates might make a concerted effort to attack against the Federal right flank, with the aim to outflank the position and gain access to the road. However, the opening Confederate attacks were concentrated on Houck's Ridge and Little Round Top, which were the key objectives of the game.

Turn 1 - the defensive line is established.

Turn 2

Following the initial attacks, a few of which were turned back thanks to some favourable circumstances (dice rolls) my defensive line appeared quite solid. The right flank, in particular, was holding out very well and putting up strong resistance. Notably, my sharpshooters positioned in Devil's Den effectively repulsed an enemy charge - a significant accomplishment.

Turn 2 - The defensive line is holding

Turn 3

The absence of available reserves was becoming a source of concern for me, particularly as Confederate forces were able to capture Devil's Den and had intensifying their attacks against my brigade stationed at Little Round Top. The fierce fighting was claiming brigade commanders on both sides as casualties, as they urged their forces forward or rallied their units in defence.

Turn 3 - The defensive line was under pressure in the centre and definitely under threat on the left flank.

Turn 4

At last, the reinforcements arrived just as my defensive line had been breached. A couple of Confederate regiments had managed to infiltrate to my rear, while the remaining units were making a frantic effort to maintain their positions. The lack of brigade commanders, all of whom were casualties by now, meant saving hits was less effective.

Turn 4 - The defensive line is broken just as reinforcements arrive.

Turn 5

The reinforcements swiftly advanced and successfully eliminated the Confederate units that had managed to penetrate the defensive line. The position on Little Round Top was promptly bolstered with fresh units. Nevertheless, the losses on my initial brigades ultimately overwhelmed their resolve, leading to their collapse and necessitating a general withdrawal of the Federal forces. A Confederate win.

Congratulations to Jon for hopefully a hard earned victory.

Turn 5 - The defensive lines started to stabilise, but too may brigades were broken and the positions would be vacated.

Summary

Could my Federal forces have maintained their defensive position if the reserves had arrived a single turn earlier? My poor dice rolling had delayed them. I suspect not, all of my brigades had become thoroughly worn out from their defence against the constant attacks by the Confederates.

Jon had wasted no time at the start of the game and had promptly advanced his brigades, throwing them into attacks against the objectives. Any hesitations in advancing the Confederates would have played to the advantage of the defenders who are always buying time until reinforcements arrive.

One particular highlight for me was the Federal artillery who performed commendably, dealing significant damage with well-aimed canister shots to impede the Confederate progress on more than one occasion.

A most enjoyable and absorbing game hosted by Jon. The three and a half hours went by very quickly.


Sunday 20 August 2023

Chance cards and a Samurai game

I am continuing my messing around with chance cards and using a slightly different approach for a Samurai game set during the 1550-1615 period. The rules used are a One-Hour Wargame variation and can be found in one of the links at the top of the blog.

A samurai game in progress.

In my previous post I described a method for using chance cards in wargames. Each player has 8 negative chance cards and 8 positive chance cards. Players shuffle their negative chance cards, then draw 5 of them unseen. They do the same with their positive chance cards. These cards are then added to the 5 "no event" cards and shuffled to create each player's chance deck. This method creates an element of uncertainty about the types of good or bad luck a player could experience, rather than having a known set of fixed events.

For the samurai game, I decided to use a slightly different variation of the above approach. Each player can select 8 cards from the following list, but no card can be selected more than 4 times:

Initiative: A free action for one unit to move, shoot, charge, or a round of hand-to-hand combat.

Rally: One unit can remove D6 hits.

Feint: One unit not within 12 inches or line of sight of an enemy unit can have an unlimited move, but can never move within 12 inches of an enemy unit during its movement on the tabletop. This makes skirmishing units particularly useful to block surprise appearances of a unit on the opposite flank or exposed flanks.

The limit of 4 cards helps to create a variety of cards, but allows players to gear their selection to suit their planned tactics for the game. Stacking the deck so to speak. For example, if defending, they may well choose 4 rally cards and a couple of feint cards to enable counterattacks, with the remaining 2 cards being made up of initiative cards.

The 8 selected cards are shuffled and 5 cards are drawn unseen by the player. These 5 cards are added unseen to 5 "no event" and 5 negative cards (which are fixed) and shuffled to create a player's chance card deck for the game.

A balanced 3 initiative, 3 rally and 2 feint cards are selected

The 8 selected cards are shuffled and 5 selected unseen and the remaining 3 discarded, again unseen by the player. All the positive, negative and “No event” cards are then shuffled and become the player’s chance card deck.

The Game…

The game has Blue and Red armies positioned on hills facing each other. Both armies are trying to capture the opposite hilltop or eliminate the enemy by reducing their number to 1 unit.

Tabletop setup with the two chance card decks in the foreground.

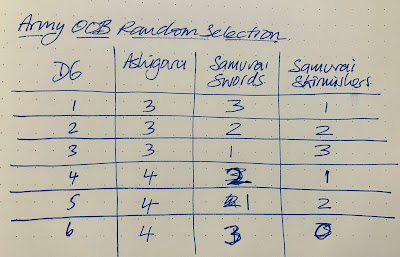
The orders of battle use 7 units because I am only using only 3 units types. This allows for a unique variation for each score on a dice.

A random force selection table

Order of Battle…

Blue Army:

  • 3 x Samurai units
  • 1 x Samurai Skirmisher unit
  • 3 x Ashigaru units

Red Army:

  • 4 x Ashigaru units
  • 2 x Samurai units
  • 1 x Samurai Skirmisher units

Note: in the photographs the samurai skirmishers have 4 bases a mix of mounted and foot bowmen, while the other samurai unit have 6 bases with a mix of mounted samurai and foot samurai with swords and pole arms.

A Brief Battle Report…

The battle commenced as the Red forces initiated an advance, directing their Ashigaru units forward along their right flank. Simultaneously, on the opposing flank, the Blue army moved forward, deploying their skirmishers and samurai. The Daimyo leading the Blue forces then chose to advance in the centre. At this phase of the battle, both sides engaged in ranged combat, employing their muskets and bowmen. Blue then executed a feint manoeuvre by transferring a samurai unit from their right flank to the left, reinforcing an assault on Red's right flank, which had been gradually gaining the advantage.

As the centre of the Blue forces began to waver, the Daimyo of the Red army made the decision to push forward with their central units while repelling the flanking threat posed by Blue’s samurai. The centre of the Blue army began to crumble, prompting some units to retreat towards a hilltop position with the aim of  establishing a final defence. Despite their battered state, the Blue forces managed to rally and effectively withstand Red attacks. The battle outcome was an honourable draw.

Red Ashigaru push forward on their right flank.

In the centre both forces exchange fire.

The switch of a Blue samurai unit to the opposite flank creates a threat for Red forces to deal with.

Blue’s centre has collapsed and the remaining forces retire to defend the hill.

Blue forces recover sufficiently to hold the hilltop and achieve a draw.

I found the game enjoyable using this method of choosing favourable cards and stacking the deck to align with the tactics planned for the battle. Building upon this approach, I am planning to create a set of predetermined card combinations, each consisting of 8 cards. These combinations will be based on the various historical battle formations, using their poetic name, such as "Ganko - Birds of Flight." Additionally, these prearranged selections will have specific restrictions regarding the deployment of units, adding a layer of constraint to the gameplay and battle narrative.

Battle formations

The formations were found in this book.

I think there will be a samurai campaign soon. Anyway that is all for now and I can ponder the campaign while gardening. There are just too many chores to do in the garden after being away and some recent wet wintery weekends.

Sunday 13 August 2023

Playing around with chance cards

Wargaming activities were limited this past week due to a trip to Wellington, New Zealand, with the wife to catch up with our adult children and celebrate a birthday. While waiting at the airport and travelling on the flight I was thinking about the use of chance cards in my wargaming. I do enjoy using using chance cards in my wargames whenever possible as a means to easily add friction and uncertainly to my solo gaming. My go to approach for using chance cards is from "One-Hour Wargaming" by Neil Thomas, where a chance card is drawn during each player's turn. (As an aside the cards also help me track the game turns.)

A medieval game setup with the chance card decks for each player in the foreground.

A chance card is drawn by each player at the start of their turn. The cards are divided into three categories:

  • 5 neutral “no effect” cards that have no impact on the game.
  • 5 negative cards that introduce unfavorable effects to a player.
  • 5 positive cards that provide advantageous outcomes for a player.

A player’s chance cards

A typical set of chance cards will have:

  • 5 x no effect on the game
  • 2 x initiative cards that enable an addition action
  • 2 x rally cards to reorganise an number units
  • 1 x enemy panic card which causes hits to be applied to an enemy unit
  • 2 x no ammunition cards that limit the number of units shooting
  • 2 x confusion cards that limit the ability to move units
  • 1 x panic card where a friendly unit must take additional hits

However, one of the challenges of using chance cards is as the game progresses one can soon determine the likelihood of good or bad events occurring, and what they may be, based on the cards that have already been drawn from the player’s chance card decks. 

While waiting around doing nothing at the airport, I was thinking through some different ways to address the predictability of the cards as the game progresses, while keeping the balance between players. To help minimise the ability to predict cards I landed on this approach and tested it out this weekend. 

Step 1 - Add additional positive and negative cards to the player’s chance card deck.

Each player as 8 negative chance cards and 8 positive chance cards. Essentially I just added 3 extra cards one for each type of event described on the chance cards. Players shuffle their negative chance cards, then select 5 cards taking care not to see them. They then do likewise with their positive chance cards. These cards are then added to the 5 “no effect” cards and shuffled to create their chance deck. Repeat the above to create the other player’s chance card deck.

Step 2 - Shuffle the positive cards and discard 3 leaving 5 cards. Do the same with the negative cards. Then combine the 5 positive, 5 negative, and 5 no effect cards into one deck and shuffle. 

This approach provides both players with equal distribution of negative and positive changes, but they cannot be sure of the type of change. Having played a couple of games I am quite tempted to add a “no effect” card into each group of 8 positive and negative cards so there would be chance of only having 4 otitides or negative cards. This will create unbalanced chances for players, but nothing too drastic.

Another photo of the game to wrap up.


Friday 4 August 2023

Miserly Medieval Marker Madness

Building on the markers' theme from last week's post about English Civil War out of ammunition markers. This week my focus has shifted to medieval markers as I am try out some medieval rules that involve recording only 2 hits. With such few hits to record provided a perfect opportunity to see what sort of themed medieval marker I could come up with.

To avoid any costs I opted to create some paper markers. I sourced images of some painted casualty markers from the internet, resized and printed them on paper. Then, I stuck the paper to cardboard, cut them out, and shaped them to give them some depth. I am pretty sure I have seen this done before somewhere, I suspect it was in one of Peter Dennis’s Paper Wargaming books or blog, but my searches did not turn up anything. 

An overhead photo of the casualty markers in use

A closer look at the markers after being shaped, The shaping has two benefits, one they do not look so flat, and second they are easier to pick up.

So here is a quick run through on how the casualty markers were made.

The resized and printed images were stuck to cardboard.

Using a grey-green wash I quickly painted around the images. Any excess paint was wiped off. By doing this I do not have to be too precise when cutting out the figures.

The figures are cut out.

I found an old modelling tool with a rounded end to be best for shaping the casualty figures.

Using a surface with a little bit of give, I place the figure face down and use the modelling tool to push down and shape the figure.

The after and before shaping.

The collection of casualties

A couple more photos of the casualty markers in use.

A unit with two hits

The look on the tabletop with the markers.

The cost of this experiment is $1 or $2 for the colour printing as I already had the glue and the cardboard was from food packaging.