Whenever my daughter visits us from New Zealand she is kind enough to play a wargame. Our go-to game choice is One-Hour Skirmish Wargaming by John Lambshead which she enjoys playing. It's a rapid-paced and simple skirmish game that involves commanding 5-10 figures on a 4x4 foot tabletop. The rules use a card deck instead of dice for variables and game turn lengths are uncertain, ending when a joker is revealed.
 |
| A game in progress. |
 |
| The rules used |
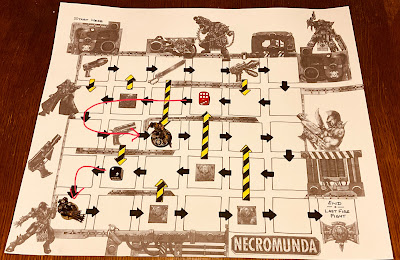
Due to the fast-paced and fun nature of these games, we often find ourselves playing multiple games throughout the course of an afternoon. On this occasion, we decided to setup a small campaign using a Necromunda theme as most of my figures are from Games Workshop. The choice of campaign was a variation of the snakes and ladders game I have used before for a Jacobite Rebellion game (see here) and is also described in the Portable Wargame Compendium. However, instead of going up the board, the players had to descend into the depths of Hive Quartus.
 |
| The campaign board. |
To help immerse ourselves in the campaign we decided to create the campaign board using a collage approach of sticking pictures from the original set of rules which I had downloaded and printed. The board represents Hive Quartus and the objective of the campaign is for a player to get their gang from the top left corner to the bottom right corner.
Hive Quartus is a hive city built upon the remains of an ancient hive destroyed in a cataclysmic event. The ruins of the previous hive serve as a foundation for the new hive, with remnants of crumbling spires and shattered walkways interspersed with newly constructed structures. The hive is a testament to the resilience and resourcefulness of its inhabitants, who have built a thriving community amidst the ruins. Gangs in Hive Quartus often emerge as scavengers and explorers, venturing down into the unexplored sections of the destroyed hive in search of hidden treasures, forgotten technologies, and the remnants of the past.
 |
| The making of the campaign board. |
As we embarked on our quickly setup campaign, we began with a basic set of campaign rules that served as a starting point. However, as we progressed with the campaign, delving deeper into the depths of Hive Quartus, we found ourselves modifying one or two of the rules to better suit the campaign and narrative. The rules written below are the final rules with all the modifications we made along the way.
 |
| The Shadow Syndicate gang moving forward cautiously. |
The Campaign Rules
In this board game, both players have the opportunity to create and name their gangs. Each gang consists of 7 figures, including one designated leader, who should also be named. The game begins with both players placing their gang token on the starting point of the campaign board.
During each campaign turn, a player can choose between rolling a dice to move their gang token forward a number of squares equal to the dice score or staying in place to recruit a new gang member as a replacement for a figure lost during a skirmish game. It's important to note that a gang cannot exceed 7 figures.
If a player lands on a square with a hazard symbol (depicted as a yellow and black arrow), they must follow the arrow and move their token to the indicated square.
Whenever a gang token moves down to a new level (not upwards), a skirmish game is triggered. The opponent in the skirmish game depends on the following situations:
- If there is another gang token on the same level, a skirmish game is fought between the two gangs using all their available figures.
- If there is no other gang token on the level, an opponent needs to be created. Before starting the game create various pre-designed gangs to choose from, such as cultists, local law enforcers, Mechanicus explorers, or hell spawn. The opposing gang which can be randomly selected from the available opposition will consist of the same number of figures as the player's gang.
Skirmish games are best played using predefined scenarios or custom-made scenarios.
After a skirmish game, any figures removed from play will have a dice rolled to determine if they survived. On a dice score of 3 or higher, they recover and rejoin the gang. Otherwise, they are considered dead. A player can recruit new gang members my choosing not to roll to move his token during his campaign turn.
If a leader is lost during the game, a new leader must be selected and given a name.
If a gang wins a skirmish game, they have the opportunity to promote one of their gang members to a veteran attacker or a crafty defender. These traits provide combat advantages in either attacks or defence. In the One-Hour Skirmish Wargames rules we used, the promoted figure is allowed to draw an additional card during combat for defence or attack depending on their choice.
After each skirmish game, players return to the campaign map for another turn.
The first token to reach the end square is the winner.
 |
| Local law enforcer may have met his match. |
A Campaign Run Through
We both decided upon our gang names and leader names. My daughter’s gang was called the Shadow Syndicate lead by Gregor and mine were the Rust Reapers lead by Vorrik. We each selected 6 followers to make a total of seven gang members.
 |
| Gang tokens placed on the board at the start. |
Turn 1
The Shadow Syndicate rolled a score of 4, allowing them to move their gang token 4 squares on the board. Similarly, the Rust Reapers rolled a score of 6, enabling them to move their gang token 6 squares. As both gangs have reached a new level, a skirmish game will take place between them.
 |
| Campaign turn 1 |
During the skirmish game between the gangs, the Shadow Syndicate emerged as the victors. As a result, they promoted one of their gang members to the status of a veteran attacker. However, they did suffer a loss as one of their gang members was eliminated during the game and failed to recover, rolling less than 3.
On the other hand, the Rust Reapers may not have been successful in the skirmish, but they did manage to come out unscathed. All of their eliminated gang members successfully recovered and rejoined the gang.
Turn 2
The Shadow Syndicate opted to forgo rolling the dice, remaining stationary so they could recruit a replacement gang member for the one they lost in the previous skirmish.
Meanwhile, the Rust Reapers rolled a score of 2, granting them the ability to advance their gang token by 2 squares on the game board. As a consequence of descending to a new level, a skirmish game is triggered between the Rust Reapers and a randomly chosen gang of equal size.
 |
| The Rust Reapers advance 2 squares and the Shadow Syndicate stay put to recruit a replacement. |
Turn 3
With a roll of 3, the Rust Reapers successfully advanced their gang token by 3 squares on the board. Unfortunately, they landed on a square with a hazard arrow, which compelled them to move back to a higher level.
On the other hand, the Shadow Syndicate rolled a score of 2, enabling them to move their gang token 2 squares.
Since neither gang descended to a new level, the Rust Reapers merely returning to a previously visited level, there was no skirmish game taking place this turn.
 |
| Campaign turn 3 |
Turn 4
The Rust Reapers made the decision to dedicate their turn to recruiting and chose not to roll the dice for movement.
While the Shadow Syndicate rolled a score of 4, granting them the ability to move their gang token 4 squares on the board.
As a result of the Shadow Syndicate descending to a new level, a skirmish game takes place between them and a randomly selected gang of equal size.
 |
| Campaign turn 4 |
In their skirmish, the Shadow Syndicate encountered a gang of Cultists, possibly the same ones who had previously clashed with the Rust Reapers. Unfortunately, the outcome remained unchanged, with the Cultists emerging as the victors. However, there was a bright side with the Shadow Syndicate managing to successfully recover all their lost gang members following the skirmish.
Turn 5
The Rust Reapers rolled a score of 2, allowing them to progress by 2 squares on the board.
The Shadow Syndicate rolled a score of 3, enabling them to move their gang token 3 squares downward to a lower level.
As the Shadow Syndicate descended to a new level, a skirmish game takes place between them and a randomly chosen gang of equivalent size.
 |
| Campaign turn 5 |
During the skirmish, the Shadow Syndicate faced off against a group of local law enforcers. Fortunately, the Shadow Syndicate emerged as the victors in the clash, without suffering any losses. As a result of their victory, a second member of their gang will now benefit by having a veteran attacker trait.
Turn 6
The Rust Reapers achieved a roll of 5, allowing them to advance their gang token by 5 squares, ultimately descending to a lower level.
While, the Shadow Syndicate rolled a score of 4, allowing them to move their gang token 4 squares, but still remaining on the same level.
Due to the Rust Reapers descending to a new level, a skirmish game is fought between them and a randomly selected gang of equivalent size.
 |
| Campaign turn 6 |
During the skirmish, the Rust Reapers confronted a gang of Cultists (they are everywhere). Despite emerging victorious, the Rust Reapers suffered a significant loss as their leader, Vorrik, fell in battle.
Turn 7
The Rust Reapers made the decision to focus on recruitment and selecting a new leader after losing Vorrik in their previous turn.
On the other hand, the Shadow Syndicate rolled a score of 6, so they progressed their gang token 6 squares and descend to a new level.
As a result of the Shadow Syndicate descending to a new level, a skirmish game takes place between them and a randomly chosen gang of equal size.
 |
| Campaign turn 7 |
The Shadow Syndicate came across a group of Mechanicus explorers scouring the depths of the hive for ancient technologies. In the ensuing skirmish, the Shadow Syndicate emerged as the victorious gang, achieving the win over the explorers without suffering any losses. As a result, another member of the gang was chosen to acquire the veteran attacker trait, enhancing their combat capability.
Turn 8
The Rust Reapers successfully rolled a score of 6, enabling them to progress by 6 squares on the board and descend to a lower level.
Similarly, the Shadow Syndicate rolled a score of 2, allowing them to move their gang token 2 squares and move to a new level below.
As both gangs have descended to a new level, two skirmish games are fought between each gang and a randomly chosen gang of equal size.
 |
| Campaign turn 8 |
The Shadow Syndicate encountered a group of Hell Spawn, creatures that dwell in the depths of Hive Quartus. These fast-moving have monsters have razor-sharp talons and teeth, making them formidable opponents in close combat. In the skirmish against the Hell Spawn, the Shadow Syndicate emerged as the victors without suffering any losses. Another member of their gang was chosen to acquire the veteran attacker trait, making them a very formidable gang.
A couple of levels above, the Rust Reapers, now under the leadership of Loric, battled a unit of law enforcers who they managed to successfully defeat, but unfortunately lost one of their own gang members in the process.
Turn 9
The Shadow Syndicate achieved a high roll of 6, which enabled their gang token to be advanced 6 squares and to reach the end of their journey as they discovered hidden treasures and ancient technology. A victory for both the Shadow Syndicate gang and my daughter. Congratulations on their success!
 |
| Campaign turn 9 |
End of Game
The campaign was wrapped up in one day and provided 8 enjoyable skirmish games against a range of opponents and in a variety of scenarios. Throughout the campaign, the opposing player took on the role of the opposition whenever random gangs were encountered.
Initially, the plan was to have a final showdown between the gangs upon one of them reaching the end. However, we decided that simply reaching the end itself was a significant achievement, making it a satisfying conclusion to the campaign.
 |
| A member of the Shadow Syndicate. |
My daughter and I set aside an entire day to gaming. The morning was devoted to creating the campaign board, and the games themselves were fought throughout the afternoon and evening with breaks for tea. Although we were both tired by the end, we found it to be a most enjoyable day.


