Saturday 29 May 2021

WW2 Western Desert Campaign - Turn 11 Game 2

The second game in this campaign turn (number 11) and has elements of an understrength South African Infantry Division defending a line of hills against a flanking attack by lead elements of the 15th Panzer Division.

The 15th Panzer order of battle:

  • 2 x Armoured Car units
  • 4 x Pz III units
  • 1 x Pz IV unit
  • 2 x Armoured Infantry units
  • 1 x Marder Self-Propelled AT unit
  • 1 x 88mm unit
  • 1 x Wespe Mobile Artillery unit

South African Infantry order of battle:

  • 1 x Armoured Infantry unit
  • 2 x Infantry units
  • 1 x 25 Pounder unit
  • 1 x 6 Pounder unit
  • 1 x 2 Pounder Portee unit
  • 2 x Sherman tank units
  • 2 x Matilda tank units

The above order of battle is after accounting for ongoing wear and tear from operating in the harsh desert conditions.

Plans

The tabletop setup. Allied forces are holding a defensive line along the hills, and have some tanks hidden behind the central escarpment.

The 15th Panzer plans are to move along one of the tracks and seize the first objective of the central escarpment. A flanking force, about a third of the overall force, will attack their second objective the hills positioned in the centre. 

The advance Panzer force arrives moving along one of the tracks.

Opening Phase

The opening phase of the game had the 15th Panzer units quickly moving along tracks towards their first objective the central escapement. A short tank engagement was fought before the Allies retired to their defensive line along the hills. The 15th Panzer quickly pushed on to attach the Allied line, but after losses panzer forces retired and waited for their artillery and 88mm units to arrive.

A tank battle begins as Allies tanks attack the advancing Panzers.

The Allied tanks retired to their defensive on the hills and waited.

The 15th Panzer attack pushes on to the Allies defensive line with losses on both sides occurring, but the defence holds and the attack was called off until support units arrive.

Flank Attack

As the panzers regrouped in the centre and brought up support units, their flanking units started to arrive. They ran into a unit of Matildas supported by a 6 pounder AT unit positioned on a hill. After a short engagement the flank attack was in disarray with the majority of units destroyed. This success allowed the Allies to reposition the Matildas, their only remaining tank unit, towards the centre where another attack was underway and beginning to make headway.

The flanking Panzers arrive just as the main attack has to regroup before making any further assaults.

The combined attacks of the 6 Pounder AT unit and Matilda tanks eliminated the flanking threat.

With the flank attack failing to achieve any success the main attack made another assault and with the support of the 88mm and artillery make a breakthrough.
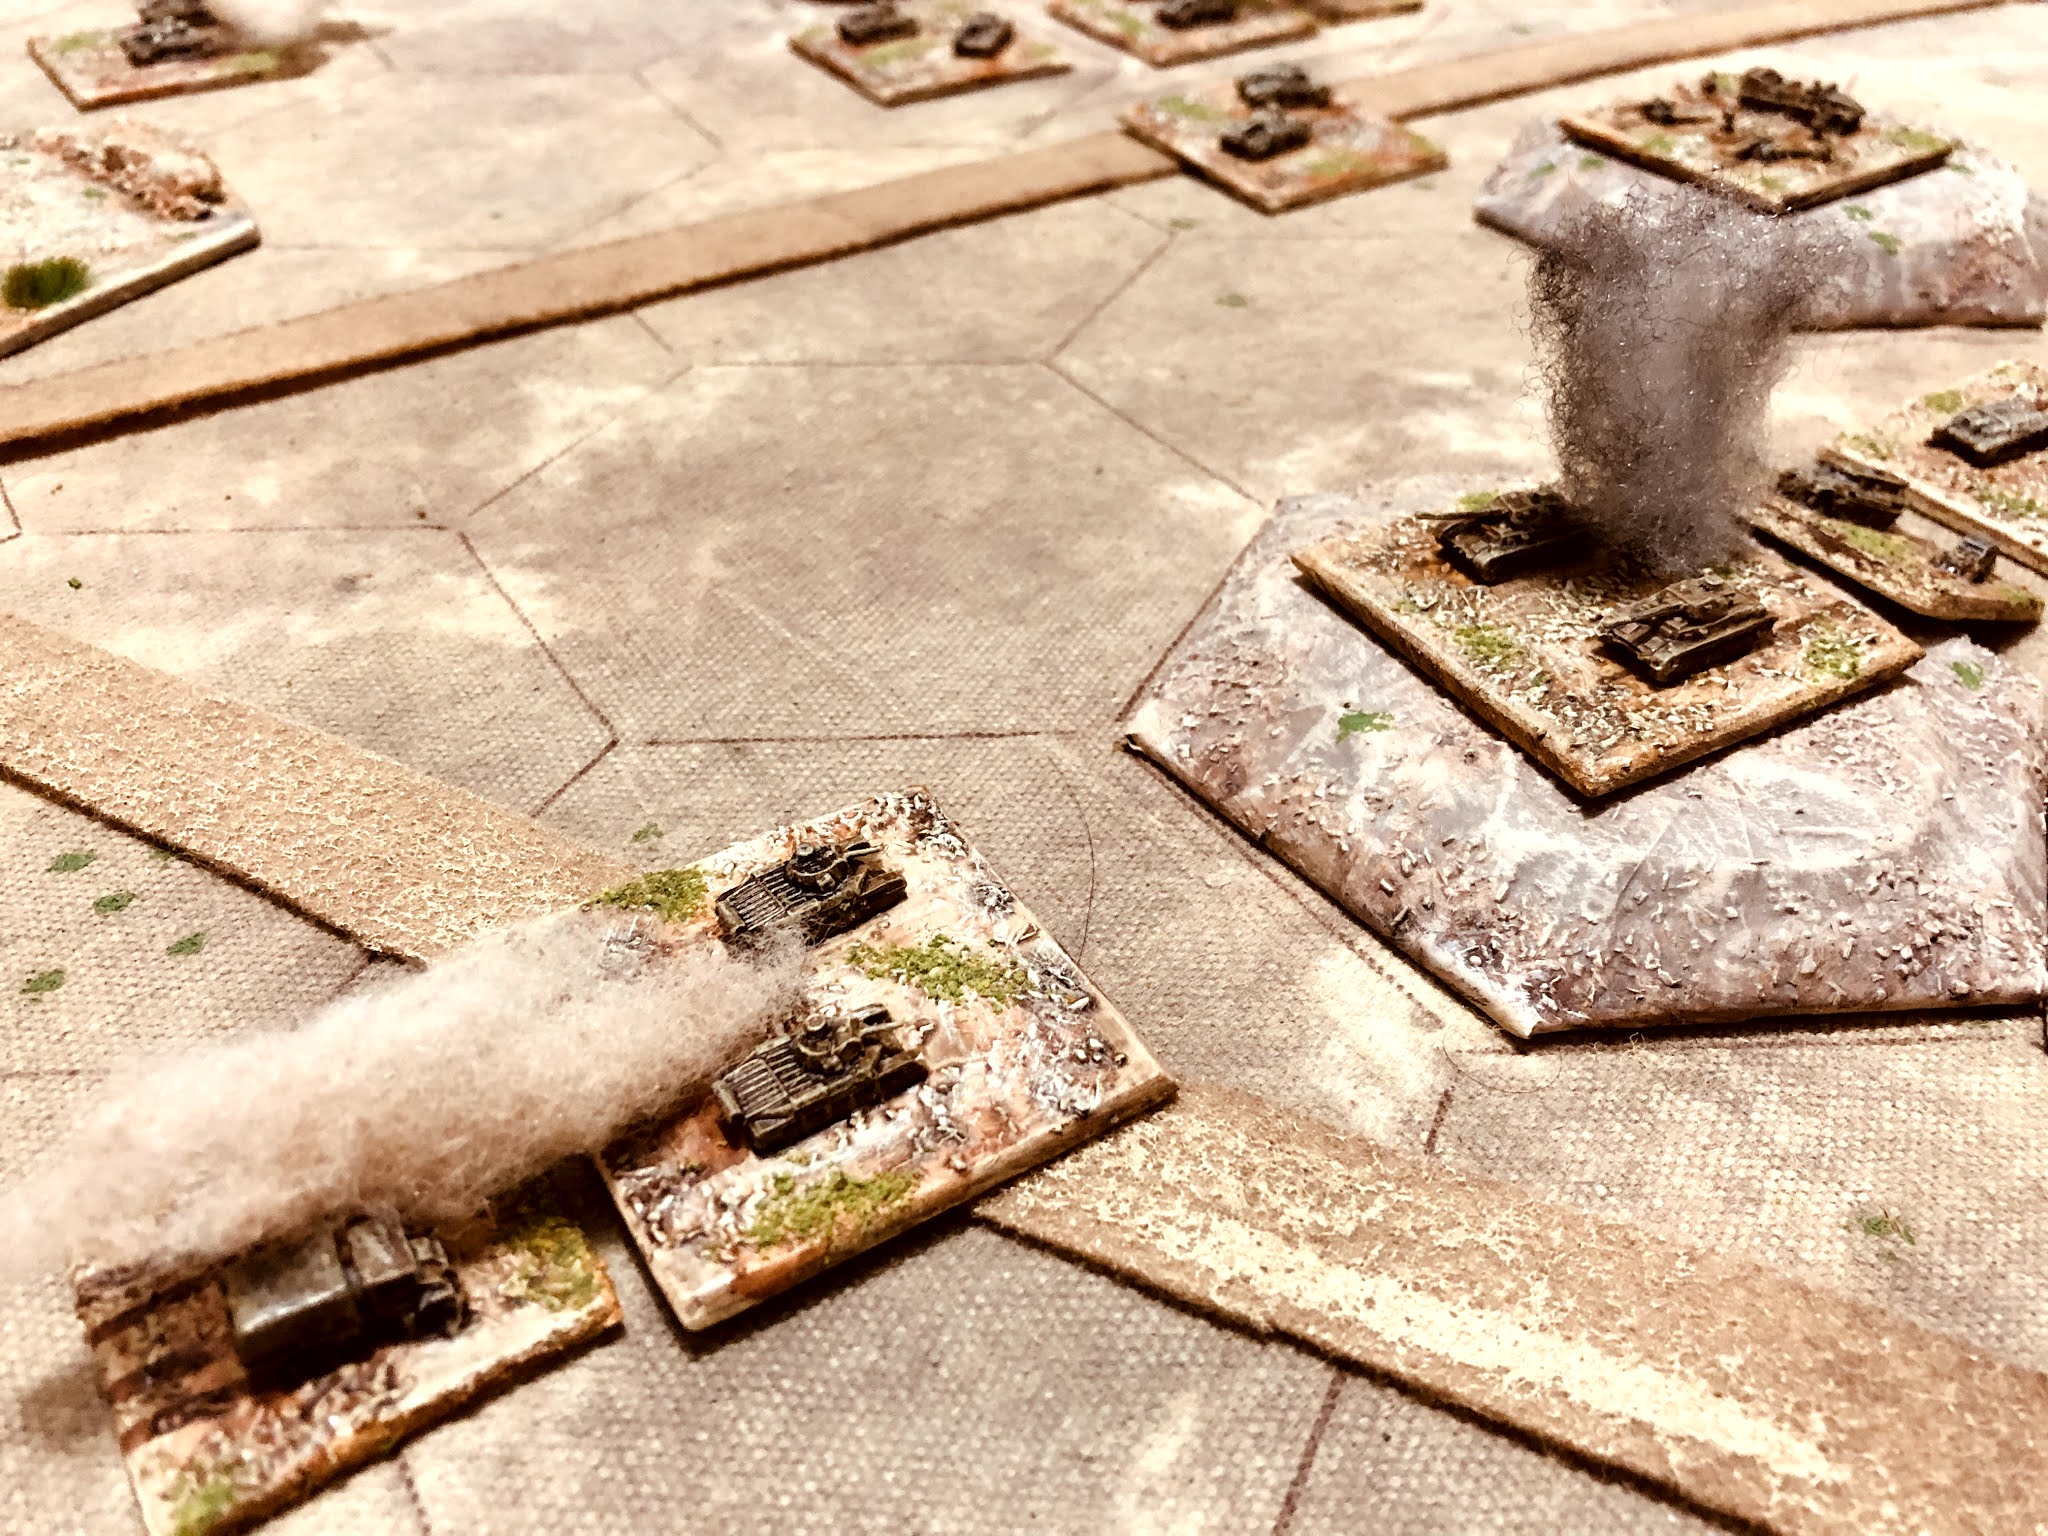
Final Phase

Having regrouped the 15th Panzer prepared to make a final attack with their remaining active units. The total failure of the flank attack meant this was going to be a make or break attack. The attack began well until the arrival of a unit of Matildas, which stopped the initial momentum. Accurate shooting from the 88mm unit put an end to this troublesome tank unit, and the attack momentum was back with the panzer units. The last Pz III unit with support from their artillery and 88mm were able to take the second objective.

The sole remaining Allied tank unit (Matildas) moves from the left flank to help defend the centre.

The loss of their final tank unit had the Allies having to sit tight on the hills and prepare for the final attack from the depleted Panzer forces.

A final attack proved successful and the 15th Panzer capture the 2nd objective and will the game.

Game End

A victory to the 15th Panzer who ended capturing and holding two of the three objectives in the game. This is the second victory on this campaign turn and they will advance another zone, but with no more zones to retire too for the Allies the campaign is won by Axis forces.

The campaign ends with a second Axis victory.

I will provide some comments on how the campaign rules went in a later post, and whether, or not, I settled upon the game rules by the end.

Wednesday 26 May 2021

Possibly the last WW2 Western Desert Campaign Game

The past week has been spent messing around with some simple hex-based ancient naval games, testing out various rules on a hex and some home-brew variations. My aim is to settle on some rules prior to starting the planned ancient campaign. However, there is my existing WW2 Western Desert campaign to finish as I want to avoid having two campaign on the go at the same time.

The start of a naval game

The Allies are in a perilous situation. Should they lose this campaign turn, they will lose the campaign overall. Already they have lost the first game of a best of three games which determine the winner of each campaign turn. The next game has the 15th Panzer division attacking the understrength 1st South African Infantry division.

Campaign map situation

The battle will have the Allies in a good defensive position defending along a line of hills and escarpments, which will funnel any attacks. Axis forces will be able to get a flanking attack in this game which may well go along way in offsetting the terrain advantage held by the Allies.

Terrain cards selected for this game. The Allies are able to choose the side they defend.

I plan to play what may well be the last game in the campaign this weekend.

Wednesday 19 May 2021

Ancient naval preparations continue

I have been playing a few small ancient naval games with 5 to 10 ships per side. There is one thing I have found frustrating, and that is the measuring and checking of angles for ramming in my games. So yesterday I decided to move to a hex grid and cut out a template for 4 inch (side to side) hexagon in preparation. This evening I have been marking up the hex grid with the template, not marking the whole hex, just marking the corners of the hex. Having laboriously completed this carefully to avoid misshaped hexes, I then went over dabbing on a bluey-grey using a piece of cut foam in the form of a wedge. My hope was to make the dabs look like waves in the hope of disguising to a certain extent the hex look.

The completed blue felt gaming mat.

Ancient ships in the hexes. They all face one side of the hex.

I chose the 4 inch hex because this will also work with my Napoleonic and WW2 ships. 

My semi-flat Napoleonic ships made from MDF wood and cardboard.

My balsa wood WW2 ships are a slightly snugger fit to the hex.

Now that I have the hex gaming mat all prepared, I need to revisit the rules and amend them to work on a hex grid. I suspect the biggest challenge will be differentiating the different ship speeds (move distances).

Saturday 15 May 2021

Ancient ships finished and a few islands added

Yesterday I was able to finish off the last few ancient ships. I will be needing to add a few islands and coastline to make the games a bit more interesting, besides which many of the naval battles were fought close to the coast.

The tabletop setup with the newly created islands and coastline, and recently completed ships.

After I considered a few option on how to creating the islands and coastline I settled on using foam/sponge sheet which I had used for packing the last time we moved. It is nice and light and can be throw in with other terrain without any worry of damage.

Here are the steps I used to create some foam islands and coastline.

Step 1 - Using a pair of scissors I cut out the pieces, shaped the coastline, and finally cut out gullies to make the coastline look quite rugged.

Foam is cut and shaped

Step 2 - I made up a large batch of brown wash using cheap acrylic paint from the kids section of the art shop. This was liberally applied to the foam pieces, then they were squeezed out to rid them of as much surplus wash as possible.

Step 3 - While the brown stained foam pieces were still damp I brushed on a light sand colour, working in the colour with the paint brush.

A comparison of a brown washed piece and one with the light sand brushed in.

Step 4 - Again before allowing time to try, a light grey paint was applied and worked in as with the sand colour.

A light grey is worked into the edges for cliffs and rocky areas.

Step 5 - A mid-green paint was applied, again nothing had been allowed to dry out, and the green was worked in on the top of the islands and coastline to represent vegetation. In all it only took 30 minutes to do all this using house paint in sample pots and cheap artist acrylics.

Green is added for vegetation

Step 6 - Once the terrain pieces are dry, then dry-brush the edges and terrain pieces to help highly the rugged coast. It can take quite a while to dry out, so finding somewhere warm will help speed up the process.

Once dry, the cliffs and coast is dry-brushed with a light sand colour

The final step is to set up the tabletop and play my first ancient naval game. All in all this terrain is simple, cheap, and no need to worry about it getting damaged when stored away.

A closer look in use on the tabletop


Thursday 13 May 2021

Preparing for some Ancient Campaigning

Now my Roman and Carthaginian armies are painted and progress is being made with some supporting naval contingents, it is time to start planning for a campaign. 

Only a few more of the current batch of ships to paint

A closer view

The following map and rules have been influenced by Phillip Sabin’s Second Punic War game in his book Simulating War. In the book the game is designed for a multi-player political game and I have modified the game ideas to hopefully make a simple solo campaign game which will generate some tabletop land and naval games.

The campaign map

During the campaign land battles will be fought using One Hour Wargames rules with chance cards as described here in an earlier post, while for the naval games I am planning on using Poseidon's Warriors rules by John Lambshead.

These draft rules below are very much my starting point and I will be posting updates as I progress with the campaign.

The campaign board begins with the following setup where each round counter represents an army from Rome (Red) and Carthage (Green). A square counter represents an exceptional general, in this case Hannibal. During a campaign turn player's can gain the initiative through winning the naval contest, which will allow them to move second after the losing player has moved and committed their forces. Then battles are fought for contested regions and finally recruitment occurs.

Campaign map starting positions

Sequence of play

  1. Naval battle is fought using the generic scenarios from Posiden’s Warriors rules.
  2. The losing player of naval battle gets to move their forces first.
  3. The winner of the naval battle gets to then move their forces second.
  4. Where armies from Rome and Carthage occupy a region a battle is fought on the tabletop. The number of armies and commanders in the region add chance cards to a player's chance deck used in the battle.
  5. The loser of a battle removes one army, or in the case of a drawn game, both sides remove one army.
  6. Recruiting of armies in regions were a player has equal or more occupying armies.

The campaign runs for 9 turns in total with each turn representing two years between 218 BC and 201 BC.

Winning the Campaign

The campaign ends immediately with a total victory, if Roman armies occupy the African region with no Carthaginian armies present, or Carthaginian armies occupy Northern Italy with no Roman armies present. 

Otherwise, the side with the most armies at the end of campaign turn 9 has a partial victory.

Recruiting

Players can recruit one new army in regions where they have an equal number or more armies than the opposition. An army cannot be recruited if there are already 3 armies in a region.

Moving

Armies can move between adjoining regions up to 2 armies between land (brown arrows) and 1 army when crossing sea (blue) arrows.

Exceptional commanders do not apply to this restriction.

Stacking Limits

A maximum of 3 armies from one side are allowed to occupy a region after all recruitment and moves are completed. Remove any excess armies.

Exceptional commanders do not apply to this restriction.

Exceptional Commanders

Carthage has a commander counter for Hannibal that moves like armies, but does not count to the stacking limit. Hannibal as a commander adds one initiative chance card to the deck in exchange for a confusion card when battles are fought on the tabletop.

Rome has a commander counter for Scipio the Younger which becomes available on turn 5. The counter is placed in a region with Roman armies. Scipio the Younger adds one initiative chance card to the deck in exchange for a no effect card when battles are fought on the tabletop.

Preparing for Chance Decks for a Battle

When setting up for a tabletop battle the chance cards need to be set up for each side. The chance cards used during the game are acted upon during the turn they are drawn and cannot be carried over to another turn.

  • 5 x No Event. Nothing happens
  • 2 x Confusion. A player’s units cannot move this turn, but they are allowed to pivot.
  • 2 x Ammunition Shortage. A player’s units cannot shoot this turn.
  • 2 x Initiative. One unit can immediately make a move, shoot, or conduct a round of combat if already engaged in combat. The unit can still be activated as normal later.
  • 2 x Rally. A player can remove 2 hits from all units.
  • 2 x Demoralisation. All hand to hand combat D6 scores are reduced by 2.

These cards are adjusted for commanders:

  • Hannibal as a commander adds one initiative chance card to the deck in exchange for a confusion card.
  • Scipio as a commander adds one initiative chance card to the deck in exchange for a no effect card.

Count the number of armies a side has in a region and subtract 1. The result is the number of rally cards which are exchanged for no effect cards. For example, the Romans have 3 armies in the contested region and would add two rally cards, replacing the no effect cards.


Saturday 8 May 2021

WW2 Western Desert Campaign Turn 11 - Game 1

The plan for the 21st Panzer division is to capture and hold the centre hills and strike on their right flank to capture the wadi then move along the line of hills. The understrength NZ Infantry division chose not to defend the centre hill, but instead hold a defensive line along the hills and wadi, close to the baseline where a few precious are available. 

(Note - preparation and set up activities for this game can be found in the previous post.)

Plans

Opening Moves

In the opening game moves 21st Panzer units quickly advanced and occupied the centre hills which would be used to support the flanking attack on the right. To counter this Allied reserves quickly arrived and rather than sit idly back and wait for the onslaught, they pushed forward with two tank sorties. One along the road on their right flank, and another with the heavily armoured a Matilda tank unit against the centre hills.

The sortie by tanks along the road is stopped with the help of an 88mm unit

A Matilda tank unit attack against the centre hills proves to be very successful and causing difficulties for the 21st Panzer and their plans

The swift advance by the 21st Panzer was stymied somewhat by Allied tank sorties

Flank Attack

Having dealt with the tank sorties down the road, the Axis begin their attack through the wadi and on to the hills. In the centre they were struggling to contain and suppress the Matilda tank unit which was stubbornly hanging on. This meant their centre were unable to provide support for the flank attack on the hills.

The flank attack begins without support from the centre hills who are occupied trying to suppress a Matilda tank unit.

The wadi is secured and the attack on the hills begins

Getting a Foothold

The 21st Panzer units finally gain a foothold on the hill, prompting the Allies to move their last tank unit across to counter the treat. The Allied units were perilously thin on the ground. Their sortie on the centre hills had ended and this meant Panzer forces, while also short of armour, were able to coordinate with their AT and artillery to finally secure their second objective and securing a victory.

Having destroyed the Allied tank sortie Axis forces are able to coordinate their AT and artillery  to support the attack gain a foothold on the hills. The last Allied tank unit attempts a counter attack.

The hills are finally captured after the Allied counter attack fails.

Game End

An Axis victory, they are now well positioned to win the campaign by winning one more of the next two games.

Thursday 6 May 2021

Returning to the WW2 Western Desert campaign

It was way back in late February that I last played a WW2 Western Desert campaign game. At the end of that game, and campaign turn, the Axis forces had pushed the Allies back to the last map zone (Alamein). Entering this campaign turn Allied forces are somewhat depleted having come out of the last turn with two losses. Getting a decent level of supply will be important to resupplying their understrength divisions for this final line of defence.

Campaign map at turn 11

I had to refresh my memory on the steps to setting up a campaign game, which are described here. Then set about determining the supply situation for both forces. Axis forces received 4 supplies points which allowed them to resupply the 21st Panzer division, at a cost of 3 supply points, after its surprise loss in the previous campaign turn. The remaining supply point was spent on reconnaissance which would allow them to reveal the identity of two Allies units before planning any attacks.

Allied forces received 3 supply points which allowed the resupply the 1st Armoured division and bring them up to full strength. However, they still had two understrength divisions, the 2nd NZ Infantry division and 1st South African Infantry division.

Having used their reconnaissance to confirm the identification of two Allied divisions, both armoured, the Axis launched an attack with the 21st Panzer division. Defending will be the understrength 2nd NZ Infantry division. The game will be a frontal assault. Both divisions would be without three of their units through the wear and tear from operating in the desert.

A closer look at the map

Elements of the 21st Panzer divisions will focus their attack on the right flank and pivot around the centre hills once control of the hills is achieved. The understrength defenders have positioned themselves along the hills and wadi, and have a third of their forces held in reserve ready to bolster the defensive line. There are three game objectives all positioned along the defensive line at the wadi and two groups of hills. Palm trees are used on the tabletop to identify the objectives.

Setup positions and openning moves

21st Panzer division order of battle:
  • 1 x Pz IV unit
  • 4 x Pz III units
  • 1 x A/C unit
  • 2 x Armoured Infantry units
  • 1 x Wespe
  • 1 x Towed AT gun unit
  • 1 x 88mm unit
  • 1 x Stug III
2nd NZ Infantry division order of battle with armoured support:
  • 1 x Infantry units
  • 1 x Armoured Infantry (Bren Gun Carriers)
  • 1 x 2 Pounder Portee AT unit
  • 1 x Towed 6 Pounder AT unit
  • 1 x 25 Pounder unit
  • 2 x Matilda tank units
  • 2 x Grant tank unit
Game report to follow...


Monday 3 May 2021

A rag-tag of things

A rag-tag of wargaming activities to report on over the last week or so.  First up, I was able to get in an Ancients game where I was using a stacked deck of chance cards. The idea behind the stacking of the decks was to try out some options to reflect the differences between the Carthaginian and Roman armies. In the game Carthaginians have more initiative cards and fewer rally cards, and the reverse is applied to the Roman chance cards. This is an attempt the reflect better commanders for the Carthaginians and the resilience of Roman forces with poorer commanders.

A second reason for playing around with chance cards is to try out some ideas for a campaign I am planning. In situations were one side has a larger force, the idea is not to have more units, but have additional rally cards instead. Also, commander quality can be introduced by having more initiative chance cards in a deck, swapping out the no effect cards.

An Ancients game in progress

Cutting up additional cards

My Ancient ship building activities continue at a steady pace with some 20 plus ships made. At one point I was thinking about adding some masts and sails to add some more colour to the ships, but I decided to avoid this complication as ships of the day generally took down their masts for action. I hope to get some painting done this week.

A fleet waiting to be painted

A surprise visit from my Daughter in New Zealand, who took advantage of a travel bubble between Australia and New Zealand, meant I actually got some face-to-face wargaming in with an opponent (rare thing for a solo gamer). 

What did we play? Gang warfare in the far flung future using the One-Hour Skirmish Wargames rule set. They are nice simple rules which give a fun and at times an unpredictable game. No game reports as there was too much laughter as poor cards were drawn at the wrong time. In all four games were played and honour was even.

One-hour skirmish wargaming

Finally, I have not forgotten my existing WW2 Western Desert Campaign. Another games was played and a battle report is to be written up.

A return to the WW2 Western Desert campaign