Sunday 30 September 2018

ECW Game 3 setup and rules

As 1642 progresses both Parliament and Royalist forces and their supporters are positioning and recruiting in regions. So far both sides have chosen to seek control regions close to their power bases and adjacent controlled areas. There are obvious benefits to doing this, in the campaign rules a side will gain support adjacent regions. This takes the form of being able to re-roll a number of poor recruiting dice rolls when determining an order of battle.

These campaign rules will change in 1643 after all regions have declared their support for Parliament or King, and both sides establish marching armies. For me that means there are nine more battles to be fought in 1642. (Note - Scotland and Borders are not to be contested.)

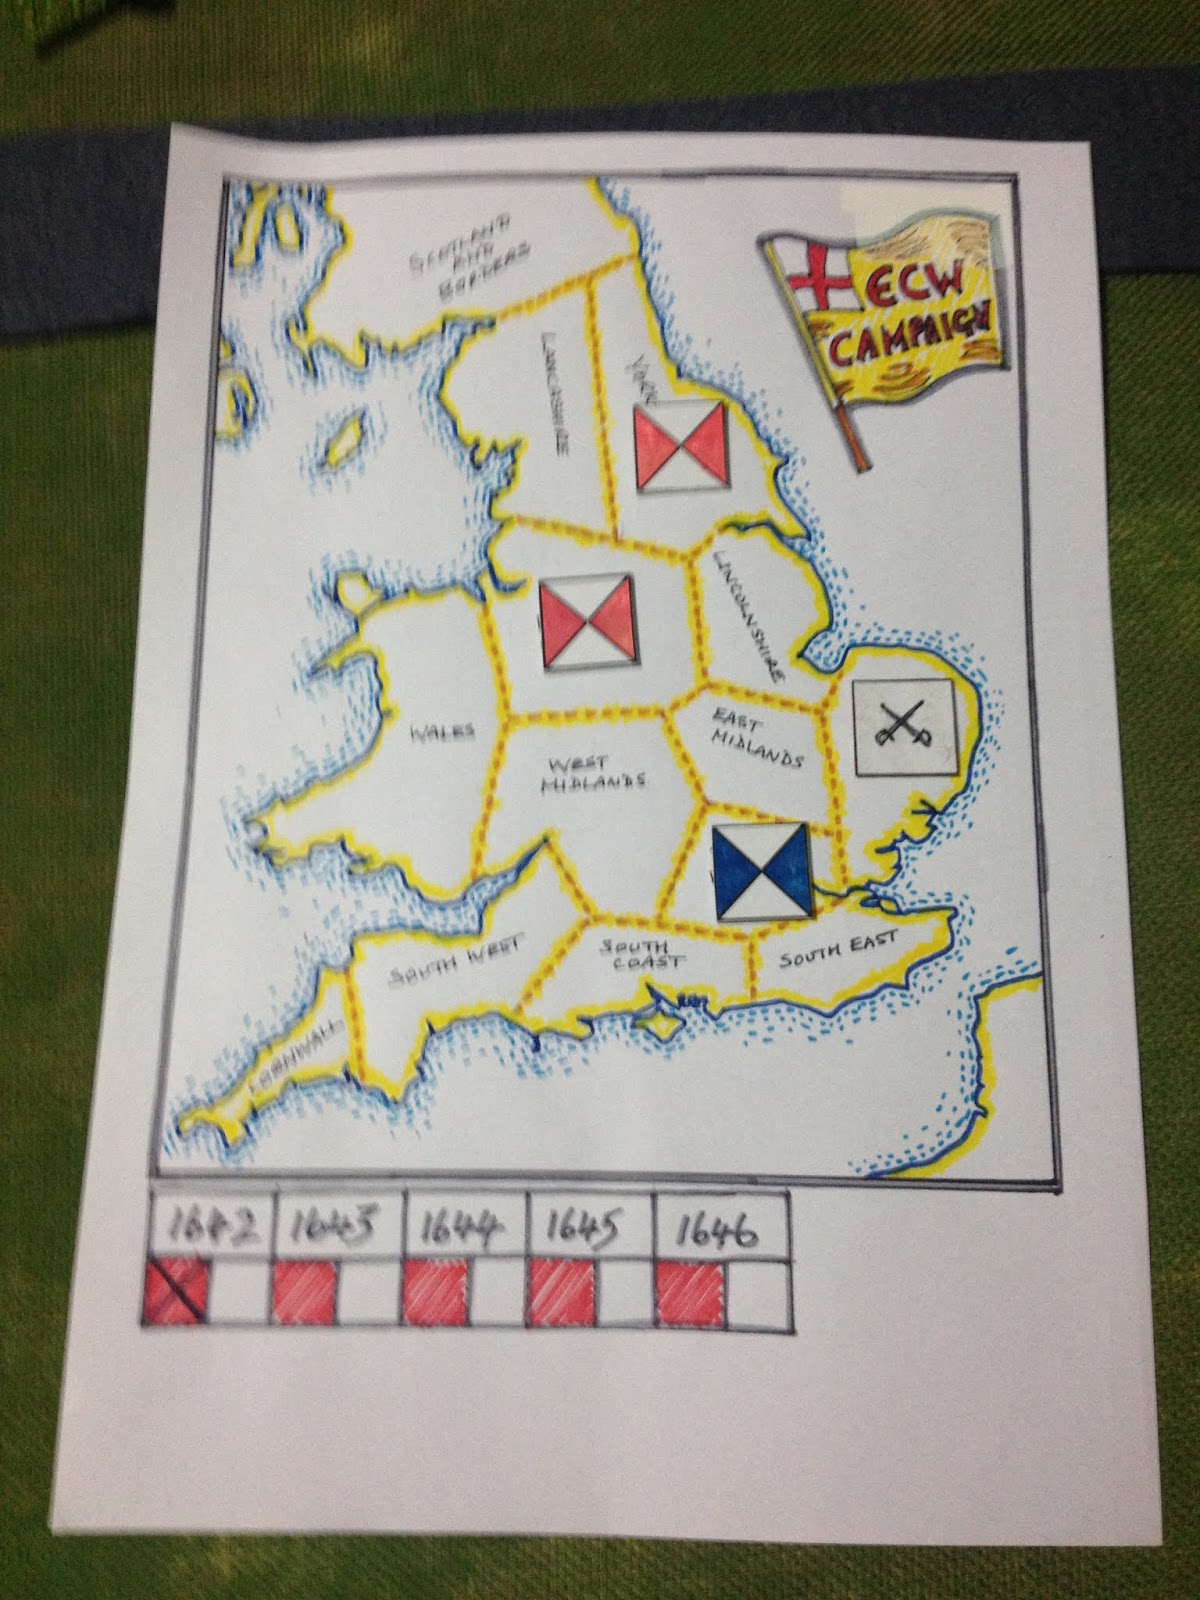
Following Parliament forces gaining control of East Anglia. The Royalists took the safe option to attempt to try and control Lincolnshire, strengthening their hold on the North. As can be seen from the picture Royalists will be able to make two recruitment re-rolls and Parliament one re-roll due to controlling adjacent areas (shown with arrows).

The next campaign map move

Lincolnshire recruitment was not so easy for the Royalists and without the support of neighbouring regions they could well have come unstuck. Here is how the recruitment played out for both sides order of battle. The D3 score is in brackets.

Parliamentarian Force
Cavalry = 2 + (3) = 5 units
Infantry = 2 + (2) = 4 units
Dragoons/Commanded Shot = (3) = 2 units dragoons / 1 commanded shot
Artillery/Elite = (1) -1 = 0. This was re-rolled as (3)-1 = 1 artillery and 1 cuirassier
Total units = 14

Royalist Force
Cavalry = 2 + (1). This was re-rolled = 2 + (2) = 4 units
Infantry = 2 + (1). This was re-rolled = 2 + (3) = 5 units
Dragoons/Commanded Shot = (1) = 1 unit of dragoons
Artillery/Elite = (2) -1 = 1 unit 1 artillery
Total units = 11

For more details of the selections see this post.

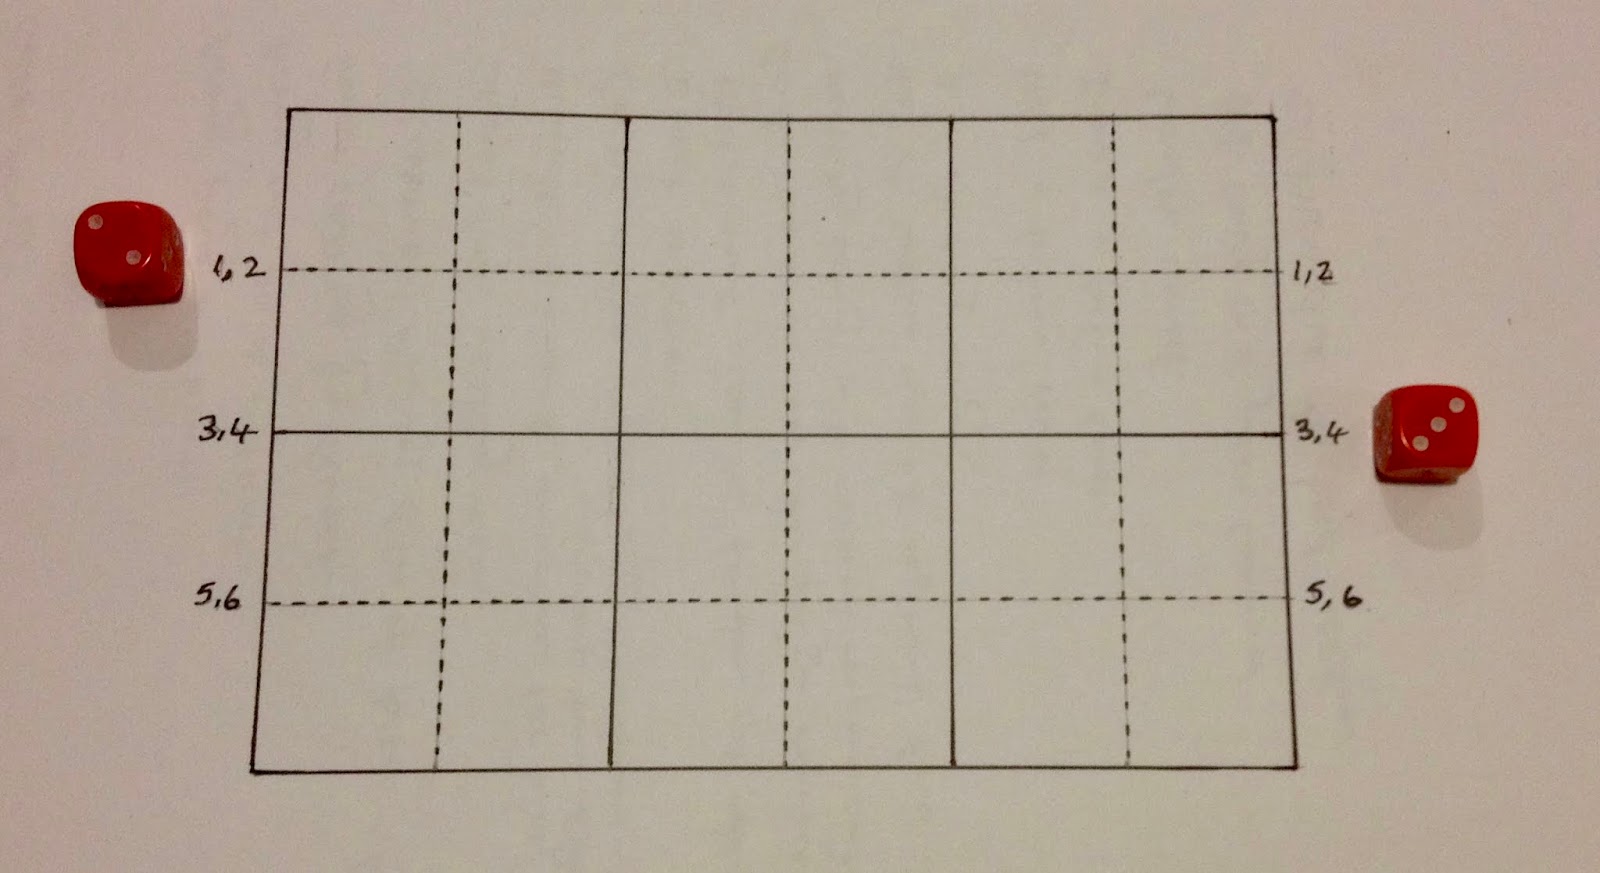
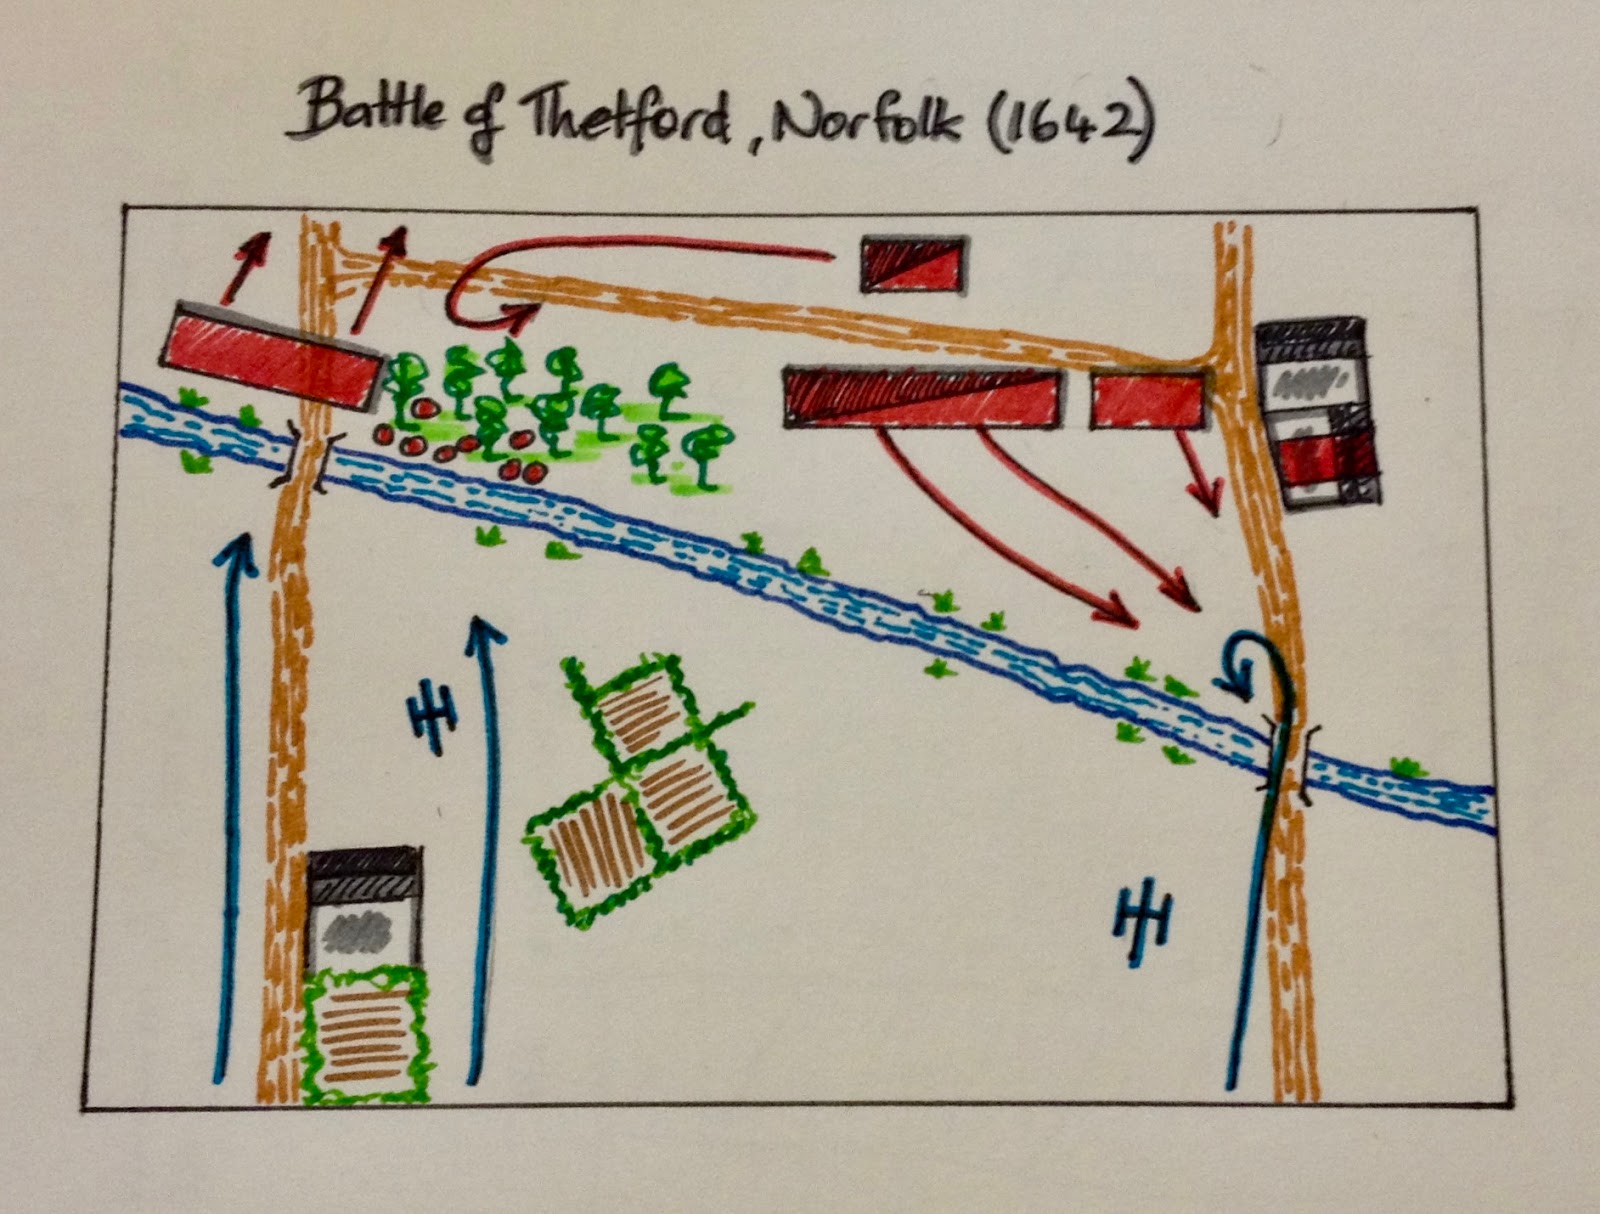
With forces selected, or should I say recruited, it was time to setup for the tabletop using the battlefield selected using cards which are described in my previous post.


The total number of units a force has is important. The side with the most units is going to be the attacking force and deploy their units on the tabletop second. The steps are:
  1. Determine the side with most units. In the event they are even, then roll a D3 and the highest score is the attacker and the defending side must remove 1 unit starting with Artillery, Elite, Dragoons, Commanded Shot, Cavalry, Infantry. If scores are tied, both remove a unit and re-roll and keep going until one side rolls higher. Even scores indicate a region where loyalties are torn and desertion could be high.
  2. The defender choses their side of the tabletop and deploys all units within 2 bounds (12 inches) of the edge.
  3. The attacker deploys all units within 2 bounds (12 inches) of the opposite edge.
  4. The defender has the first turn. Allowing them to reposition their forces or advance and take a critical terrain feature.

Finally, I have put up my draft D3 ECW rules on one of the tabs at the top of this blog.

Friday 28 September 2018

WW2 unit and preparing for ECW campaign games

My painting effort is dawdling along, something which often happens after finishing a project. But  while I am in-between projects I am continuing to fill the void with finishing off a few WW2 units. This week saw the completion of a Sd.Kfz. 250/10 using one of a pair of Sd.Kfz. 253 I have and a spare Pak36 found in the bits box.

The half-track and some WW2 Airfix Germans 
Armoured infantry unit
This weekend I plan to play game 3 of my English Civil War campaign. The preparation of a game starts with the selection of the terrain for the tabletop. The approach I am using in this campaign is to divide the tabletop into 6 squares each 2x2 foot (I have a 6x4 foot table). Each of these squares will contain a piece of terrain.

When choosing the terrain I use some homemade cards with terrain features drawn on them. These are shuffled and six are selected for each of the 2x2 foot squares. Some of the features are deliberately offset and not centred to show placement within the 2x2 square.

The current set of cards
If a river square is drawn, then that particular square will be treated as open terrain and the position of the river will need to be calculated. Rivers flow across the tabletop longways. Two dice are rolled, one for either side of the table (see diagram below).

An example of 6 cards drawn and placed starting left to right top row first then second.
Calculating a river's position - Dice are rolled for opposite sides and the river flows between the two marks
Once the river is in place the other selected terrain is positioned. Occasionally it may be necessary to adjust a terrain features position to accommodate the river. Then roads/tracks are added, I generally try to have two roads which avoid terrain features excluding towns, and help identify where to place any bridges.


One final note on the rivers there are two cards, one with an unfordable river and one which can be treated as fordable.

Sunday 23 September 2018

ECW Campaign - Game 2 at tale of two bridges

The English Civil War campaign continues with game 2. After the loss of the Yorkshire region, Parliament has made a move to secure East Anglia which is close to their power base of London and the Thames Valley region. A small Royalist force has taken up position north of the river Thet waiting for the advancing Parliamentarian force.

Campaign map showing the battle in East Anglia

Order of battle (OB)

Parliamentarian units
5 x Foot (mixed pike and musket)
5 x Horse (Trotters)
2 x Dragoon
1 x Commanded Shot
2 x Artillery

Royalist units
4 x Foot (mixed pike and musket)
5 x Horse (Gallopers)
1 x Commended Shot
1 x Dragoon

Parliamentarian forces had recruited well in East Anglia and had 15 units vs. Royalist 11 units. This can be read as their dice rolling for determining their OB had been so lucky, every roll a 3 on a D3. They did not even need to use their re-roll option for controlling the nearby region of Themes Valley.

Parliamentarian forces arrive
The Royalist commander had split his force to defend the bridges, the only river crossing points. The bulk of the cavalry were positioned to cover the eastern bridge. Parliamentarian forces arrived at midday and quickly advanced on both bridges. The larger of the two groups headed for the closer east bridge.

Royalist defensive positions
At the bridge west of Thetford a combined attack from trotters, dragoons, foot and artillery had the defending Royalist forces under pressure. Progress was slower at the other bridge. Where any unit crossing the bridge were faced with cavalry charges from the Royalist gallopers.

By mid-afternoon Royalist forces defending the western bridge requested assistance and the Royalist cavalry reserve were ordered across to provide support. The contest for the eastern bridge was not going well for Parliamentarian forces with their artillery support proving totally ineffective. It was a different story at the western bridge where most Royalist units were routed and the bridge was defended tenuously by a unit of commanded shot. A unit of Parliament foot successfully crossed the bridge and were able to see off a charge by the reserve cavalry.

The assault on the eastern bridge was becoming quite a struggle with losses on both sides rising. When news of the other bridge being lost arrived late in the afternoon, the Royalist commander ceded the battlefield to the Parliament forces.

A Parliamentarian victory, honours are even in the campaign.

Flow of the game
A few photos of the game...

Assault on the eastern bridge
Assault on the western bridge
Royalist cavalry charge all who cross the bridge
The commanded shot defend from the woods while cavalry reserves arrive
The heavily contested eastern bridge
The western bridge is crossed and the cavalry change failed to dislodge the foot unit.
Final stand off at the eastern bridge


Saturday 22 September 2018

WW2 game using a tabletop teaser

This weekend after playing during the week two English Civil War campaign games, one of which still has to be written up as a battle report, I wanted to see if I could get my new Bergepanther into a WW2 game. 
It is always a joy to get recently painted units into a game
In seeking inspiration for a suitable game I flicked through an electronic version of "Battlegames - Table Top Teasers Volume 1" purchased recently and found a teaser called "The Bridge Demolition". While the teaser is designed for “Horse and Musket” period it did suggest it could be adapted to "Modern" periods. With a little adaptation to the unit types the tabletop was setup and ready. In the game the Bergepather would represent an engineering unit preparing the bridge for demolition.

Game setup with British reconnaissance units surveying the situation
The teaser has a defending force, in this game it was the Germans, trying to delay the arrival of an attacking British force until the bridge can be blown up. The attacking British arrive in dribs and drabs on either road based upon a dice roll.

I decided to tryout a sticky note approach for tracking hits upon a unit rather than my usual green dice. I just mark off hits using a pencil.

A close up of the defenders and engineering units with sticky notes attached to the underside of their bases.
The following photos provide the gist of the game which turned out to be a close run thing and highly enjoyable.

Armoured infantry units were some of the first arrivals
Armour and artillery quickly arrived to support the attack 
Most units were arriving on the German's left flank
British forces were taking casualties has they used ahead towards the bridge 
German units were getting worn down under the continued pressure
Things were starting to look grim as the way to the bridge looked open
The first attempt to blow the bridge was necessary and as British forces arrived.
Success to the defenders (and the Bergepanther) who in the nick of time blew up the bridge.

"Battlegames - Table Top Teasers Volume 1" was purchased as a PDF from Wargame Vault for about $6, which is good value for the 12 teasers contained within. One of which, quite surprisingly, was played out as a Warhammer 40K game. I will have to tryout a few more of the teasers.

Thursday 20 September 2018

ECW Campaign Game 1

The English Civil War (ECW) campaign started in Yorkshire as Royalist forces began their recruiting to control the region. They were supported from their adjacent North Midlands base. Parliament had not been as successful recruiting, and when the forces clashed at Sherborn Parish they were outnumbered.

The opening campaign move

Order of battle

Parliamentarian forces:
1 x lobster unit
3 x trotter cavalry units
4 x infantry units (mixed pike and musket)
1 x commanded shot

Royalist forces:
4 x galloper cavalry units
4 x infantry units (mixed pike and musket)
1 x elite pike unit
2 x dragoon units
1 x commanded shot unit
1 x artillery unit

The method for deciding the composition of forces is described in a previous post. Because there is a Royalist controlled region adjacent to the Yorkshire region, they were able to re-roll a single dice roll and improve their chances of a large force.

Starting positions (Royalists in red and Parliament in blue)
Parliamentarian forces took the initiative and moved their trotters forward hoping to disrupt their opposition Royalist cavalry. To begin with they did, but the weight of Royalist numbers and their charge bonus saw them routed after a few turns.

Starting positions
The cavalry engagement begins.
Royalist cavalry charge.
With their left flank threatened the Parliamentarian commander moved his lobster unit held in reserve to counter the Royalist threat. The Royalist cavalry attack was nullified, but at the cost of the remaining Parliamentarian reserves. The Parliamentarian left flank was now open and Royalist dragoons moved forward along with their centre. The Parliamentarian commander saw his army's situation was untenable and retired.

Parliamentarian forces move to counter the threat to their flank
Parliamentarian forces with an exposed flank and outnumbered retire and victory goes to Royalist forces
The flow of the game
The victory gave control of Yorkshire to the Royalist cause. While further south Parliament seeks to control East Anglia and where the next battle will be fought.

Campaign situation


Bergepanther painted and sticky notes to track hits

The Bergepather has now left the painting table and has been added to my WW2 forces. I should really play a game of two with them, but the English Civil War games are dominating my tabletop at present with two games played through on the campaign. Both battle reports are yet to be written up.

Bergepanther and panther
I generally fill in any open areas of a model and paint a dark grey to show openings.
Moving on to a completely different subject. Pretty much all the miniatures are based as units and during a game hits are tracked with dice positioned behind the unit, or placed carefully on the stand so dice and unit move as one. In my next game I plan to us sticky notes, the smaller sized ones, to track hits. They stick quite nicely to the underside of a unit's base with a small overlap which allows hits to be recorded.

A sticky note is applied to the base underside.
Hits are marked off

Monday 17 September 2018

WW2 armoured recovery vehicle conversion

Now that painting of English Civil War units is complete, I have a few WW2 units to build and paint and add to my existing armies. These few items will keep me occupied while I decide upon my next painting project.

First up was to repurpose a spare Jagdpanther I have to a Bergepanther, an armoured recovery vehicle equiped with a 40 ton winch, spade and 1.5 ton derrick. This conversion aims to give the impression a Bergepanther for a wargaming table rather than be a detailed scale model.

Much of the model's front is removed and replaced with plastic card
Spade attached at the rear
Ready for painting

Finally, a quick shout-out to Jonathan of Palouse Wargaming Journal who is celebrating 6 years of blogging with a competition. Jonathan is an active commenter providing many bloggers with encouraging and supportive comments. Congratulations on six years!


Sunday 16 September 2018

Beginning the ECW Campaign

Yesterday I finished painting my final English Civil War (ECW) unit. An elite unit of pike made up of the remaining unpainted figures I had available. Hazzah!

Elite pike - the last unit to be painted
Full of enthusiasm it was time to start the ECW campaign. Knowing the end of painting was insight, I had been doing a bit more preparation and reading for the campaign. One site, where I found a simple ECW campaign was the Solitary Wargamer, this provided some ideas on how to start the campaign in 1642.

Start of the campaign and the contest begins in the Yorkshire region.
The campaign starts in 1642 with Parliament in London controlling the Thames Valley region and Royalists the North Midland region, where the King has been recruiting. There will be a series of small battles played as each of the remaining regions are fought over as recruiting begins in earnest. Each side gets to contest any empty region in turns. A victory on the tabletop will give them control.

The rules for contesting a region are:

  1. Taking turns players pick a region which has not been contested.
  2. Both sides dice for the order of battle which are influenced by any adjacent controlled regions (see below).
  3. The winner of the battle gains control of the region.
  4. This process continues until all regions are controlled and the campaign can move on to the year 1643.

The orders of battle are decided using the following steps for games:

  • Cavalry = D3+2
  • Infantry = D3+2
  • Dragoons or Commanded Shot = D3
  • Artillery and elite units = D3-1 (elite units for Parliamentarian forces are Lobsters and Royalists forces are elite pike).

When dicing for the order of battle, a side can re-roll a D3 score for each adjacent controlled region. The re-rolled score stands. For example, a side controlling 3 adjacent regions can take the opportunity to re-roll 3 times and a category (infantry, cavalry, etc) can be re-rolled more than once.

I still have to write up my notes on campaign rules for the years 1643 onwards. This may appear a bit haphazard on my part, but the whole ECW period seems to be a rather haphazard affair.

A game in progress
Cavalry engage
Infantry units bide their time.
One of the purposes of starting this campaign is to provide a background for games where I can test out my house D3 ECW Rules based upon One Hour Wargaming Pike and Shot rules. I will post the current version of the rules in the next couple of weeks.