Sunday 24 January 2021

Ancient project continues and creating chance cards

Much of this weekend's free time has been spent painting a few more Roman units for my Ancients project. The very simple block painting of these HaT figures continues to be very enjoyable exercise and units can be created at a reasonable rate.

Four more Roman units painted

On the wargaming side I made up some chance cards for the WW2 Western Desert campaign. I had been using them and adjusting them over the last few games and they are covered with lots of hand written notes. It was high time to recreate them as the notes and crossing outs were getting very messy and confusing.

The cards are created in Google Slides and printed off before being stuck on cereal/cracker boxes. I use a glue stick and stick the the outside part of the cardboard. Then cut out.

I am using 12 cards during a game. Air support, mid-day haze, and sandstorm cards are added (depending upon the scenario) replacing one of the "no event" cards.

By using a glue stick avoids the issues of the printed paper bubbling when stuck on the cardboard.

The finished cards. The pictures on the cards help differentiate the cards for each player. One set has a Matilda tank and the other a Panzer III.

I am planning to play the next game in the WW2 Western Desert campaign using these cards.

Western Desert game


Monday 18 January 2021

Ancients project begins again and three influential wargame books

After a brief break over Christmas from my ancients project. Painting of Romans began again last week. The first 3 of some 20 planned Roman units are completed and based.

Work begins on the Roman units. All figures are HaT.

Back in December 2020 Nundanket on the Horse and Musket Gaming blog posted about three books which had a major impact on his wargaming. See link below...

https://horseandmusketgaming.blogspot.com/2020/12/influential-books.html

This got me wondering which three books would I chose, and what was the reason for them being influential to my wargaming.

The first book on my list is "Introduction to Battle Gaming" by Terry Wise.

The first wargaming book I ever owned and I still have the book.

In a sense the first wargaming book you read is in most cases going to be influential. I my case it was this book, and I still have the book in my library. It was a present from my Mother when I was 11 or 12 years old. What made it so captivating, other than the idea of moving toy soldiers around with a defined set of rules, was all the photographs of the games and figure conversions were using Airfix figures. I already had a number of Airfix figures and model kits, and they were affordable with my pocket money and readily available at the local toyshop and model shop.

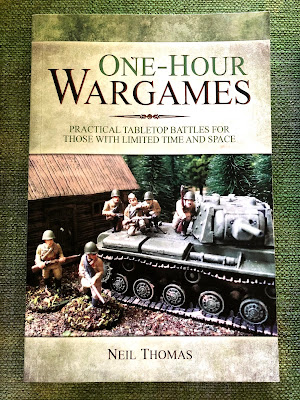
The second book selected is "One-Hour Wargames" by Neil Thomas

Get me back into wargaming

I purchased this book in 2015 and got me back into wargaming with its pared back rule approach, gaming with a small number of units, and 30 scenarios. Prior to this book I had given wargaming a miss for some 25 years with the exception of an occasional Warhammer 40K game with my son. The complexity of wargaming rules of the 1980's had turned me off the gaming side of the hobby and I had retreated to the occasional modelling and painting project. Moving countries and having a young family also meant my focus was elsewhere.

After reading this book and enjoying the approach to wargaming rules. I finally, after some 35 years, finished painting my old Peter Laing WW1 and AWI armies and got them onto the tabletop. Since then I have slowly increased the periods I wargame.

My third book is "War Game Campaigns" by Donald Featherstone.

The source of many campaign ideas.

The third choice was a book I remember getting repeatedly on loan from the local library in my youth. However, it is a book I have appreciated more in recent years after returning to historical wargaming and becoming interested in stringing together a series of wargames into a campaign. It is a book with many suggestions which I enjoy re-reading and 19 campaign ideas for various war-gaming periods.

Thursday 14 January 2021

SciFi terrain mat made from curtain material

Last weekend was a nice sunny day so I took the I took the opportunity to make a new sci-fi tabletop mat. The material used is curtain material, it is a heavy material with a backing so sits well when laid over hill features and does not move around when playing a game. 

The base colour began as a light green. My intention was to overlay this with mid-green, brown and grey colours so it would fit in with my existing terrain. Unfortunately I did not take pictures of the process to make it, but here are the step I took in creating the mat:

  1. Sponged on a watered down green paint (a sample pot from the hardware store).
  2. A second sponging of the watered down green was applied to get different depths of green.
  3. Sponged on a watered down brown (a tube of kids acrylic paint from the Art store)
  4. Carefully sponged on a mid-grey (which was not watered down) over areas of brown. This had to be carefully done so it did not look splotchy and in many cases I had to return a second time to build up the grey.
  5. Lightly sponged on a sand/cream colour on parts of the grey (a sample pot from the hardware store)

The finished mat on the tabletop.

A close up of the sponging effect.

An overhead photo of the mat.


Terrain and models added


Tuesday 12 January 2021

WW2 Western Desert - Turn 10 Game 1

As the campaign moves into its 10th turn. I thought I would take the opportunity to write up my notes on the game setup rules as the setup approach has morphed somewhat from when I originally drafted the rules.

There are 3 steps to determining a game setup. These are:
  1. Decide what type of engagement will be fought (e.g. flanking attack, escalating encounter, or frontal assault.)
  2. Decide tabletop layout, adjustments, and defender's position
  3. Allocate objectives

1. Type of Engagement

The game number within a campaign turn will influence the type of engagement to be played on the tabletop. Roll a D6 dice and consult the list below.

Game 1
1 = Flanking attack
2,3 = Escalating encounter
4,5,6 = Frontal assault

Game 2
1 = Escalating encounter
2,3 = Frontal assault
4,5,6 = Flanking attack

Game 3
1 = Frontal assault
2,3 = Flank attack
4,5,6 = Escalating encounter

Encounter Engagement

Both sides deploy a third of their units on their tabletop edge with remaining units coming on as reserves.
1-3 Objectives determined by D3 dice are positioned on terrain features equidistant between the opposing tabletop home edges (or as close as possible depending on terrain features).

Frontal Attack

Defender deploys two thirds of their units on their half of the tabletop with remaining units arriving as reserves. The attacker deploys all units on their table edge.
1-3 objectives determined by D3 dice are positioned on terrain features in the defenders half of the tabletop.

Surprise Attack

Defender deploys all units on their half of the tabletop. The attacker deploys half of their units on their edge with the remaining half arriving as reserves on one tabletop edge. The edge must be decided before defending units are deployed.
1-3 objectives determined by D3 dice and positioned on the defenders half of the tabletop.

2. Tabletop Layout

The terrain is decided by placing nine terrain cards from a deck of terrain cards. Before shuffling the cards I remove some terrain cards which do not apply or reduce the number of a certain type of terrain. Essentially, I stack the deck to better reflect the type of terrain being fought over.

Example - If there are no salt marshes in the zone being contested, then all salt marsh cards are removed from the deck.

Example - If the engagement is between divisions close to the coast, then I have all the escarpment cards in the deck.

Example - If the engagement is between divisions more inland, then I reduce the number of escarpment cards.

In the first game layout the cards in a 3 by 3 square. The defender chooses the side to defend and is allowed to switch any 2 terrain cards which are side by side to their benefit their defensive position. Then setup the tabletop using the terrain cards as a guide.

In the second game layout the cards in a 3 by 3 square. The defender chooses the side to defend, the cards are not adjusted in this game, and the tabletop setup using the terrain cards as a guide.

In the third game layout the cards in a 3 by 3 square. The attacker chooses the side to attack from and is allowed to switch any 2 terrain squares which are side by side to their benefit their attack. Then setup the tabletop using the terrain cards as a guide.

Example of the terrain cards laid out and two adjacent cards being swapped,

3. Allocate Objectives

The defending player always places the first objective on a terrain feature, then players take turns to allocate any remaining objectives. Objectives must be placed on terrain features such as hills, escarpments, broken terrain, buildings, and wadis. However, where roads (or tracks) cross or join they also can be considered features when allocating objectives. In a very featureless desert all features can be useful as a point of reference and objective.

Campaign turn 10 game 1 report

Both forces involved, 21st Panzer division and 7th Armoured division, are at full strength so 15 units from representing elements of these divisions may be available. However, they will be subject to wear and tear losses which are decided by a D3 dice, and the owning player selecting which units are removed. The only constraint is none of the units can be of the same type (e.g. only infantry units) and must be a mix.

In game 1 of campaign turn 10, Axis forces roll 3 and Allied forces 2 for wear and tear.

Selected units (HQ markers not shown)

21st Panzer Division Force
  • 1 x Wespe
  • 1 x 88mm Towed Gun
  • 1 x Marder
  • 1 x Armoured Car
  • 1 x Pz IV
  • 4 x Pz III
  • 1 x Pz II
  • 2 x Armoured Infantry
7th Armoured Division
  • 1 x Honey
  • 1 x Bren Gun Carriers
  • 3 x Crusader 2 Pdr.
  • 3 x Sherman
  • 2 x 25 Pdr. Towed Gun
  • 1 x 2 Pdr. Portee
  • 2 x Motorised Infantry
This rather brief action report is of an escalating encounter between forces. Both are aiming to control a single objective, the oasis in the centre of the tabletop.

With a single objective the plans were similar for both forces. Get to the objective quickly and with the most units.

The 7th Armoured force was able to occupy the oasis early and supporting reserves were moved up quickly. Axis forces pushed along the road while they struggled to bring up reserve units.

The action escalated and both sides were taking casualties with reserves being thrown into the action as quickly as possible. The new Shermans moved along the road and soon joined the action with their longer weapon ranges.

The battle began to turn in the Allies favour with the Shermans proving very useful.

A victory to the 7th Armoured division forces

A good start for the campaign turn with the Allies achieving an early victory.

Friday 8 January 2021

More 17th century buildings

Having completed a wooden block windmill a started painting a couple more of the buildings I had undercoated.

A 17th Century House Completed

As I went through the painting steps of these very simple wooden block buildings, I took photographs of the process for those of you who may be interested.

The building features are pencilled in and the roof painted a dark grey with some brown added

A very light brown wash is applied

Doors and windows are painted a dark grey

Wood timbers are painted dark grey again. I mixed up enough for the roof, windows and timbers.

A red-brown is dabbed on the roof, keeping them in rows as much as possible.

The cream colour was added to lighten the red-brown and most, but not all the gaps, are filled in.

A yellow-orange dab is added. Making sure not to over do it with this colour.

Corner stone and stonework around the lower doors are added. Again these are just dabbed on.

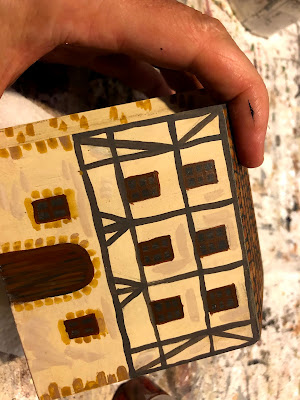
Windows and door are painted on with slightly watered down colours and over painted again where necessary.

Addition details are added to areas with flat colour just to give some colour texture.

The completed buildings


Sunday 3 January 2021

A windmill and War of the Spanish Succession game

I have started the New Year with a small War of the Spanish Succession campaign. With these games hopefully I will finalise the recent set of rules I posted, to which there have already had a couple of minor tweaks and clarifications. 

I am using a campaign called the "Emperor's Balls" created by Old Trousers on his blog (here). It is a simple three game tree campaign with some tongue in cheek narrative which suits me perfectly, and all the games use One-Hour Wargames scenarios.

A WSS paper soldiers game in progress as part of a small campaign

Because I wanted to use 8 units on a 6x4 foot tabletop in the games. I used the OHW table for determining an army make up with the two following amendments:

  • 2 cavalry were always added
  • Dragoons replaced skirmishers

This change always gives armies a good number of cavalry and dragoons in line with the high percentage (30-50%) typical of battles of the time.

One second change to the campaign rules was the winner of the last battle gets to roll 2 D6 when determining the army make up and can select the force composition best suited for the next game.

On the modelling side of the hobby, I am in the process of preparing some cheap 18th century buildings as I am a bit short of buildings for this period. For this I am used my current building approach of using blocks of wood simply cut with major features (eg chimneys) stuck on and painting all other details such as windows and doors. They are very robust models which can be thrown into a plastic tub after a game without any worry of breakages.

Simple wooden blocks are sawn and chimneys added (and sails in the case of the  windmill). They then get an undercoat of light sand or grey depending upon the paint effect being applied.

First off the painting table was the windmill.

Opening battle moves

On to the game report. You will notice the windmill gets to make an appearance along with a small hill I added for it to sit atop.

Alliance order of battle:

  • 3 x Foot
  • 1 x Gun
  • 2 x Horse
  • 2 x Dragoon

French order of battle:

  • 3 x Foot
  • 2 x Guns
  • 3 x Horse

The objective for the Alliance was to control the hill before French reinforcements put a stop to their preemptive attack.

The attack on the hill has begun

The Alliance quickly pushed up their horse on the right flank in an attempt to stall the deployment and advance of French reserves. While on the other left flank, dragoons move around to outflank the defenders of the hill and threaten their rear. In response, French defenders refused the flank on the hill and a detachment of horse speed their way to support the defenders of the hill.

The Alliance attack is progressing well

The Alliance attack on the hill was progressing and their horse on the right flank had the upper hand in a tough engagement with their French counterparts. The French at this stage were still reacting to the Alliance moves and had deployed their reserve foot early expecting a loss on their left flank. On a positive note, their artillery was proving effective and wearing down some of the attacking Alliance units.

Both sides were starting to use their commanders to rally units. One of the rule tweaks was to commanders and rallying.

  • Commanders and generals are able to rally units (except artillery units) which are wavering by attaching themselves to the unit. Upon joining a unit their number of hits is halved (rounding up any fractions). The Commander must remain with the unit for the remainder of the game.
  • Generals are only able to rally a unit once all their commanders have rallied units and are attached to units.
  • Only one commander or general may perform a rally per turn and a unit can only ever be rallied once during the game.
  • Note - units no longer need to be within a command range to move.


French horse see off the Alliance attacks.

The engagement between the horse had become very close and would be decided by the order of activation cards, which went the way of the French who won the engagement by counterattacking first. This turn of events meant the French would no longer be just reacting to the Alliance moves and could take limited offensive actions with some very weakened horse. Meanwhile, the Alliance foot were contesting the hill.

The battle is in the balance as Alliance forces try and take the hill before any meaningful French attacks begin.

The battle was in the balance and almost tipping in the favour of the French. Their foot were now facing the Alliance foot on the hill exposing their rear to an attack from the remaining dragoon unit. The turn of the activation cards would determine whether a nearby French horse would be able to intercept the dragoons before they could mount a charge.

Can the French intercept the dragoons and stop their attack on the hill?

Fortune favoured the French for a second time in this battle and the dragoons were intercepted. Allowing the French foot to rout the attacking Alliance foot. Alliance forces were now too weakened to mount any further attacks and had to retire from the field of battle.

The campaign begins with a French victory.

The dragoons are intercepted.

A victory to the French

The next post will have a WW2 Western Desert campaign game report and also the updated rules.

Edit - The D3 WSS rules have been added to the tabs at the top of page.