Showing posts with label Scenario. Show all posts

Tuesday, 28 January 2025

French and Indian War Convoy Battle Report

This is a battle report for a French and Indian War scenario where a supply convoy is trying to reach a fort and is expecting an attack by enemy forces. See the previous post for the background, order of battle, and victory conditions. 

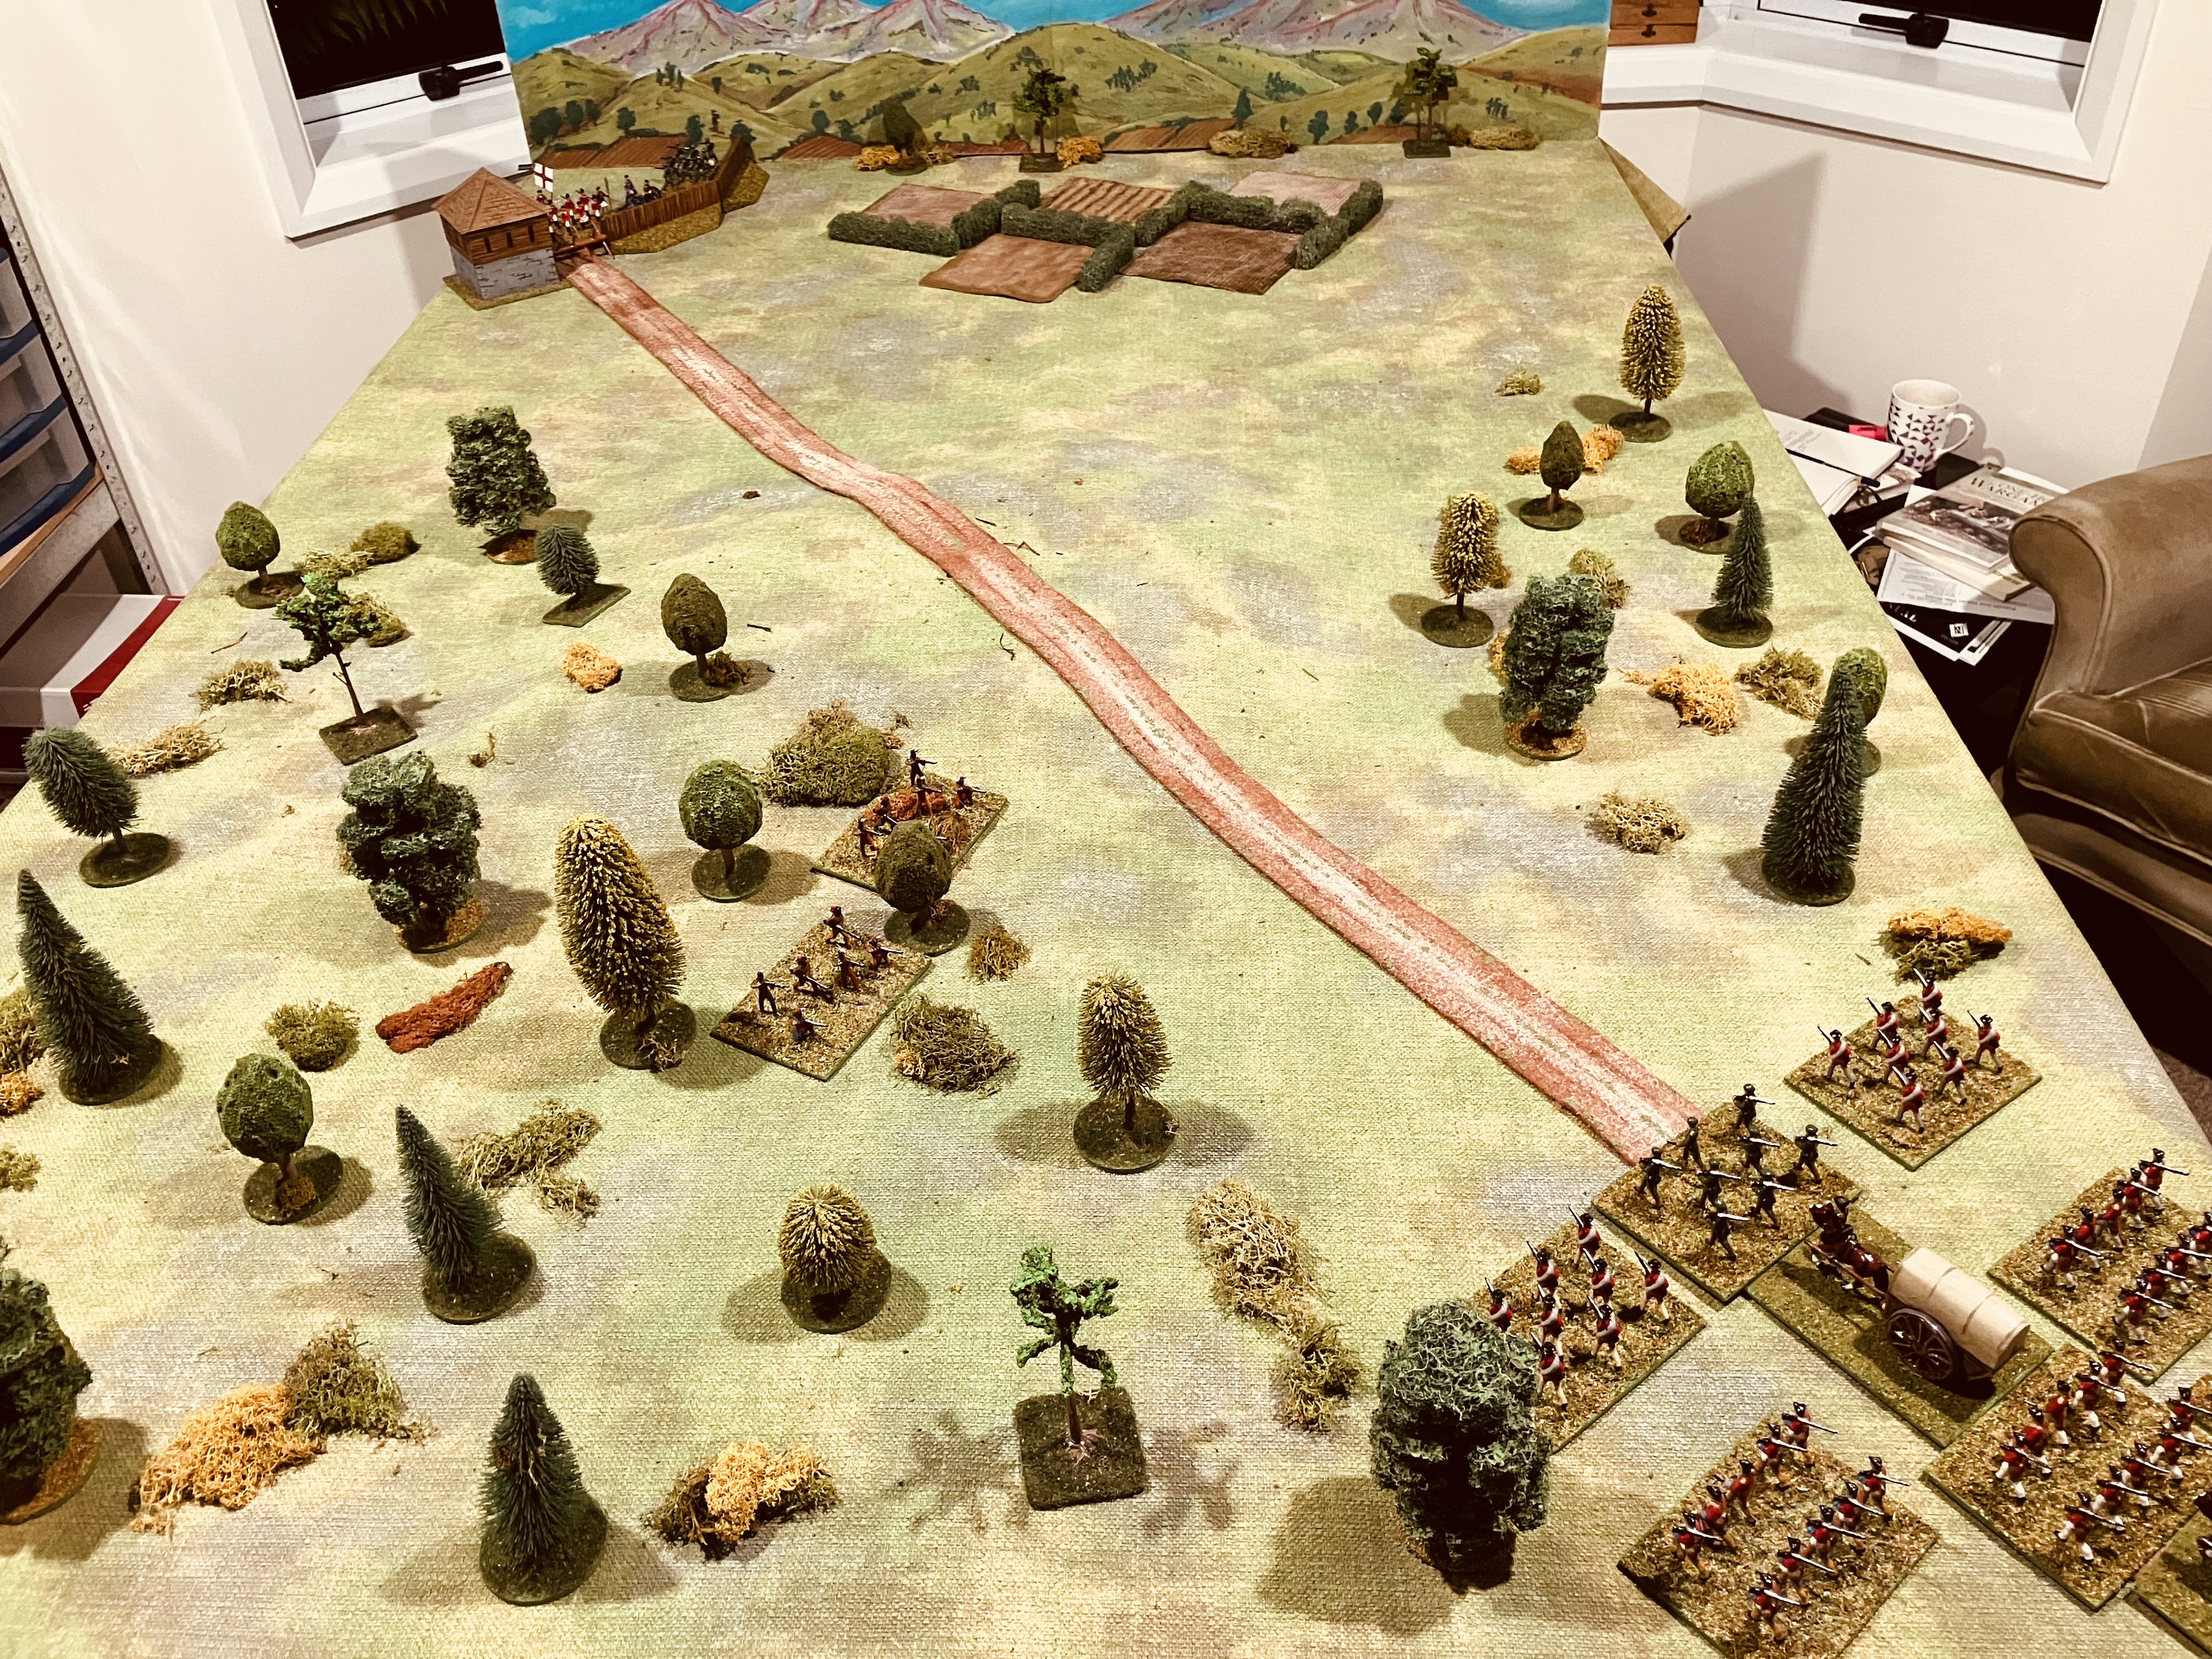
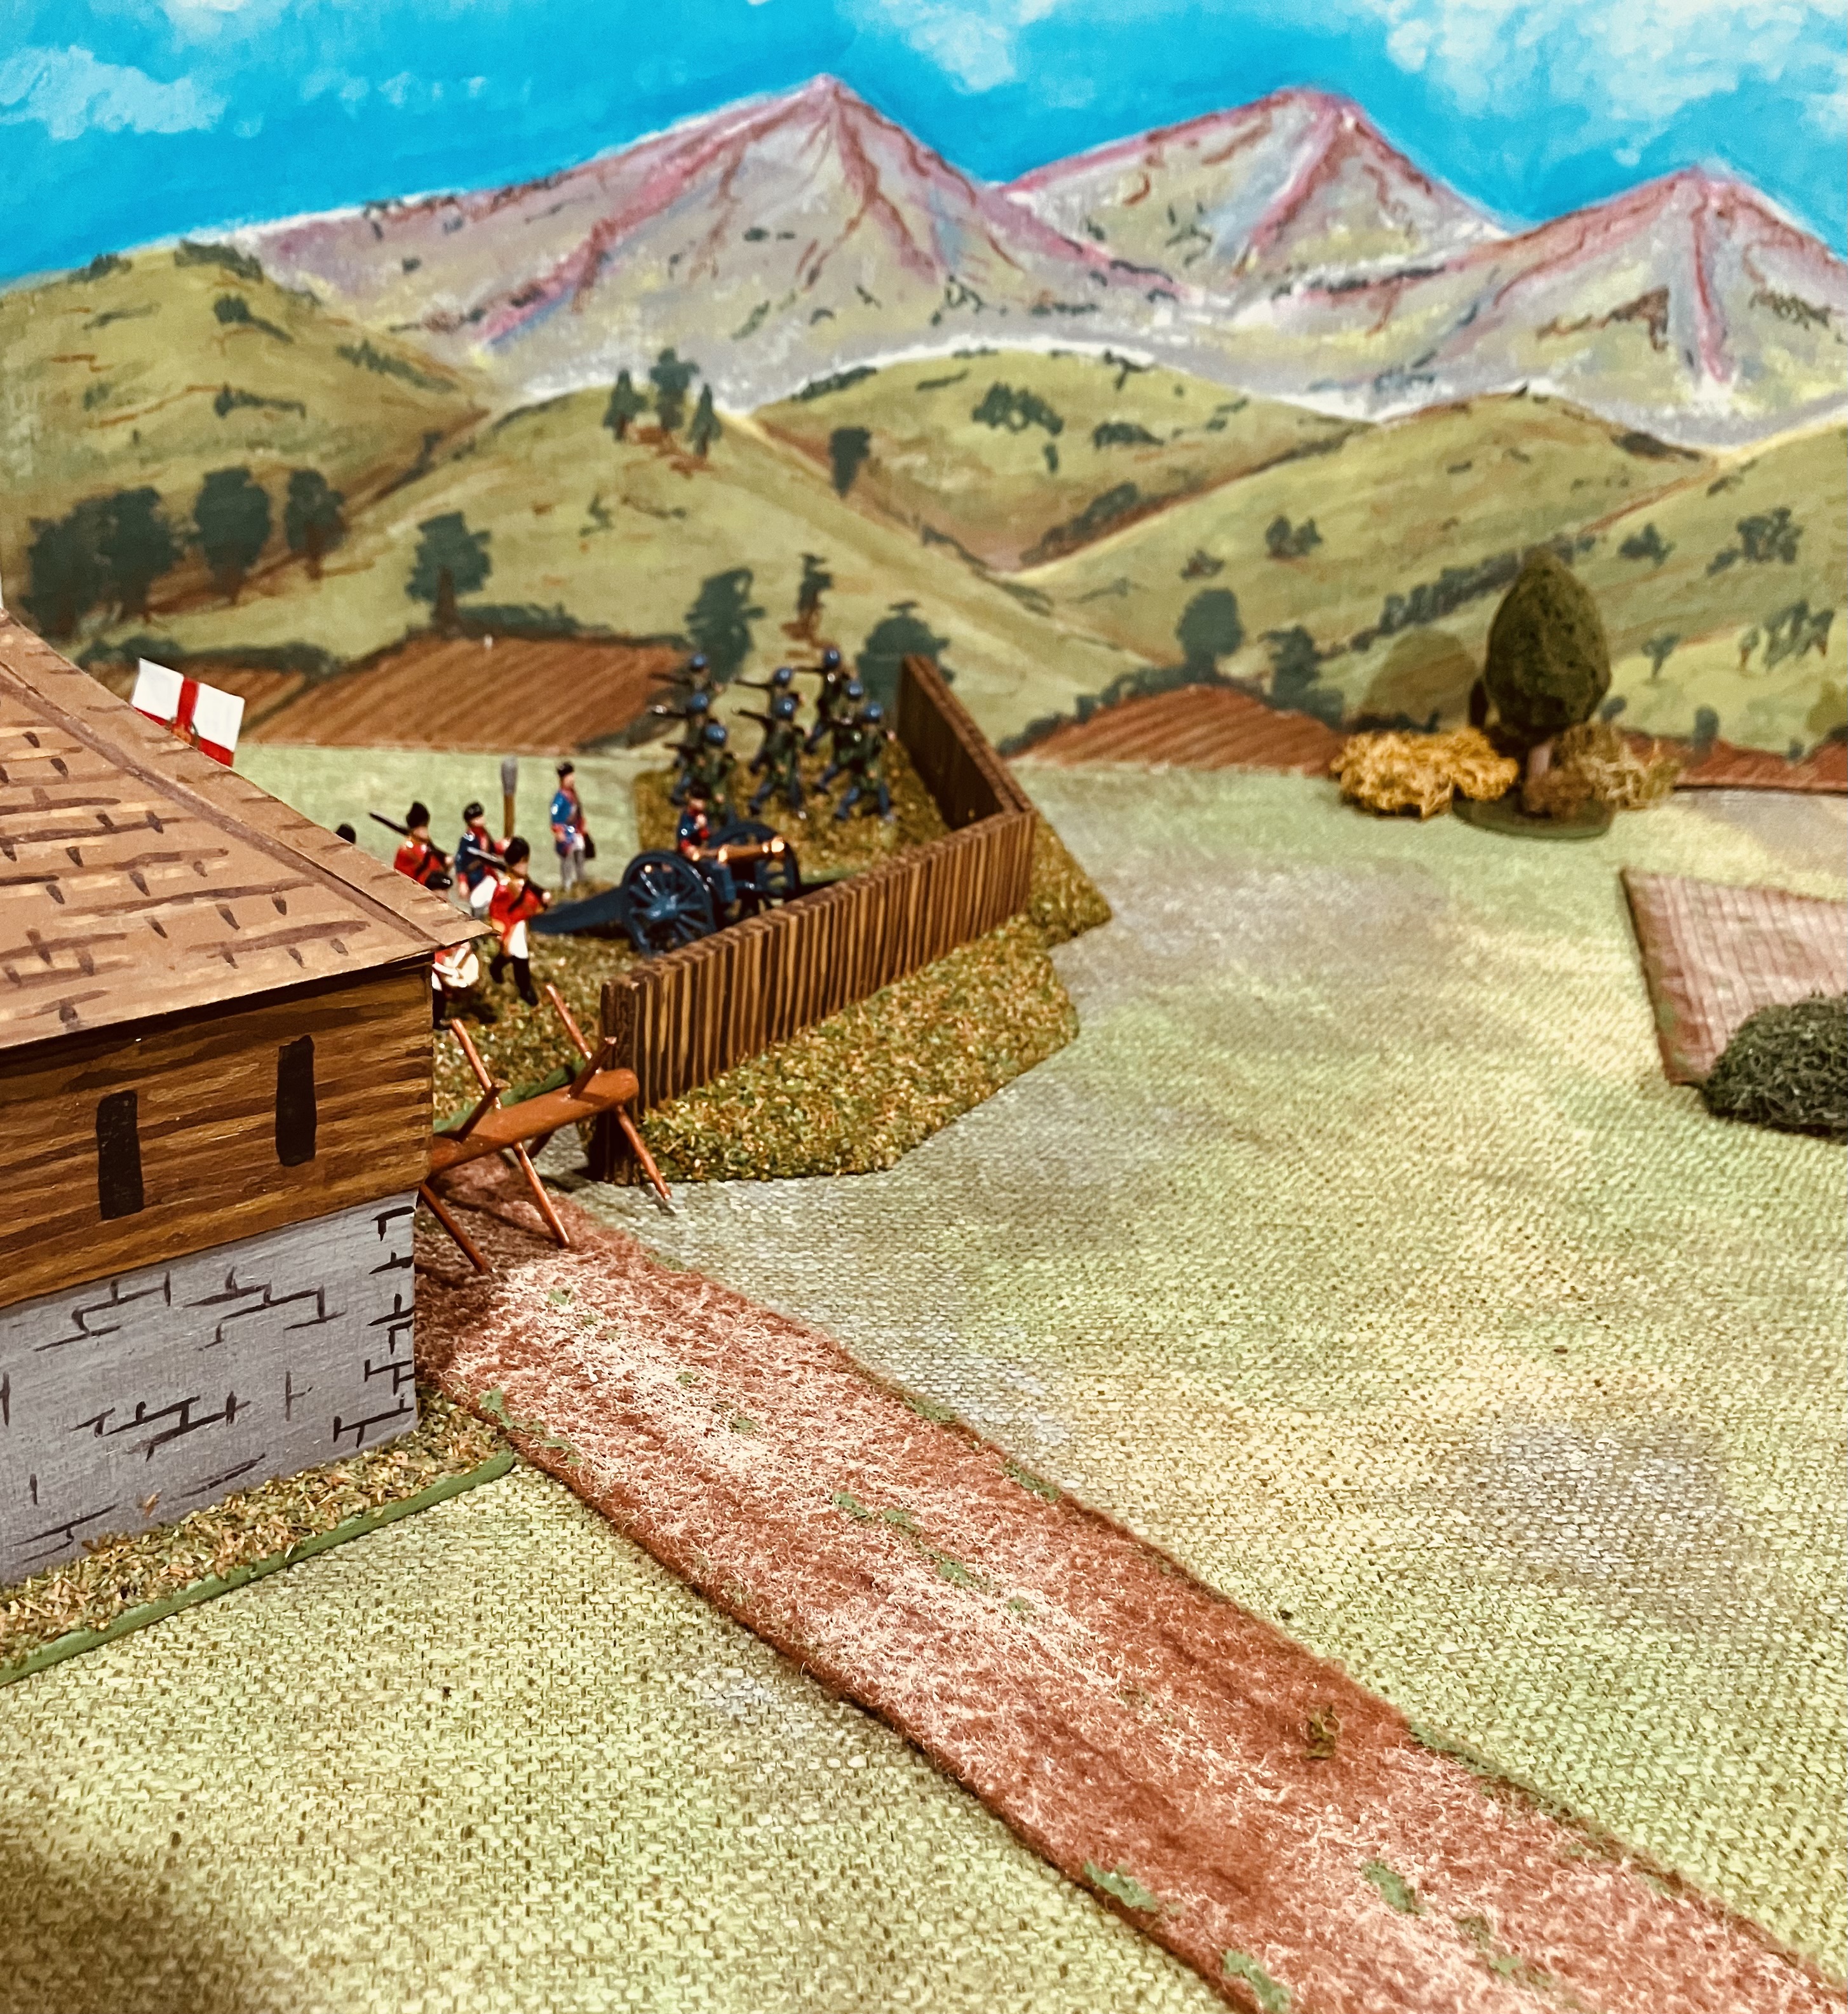
The tabletop with the supply convoy arriving.

For the game I am using a variation of the One-Hour Wargames (OHW) horse and musket rules. Some of the changes include:  

Shooting Changes: Subtract 1 from shooting rolls if the unit fired during the previous turn, reflecting the difficulties of visibility following an initial volley. Militia units always subtract an addition 1 when shooting.  

Charge Changes: Only Indian units and regular infantry may charge. If a charge does not eliminate the target unit, the charging unit must retire facing away from the target. Units have to wear down their target first, else risk failure.

Movement Adjustments: Units (excluding carts and artillery) gain an additional 3 inches of movement when traveling on open ground or roads. Carts move 6 inches on roads and open.

Elimination Tests: To determine if a unit is routed, roll a D6 and add the result to the unit's accumulated hits. If the total is 16 or more, the unit is routed and removed from play. Modify the D6 roll as follows: add 2 for Indian units and 1 for militia units.  

Battle Report

As the convoy advanced along the road, gunfire erupted from the northern woods. Reacting swiftly, the British commander ordered three units to engage the ambushers. Meanwhile, the supply carts, flanked by regular infantry units, hurried forward, determined to reach their destination. The intensity of the enemy fire from the north woods increased as additional reinforcements of Indian warriors and French militia emerged along the tree line.

Gunfire erupts from the trees. Additional French reinforcements can be seen moved through the north woods.

Along the road British engage while trying to push the carts to towards the fort.

As the convoy crested the hill and the fort came into view, so too did a line of French regular infantry advancing rapidly from the south. See the danger, a detachment of regular infantry from the fort's garrison sallied forth to intercept the approaching threat and help to bolster the convoy’s defenders and prevent the French from cutting off the carts before they could reach the safety of the fort. 

More French reinforcements arrive from the south.

A unit from the fort marches out to help protect the carts.

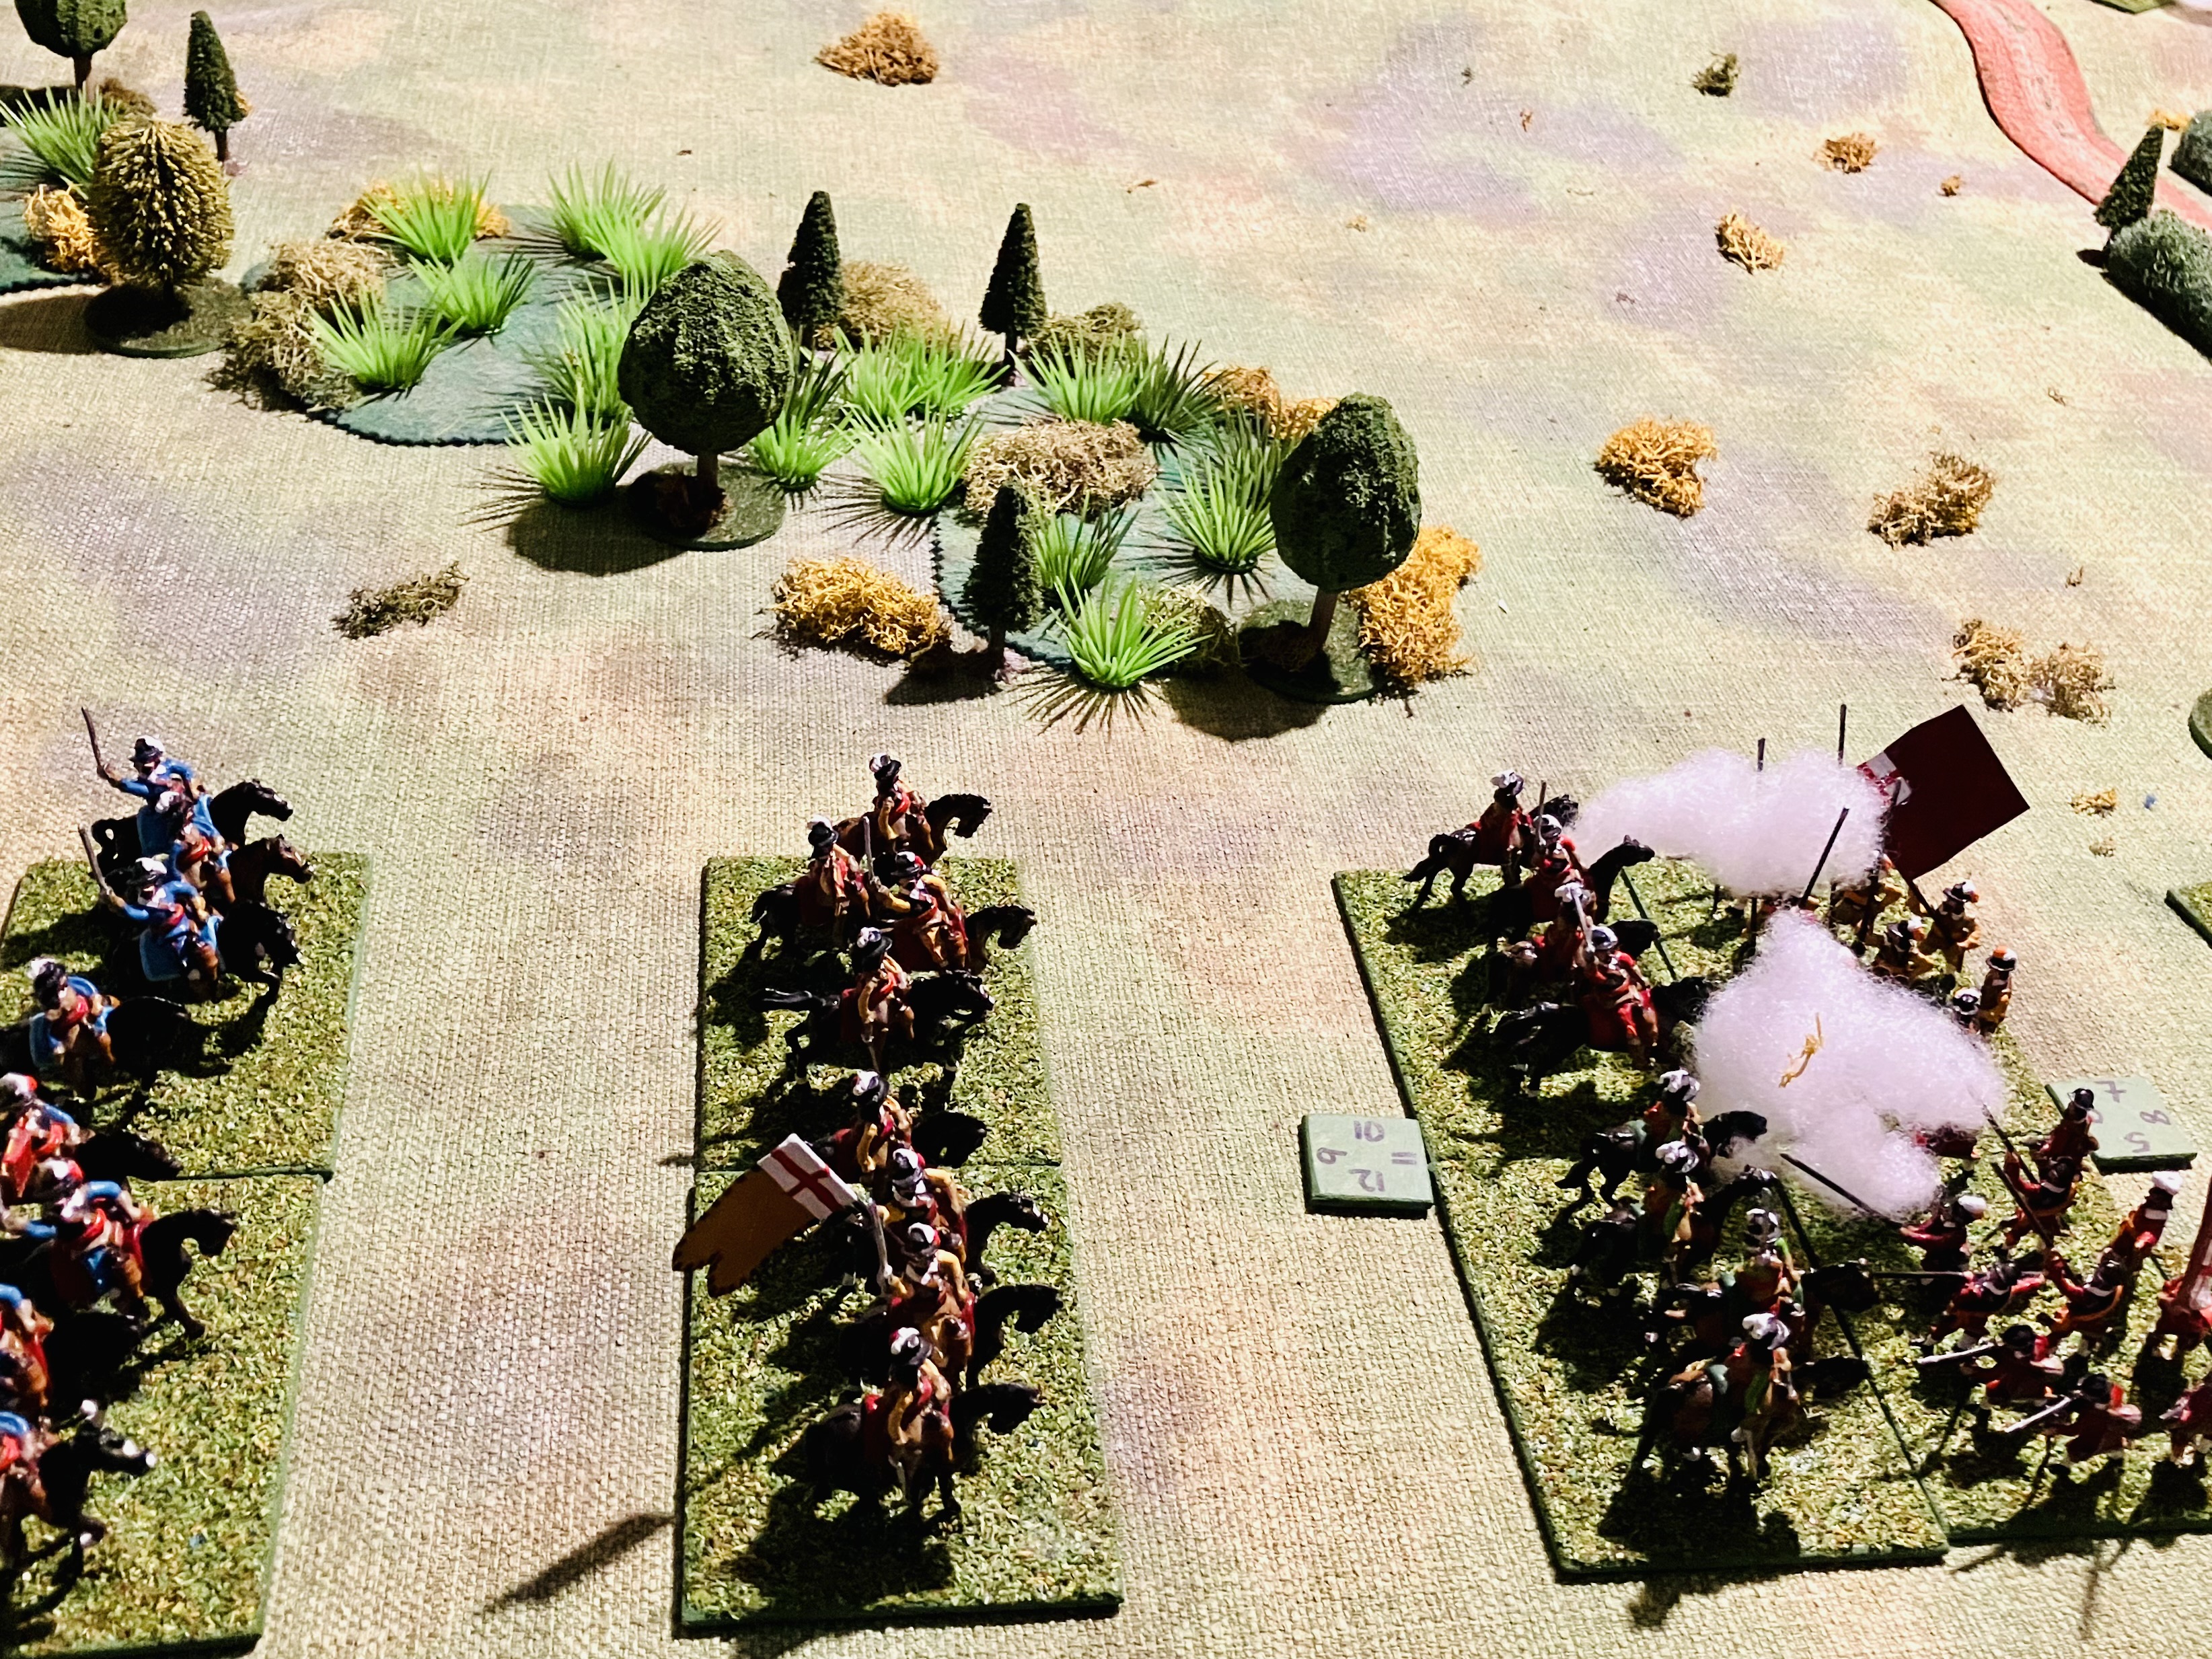
As the supply convoy began its descent down the hill, the British units holding the northern flank faltered and routed, leaving the convoy dangerously exposed in its final run to the fort. A unit of French regular infantry moved to cut off the convoy’s path. In response, all remaining British forces formed a protective cordon around the supply carts, relying on the fort’s gun to provide them with covering fire.

The convoy’s northern flank routed.

The French close in.

With their rearguard routed, the remaining British units marched alongside the supply carts, taking relentless French fire. Despite suffering heavy losses, they shielding the carts and ensured their safe passage to the fort's gates. 

Continuing to march along the road the British take heavy casualties.

Finally the supply carts reach the fort.

Wrap up…

The battle was a British victory as both supply carts successfully reached the fort. In hindsight, I should have pushed the French forces from the northern woods closer to the fort in an attempt to cut the road ahead of the convoy, even at the risk of coming under fire from the fort’s gun. If I were to replay the scenario, I would also consider bolstering the French southern reinforcements with another unit of regular infantry to balance the engagement.

The supply carts move into the safety of the fort.


Sunday, 26 January 2025

French and Indian War convoy scenario

Having recently completing two scratch-built supply carts for my French and Indian War forces (see previous post), I was keen to see them in action on the tabletop. This post outlines the game setting and order of battle, while the next post will have the game report. The game scenario is inspired by two sources: 

  • “Convoy (1) Wagon Train” from “Scenarios for Wargamers” by C.S. Grant and 
  • “Scenario 25: Infiltration” from “One-Hour Wargames” by Neil Thomas.

Supply carts on the move.

Background

A guarded supply convoy has been sent to deliver much needed supplies to a fort. On the march the convoy has spotted enemy forces and expect an attack before they reach the fort.

Map of the tabletop.

Forces

British forces in the fort. 1 unit can leave the fort on turn 6.

  • 1 Militia Unit
  • 1 Gun
  • 1 Regular Unit

British Convoy

  • 3 Militia Units
  • 3 Regular Units
  • 2 Carts

French Blocking force

  • 2 Indian units

French northern reinforcements arriving turn 3

  • 2 Indian units
  • 2 Militia unit

French southern reinforcements arriving turn 6

  • 3 Regular units

Special Rules

The convoy carts can be captured or destroyed if a French unit makes contact with them and no British unit is within 3 inches of the cart.

Victory Conditions

The British forces achieve victory by escorting both convoy carts to the fort, while the French forces win by capturing or destroying both carts. Anything else is a draw.

Fort awaiting supplies.

Tabletop setup with convoy arriving.


Saturday, 7 October 2023

Battle of Lake Trasimene - scenarios and remote game report

This week, I hosted a remote Ancients game with Jon of Palouse Wargaming Journal blog. The Battle of Lake Trasimene was selected, and we would be using a variant of One-Hour Wargames that uses D3 dice instead of D6. These rules can be found at the top of the tab. I recently added a morale and an army resolve system to the rules, the resolve mechanism is based on Jon's approach in his Hex-Based Basic Impetus rules variant.

Early stages of the game.

When setting up the scenario, I searched the internet looking at various historical sites, wargaming sites, and some board game sites for ideas on both the terrain layout and composition of forces involved. I also ran a couple of quick solo play tests to ensure that the scenario was reasonably balanced a possible for an ambush scenario.

Here is the scenario detailed below followed by the battle report.

Scenario - Battle or Lake Trasimene

Background

On June 21, 217 BC, Hannibal and his Carthaginian army ambushed a Roman army led by Gaius Flaminius at Lake Trasimene. The battle resulted in a decisive victory for Hannibal, with the Romans suffering heavy casualties.

Hannibal had positioned his army on the hills overlooking the road that the Romans would be marching along. When the Romans arrived, they were attacked from all sides. The Romans were caught completely by surprise and were unable to form a proper battle line.

The battle raged for several hours, but the Carthaginians eventually overwhelmed the Romans. Flaminius was killed in the battle, and the majority of the Roman army was either killed or captured. Only a small number of Romans managed to escape.

Situation

The Roman army is marching along the southern edge of the tabletop while the ambushing Carthaginian army is positioned in and around the hills ready to spring the trap.

The layout on a 6x4 foot tabletop

Orders of Battle

Roman
6 x heavy infantry
1 x cavalry
2 x light infantry

Roman Army Resolve = 14

Carthaginian
3 x heavy infantry
2 x Gaul war bands
1 x light infantry
3 x cavalry

Carthaginian Army Resolve = 18

Deployment

Roman units must deploy along the road beside the lake's edge.

Carthaginian units cannot be within 12 inches of the Roman deployment.

Starting deployment positions

Reinforcements

There are no reinforcements in this game.

Special Rules

The Roman Army Resolve has been reduced by 4 to 14 to reflect the surprise element of the ambush. They can however increase their resolve by 4 if a unit exits from the eastern edge of the table.

Game Length

The game lasts for 15 turns or until one arm’s resolve is reduced to zero. The Carthaginian player goes first in each turn.

Victory Conditions

The player with the most army resolve is the victor.

Battle Report

I suggested that Jon play the Carthaginians, as the Roman tactics for the battle are relatively simple which is always helpful when you are hosting a game. They just needed to deploy their units and create space so that they are not forced to retreat into the lake, then try to force their way along the road.

From a Carthaginian perspective, the best strategy is to engage quickly and prevent the Romans from deploying fully. This will give the Carthaginians an advantage early on, as their cavalry and Gaul war bands are less resilient than the Roman heavy infantry. The challenge for the Carthaginian side is to us their units wisely and take advantage of any Roman retreats. The longer the game goes on the batter it is for the Romans.

Opening Game Turns

The Carthaginian cavalry and Gaul war bands descended rapidly from the hills, giving the Romans little time to deploy. Only about a third of the Roman army was effectively deployed before the Carthaginians attacked, forcing one Roman unit to retreat. This early retreat increased the difficulty for the Romans to manoeuvre.

The Carthaginian ambush is sprung.

Mid-Game Turns

At the front of the Roman column, the units were holding their own and getting organized, ready to counterattack. However, at the back of the column, things were going from bad to worse. Carthage's cavalry attacked two heavy infantry units, forcing them to retreat. In their retreat they pushed back two other units into the lake, eliminating them from the game, and costing the Romans a full 6 army resolve points.

Mid way through the game.

End Game Turns

Carthage's cavalry quickly exploited their success and began to encircle the rear of the Roman column. In the center, the little success the Romans had achieved under the leadership of Gaius Flaminius and his veteran heavy infantry evaporated with the arrival of the Carthaginian cavalry on their flank. The veteran infantry eventually succumbed to the cavalry onslaught, along with Gaius Flaminius himself. This broke the remaining resolve of the Roman army, and the battle was lost.

Gaius Flaminius in the thick of battle.

The Roman army resolve collapses as in the distance Carthage’s cavalry start to mop up the panicked Roman units.

After Game Thoughts

A historical result, and from a game point of view, the double retreat at the tail of the column turned out to be a real blow to the Romans. This was not just from the lost units, but it allowed the swift Carthaginian cavalry to quickly engage Roman units in the flank and capitalise upon their good fortune.

Well played Jon and a comprehensive victory!

Thursday, 21 September 2023

Battle of Nantwich ECW game leads to a generic scenario

An English Civil War game has recently been played out on the tabletop. I used the Battle of Nantwich scenario from “With Pike and Musket” by C.Wesencraft as a guide for setting up the game. The battle itself took place on January 25, 1644, and was fought between a Parliamentarian force under the command of Sir Thomas Fairfax and a Royalist army led by Lord Byron.

The Royalist army had become divided into two parts due to flooding of the River Weaver, with the infantry and artillery on the west bank and Lord Byron and his cavalry on the east bank. Sir Thomas Fairfax attacked the Royalist infantry positioned near the village of Acton, while deploying some infantry and cavalry as a blocking force against Byron's approaching cavalry who had eventually found a crossing of the River Weaver and was approaching the left flank.

The Parliamentarians attack on the Royalist infantry would be aided by a sortie of  musketeers from Nantwich. They were able to overcome the Royalist defenders. Byron's cavalry were unable to breakthrough to turn the tide of the battle, and the Royalists were defeated.

The order of battle

Parliament Force

  • 2 infantry units
  • 3 cavalry units
  • 1 artillery unit
  • 1 infantry unit (arriving on turn 6 from Nantwich)

Royalist Forces

  • 2 x Infantry units
  • 1 x Artillery unit
  • 3 x Cavalry units (arriving on turn 2 from the north-east.

The village of Acton is the objective of this game. The army occupying the village will be victorious. Royalist cavalry arrive on turn 2 top right, and Parliamentarian infantry arrive turn 6 bottom right. The marshland is impassible. 

Victory Conditions

The victory conditions are for Parliamentarian forces to capture Acton village. If the Royalists hold the village, then they win.

Game Report

The game used a variation of One-Hour Wargames Pike and Musket rules and limited movement to two units per turn.


In the opening moves both sides exchanged artillery fire while Parliament’s cavalry advanced.

Once the Parliamentarian cavalry were positioned threateningly on the flank, their infantry centre moved up to engage in musketry with the Royalist infantry defending the high ground around the village of Acton.

Royalist cavalry lead by Lord Byron arrive and charge the blocking infantry unit.

The attack on Acton defenders continues.

The Royalist cavalry are held up as they try and breakdown the blocking force.

The cavalry charge the Royalist infantry trying to outflank them.

Parliament infantry from Nantwich arrive on the Royalist flank.

Parliaments blocking infantry are under pressure and are supported by a cavalry unit.

Attacked on both flanks the Royalist infantry eventually surrendered the village for a Parliamentarian victory.

After game thoughts…

I've played this scenario a couple of times now, and Parliament won every time, but only by a small margin. This made me wonder if the Royalists could ever win, and I decided that they probably couldn't unless they had another unit to help defend the town, or the Royalist relief force had more room to manoeuvre around the marshland and get more units into the action. This led me to think about how the scenario could be adapted into a generic scenario, like the ones in Neil Thomas's book One-Hour Wargames, where a variety of historical situations and other wargaming scenarios have been reworked.

So for a bit of fun and hopefully interest, here is my attempt at a generic scenario using Nantwich 1644 as inspiration…

Scenario Situation

Bad weather has divided the Blue army, with half of its units defending a strategic town and the other half on the opposite side of the river trying to rejoin them. Meanwhile, the Red army is trying to concentrated its forces and plans to attack the strategic town.

Scenario map

Army Sizes

  • Both armies have 6 units.

Deployment

  • Red army deploys 5 units in zone 1.
  • Blue army deploys 3 units in zone 2.

Reinforcements

  • Turn 2 - Blue army: 3 units arrive at the north-eastern bridge
  • Tuen 4 - Red army: 1 unit arrives at the south-eastern bridge

Special Rules

  • The river can only be crossed at the bridges and the marshland is impassible terrain.

Game Length and Turn Order

  • The game lasts for 15 turns with Red army going first.

Inspiration

  • The Battle of Nantwich, “With Musket and Pike” by C. Wesencraft.

Next…

Now that the scenario is written, I'm looking forward to try it with a different period this weekend. I'm not sure which one yet, but I'm leaning towards the American Civil War.

Saturday, 6 May 2023

Connecting or mashing up a couple of tabletop layout ideas

A lot of my wargames rely upon scenarios from the book "One Hour Wargaming”, either as one off games or incorporated into campaigns. When setting up the tabletop using these scenarios, I generally end up doing two things: 

  1. Modifying the scenario map so it fits with using a 6x4 foot tabletop. This essentially entails stretching the map which is drawn for a 3x3 foot tabletop into 6x4 foot dimensions.
  2. Adding additional terrain features as the tabletop can look very empty otherwise

As I replay the scenarios, especially my favourites, I am increasingly finding myself adding a number of terrain features to help add a bit more variation and interest, such as small woods or a knoll here and there.

An example of One-Hour Wargames scenario 7 - Flank Attack (2) using Minifigs 15mm ACW figures.

Anyway, Last week I was travelling to New Zealand to visit the adult children, and to keep myself occupied while waiting at the airport or on the flight, I was reading a book about English Civil War battle of Edgehill. The book was recommended in one of the comments from a post a few weeks ago (a quick thank you for the tip). 

Current reading “Edgehill 1642”

One of the interesting chapters in the book is about how they went about trying to interpret and piece together the battlefield and its features using the different sources and written accounts of those at the battle. Often written many years later, these accounts could have different or conflicting views on the battlefield terrain.

This got me thinking about my approach when I’m laying out terrain features on the tabletop for a game, and whether there was a better or more systematic way of doing things. This jogged a memory about a technique used in the book “Programmed Wargames Scenarios” by Charles S. Grant for selecting tabletop layouts.

A very useful book for solo Wargames

Many of the scenarios in the book use an approach where different versions of a battlefield layout are drawn and then decided by the dice. This clever technique creates a geographical “fog of war” when deploying forces, particularly so for earlier periods when armies on a campaign had none or few accurate maps. 

Example from the book with 3 different options for the left, centre, and right sections of the tabletop. 

The scenario maps were divided into three sections: left, centre, and right. Each section has three variations of the terrain which fits with any of the adjacent sections. So a road or river going across the map would always link regardless of the sections selected with a dice roll.

Prior to selecting the left, centre, and right sections. Each army must write orders or draw their deployment. This can create a few problems for players, for example, they find some difficult terrain in front of their cavalry or a an unexpected building which can assist the opponents defence.

So, I thought I would try and apply the Programmed approach to one of the One-Hour Wargame scenarios. I picked the scenario Flank Attack (2) which is one of my favourites. The first step was to take the map from the book which is for a 3x3 foot tabletop and stretch it to a 6x4 foot tabletop.

Scenario map for Flank Attack (2) modified for a 6x4 tabletop

Having drafted a map it is divided into the left, centre, and right sections. Then each section is reworked into three options which are slightly different. In the picture below the centre row (dice 3-4) represents the above map.

One-Hour Wargames scenario Flank Attack (2) map has been modified to create different terrain options using the Programmed Wargaming Scenario approach. After writing down the deployment, roll the dice to decide the tabletop layout.


The left section selected by a 6, the centre by a 2, and the right section by a 5.

I cut out the sections to help show how the selected sections fit together to create the map.

The final tabletop setup

With the tabletop setup determined the next step is to see how the forces are deployed based upon their prior written orders. Using the ACW forces already set up we find few changes with the Union deployment. However, than two of the flanking units find themselves positioned on a hill and the other two facing woods which they will have to navigate. 

The Confederate force deployment is not quite as planned. Their main line is anchored on a small hill (the scenario objective) and the remaining line spread out in the valley with their cavalry now positioned on a second small hill. There is no nice long ridge to defend as expected.

A view of the troops deployed with limited prior knowledge of the tabletop layout. 

A better view of the Confederate troops spread out in the valley between to small hills.

The half the Union flank attack will now have to navigate the woods.

Anyway, the tabletop is now setup and ready for a game. Time to stop posting and play!

Saturday, 18 March 2023

WW2 scenario and game report

This scenario, set in North West Europe, draws inspiration from the events that took place in Villers Bocage during WW2 in 1944. It depicts an Allied effort to break out of the German encirclement, where a British armored group has spotted a weakness between two enemy divisions and is making an attempt to capture a crucial hilltop.

A close up of some of the engagement.

The wargame being played incorporates the "Tank on Tank" board game rules from Lock n Load, but with some adaptations that enable free movement on a tabletop. Additionally, a few new rules have been added for tank destroyers and infantry to enhance the combined arms feel of the game. There are a few more notes on the changes and adaptations at the end of this post.

Scenario

The scenario titled "Action at Birscote - Somewhere in France 1944" depicts a situation where a British armoured group is moving forward through the town of Birscote to capture the hilltop. To counter this advance, the Germans have mobilised a force that will converge on the town from three directions - north, east, and south - denoted as points A, B, and C on the map below.

Map of the scenario. The British are advancing towards the hill and the Germans will converge on the town from points A, B, And C.

The game was played on a 6x4 foot tabletop.

Armies

The British force has:

  • Two Sherman troops (both have reconnaissance tanks a Cromwell and Stuart, and one troop has a Firefly 17 Pdr).
  • An armoured infantry company
  • A infantry company with mortar support
  • A 25 pdr. Artillery section

British Force

The German force has:

  • A troop of two Tiger tanks with two armoured infantry - these will arrive at point A on the map.
  • A armoured company of two armoured infantry, armoured car, Stug III, and Wespe - these will arrive at point B on the map.
  • A troop of three PzIV tanks - these will arrive at point C on the map.

German force converging on the town of Birscote from three directions

Deployment

The British troops start the pre-game actions by deploying as many units as they desire along the road leading into the town of Birscote. Any additional forces that cannot be accommodated at the outset can arrive as reserves at any point in the game, along the same road.

On the other hand, the German forces will commence the game off-table and appear at designated points A, B, and C on the map. They are required to first deploy all their units at point A before beginning to have units arrive at point B. Only after all point B units have arrived can the units begin to arrive a point C. This restriction will require the German player to strike a balance between the arrival of units and attacking the enemy.

Game length and turn order

There is no set game length. The German player goes first arriving along the road at point A on the map.

Victory Conditions

British forces must capture and maintain control over the hilltop, while the German forces must seize and hold the town of Birscote.


The Game Report

At the beginning of the game, a solitary Tiger tank arrived and shortly after, the first British tank was destroyed. In response, the British forces quickly left the road and stationed their armored infantry in the town while their tanks moved to either side of it. Soon after, another Tiger tank arrived, along with supporting armored infantry. At this point, the British tanks had adjusted their aim and were lucky enough to disable one of the Tigers, but at the cost of losing another of their own tanks.

From a deployment perspective, by turn three all German units had arrived on the tabletop at point A. This would allow their other forces to start arriving at point B.

Opening moves as the British respond to the arrival of a couple of Tiger tanks on the hill.

The first British tank brews up.

The British leave the road and reposition their armour, while armoured infantry occupy the town.

A Tiger tank is disabled as after three turns all the German units that were to deploy at point A have arrived.

Flank attack from the south

The attack by the Germans, approaching from the southern direction, caught the British forces off guard. Although a fortunate hit managed to take out the Stug.III tank destroyer early on, the German armoured infantry successfully made their way into Birscote and were only forced out after some intense house-to-house fighting. Realising that any further attempts to attack Birscote directly would likely end in failure, the Germans shifted their focus towards targeting the flank of the British tanks that were still engaged in battle with the solitary Tiger tank situated on the hill.

The Germans launch an attack from the south in an attempt to take Birscote.

Initial units of the southern attacking force arrive. Unfortunately for the Germans a luck shot (double sixes) had destroyed the Stug III.

German armoured infantry press on with the attack in Birscote.

German units briefly enter Birscote.

Having been ejected from Birscote, the attack is directed at the flank of the lead British tanks engaging the lone Tiger tank on the hill.

Attack from the north road

The British forces were not granted any respite after just repelling an assault on the town, when German tanks approached from the northern direction. Fortunately, the British tanks were anticipating a possible attack from that direction and were able to quickly engage the enemy in a tank-to-tank battle, with the Sherman Firefly joining the fray as soon as possible. Through their gunnery, the British gradually gained the upper hand and were able to destroy the German tanks one by one with only few losses themselves.

The tank attack from the north arrives.

An early success by the British give them the upper hand in the tank-on-tank battle.

The tank battle was over quickly allowing the British to regroup for a counter attack.

Counter attack along the south road

The swift elimination of the northern tank attack provided the British forces with the opportunity to reorganise themselves and mount a counterattack against the remaining German units located south of Birscote. Lead by the Sherman Firefly, the British launched an attack that ultimately resulted in the destruction of both the German armoured car and the Wespe mobile artillery.

The removal of the northern threat allows the British to regroup and counterattack in the south.

German forces south of Birscote come under fire as the British launch a counterattack. 

The counterattack is successful.

A last ditch attempt to take the town

The German forces that remained on the hill began to descend with the aim of capturing the town. A single Tiger tank, accompanied by two armored infantry units, slowly advanced towards Birscote. Sensing a chance, the Sherman Firefly involved in the counterattack was able to position itself on the flank of the Tiger and successfully fired, causing the tank to explode in flames. This decisive blow shattered any hopes the Germans had of capturing Birscote and they were forced to retreat. The British units, thereafter, were able to seize control of the hill with the aid of their remaining tanks and reserve foot infantry.

A victory to the British, coming at the cost of half their forces.

Germans make a final attack on Birscote.

A Tiger tank and armoured infantry advance.

The Firefly takes it shot.

This was the third time I have played the scenario and so far it is 2:1 in favour of the British. The outcome of the northern attach appears to be the key to any success or failure.

Modifications to the Tank on Tank rules

To adapt the board game, which uses a hex-grid, to the tabletop rules I used the following adjustments:
  • One hex equated to 8 inches on the tabletop.
  • Any unit located within 1 inch of a terrain feature, such as a hedge, building, or tree, was considered to be in cover.
  • Buildings and trees were obstacles that blocked line of sight, with measurements taken from the center of the unit's base to the entirety of the target base. Hedges did not obstruct line of sight.
  • Units had to move in a straight line unless they were on roads, in which case they could move along the road for their entire movement. Units had to navigate around clumps of trees and buildings. Movement allowances were not reduced when moving into terrain or cover.
  • Destroyed armor units remained on the tabletop and were marked with smoke. Other units could move through them without hindrance, but they blocked line of sight.

Further modifications were implemented in the rules to improve the game's combined arms aspect rather than just focusing on tanks. These changes included:

  • Infantry units, whether on foot or armoured, had a 360-degree firing arc.
  • Tank destroyers (e.g., Stug.III) were treated similarly to tanks, with the exception that they couldn't fire after moving.
  • Foot infantry could move through other units without impediment, whereas other units could not move through one another.

End note

This post contains more text than I typically write, and I generally try to avoid lengthy posts because I find it time-consuming to check my spelling and grammar. English was not my strongest subject in school, and while I received the usual feedback of "tries hard, but could do better" for most subjects, in English, I only received "tries hard" without the "could do better" part. For much of this post I quickly typed what I was trying to say then used ChatGPT, an AI tool to format for me. Copying and pasting my text into the tool and adding "reword -" at the beginning, ChatGPT generated some readable text for me. A little bit of modification was required afterwards, but it was surprisingly effective.