Sunday 19 May 2024

Planning a future campaign and ECW rules

A recent second-hand purchase arrived this week. I was fortunate enough to be able to buy locally at a reasonable price and avoid the high international postage costs, which seem to cost more than the price of the game itself. The game was in good condition for a used game and came wth all its parts.

Recent purchase - Avalon Hill’s Afrika Korps

Why am I buying this? Later this year, my wargaming will be restricted as we pack up and move house and countries. However, I plan to keep my 6mm Heroics and Ros WW2 Western Desert armies out for a few games and a campaign, as they can be easily packed up last. 

To test the idea of using this board game for the campaign, I will spend the next month, or two, running a mini-campaign of Operation Crusader using the board game pieces and transferring any combat to a small tabletop game. The idea of a mini-campaign came from a link on Boardgame Geek to an article from the  old Avalon Hill General Magazine (November-December 1973 issue).

  • Board Game Geek link - here
  • General Magazine link - here

It's been a while since I've done much gaming with my 6mm Western Desert armies, other than the odd one off game. The last major outing for these armies was when I played a solo ladder campaign over a 15 month period, from March 2020 to May 2021. This campaign included 11 turns and 27 tabletop games. The first game can be found here and the wrap up here.

This past week, and weekend, I have continued with play testing my English Civil War rules and have finally reached a point where I'm satisfied with them, and have stopped making anymore adjustments. The final amendments involved clarifying the routing rules, which now allow both infantry and cavalry to increase their hit count before routing if they're within 3 inches of two other units of the same type. This encourages units to stay together in there commands and in formation. Additionally, I reduced their base hit count by one to prevent combat from dragging on too long.

The other area of the rules I was flipping and flopping on with different rule mechanisms for commanders. I decided I was making things all too complicated and so settled on the simple and often used approach where commanders improve the odds in combat, but this comes with the risk of mishap.


I am hoping to post the full write up of the rules sometime next week.

Sunday 12 May 2024

Making a Semi-Flat Town

In a few recent games I played scenarios which had a town is positioned on the edge of the tabletop, serving as an anchor for an army’s flanks. Typically, I arrange a cluster of houses closely together to depict the town, but this setup encroaches six inches into the table's edge. In attempts to maximise tabletop space for gaming, I could place just one house to indicate the town. However, while practicable, it doesn't quite provide the look I want.

One of the prints that sparked the idea of making a semi-flat town.

Recently I have been re-reading and browsing through some books relating to the pike and musket period and enjoying the various prints of battles in the books. This sparked the idea of sketching a town scene, cutting it out, and sticking it to foam board, which I could then attach to the edge of the tabletop. As I began the drawing, I thought about using a semi-flat approach by layering multiple sheets of foam board and making the town into more of a model rather than a drawing

I remembered seeing similar concepts of semi-flat buildings on a few other blogs. Some of the posts are going a while back. One was from AJ’s Wargaming Table blog of a medieval manor (see here). Another use of semi-flats was in Wargaming Miscellany which described the use of two-dimensional buildings to reduce the footprint of buildings on a grid. (found here). Another more recent blog post with extensive use of semi-flat buildings is on Not Quite Mechanised (found here).


The finished town on the tabletop edge with a backboard.

Positioned on the table’s edge without a backboard.

A closer look at the semi-flat town.

The steps to making the town…

Materials required:

  • Foam board
  • Gesso Moulding Paste
  • Paints and brushes
  • Pencil and Paper
  • Toothpicks (or moulding tools)
  • Stiff cardboard

The steps to create a semi-flat town are:

  1. Begin with drawing a sketch and getting the positioning of buildings.
  2. Cut out the drawing and use it as a template to cut out the foam board.
  3. Cut away the rear buildings on the drawing and use gain as a template to cut out another piece of the foam board.
  4. Cut away more buildings and repeat until there are four layers of foam board.
  5. Stick the foam board together lining up the layers of foam board.
  6. Apply the Gesso Moulding Paste to the front of the foam board.
  7. Using toothpicks I etch in building details particularly for the building roofs and corners.
  8. Once the gesso is dry, paint the model with a base colour of the building walls, then add base colours for roofs.
  9. When painting the roofs and details I will use washes and highlights to give depth to the buildings. This is where etching the roofs and other details help in the painting process, particularly for washes and highlights.

Pictures of the process below…

My original sketch. Along the way I ignored the chimneys as they were too fiddly.

After cutting out the drawing I used it as a template to draw around on the foam board.

I cut away some of the back buildings from the drawing. Then used this as a template to cut my next piece of foam board.

I gradually cut away more and more until I have four layers of foam board.

The pieces of foam board are stuck together. You can see how this gives some depth to the model.

Gesso Moulding Paste is used to cover the front of the model. I also added a base of stiff card.

Using a toothpick etch in some details for the roofs and buildings. A small piece of card help smooth out some of the surfaces.

The base colours are applied.

I find a brown wash helps pick out the details.

Watered down paint is used to draw in windows and other features. If you get it wrong the watered down paint is easily wiped away.

I continue adding details and little blobs of watered down paint to indicate bricks and stones.

The finished model is given a coat of PVA glue to seal it and some scatter on the base.


Saturday 11 May 2024

English Civil War - Battle of Nantwich Game Report

This past week I played out the Battle of Nantwich, 1644, scenario from the book “With Pike and Musket” by C.F. Wesencraft. This is the second time I have played the scenario, this time I was using the English Civil War (ECW) rules I have been working on and posting about over the past few weeks. One area of the rules I was wanting to test is the organisation of the armies into commands and the sequence of play, which limits the number of commands in an army that a player can move.

Hurry up lads! We need to find the river crossing before turn 6 of the game.

By having rules for army organisation and limiting the number of commands that can move, the aim, or hope, is to make deployment decisions important as they were for commanders of that era. Moreover, manoeuvring the army after deployment was far from straightforward and often time-consuming. So, restricting players to two orders to move command(s) or conduct artillery bombardment prevents armies from being overly responsive. Coupled with the movement rule, which reduces movement to 3 inches for any unit making a turn. 

Here are snippets from the rules on organisation and sequence of play…


One of the reasons for choosing the Battle of Nantwich scenario was it was not the standard pitch battle with infantry in the centre and cavalry on the wings, and it would be a good test of the organisation and the moving of command(s) rule mechanisms.

Battle Report…

Background

The Royalist infantry have been separated from their cavalry by the flooding or the River Weaver. The Parliamentarian force has used the opportunity to attack the Royalist infantry who are positioned just north of the village of Acton. Additionally, Parliament will get support from the Nantwich in the form of a regiment of infantry arriving from the south east (turn 6). Meanwhile, the Royalist cavalry are expected to arrive from the north east having found a river crossing (turn 2).

Order of Battle

Royalist:

  • Centre Command - 3 x Infantry plus commander
  • Infantry Reserve - 2 x Infantry plus overall Commander
  • Artillery Command - 2 x Artillery
  • Cavalry Command - 6 x Cavalry plus 2 commanders (arriving on turn 2 from the north east).

Parliament:

  • Centre Command - 2 x Infantry plus overall commander
  • Reserve - 1 x Infantry arriving on turn 6 from the south east.
  • Artillery Command - 1 x Artillery
  • Left Wing Command - 3 x Cavalry plus commander
  • Right Wing Command - 3 Cavalry plus commander

Tabletop Setup and Objective

The Royalist infantry has positioned their centre command infantry in front of Acton village, with a secondary reserve of infantry stationed behind them. Their two artillery units deployed at either end of their centre. Parliament has stationed their infantry in the centre, formed in two lines, with their cavalry evenly distributed on both wings. Their artillery is positioned to the right of their centre.

The initial deployment.

Parliament forces are aware of possible Royalist cavalry appearing on their left flank and will be pressing home their numerical advantage as quickly as possible, with the objective of securing Acton village before the Royalist cavalry can intervene.

Both armies will receive addition units during the game.

The Royalist cavalry will arrive on turn 2 and will have to move north of a marshy area before being able to join their infantry defending Acton. While Parliamentarian forces will receive support from the south east with a unit of infantry on turn 6.

Opening Game

Parliament advance their right-wing cavalry with the aim to outflank the Royalist infantry, simultaneously bombarding them with their artillery. The Royalist infantry maintain their defensive positions, retaliating with artillery fire as they anticipate the arrival of their cavalry.

The Royalist cavalry arrived, having discovered an alternative river crossing, and posed a significant threat to Parliament's left flank. Parliamentarian cavalry from the left wing, reinforced by infantry, were positioned to counter the threat. Parliament’s defensive response to the cavalry resulted in delays in advancing their infantry centre toward Acton to support their right flank cavalry, which had initiated an assault on the Royalist infantry.

The left flank cavalry be seen advancing while artillery fire is exchanged.

Royalist cavalry arrive.

Parliament’s cavalry continue their outflanking move.

Parliament’s cavalry come under fire from Royalist artillery as they slowly turn in readiness to charging.

The cavalry begin their charge as the Royalist reserve infantry are moved to face them.

Parliament’s centre is yet to advance as the attention has been directed to the charging Royalist cavalry is the distance.

Middle Game

The cavalry stationed on Parliament's left flank were proving their mettle in clashes against the Royalist cavalry. Both cavalry forces engaged in repeated charges, each trying to gain the advantage. Meanwhile, the defenders of Acton village were standing resolute against the flank attack by Parliamentarian cavalry,  while watching the steady advance of the enemy infantry in the centre and along the road from Nantwich.

Support from Nantwich arrives for Parliament.

Royalist cavalry try and force their way through.

End Game

The Royalist defenders of Acton village soon found themselves pressed as Parliament's infantry centre launched their assault. Despite initial setbacks, the Royalist cavalry eventually routed the Parliamentarian cavalry and found themselves facing a line of infantry. With the Royalist cavalry effectively delayed further by the infantry, Parliament's cavalry and infantry were able to rout the defenders of Acton, securing the village. They were soon reinforced by the arrival of additional infantry from Nantwich.

The assault on Acton underway by both Parliament’s infantry and their cavalry.

Royalist cavalry prepare to charge Parliament’s infantry. In the background the assault on Acton is underway.

Acton village is secured as the Royalist defenders are routed.

Summary

The game was played out over 12 game turns and the outcome mirrors history with a Parliamentarian victory. The Royalists face an uphill battle to secure victory, relying on the swift breakthrough with their cavalry or having the Parliamentarian player fail to balance their forces effectively between attacking Acton village and delaying the Royalist cavalry.

Regarding the rules, the army organisation approach worked for the scenario. I did overlook assigning a Parliamentarian commander to the reserve infantry arriving on turn 6, but this mistake did not impact the game's outcome. The rule limiting the moving commands or conducting artillery bombardment, presented the attacking Parliamentarian player with choices, having to decide between defending their left flank against the Royalist cavalry's flank attack or pushing forward the centre infantry to offer timely reinforcement for the right flank cavalry's assault.

Sunday 5 May 2024

Still meddling with English Civil War rules

My English Civil War themed posts continue, hopefully I am not boring with these posts as I gradually muddle and stumble my way through the large battle ECW rules one bit at a time. This weekend, my focus has shifted to the game’s combat mechanics, and I've also begun looking at including victory points to determine the game’s winner. Part of this idea behind victory points is to encourage cavalry units to charge off the enemy’s side of the tabletop after they have defeated their opposition, which they had a tendency to do so until later in the war.


A game in progress testing the rules.

So where did I end up with the combat mechanisms? Firstly, I pulled out artillery bombardment into a separate section from all other combat as it uses a different mechanism. 


Draft - Artillery rules


Artillery are not very effective but can be a nuisance and prompt an enemy to act.


Secondly, I went with an opposing dice mechanism for all other combat. There were a a few of reasons behind this approach. These were to avoid the first strike situation particularly with the IGOUGO sequence of play I am using and to simplify combat by combining both musketry and melee. Given this game is geared towards the larger battle and the effective distance for musketry was between 80 to 100 yards a combat distance of 3” seemed suitable. With charge of pike, units would charge and once exhausted retire a short distance still within musket range. They did not remain continuously locked in combat.


Draft - Combat Rules.

A couple of combat examples…


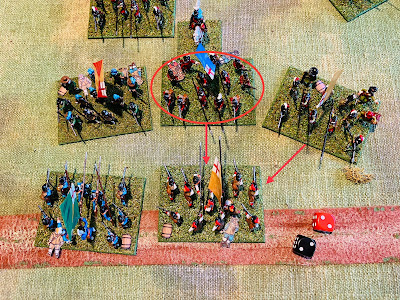
Infantry attack. The primary unit does not benefit from an attached commander as they only help with defence. However, they will add to their red D6 roll, 1 for muskets (they still have ammunition) and 1 for a supporting unit. The attackers (red) have a score of 4 vs. 2 for the defenders (black) who will now take 1 hit.


Cavalry Attack. The primary cavalry unit will add 3 to their score. 1 for being cavalry, 1 for an attached commander in an attack, and 1 for support from dragoons. Dragoons are very useful for providing support on the flanks.


Initially, I used a rule from Neil Thomas’s Introduction to Wargaming, where a unit exiting over the enemy tabletop edge would be eliminated and also two enemy units would be eliminated. This penalty can be quite severe. So I have opted to try a victory points approach instead. I still want to encourage, and reward, advancing cavalry units off the tabletop once their foe’s have been routed. The battle ends, when one side has been reduced to less than half of their starting units. Then each player calculates their victory points. Point are awarded as follows:

  • 1 point for each routed enemy unit.
  • 2 points for each cavalry unit exiting the enemy’s side of the tabletop.
  • 2 points for each enemy commander lost in action.
  • 5 points if the enemy units are reduced by half, including any enemy cavalry exiting the tabletop.
I am still working through what the points value as I play a few more games. I am hopeful to finalise other areas of the rules soon.

Wednesday 1 May 2024

Continuing with an English Civil War wargaming theme

Currently, the focus of my wargaming activities are very much on the English Civil War. I'm still messing around and tweaking a set of rules to suit larger battles, while making changes I have been revisiting the book "Edgehill - The Kineton Fight 1642" for ideas and reference on how the armies fought, and finally one more infantry unit left the painting table.


A recently painted base of infantry, a mix of Hinchliffe and MiniFig miniatures.

Currently re-reading

The bulk of my time has been testing out rule changes. Initially, I started tweaking my existing homemade ruleset, but as the rules evolved more and more towards larger battles I have been influenced by the SPI ‘s board-game “Musket and Pike” a Thirty Years War Quad Game. This pretty much confirmed the approach of using of single bases in the games, previously I used two bases for a unit.


Some other rule mechanisms which seem to be working in the test games are:

Variable Hits

Adjusting the number of hits a unit can sustain to 1, 2, or 3 based on the unit type before being routed. For example: dragoons are routed after a second hit, whereas infantry and cavalry rout after a third hit. However, certain circumstances allow units to withstand more hits before being routed. Such as dragoons in cover or supported infantry. This can mean a dragoons can get committed to defending once engaged, with no option for retreat if they surpass their standard hit limit. Similarly, infantry that become unsupported with 4 hits will immediately rout. With these changes the combat mechanisms are simpler and no longer have adjustments for cover as it is addressed in the unit’s hit limit. 


Example of infantry support - An infantry unit on the right is able to take an additional hit (3 hits) because there are 2 friendly units within 3 inches.

Example of cover - Dragoons in cover can take an additional hit before being routed. Normally they would be routed on thanking their second hit.

Reduced Shooting Range

Reducing shooting ranges to 6 inches has proven effective. The range reduced from 12 inches means units are moving closer for combat allowing for more manoeuvrability for cavalry on the flanks on my 6 by 4-foot tabletop.

How to Win

Unless playing a scenario with victory conditions. Victory is achieved whenever one army’s infantry and cavalry units combined number is less than half of its original strength. The dragoons and artillery are not included in the count. 


Exiting the tabletop - For every cavalry unit exiting the tabletop on the enemy side, the enemy immediately withdraws two of their units closest to the cavalry unit’s exit point. All 3 units are counted as lost. The average cavalry commander of this age having defeated his opposing cavalry would pursue his foes, attempt to capture the enemy baggage and prevent reinforcements.

Combat

I'm still experimenting with the rule combat mechanisms and haven't settled on one yet. The current approach involves opposing dice rolls a method I have rarely used.


The closing turns of a game.