Tuesday 29 December 2020

Cardboard Toy Soldiers

I have had the rules "Men Who Would be Kings" by Daniel Mersey for a while now and with the intention of doing some colonial wargaming. Apart from other projects, one thing that was holding me back was which colonial area to cover? Should it be Zulus, Dervishes, Northwest Frontier, etc. In the end I settled on North Africa and the French, and in particular those activities of the French Foreign Legion. I suspect in the back of my mind was the idea of recreating those old Beau Geste style Hollywood films.

The next question was what figures to use. I did notice there were some ranges in 1/72 plastic which were reasonably priced, but I was thinking the larger figures, possibly 1/32 scale would be fun. I don't have any 1/32 scale figures for wargaming, and I really enjoy a number of blogs which show the larger traditional old style figures, and often cast the figures themselves. Not that I want to get into home casting, but I do like the idea of making my own figures somehow. Particularly figures looking like the old toy soldiers.

Over the last couple of years I have been creating Paper soldier armies from Peter Dennis' books, these include: Jacobite armies, Norman and Saxon armies, and most recently War of the Spanish Succession armies. I have become quite fond of the paper armies which are flat figures. So the question was how could I create some flats with a traditional toy soldier look.

To get some inspiration I looked through "The Collectors Guide to Toy Soldiers" which was a present from many years ago. It has lots of nice pictures mainly of Britains figures, but near the front there are some wonderful pictures of simple flats produced in France and Germany which got me thinking. Could I create something from cardboard?

The source of possible inspiration

A few  prototype figures were created and some discarded before I came up with the following approach. In the back of my mind was always the question - is this a quick and easily repeatable process? As whatever I make I will be doing a hundred or more times over to produce a wargaming army.

Lots of inspiration was found in the pages

The first step to assist with building a prototype was to take a few photos of a figure I want to use as a model and load it into Google Slides (or PowerPoint would work) to resize, duplicate and flip the image. The required figure was then cut out and stuck to card (note - 600 GSM weighted card was found to be best so far, but more on that later). This included the arms which are also cut out from a separate image and stuck on card.

The body and arms cut out and stuck to the card.

The body is stuck again to card to get double thickness. A glue-stick is used for gluing at this point. Later PVA all purpose glue is used.

Once the body was cut out it was stuck again to the card and cut around. This aim of this was to create more stiffness, and it is easier to cut out two thinner pieces are card and stick them together than cut out one thicker piece of card.

Once the thickened body was cut out the single thickness arms are stuck on and the figure attacked to a stand. The stand again is made from card with the figure stuck between two bits of card to provide stability.

The arms are stuck on and the figure based

Once all dry the figure is given a couple of coats of PVA glue and a final grey undercoat.

Once made the figure has two generous coats of PVA glue and an undercoat of grey acrylic paint (from the hardware store) 

The figure is then ready for painting. I am sticking with the toy soldier look when it comes to painting, but do use a little bit of shading on the legs and highlighting on the dark jacket. Anyway, here are the second and third prototypes. (We don't talk about the first prototype, no salvage opportunities there.)

3rd prototype on the left and 2nd prototype figure on the right.

Looking head-on at the figure
The figure ended up being just over 2 inches or close to 54mm tall

Next up I am going to try just one sheet of card for the body as this will simplify the making of these figures, and then create a figure using tracing paper with just the outline and key parts of the uniform to help with painting, almost a paint by numbers approach.

The figures have a very toy-like appearance that I quite like the look of. I will be progressing with this as a background project.

If you are wondering about the Ancients project, it is still on the go. All the Roman forces have been washed and are now ready to start painting.

Roman figures getting a wash and soak.


Friday 25 December 2020

WW2 Western Desert campaign rules and turn 10 begins

There have been a few changes to the WW2 Western Desert campaign rules as the campaign has progressed. In some cases I over complicated things and adjusted them after a turn or two. So I am posting them here in their current state. The campaign has been running on and off now since March 2020 and I have played 22 games over 9 campaign turns. 

A game in progress

A quick reminder of the objective of this campaign which was to:

  • Provide a narrative for a series of tabletop games using my 1/300 Heroics and Ros models. 
  • The campaign needed to be easy to set aside for a while and return to pick up where I had left it. 

The tabletop games are played on a hex grid using a variant of "Tank on Tank" boardgame rules. I will be posting the updates to these rules in a later post as these to have been adjusted as the campaign progressed.

A linear campaign approach was used and I used the KISS Rommel campaign rules to get inspiration for the map layout and approach. The question for linear campaigns is always how many steps to have in the campaign? I decided on 9 zones and a map was drawn.

WW2 Western Desert Campaign Map

Each side has five counters representing their forces grouped at a divisional level. This is where there is unfortunately one bit of paperwork to track just the number of losses and recovery throughout the campaign. At the start of a turn one both players line up their counters on the board face down. The campaign begins with Allied and Axis forces positioned at Tobruk, the centre point of the linear campaign.

Each campaign turn represents 1 month. During each month’s turn players receive an unpredictable flow of supplies determined by a D6 dice. Players are then able to direct their supplies (D6 pips) on the following:

  • 3 pips - Re-equipment a division back to their original strength.
  • 1 pips - A unit can prepare defense positions (I allow upto 6 hexes worth of mines and 3 units in improved positions)
  • 1 pip - Increased reconnaissance activities to reveal up to a maximum of two enemy divisions before an attack.
  • 1 pip - Interdiction of enemy units to remove a maximum of one enemy division from the attack or defensive line.
  • 1 pip - Air support for a division.
Supplies cannot be carried over to following turns.

Sequence of campaign play

Determine who is the attacking player. The attacking player is the player who won the most games in the previous turn. (For the first campaign turn flip a coin to determine who is the attacking player.)

  1. Dice for supplies to reequip divisions, interdict enemy movements, provide air support, interdict enemy movements, or add defences.
  2. The defending player notes which divisions will benefit from defences.
  3. If the defending play has available interdiction they indicate which of the hidden attacking divisions cannot participate in the attacks.
  4. The attacking player now flips over their division’s counters and indicates which divisions will benefit from air support.
  5. The attacker selects the first division to make an attack and the defending division counter opposite is turned over. The game is moved to the tabletop.
  6. The attacker selects the second division to make an attack and the defending division counter opposite is turned over. The game is now moved to the tabletop.
  7. If the attacker has lost the two previous engagements the attacks are called off. Otherwise they select the third division to make an attack and the defending division counter opposite is turned over. The game is moved to the tabletop.

After each tabletop game, which represents a key engagement between elements of the two opposing divisions rather than the whole division, the losing division is reduced by 3 units which need to be recorded. A division with multiple losses keeps reducing the number of units they can field until reequipped when they return to their full strength of 15 units. Note, the wear and tear of desert conditions comes into the set up the tabletop games where between 1 and 3 units cannot be fielded.

Up to a maximum of three games can be played during the campaign turn. If the attacker wins two games they advance one zone on the campaign map the loser retires one zone. If the attacker wins all three games they advance two zones on the campaign map the loser retires two zones. 

If a defender wins two games the attack is called off and neither side moves on the campaign map, and the defender will become the attacker in the next campaign turn.

The rules for transferring a game to the tabletop will be posted with the next game report. First though here is a recap of the current campaign status as turn 10 begins.

Situation after turn 9 and starting turn 10...

After turn 9 which saw a minor Axis victory (2-1) the Allies have retired to take up defensive lines at Mersa Matruh. Both armies are suffering from losses, some carried over from turn 8, and they will be hoping for sufficient supplies to help reequip at least one of their divisions.

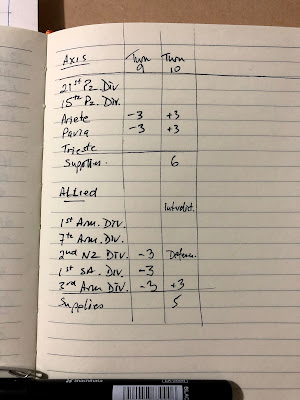
An Axis convoy had recently arrived and they were able to reequip two of their weakened Italian divisions (Ariete and Trieste). Supplies were also reasonably plentiful for the Allies who are in more urgently need with three weakened divisions. One armoured division was reequipped and the remaining supplies went to improving the defences of the weakened 2nd New Zealand infantry division and interdict Axis forces.

Tracking Supplies - Supply situation after turn 9 and resupply undertaken for turn 10. Axis scored 6 to reequip 2 divisions and the Allies scored 5 to reequip 1 division along with beefing up their defences and disrupting the Axis attack with interdiction.

As I am playing this campaign solo all divisional counters began placed face down. Normally I would have the attacking Axis divisions revealed, but I need to remove from the attack one of the divisions due to interdiction.

Divisional counters placed face down

One Axis division is removed from play due to interdiction

The Axis will use their three armoured divisions to try and breakthrough the Allied defences. The 21st Panzer division will be leading the attacks and the defending division is the 7th Armoured. This will now be transferred to the tabletop.

The Axis divisions are revealed and three are chosen for the upcoming attacks

The first attack by the 21st Panzer division will be against the 7th Armoured division. 

The game has begun and will be the next post along with the approach used for determining the tabletop layout and order or battle.

Part of the action to come. The sharpe-eyed may have noticed the Allies now have some Sherman tanks instead of the usual Grant tanks.

Anyway that is all for now as Christmas lunch is in the making...Have a good Christmas.


Sunday 20 December 2020

A scenery mess that turned out better than expected

A few months ago I made some cheap wooden block sci-fi terrain (see here). One item I had not got around to completing was a base board for this terrain. My original idea was to get some MDF board from the hardware store and paint it grey. While shopping with my wife at a material and craft store last week, She was looking for material for her quilting, and I was doing my normal wondering around the store for any wargame terrain opportunities. I came across some grey vinyl and decided that this would be perfect for a wargaming mat. Not only that it was 50% reduced price at $16 per metre. Bonus! I bought 2 metres which will nicely cover my 6x4 foot wargaming table.

The grey vinyl

A close up of the vinyl texture

The vinyl has a texture which I was hoping to highlight with a paint wash. I applied different test washes and a sand coloured wash worked quite well. It was not quite what I had in my mind, but I decided to go with a sand wash and apply a dark grey wash over that. Hoping this would provide some overall colour variances.

A light sand wash applied

The black wash was applied not too well

Unfortunately I was having difficulty applying washes and could not get a good consistent look. I tried another wash, but it was just not working for me and when I look at the overall look it was getting darker and darker. I attempted a light brush of sand to see if I could highlight the texture and lighten the look at the same time. Not good, I only achieved highlighting a brick design from the bricked area I was working on.

At this point I was most disappointed and decided I best somehow retrieve the situation and clean off the layers of washes and messed up highlighting. A sourer was sourced from the kitchen and the clean up began.

The clean up showing the light after effects on the left hand side.

The clean up had two effects. Firstly it got rid of the dark washes back to the original light grey of the vinyl, but it also left the washes in the grooves. Effectively, giving the desired look I was originally trying to achieve. In no time at all I had scrubbed, or is that scoured, the vinyl and had a wargaming mat.

A close up of the effect once cleaned up

The wargaming mat on the tabletop

Any new terrain needs to be tested out and the tabletop was soon filled with all my available sci-fi building scenery to create a space dock of sorts.

Terrain was added

All available terrain was added

A quick game was soon underway


Friday 18 December 2020

Sci-Fi painting and War of the Spanish Succession rules

After deciding to take a short break from my Ancient's painting project to paint some Sci-Fi figures. A couple of figures came off the painting table. They were both test figures as I was trying to workout colour schemes I will use for the remaining figures. 

On the gaming side of the hobby I have been playing some War of the Spanish Succession games in the hope of settling on some rules.

A Plague Space Marine given a rusty look

Necromunda gang member soon to join my skirmish games

The first draft of the WSS rules are below. The combat mechanisms are very much based around those from One-Hour Wargames (Neil Thomas) but the artillery shooting rules are based on ideas from Charge! (Brig. P. Young and Lt.Col. J.P. Lawford). I opted for a different approach for artillery: firstly because I like the mechanism, and secondly it makes artillery shots more unpredictable.

The sequence of play uses playing cards to determine the order of phases in a given turn using ideas from the ruleset “The War of the Spanish Succession - Paperboys Rules”. I really like the way the approach works and it gives a clunky feel to the way a turn progresses, which seems to fit the period where armies were organised but still ponderous in their movements.

I do use Commanders and Generals in the game. These determine if units can move based on command radius, and also to rally units who may be wavering. As Commanders are used to rally troops they cease to have a command radius and your plans can get bogged down.


The Paper Soldiers march on the tabletop

Cards are used to determine the order of phases in a given turn.

Another game underway.

Draft War of the Spanish Succession Rules

Units

The armies can have the following unit types and as a general rule are made up of 8-10 units (excluding Commanders and General)...

Infantry - Line infantry in close order who faced each other at about 60 yards and blazed away until the moral of one side failed and they routed.

Dragoons - Dragoons of this period were often used as second rate cavalry mounted on inferior horses. However, they could dismount to hold and secure key battlefield positions, such as buildings, when required.

Cavalry - Heavy cavalry used on the battlefield to engage and defeat enemy cavalry, then fall upon enemy trains, guns and infantry. A combination of Cavalry and Dragoons should make up a good third to fifty percent of the units in a force.

Artillery - Cannon were generally heavy to move and were static once they took up position on the battlefield. They were used to soften up enemy forces and any strong points.

Commanders - Individual bases representing brigade commanders.

General - Individual bases representing the General.

Sequence of Play

The game is played in a series of turns. During a turn there are a series of phases which players perform in order when their colour playing card is revealed. To prepare take six red and six black playing cards and shuffle the deck. Assign a colour to each side, for example, the French are black and the Alliance are red.

The order in which player’s perform their turn phases is determined by taking cards off the top of the card deck. Each time their colour card is revealed a player performs their next phase in the following order:

1) Artillery Shooting - a player resolves all artillery shooting.

2) Musket Shooting - player resolves all musket shooting.

3) Cavalry and Dragoon moves - a player can move all cavalry or dragoon units within a command range. This includes resoling charges where a unit moves into contact.

4) Infantry moves - a player can move all infantry units within a command range.

5) Artillery moves - a player can move any artillery and mortar units within a command range.

6) Commander/General moves and rallying - a player can move any commander and use them to rally units.

Once a player has performed their phase, take the next card from the top of the pack and a player performs another phase. This continues until both players have performed all their phases in order, then shuffle the card deck and start the next turn.

Movement

Units can be either in column or deployed. Once deployed a unit cannot return to column. Units may move up to the distances listed below during their turn.

Infantry in column = 6”

Infantry deployed = 3”

Cavalry and dragoon in column = 12”

Cavalry and dragoons deployed = 9”

Dismounted dragoons = 0”

Artillery limbered = 6”

Artillery deployed (unlimbered) = 0”

Commanders and General = 12”

Units may only move if within 6” radius of a Commander or 12” radius of a General. If outside of the command radius a unit can still turn to face enemy units.

A unit may make one turn at start or end of their move. When turning units pivot on their central point.

Units once they have changed their formation to deployed cannot move back into column formation again. The change in formation must occur before a unit is moved.

Dragoons are able to dismount after moving and it takes a full move to mount again. Once they dismount, they are considered to be in a deployed formation. Dismounted dragoons cannot move and must remount to move.

Artillery units once unlimbered cannot move for the remainder of the game, but are allowed to turn.

Units may never move through other units.

Only cavalry and mounted dragoons can move (charge) into contact with enemy units.

Only deployed infantry units, artillery units or dismounted dragoons can shoot.

Terrain

Woods - Cannot be entered.

Towns - only Infantry & dismounted dragoons may end a move in a town, unless on a road. Towns provide cover to infantry and dismounted dragoons.

Marsh/Lake - impassable.

Rivers - Can be only crossed via bridges & fords. It takes a full move to cross.

Streams - cannot be crossed by artillery. All other units take a full move to cross.

Fields - Infantry & dismounted dragoons can claim cover.

Hills - all units can move onto hills. Provide benefits to those defending hills against charges, and artillery can fire over units.

Cavalry Charges

Only deployed cavalry and deployed mounted dragoons can charge into combat. Charges are resolved by moving the attacking unit into contact with the target unit with the following restrictions:

  • The attacking unit can only pivot up to 45 degrees before charging.
  • The attacking unit can only attack a single unit.

Combat is one sided with only the attacking unit causing casualties. The attacking unit rolls a D6+2 for cavalry and D6 for dragoons to determine the number of hits, which are modified by the following:

  • Half the score if the target is uphill
  • Double the score attacking the flank or rear of the target unit.

After the hits are applied. If the target unit is not eliminated, the attacking cavalry or dragoon unit must retire 6”.

Artillery Shooting

Only unlimbered (deployed) artillery units are able to shoot. The procedure for shooting is as follows:

  • Check field of fire - units can only shoot at a single unit within 45 degree of their frontal facing side.
  • Check the range - to determine the range roll a D6-1 and multiply by 6”. If the target is in cover, deduct a further 2 from the score. Measure to see if the target can be reached.

Assess hits - roll a D6 to determine the hits.

Artillery can shoot over other units if they are positioned on a hill.

Musket Shooting

Only deployed infantry and dismounted dragoons are able to shoot. The procedure for shooting is as follows:

  • Check field of fire - units can only shoot at a single unit within 45 degree of their frontal facing side. Units in towns have a 360 degree field of fire.
  • Check the range - infantry and dragoons have a range of 9”.
  • Assess hits - infantry roll a D6 to and dragoons roll a D6-2

If the target is in cover halve the number of hits rounding up fractions.

Routs and Rallies

Units are routed and removed from the tabletop after taking 15 or more hits. Units can be rallied and D6 hits removed when a commander is attached.

Generals and Commanders

Commanders are used to order units to move and in the case of Commanders rally units.

To order units to move a Commander must be with 6” radius of the unit and 12" for a General.

Commanders are able to rally units which are wavering by attaching themselves to the unit. Upon joining a unit their number of hits is reduced by the score of a D6. The Commander must remain with the unit for the remainder of the game and cannot order other units, except the one they joined.

Generals are not allowed to rally units.

Commanders and Generals cannot be shot at or charged. If they are in the way, then move then 6" out of the way and towards the rear.


Thursday 10 December 2020

Ancients project

The painting of my Carthaginian units is slowing a bit as the 22nd unit of this army is on the painting table for basing. To change things up I have a Necromunda gang to paint, they were a birthday present from my daughter and have been sitting on the shelf for a while. This will give me a bit of a break before returning to finish the final few Carthaginian units and then start on the Romans.

Some heavy cavalry completed at the weekend.

Some Celtic infantry ready for basing

Next up for building and painting


Saturday 5 December 2020

WW2 Western Desert campaign game turn 9 game 3

The first two games of campaign turn 9 were Axis victories. This third game has elements of the Italian Ariete armoured division launching an attack on an area defended by the South African infantry division. Should Axis forces win this game, they will be able to advance two zones on the campaign map. If the Allies win the game, then Axis forces only be able to advance one zone.

Campaign map

The game is an encounter game with both sides starting with two-thirds of their supporting units in reserve off table. There are three objectives to be taken and held in this game. The Allied plan is to occupy the fort and push their on-table units into the centre and take a holding position while their reserve units push up along the road to take and hold the crossroad objective.

South African infantry order of battle:

  • 1 x carrier unit
  • 1 x a/c unit
  • 1 x 25 pounder artillery unit
  • 1 x 5.5 inch artillery unit
  • 2 x Matilda units
  • 1 x Valentine unit
  • 3 x Infantry units
  • 1 x 6 pounder AT gun unit
  • 1 x 2 pounder portee unit

Ariete armour order of battle:

  • 2 x a/c units
  • 5 x M13/40 tank units
  • 2 x Semovente 75mm unit
  • 3 x Infantry units
  • 1 x AT gun unit
  • 1 x Artillery unit

Both sides will benefit from air support.

Opening positions, objectives and plans of attack.

The battle opening saw the Allies quickly secure the fort and push into the centre to taking up their planned defensive position. Their reserves were slow in deploying and moving down the road. The Italians on the other hand were quicker off the mark and had secured the hills near their starting positions, and also had sped down the road to get a tenuous hold on the crossroads objective.

Allied units quickly secure the fort and push up in the centre. Their supporting reserve is slow in moving up on the road. 

The Italian forces soon had a foothold at the crossroad objective.

The initial engagement around the crossroads quickly escalated with both forces moving all available tanks and units into the engagement. While outnumbered in tanks, the heavy Matilda tanks were proving steadfast and the more numerous M13/40 tanks were whittled down over a period of time. Allied 2-pounder anti-tank portees and infantry were able to push up in support and establish positions around the crossroad objective.

The battle at the crossroads soon escalated with both forces trying to push up reserve units as fast as they could.

The heavy Matilda tanks were proving to be a thorn in the Italian side and the Allies were able to gain control of the crossroads.

Now with few available and working tanks, Italian forces began attacking the Allied centre positions with a combination of armoured cars and infantry. Their air support arrived and soon the Allied centre was back tracking towards the fort. Italian forces were limited and they were not able to carry forward the momentum and the attack which was called off.

Out armoured the Italian tanks were unable to make headway and the attack on the crossroads was called off.

The Italian's redirected their attacks against the Allied centre.

Air support proved very timely in their attacks, but the Italians lacked sufficient units to capitalise on the success of their attacks.

This was an important win for the Allies. Allowing then to retire with some semblance of order as they give up one more zone on the campaign map. 

Allies ended the game holding two of the tree objective and won the game.


Monday 30 November 2020

Making event cards

Over the past few months I have been increasingly using event cards in my games. These cards are also known as chance cards from Donald Featherstone’s Solo Wargaming. I am finding they add a bit of unpredictability and fun to my games. As I generally use rules from One-Hour Wargames, or more commonly variants to these rules, for most of my wargaming. I have adopted the card structure used from One-Hour Wargames (OHW) where event cards are divided into three types of cards:

  • Cards which have no effect on the game
  • Cards which benefit the current player
  • Cards which are detrimental to the current player.

The cards are split into thirds, 5 cards of each type if playing a 15 turn game as in OHW, or as close as possible if playing other games. In my WW2 Western Desert games where the maximum game length is 12 turns, I use 4 of each event type.


The use of event cards in the games is proving most enjoyable

The other aspect I like about using event cards is that you can create card decks for a specific period or even army. The example below is for my ACW games. For some of the cards I have used ideas borrowed from other games, such as the “Sharpshooter” card from the ACW board-game Battlecry.

ACW cards

Where there are specific events in a battle, such as weather changes or the arrival of reserves. I make up one or two cards for the event and add them to the army’s cards replacing a No Effect card,. For example, to increase the likelihood of a sandstorm occring earlier in a game with my WW2 Western Desert games, two sandstorm cards are added one for each army’s card deck. The first sandstorm card drawn takes effect and the second is ignored, unless you want two sandstorms. 

A similar approach could apply in horse and musket games with rain. Rain comes into effect with the first rain card drawn reducing the effectiveness of shooting. The rain ceases when the second card is drawn. I use this approach with some of my Jacobite games when the weather is deemed as changeable for a battle.

Another fun thing I have been doing for some of the card decks is to name events for a particular army theme (example Space Marine army cards below). This theming also goes as far as including more of certain events to reflect the nature of an army. For example, with a Space Marine army I may reduce the no effect cards by one and add an additional move and shoot to reflect their veteran status. 

(Note - I am currently messing around with OHW sci-fi variant for the umpteenth time and trying to have standard rules for all armies and use the event cards to distinguish between styles of armies)

Space Marine themed cards

For a Warhammer 40000 Necron army (slow moving robots that regenerate) I have replaced one or more move and shoot cards with a regenerate card.

Necron themed cards

Anyway, my next post is a WW2 Western Desert game report. If I write it here it increases the likelihood of me getting around to do it.