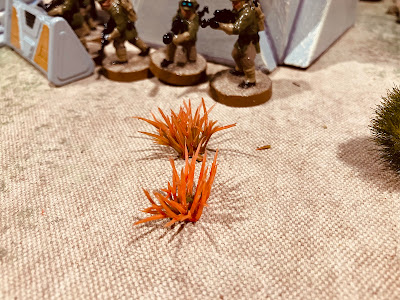
Showing posts with label Terrain. Show all posts

Friday, 29 August 2025

English Civil War fortified town ready for a siege game

My original plan was to make and paint a simple backdrop of a fortified town, with a couple of earthwork bastions placed in front for another English Civil War siege game. However, after trying out a few options with the two foam earthwork bastions I have made over the past few weeks (see here for details) and looking at the illustrations in "English Civil War Fortifications 1642–51", I decided to use all the bastions and my woodblock houses to make a more substantial looking fortified town.

A fortified English Civil War town.

The first step was to determine what additional ramparts I needed. I set up the town layout, positioned the earthwork bastions around it, and then measured and cut foam ramparts to connect them and create a wall for a gate. The upholstery foam was cut with a sharp carving knife, then shaped with scissors. very much the same steps as with making the earthwork bastions.

The shaping process can get to be a messy business with lots of small bits of foam which seem to stick everywhere. I used masking tape to help collect and pickup the bits of foam. 

Working out the size of ramparts to connect the bastions.

A messy business cutting the foam.

Masking tape used to collect up the mess.

Easily picks up the bits.

Once the foam was cut and shaped, I painted it with a couple of brown washes, followed by touches of green. While the paint is still wet, and it takes a long while to dry, the colours can be blended with a clean brush to achieve the desired look.

For the gate, I used some MDF scraps to build a three-sided arch that fits neatly over the foam rampart. It was quickly painted brown and lines added to suggest wooden planks.

The painted ramparts.

The gate is made to slot over the wall.

Gate simply painted painted in brown and lines added to suggest wooden planks

The gate slots over the wall.

A close view at ground level.

The completed fortified town.

All is now ready for my next siege game.

The defenders man the walls.

Sunday, 24 August 2025

A second earthworks fort and some ECW painting

This past week and weekend, I managed to make another earthworks fort and paint up some English Civil War infantry that had been sitting around primed for a couple of months. I also painted a General Fairfax figure that had been lying around and hiding in the remaining ECW lead pile.

Another earthworks is added.

The earthworks are made from upholsterer’s foam and coloured with watered down paint. Cocktail sticks are painted and pushed into the foam for storm poles. (see my previous post on the steps to making a foam fort.)

The new earthworks will be a useful addition for an upcoming siege game. My next step in preparing for the game is to draw and paint a backdrop of a fortified town. The backdrop I currently have looks more 18th Century than 17th Century. I have just finished reading English Civil War Fortifications 1642–51 by Peter Harrington, which is filled with lots of illustrations that will provide plenty of inspiration for the backdrop.

General Fairfax - a Hinchliffe model.

Latest infantry painted. These models are mainly Minifigs, but the officer and drummer are Hinchliffe.

I also managed to paint some farm animals this week for the siege game. I picked them up while browsing the local hobby shop. They will be used in a game before the siege, if the defenders can escort the animals safely across the tabletop, it will improve their chances of withstanding the siege.

Farm animals added for supplies.

A recent pick up from the local hobby shop by Warlord Games

In the meantime, both earthworks will see action in a game this week using the “One-Hour Wargames” Scenario 15 - Fortified Defence.

The tabletop is set up for the OHW scenario 15 - Fortified Defence.

Sunday, 17 August 2025

Making some English Civil War fortifications

Continuing the siege theme from my last two posts, this afternoon I decided to make some quick English earthworks using upholstery foam. These will be useful for playing out some smaller siege actions set during the English Civil War. I have purchased the ebook “English Civil War fortifications 1642–51” from Osprey for ideas and some inspiration.

The completed earthworks.

Current reading.

The steps used to create the earthwork...


1) The foam is measured up using a couple of bases.

2) The foam is cut out and the ramparts shaped.

3) The foam is cut in half and an area removed to create the parapet of the earthworks.

4) Scissors are used to help shape the ramparts and cut little divots to make the ramparts a bit uneven.

5) A brown wash is liberally applied to the shaped foam.

6) Additional colours are added.

7) Dark brown dashes of paint are used to give the impression of wood supports on the parapet.

8) Painted toothpicks are pushed into the foam to create the spikes.

By having the earthworks cut in half, they can be placed along the table edge as part of a larger defensive position, or set up as a small standalone fortification. 

Set up as a fortified position.

After looking over the photos and seeing how they dried, the earthworks appear a little lighter than I intended, so tomorrow I will be applying another brown wash to darken them down and give them a more earthy look.

Saturday, 28 June 2025

Finding a use for stuff in my wargaming stash

One of the benefits of packing up and moving house is I now have a much better sense of all my wargaming stuff, having late last year packed and then unpacked everything. This is especially true for items that I had stashed away a good while ago with the thought, "This might be useful someday," or "It would be a shame to throw this out." As it turns out, I found a use for two such items this week to add to my Star Wars project.

The first item was a piece of plastic foliage, an orange thistle-like plant, that I would have picked up from a local craft store. I often find myself browsing for items that may be useful terrain while my wife shops for fabric for her quilting hobby. I find many of these plastic plants can be pulled apart, with individual pieces repurposed as wargaming scenery. In this case, the orange thistle consisted of clusters of plastic spikes attached to a central ball. I peeled them off, and they turned out to be perfect for creating colourful alien plants. They stand reasonably well on their own, but I plan to hot-glue them to washers for added stability.

A tabletop with the new orange alien plants.

A closer look.
This is the type of plant. I had pulled all the spikes off all the plants and did not take a photograph.

The second item was a crashed sci-fi plane from an old Games Workshop starter set that featured Tyranids and Space Marines. I had picked up two of those sets back in the mid-2000’s, but the second plane never made it to the painting table. Now it has finally been prepared and painted for some scatter terrain.

A old Games Workshop crashed plane added to the Star Wars terrain.

In addition to the alien plants and the crashed plane, I also managed to complete another building and some scatter terrain pieces, which can be used either as sewer covers or rooftop vents. The sewer covers will be used in ambush-style scenarios, where units can emerge from underground tunnels to strike behind enemy lines. The sewer covers were found at the hardware store in the plumbing section. I have no idea what they should be used for.

New building and sewer covers.

The sewer covers can also be used as vents on a building.

And finally, on the gaming front, I have been trying to adapt the Squad Hammer Core rules to work on a 6-inch square grid. The goal is to make it easier to run a remote game. A gridded board simplifies movement compared to freeform movement. In the picture below I use the new repurposed orange plants to mark out the corners of each square.

A test game of Squad Hammer Core using a 6-inch square grid.

It has been a rather productive week for wargaming, helped along by some wet weather that kept me indoors and away from outdoor chores.

Saturday, 14 June 2025

Finishing the Sci-Fi buildings and some foam hills

I have finished making all the terrain I currently need for my Star Wars project, which included one final building and a few hills. For the hills, I decided to try using upholstery foam. It is dense enough to support the weight of the models without any sagging. I have used foam for hills before, but that was for my smaller scale 6mm WWII armies (see here).

A completed foam hill with Rebels taking up position.

The upholstery foam I purchased for $30 was much thicker than needed at 100mm (almost 4 inches). So the first step was to slice it in half, bringing the height down to a more suitable 50mm which will work well with the 35mm Star Wars Legion figures. I did this using a sharp kitchen knife. After the hills were cut out, I then shaped them with scissors. In all I made two smaller hills and one larger one.

After shaping all three hills, they were all given an initial coat of watered-down sand-coloured paint. While the paint was still wet I added a darker sand colour around the sides, followed by a purple-brown wash at the base. Doing this while the paint I still wet allows the colours to be blended. The hills were left to dry in a warm spot for around 24 hours. It takes the foam takes a very long time to dry out thoroughly. Once fully dry, I finished them off by dry-brushing them with a light sand colour.
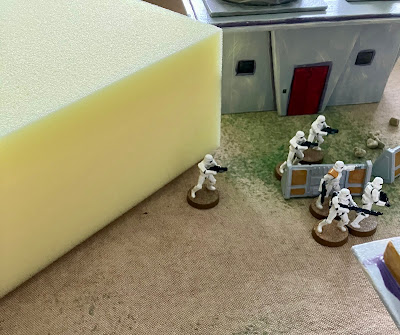
The 100mm upholstery foam, far too high to be used as a hill for the Star Wars Legion miniatures which stand 35mm high.

The foam is cut to size, then sliced in half using a sharp kitchen knife.

Preparing for shaping the hill.

The hills are shaped with scissors.

The hills are painted a sand colour using watered down paint.

The hill sides are painted with a dark sand colour and the bottom the hill a purple-brown colour. Once dry they are dry-brushed with a light sand colour.

The large hill being defended by Empire forces.

The final building for this project is now made and painted. I generally try to finish all the buildings in one go, or at least over a few painting sessions, as this helps with giving the buildings a consistent look. I have found that coming back later to add more buildings often results in slight variations in style or colour choices as I always seem to forget one step or colour that I originally used.

All the buildings have flat roofs, allowing me to swap in different rooftop features using the scatter terrain made from old down-lights, parts off an old lamp, and leftover piping from our house renovations.

The final building is completed.

All the buildings and scatter terrain.

The flat building roofs allow the features to be swapped and provide a different look.

I found a cheap Empire TIE Fighter online. While it is 1/72 scale, smaller than the Star Wars Legion figures, which are closer to 1/48 scale, that does not really matter. I generally prefer to use slightly scaled-down aircraft, as they look better on the tabletop because they do not overwhelm the other miniatures.

A recent purchase of a Star Wars TIE fighter.

And finally, I am starting to get a few more games played. I have been using and modifying scenarios from the One-Hour Wargames book. 

All this terrain modelling and painting has meant I have not been able to write up a battle report this week as I had hoped.

A game underway.