Sunday 29 September 2019

ECW Campaign - Battle of Brinklow Bridge

Game 22 of the English Civil War campaign has a Royalist force marching into the West Midlands and finding a blocking Parliamentarian force near the small market town of Brinklow.

Troops deployed ready for the game at Brinklow Bridge, May 1645
One thing I forgot to do for preparing this game was draw the campaign cards which add a bit of chance into an individual game, or sometime a series of games. I will have to make sure they are drawn for the next game, and will possibly be drawing two cards per side rather than one to make up for this oversight.

Deployment positions
The order of battle (see photo above) was decided in the normal manner using a D3 dice:

  • Foot (combined musket and pike) = D3+2
  • Horse  D3+2
  • Dragoon (or commanded shot) = D3
  • Guns or special units = D3-1
Special units are Lobsters for Parliament and Elite Pike for Royalist.

Parliament were going to take up a defensive posture in this game as they had fewer units, nine versus twelve units in the Royalist force. They planned to hold fast behind the stream with their Foot, which while being fordable provided them with a good defensive position when it came to push-of-pike.

A quick note on deployment rules:
  1. Defenders place half their units (rounding up fractions)
  2. Attackers place all their units
  3. Remaining defending units are placed.
Battle of Brinklow Bridge - May 1645

With Parliamentarian forces taking up defensive positions behind the stream, The Royalist commander pushed up his line of Foot and Gun, very quickly both sides were soon engaged in an exchange of Musketry. Parliament's Foot units loosed off some very effective volleys and as a consequence were soon out of ammunition. While Royalist Foot units maintained a slow and steady rate of fire supported by their gun.

Royalist advance and musketry is exchanged
This was not the desired situation for the Parliamentarian commander, who berated his officers for their lack of control. He could only watch as his Foot unit's cohesion levels were being whittled away by steady musketry. They would soon be poorly placed to withstand a push-of-pike contest, even with  using the stream as a defensive advantage. To rectify the situation and to use his slight advantage in Horse, he sent orders to both wings of Horse to advance.


The Royalist commander seeing the threat of Parliamentarian Horse on his right flank ordered a unit of Horse across to counter the move and bolster the Dragoons on the right. Other than that the morning had been going better than expected for him. The loss of a Foot unit, while concerning, had not perturbed him as Parliamentarian musketry had dwindled and was becoming increasingly sporadic.
Parliament's Horse can be seen in the foreground and in the distance attacking
At midday Parliament's Horse units crossed the stream and launched themselves into the Royalist flank units. With a slight advantage in Horse on the left they soon had nullified the Royalist Dragoons who were proving to be exceptionally accurate shots, and on the right flank the news would prove even more favourable as they routed the Royalist Horse. However, these successes were late in the battle and the damage from Royalist muskets had been done. Parliament's Foot units in the centre with no knowledge of their Horse units success and in the fog of war finally gave up and left the field. 

Game moves
A victory to the Royalists, and quite a crucial one which tightens their squeeze on Parliament and the regions around London.

The campaign map after the battle


Friday 27 September 2019

Continuing the ECW Campaign

It seems to have been quite a while since I paused my English Civil War campaign. A check back on my posts shows it is three months since the last campaign game was played. To restart the campaign a quick recap is necessary, mostly to remind myself where it ended.

The last campaign move was in the autumn of 1644 with Parliament marching on the East Midlands and after successfully defeating the opposing Royalist force at the Battle of Barton Hall, September 1644, took control of the region.

Last moves of 1644
The campaign to date has been fought in two phases. The first phase had Parliament and Royalist forces fighting over each region trying to get control in 1643. The second phase has marching armies trying to add to the areas control. The campaign rules for the current phase can be found here.

The situation at the beginning of 1644
The resumption of the campaign begins in 1645. Royalist forces are able to make the first move on the West Midlands. They rolled a 3 plus 8 for controlled regions scoring 11. While Parliament rolled 5 plus 5 for controlled regions scoring 10.

The first battle will take place in May 1645 near the small market town of Brinklow.

Royalist move on the West Midlands
The terrain cards were used to determine the tabletop layout. However, there was a slight twist this time with some clever ideas from Steven's Balagan blog for allowing players to switch cards and how to deal with streams and rivers. The terrain cards and mechanisms are very nicely laid out and written up on Steven's blog.

The terrain cards were shuffled and laid out. The defenders selected a side and then rather than switching a card, they chose to rotate the stream to run across the tabletop. The attachers with limited choice of cards, all woods, opted to rotate the lefthand woods to limit the views from the hill.

Terrain cards laid for a 6x4 foot tabletop. Attackers and defenders make one card adjustment.
Final terrain setup
All ready for the tabletop to be setup. I must say I am looking forward to a few ECW games. The games will be using a square grid for play, continuing on from the last campaign game where I switched from free movement to a grid.

Saturday 21 September 2019

AWI Cavalry and Dragoon units

I have a reasonable collection of Peter Laing 15mm American War or Independence (AWI) miniatures. I brought them way back in the late 1970's shortly after I started work. I started painting them, but never completed the painting until I dug them out of their boxes in 2015, and finished off what I have started some 35 years earlier.

The figures in action
Most games only have 8-12 units per side so the existing armies are quite sufficient for all units types except cavalry/dragoons
Generally I have sufficient miniatures for infantry and artillery, but I am a bit light on for cavalry, with both sides only having one cavalry/dragoon unit. Each unit with a mere 5 figures. Ideally I would like to have some more cavalry so I can play all of the scenarios in the books "Seven Steps to Freedom" and "Wargamer's Handbook of the American War of Independence".

Two enjoyable war-game related books covering the period
British Units
American Units
As Peter Laing miniatures are no longer manufactured, secondhand miniatures are the only option and are unfortunately a bit of a rarity to obtain on eBay. The alternative was then to purchase some other 15mm AWI. One of the problems with other manufactures is the level of detail they have compared with Peter Laing miniatures which are of their time and are much simpler figures.

A question to the MeWe Peter Laing group of other wargamers and collectors of Peter Laing figures regarding possible alternatives helped determine my next steps. They are a helpful group and I soon discovered some of the original miniature ranges were intended to be ‘N’ gauge and are smaller 15mm. Later rangers were truer 15mm miniatures. So with that in mind I began looking at 12mm miniature producers. In the end I settled on 10mm AWI Range from Pendraken Miniatures hoping that most miniatures are a fraction larger than their stated 10mm size.

A couple of weeks ago the figures arrived. In the parcel with the cavalry were some wagons along and a couple of mortars and crew which I had also selected. Comparing the cavalry showed the miniatures to be a fraction smaller, but overall the proportions looked similar. The slight difference in height would be disguised during basing with the addition of 1mm card to the figure's base.

A comparison of cavalry miniatures. Peter Laing 15mm cavalry are painted and the unpainted are Pendraken 10mm cavalry. This shows how the Peter Laing ranges started as being undersized.
The Pendraken mortar will be a nice addition.
A comparison of artillery crew shows the difference. Fortunately I have just enough  spare AWI artillery crew to  man the two mortar units.
The artillery pieces and wagons will work out fine, but I will use my last few Peter Laing artillery crew to man the mortars. The 10mm Pendraken crew are just too smaller scale to be used. All in all a good outcome as I will add two cavalry units to both armies, a couple of mortars with neutral painted crew so they can be used by either army, and a couple of wagons.

Peter Laing miniatures on the left front unit. I chose not to mix the figures and the original cavalry will remain.
A side on comparison. Peter Laing cavalry unit at the front.
Over the next week I will be getting back to my English Civil War campaign which has been paused now for a couple of months.

Wednesday 18 September 2019

1066 Paper Soldier wargames and Books

It was time for a change of period after playing through quite a few WW2 games as part of a campaign. So out came the 1066 paper soldier armies for some quick games using Lion Rampant rules, while I try and decide what the next campaign will be.

Norman inafantry and Breton cavalry look across at the Saxon army in the distance
Start of the game
Game in progress
Last week a couple of secondhand book purchases arrived. The book I was after was "War-game Through the Ages Vol. 3 1792-1859" to get the series and "A Wargamer's Guide to The Desert War 1940-1943" was an impulse buy as it was at a reduced price.

Purchases
The series of books now complete
I have started reading The Desert War guide which has chapters covering:

  • The Desert War - 13 pages
  • Armies, Organisation, and Equipment - 19 pages
  • Wargaming the Campaign - 36 pages
  • Choosing Your Rules - 19 pages
  • Choosing Your Models - 11 pages
  • Scenarios - 11 pages
So far I have found it an easy ready with the chapters providing a good and straightforward summary of their topics.


Sunday 15 September 2019

WW2 rules used in recent campaign

During the WW2 mini campaign I used the following rules to play out the actions on the tabletop. They are very much based upon the WW2 rules from "One-Hour War-games" by Neil Thomas. No surprise there, as this book got me back into historical wargaming with its pared down rule systems and small tabletop needs. However, they do use a different activation mechanism with movement and shooting having very similar rule mechanisms.

The rules started out as a series of notes which have finally been written up and is a first draft, and will no doubt include the usual typos and spelling errors. I am not a good proofreader and my eyes are starting to glaze over.

The choice of these simple rules were so the tabletop action, or actions in some cases, could be played quickly in an evening or weekend. This way the campaign would not get bogged down with the resulting loss of interest on my part.

Units

Each player’s army has a selection of units representing platoon and troop size units. Each unit has two bases which must remain within 1” of each other during the game. Base sizes do not matter in this game providing there is a level of consistency.

All units have an assigned class which is used when determining shooting results.

Infantry types:
  • Infantry units
  • Armoured infantry after 1 base loss

Gun types:
  • Mortars
  • AT Guns
  • Artillery

Armoured types:
  • Armoured Infantry
  • Armoured Cars
  • Tank
  • Self-Propelled AT Gun/Tank Destroyer

An armoured infantry unit with two bases. The unit is treated as armoured until the first base is lost, then the half-track base is removed and the remaining base operates as infantry.
AT gun unit with a transport base and gun base. Only the AT gun base can shoot. Hits are taken against the transport unit which when removed will reduce movement to 6".
Mo rtar unit with a transport base and mortar base. Only the mortar base can shoot. Hits are taken against the transport unit which when removed will reduce movement to 6".

Sequence of Play

Using a shuffled set of playing cards deal a card for each unit, placing the card face up beside each unit.

Units are then activated from the highest value card to the lowest. When activated a unit can move or shoot.

Off-table artillery and air support can only shoot when receiving a red suited card.

Unit Movement

All units must move in straight lines.


Any unit moving into cover can only move a maximum of 6” for an activation.
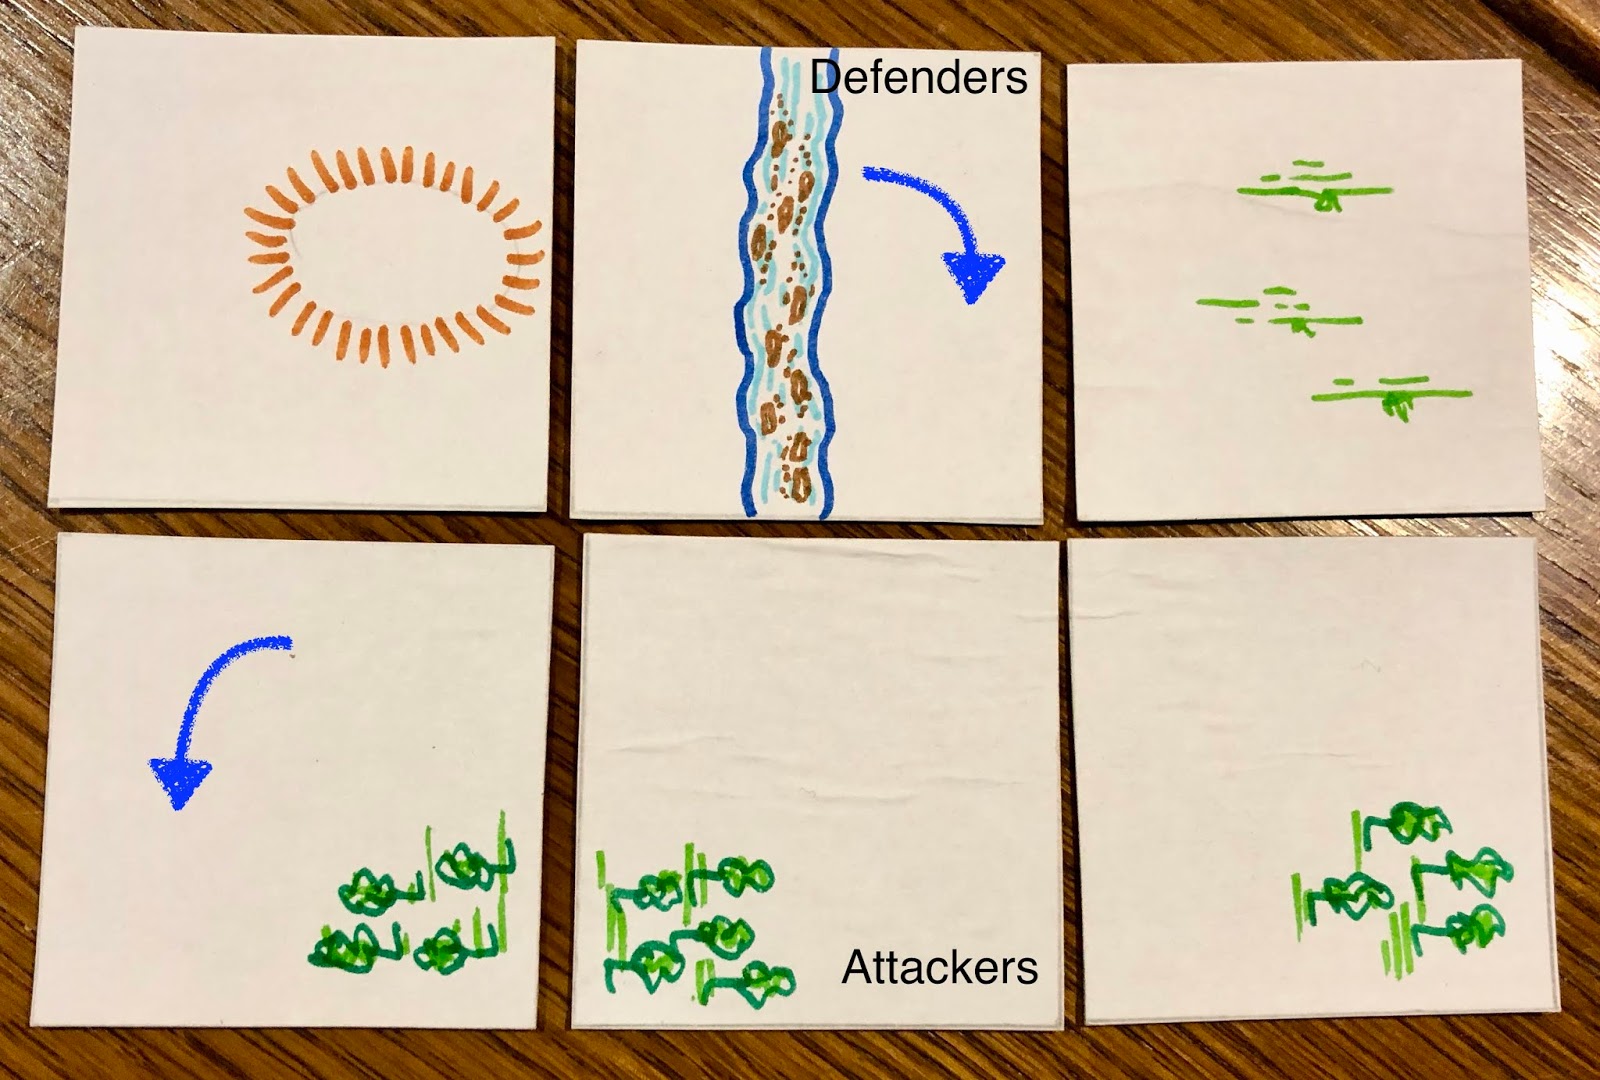
Terrain

Open Terrain - no effects
Buildings - all units can enter, but only infantry can claim cover
Woods - only can enter infantry and claim cover
Marshland/Lakes - are impassable to all units.
Fields - all units can enter, but only infantry can claim cover
Rivers - Units may only cross rivers at bridges & fords. Rivers do not block line of sight.
Roads - no effect.
Hills - block line of sight & Tank units are able to be “hull down” & treated as in cover for combat.

Observation

Units may only shoot units they can see. All units can observe units at a range of 12” providing their line of sight is blocked by terrain or smoke.

Units have a 90 degrees of observation from the front edge of either unit base.

The exception to the observation rule is indirect fire from Artillery & Mortars, which can attack units they cannot see providing a friendly infantry or reconnaissance unit can observe the target & radio in the coordinates.
Both bases have individual 90 degree fields of fire. This allows a two base unit to increase its field of fire by careful positioning of both bases. Single base units and AT guns only have the single 90 degree field of fire.
An example of the AT guns single 90 degree field of fire compared to an armoured and mobile AT unit.

Shooting

Units cannot move and shoot.

Direct shooting bases have a 90 degree field of fire. Only one base needs to observe a target in the field of fire for a unit to shoot or call in artillery support.

Artillery and mortars when not direct shooting don't use a field of fire. However, after targeting a unit they cannot switch to another target in the following turn without a break of one turn.

Determine if in range.


To determining damage roll 1 D6 and make adjustments in the table below. When increasing or reducing by 50% any fractions are rounded up to the attacker's advantage.


The result is further reduced by 50% for:
  • Infantry in woods, buildings, or positioned behind armoured units.
  • Tanks (not other armoured units) hull down on a hill.

An infantry unit seeking cover behind an advancing tank unit.
Target units which cannot claim cover and are yet to be activated at can sacrifice their card and take evasive action. They are then treated as being in cover reducing the hits by 50%. For infantry that is going to ground, other units must retire out of range. However, the attacking unit must be in their field of fire to take evasive action.

An infantry unit (9 spades) has been flanked by the armoured car unit (Queen diamonds) and cannot take evasive action. Having a narrow field of fire and this rule to evasion encourages flanking moves on the tabletop.
The this example an infantry unit (9 spades) positioning of its bases means it can sacrifice its card and take evasive action to reduce the shooting hits from an armoured car unit (Queen diamonds).
Split units, such as armoured infantry, will always be treated as armoured until the half-track base is removed. Then on after they are treated as infantry and operate like infantry when taking hits.

This armoured infantry unit will now be operating as an infantry unit only.

Elimination

Units are eliminated after 14 hits. When 7 hits are taken remove one base. This means hits can be recorded on a single dice as the 7 or 14th hit removes a base.

The removal of one base limits a unit’s field of fire as the combination of two base's field of fire when carefully positioned increase the field of fire.

Optional Rules

Smoke ScreensArtillery & Mortar units may provide smoke screens. On a score of 4+ place 6” of smoke which blocks line of sight. All smoke is removed at the start of turn.

Aircraft SortiesOn a read suited card air support can attack any unit not in woods or buildings. Air support attack as AT guns.

AA GunsIf there is an AA gun within 12” of the unit being shot at by air support reduce hits by 50%.

Wrecks - Mark eliminated armoured based with smoke. If behind these wrecks units can be treated as in cover. The wrecks do not block line of sight.


Wednesday 11 September 2019

Thoughts on my completed WW2 solo-campaign

Here are a few thoughts about what worked and didn't in my WW2 solo campaign which I have now finished, or maybe I should say lost.


A quick reminder about the campaign that used the chapter "Panzer Grenadiers vs. Guards" from "War Game Campaigns" by Donald Featherstone as inspiration and guide. During the course of the campaign Panzer Grenadier forces are trying to push southwards attempting to breakout into more open country.
Original map from the book
Breaking up the original map into squares each representing a tabletop worked well as it helped to create a point to point map which allowed the Panzer Grenadier forces to be simply moved from one point to another based upon a dice roll.


The dice generated moves were very simple and worked well. Details can be found here. During the campaign there were situations where the advancing Panzer Grenadier units had a Guards unit on their flank, then on a 1-4 they attacked the flanking unit or 5-6 they pushed on southwards. This approach occasionally produced the odd result which I put this down to fog or war.

The campaign produced a 13 tabletop games and good number of them were asymmetrical games, requiring a side to make a fighting withdrawal or not be reckless with attacks, to preserve units so they could continue in the campaign. Units which were eliminated in the tabletop game were removed from the campaign as being no longer being combat effective, while units with losses were returned to the campaign at full strength. The assumption was they were able to reorganised and there were a level of reserves or leftovers from eliminated units to make them effective again. I chose this approach as I did not want to keep track of unit's strengths during the campaign. Although I did ticking off platoon loses on the infantry company counter.

Panzer Grenadier forces. Each company had 3 platoons while Reconnaissance companies have one AC section and armoured infantry platoon. 30 units in all.
Guard forces. Each company had 3 platoons while Reconnaissance companies have one AC section and armoured infantry platoon. 25 units in all.
I am not totally sure as to why I chose to be the defender rather than the attacker. It may have been the way I read the chapter, anyway I just automatically took to the defender's role. 

Having decided to be the defender I then added a few additional units to the attacking forces to make up for any deficiencies with the dice decided campaign moves and random positioning of hidden units. (Note - given I lost the campaign this could be considered a mistake or an overestimation of my wargaming abilities)


The number of games (13) was about right and I was happy for the campaign to wrap up. If it had gone on longer I suspect my interest would have waned. The small scale of the games themselves suited me well, taking about one hour to setup and play.

One area of the campaign rules I would definitely change was how the orders were actioned. Having the Guards make their orders before dicing for the Panzer Grenadier movement worked well. My error was not making the movement simultaneous. What happened was the German moves were applied and actions were fought where opposing units are in the same map square, then the Guards moves were applied. This often meant the guards moves were not always carried out due to the result of tabletop actions. I cannot remember the reasons why I complicated the campaign moves, but simultaneous moves would have been a simpler approach.

Would I refight the campaign reversing roles and play attacker? Yes, but I would reduce the size of the attacking force and would have to decide to randomise were the defender stands or makes a fighting withdrawal.

Anyway these are my thoughts looking back at the campaign. The next post will cover off the rules used.


Sunday 8 September 2019

WW2 Solo Campaign wraps up

I was able to play out the last few games of the WW2 solo campaign this weekend. Here are two quick summaries of the games which saw the Guards defences succumb to the advancing Panzer Grenadiers units.

The penultimate action has a small and well armoured German force advancing upon a small Guards force before it was able to retire as ordered. Air support had been called in and was available.

Air support arrives early and quickly deals with some armoured infantry outside of AA cover.
The Guards ground forces are easily dealt with as air support has a final attack run.
Campaign map showing the above action circled in blue.
The campaign map below shows the new positions after the above action. The Guards defences are struggling to hold back the advancing Panzer Grenadier forces. As usual the Guards make their orders before the German moves are determined. They chose to split their forces to cover the two nearest threats.
Guard orders
Panzer Grenadier moves
The Panzer Grenadier moves, all dice driven, consolidate a couple of forces and push forward south displacing a lonely AA unit. The final action has a Guard's tank troop, armoured car section and mortar section making a last ditch attack.

Units deployed on the tabletop.
German armoured infantry push up on the flank.
The Guards tank troop respond to the flanking move and the German tank troop advances to become involved.
The Guards's tank troop is eliminated, but not before inflicting damage to both the armoured infantry and tanks.
The German tank retires to a defensive position. With only an armoured car section and mortar any attack on the  remaining tank would be futile.
So the Panzer Grenadiers have successfully broken through the Guards defence and can advance into open country side. But how strong are their remaining forces?


Looking at the available Panzer Grenadier units they could certainly push ahead with their tank troops, but without many infantry lack the ability to hold any gains. Remaining units:

  • 2 mortar sections
  • Mobile AT section
  • 2 AA sections (one being an 88mm)
  • 2 tank troops
  • AT section
  • 1 armoured infantry platoon
During the course of the breakthrough as they pushed southwards. Over half of their units were lost or rendered ineffective.

A win for the Panzer Grenadiers who had to breakthrough. The next post will cover the rules used and any other thoughts on what worked and did not work in the campaign.