Tuesday 27 April 2021

Ancients project all at sea

I am planning an ancients campaign and I want to include some naval games. After reading some reviews I decided to purchase "Poseidon's Warriors" by John Lambshead. On the first reading they appear to be straightforward with options of adding more from the advanced rules as desired. I will most likely stick to the basic rules.

Rules for the naval games

The game will use quite a few ships and not wanting to spend too much money the choice was to scratch build. The first step was to make a model and test out how to simply make a number of ships. The approach was to make a cardboard shape with the distinctive ship bow and stern, then stick 6mm square dowel either side for the hull. The final step is to attach some MDF as the oars. 

A card insert is made

Two pieces of shaped square wood dowel are stuck on either side of the card insert 

MDF oars are added. The oars were later reduced in size after this photo was taken.

The ship is simply painted

I will use different lengths of ship to represent the different category of ships.

Having made the first model I now have 20 ships in various stages of construction. Two changes to the build process are: 1) I use balsa wood for the oars as it is easy to cut out and shape the oars downwards, and 2) a mast is added with a cocktail stick with card for the sails.

Saturday 24 April 2021

Ancients Project - Battle Report

This battle report is from a game I played a couple of weeks ago. Normally, I would summarise my reports with a few pictures and describe the opening moves, the middle game and end game. However, this time I have chosen to do a turn-by-turn game report. Why do this? Mainly so I highlight the use of chance cards I am using during the game.

The rules used are pretty much lifted straight from the One-Hour Wargames book (see previous post here) with modifications for troop types to cater for veteran heavy infantry, elephants, and catapults).

Starting positions

The Carthaginian and Roman forces are evenly matched with 10 units per side. Three pieces of terrain were selected for the tabletop: a large hill, a stream which is fordable and treated as broken ground, and a few buildings. The positioning of these terrain features was decided by terrain cards (see here).

Roman right flank (positioned on the hill)
  • 2 x light infantry
  • 1 x heavy infantry
Roman centre
  • 3 x veteran heavy infantry
  • 2 x heavy infantry
  • 1 x catapults
Roman left flank
  • 1 x heavy cavalry
The opposing Carthaginian forces are lined up along a load with their right flank occupying the buildings.

Carthaginian right flank
  • 1 x light infantry
Carthaginian centre
  • 1 x light infantry
  • 2 x elephant units
  • 2 x heavy infantry
  • 2 x veteran heavy infantry
Carthaginian left flank
  • 1 x light cavalry
  • 1 x heavy cavalry
The Carthaginian forces won the dice rolloff to start the turn first...

Turn 1

Carthaginian forces draw a rally card which is of no benefit to them as no units have taken any hits. They push forward their centre with the aim of getting their elephant units in and amongst the Roman heavy infantry.

Roman forces draw a no event card. They moved their light infantry on their right flank to line the river and used their catapults to fire at the approaching elephants.

Turn 2

Turn 2

Carthaginian forces drew a no event card and continued to push forward their centre.

Roman forces drew a rally card which is of no benefit this early in the turn sequence. The light infantry along the river and catapults continued shooting at the advancing Carthaginian centre.

Turn 3

Turn 3

Carthaginian forces drew a no event card. They continued their advance in the centre and the elephants charged into contact with the first line of the Romans. On the left flank their light cavalry crossed over the river to harass the Roman light infantry.

Roman forces drew a no event card. Their light infantry and catapults continue to shoot at the Carthaginian centre, and their first line of heavy infantry are engaged fighting the elephants.

Turn 4

Turn 4

Carthaginian forces draw a no ammunition card and units will not be able to shoot this turn. The movement of their light cavalry and heavy cavalry across the river was slow due to the larger base sizes (8 inches) makes repositioning units a slow process.

Roman forces with a no event card continue to shoot at the Carthaginian centre with combination of light infantry and catapults. In the centre the battle against the elephants continues.

Turn 5

Turn 5

Carthaginian forces draw a demoralisation card and attacks by all units will deduct an additional 2 from the dice score. This is unfortunate with the elephants still pressing on the first line of heavy infantry in Roman centre.

Roman forces draw an initiative card and one units will be able to make a double move or extra attack in combat. The heavy cavalry on the left flank used the card to make and additional move and swiftly charged the Carthaginian light infantry who had advanced out from the town.

Turn 6


Carthaginian forces get a no ammunition card, but the action was with the elephants and one unit had broken through the first line of Roman heavy infantry.

Roman forces drew a no event card the second line of veteran heavy infantry prepare to engage the elephants. On the right flank their heavy infantry advanced towards the Carthaginian cavalry.

Turn 7

Turn 7

Carthaginian forces have a no effect card drawn. One unit of elephants were now engaging the Roman second line.

Roman forces draw a rally card and are able to remove 2 hits from all units. The second line of veteran heavy infantry moved quickly to eliminate the elephants. A berserk test resulted in the elephants making a last attack, prior to its removal, on the nearest Roman unit. On the right flank the advancing heavy infantry attack Carthaginian cavalry who were slow to deploy after crossing the river.

Turn 8

Turn 8

Carthaginian forces have a rally card drawn for a timely eduction in units hits. The Carthaginian heavy infantry on the right flank heavy infantry engage the Roman heavy cavalry, and reposition their centre units to counter the light infantry hovering around the other flank.

Roman forces get a no ammunition card. The heavy infantry attacking down the hill successfully eliminated the Carthaginian heavy cavalry. 

Turn 9

Turn 9
 

Carthaginian force draw a no effect card. Progress is going well on the right flank having eliminated the Roman heavy cavalry.

Roman forces get a no effect card. While the Roman left flank was struggling their other, right flank, was holding its own and the centre still held firm.

Turn 10


Carthaginian forces get a confusion card and will not be able to move just as they outflank the Roman left flank.

Roman forces draw a no effect card. The last Carthaginian elephant unit is eliminated and Roman units are starting to form a line along the river.

Turn 11

Turn 11

Carthaginian forces draw an initiative card and use it to make two attacks in the centre and mount the pressure on the Roman heavy infantry.

The Roman force get a rally card to reduce all unit hits by 2 hits which countered the additional hits caused from the Carthaginian's initiative card.

Turn 12

Turn 12

Carthaginian forces draw a confusion card and are limited to just combat not being able to make any moves.

Roman forces also draw a confusion card. Not much happened, exhaustion setting in perhaps?

Turn 13

Turn 13

Carthaginian forces get a demoralised card, but still choose to move into contact with their heavy infantry as it was close to the end of the game. 

Roman forces draw a no effect card and choose to hold their position.

Turn 14

Turn 14

Carthaginian forces draw an initiative card which is used for an extra attack while their Heavy infantry try to reorder their position

Roman forces draw a no ammunition card and hold off from engaging in combat.

Turn 15 (Last Game Turn)

Carthaginian forces get a rally card and Roman forces have an initiative card drawn. Both forces have redeployed their lines.

As neither side had the upper hand the game was considered to be drawn.

Wrap up...

The chance cards are working well and adding to an enjoyable solo game. I did have a question in my mind about whether some of the chance effects should apply to the whole army or player chosen units? For example: demoralisation, out of ammunition, rally, and confusion. Overall, and having played a few other games where effects are across the whole army and games where the effects are limited to a few units, I have decided to stick with the effects applying to all units as it creates a greater level of uncertainty.

Since playing this game I have made some modifications to the veteran units rules and added commanders and will most likely post them in the next week or so. For the moment I will be sticking with the OHW rules as I am enjoying the games and will now plan for a campaign.

In many ways this game marks the end of my Ancients project, having created the game mat, buildings, and painted some 500 plus HAT figures. There will be the odd addition, for example I purchased some Spanish cavalry last week to add to the variety of cavalry, but the armies are now pretty much completed.

Friday 16 April 2021

Ancients Project - Deployment and Decision Points

This post was going to be a short post about the order of battle and deployment of units on the tabletop for a game and battle report. The game has been played and I have been a tad slow in posting it. However, in the process of writing the post I have added some notes mapping out where player decision points occur in the One Hour War-games (OHW) rule variant being used.

A Roman commander painted and in a game. I always know when a project is just about done when I paint the commanders.

Order of Battle

I have yet to decide how to determine the order of battle for a series of campaign games. At the moment for one-off games I am using the army list suggestions from the book Ancient and Medieval Wargaming by Neil Thomas as a guide.

Both forces are now deployed and ready for a game.

For the upcoming battle report I opted for the following orders of battle:

Carthaginian (10 units)

  • 2 x Elephants
  • 2 x Veteran Heavy Infantry
  • 2 x Heavy Infantry
  • 2 x Light Infantry
  • 1 x Light Cavalry
  • 1 x Heavy Cavalry
Romans (10 units)
  • 3 x Veteran Heavy Infantry
  • 3 x Heavy Infantry
  • 2 x Light Infantry
  • 1 x Artillery
  • 1 x Heavy Cavalry

Deployment

Having decided upon the order of battle, the next step is deciding each army's deployment. Both sides decide their deployment in secret by drawing the deployment on a sketch of the tabletop. All forces are then deployed within 18 inches of the tabletop edge (on a 6 x 4 foot tabletop) according to the sketches.

Because I am playing solo and will be taking the role of the Carthaginian player. I deployed the Carthaginian forces first. I then sketched three deployments for the Roman army. Rolling the dice to decide which option to deploy on the tabletop. I rolled a 2, the top sketch.

Three Roman deployment options sketched out.

The battle report will hopefully be my next post.

Decision Points

As a little exercise I thought I would list all the decision points a player has in preparing and playing a game. Why do this? There are a couple of reasons:

  1. The decisioning around the deployment of forces seems to have been really important in the outcome of battles. As deployed forces were generally difficult to reposition during the battle. In the One-Hour Wargames (OHW) rules I am using I have increased the unit base size to 8 inches which makes turning difficult unless there is sufficient space.
  2. As forces become committed to combat the opportunity to make decisions is reduced as reserves or battle lines are committed.
So here are the decision points. I have added a subjective level of influence in brackets.

Setting up the terrain (low) - selection of 2 pieces of terrain which may get selected. It is likely at least one chosen terrain feature will appear somewhere on the tabletop.

Order of battle (high within constraints) - at the moment players can select what forces they want within the constraints of an army list.

Deployment (high) - all available units can be placed anywhere by players within the deployment area (18 inches from the tabletop edge).

Chance Cards (low) - You get what you draw, and the impact of chance cards are on all units. The one exception is the Initiative cards, these are 2 of them in a pack of 15 cards, which allow a unit an additional action and a player chooses the unit and action.

Movement (high) - Movement, which includes charges, is the one area of the sequence of play where player's have the most influence and decision making. This is through the positioning of units to counter or create threats, or by charging units into combat. This influence reduces during game turns as units enter into combat until one unit or the other wins the combat and units are free to move again.

Shooting (medium) - Choosing targets for shooting is reduced as the game turns progress with potential targets become embroiled in combat. Light infantry and cavalry units can get drawn into combat situations.

Combat (very low) - Once units are in combat there is no influence, it is pretty much all in the hand of the dice! One possible influence in the Initiative chance card which can be used to make an additional attack. Units are locked into combat until one side wins, then the influence over the unit is back with the movement phase.

This was an interesting little exercise and highlighted how a player's influence on the game using OHW style Ancient rules diminishes as the game progresses. Towards the end of a game players are sweating on the outcome of combats (or more precisely the dice rolls). From what limited reading I have done the grand-tactical aspects of battles (deployment and selection of a suitable battle ground) appear to be as important as the tactics of the battle itself. Where a commander's control becomes more and more limited as the battle progresses, and the commitment of reserves or the commanders themselves are critical decisions.

Anyway, this exercise has got me thinking about:
  • Terrain layout rules and how a player can influence the layout of the limited terrain.
  • How to add a commander rule into the game rules to influence combat. (Especially now as I have painted up both commanders for this project.)
  • How to add some decisions into chance cards. An initial thought, for example, is to change Rally cards from removing 2 hits from all units with hits, to removing 2 hits from a maximum of 4 units. Then a player would have to decide which units.
Carthaginian Commander. A mixed unit so it can attach to either a heavy cavalry unit of heavy infantry unit.


Sunday 11 April 2021

Ancients Project - Setting up a game (part 1 - terrain)

When setting up an ancient game I want to use a rule mechanism for determining the setup of the tabletop. Part of my reasoning for doing this is I will be setting up a quick 2nd Punic War campaign in the next couple of months and will need a mechanism for campaign games. This post covers the procedure for setting up terrain on the tabletop.

A tabletop setup using terrain cards

For the tabletop setup I am using terrain cards as they proved successful with my English Civil War campaign (see here). The ECW approach uses a deck of hand drawn terrain cards which are shuffled and six are drawn for my 6 x 4 foot tabletop, one for each 2 x 2 foot square area. This is fine for ECW terrain, but with ancient battles fought in more arid regions with few terrain features, a slightly different approach is required.

Making of terrain cards - 12 cards in all are required.

The approach I decided upon was to have four blank cards (representing open terrain) which are set aside. Then each player selects two terrain cards a piece from the remaining eight cards. The player's selected cards are added to the blank cards and shuffled. This allows players to select terrain to hopefully suit their army.

The Carthaginians (top) selected a river and town features. While the Romans (bottom) have selected a large hill and rocky broken terrain features.

Having shuffled the cards they are laid out in two rows of three to represent my 6 x 4 tabletop. In most cases this will work fine, but there are some additional rules for rivers. Rivers when placed will run North-to-South or East-to-West, depending how they are placed down (no peeking when you are placing them down). When a river's flow is blocked due to hills (they can flow through all other terrain features) they have to be rotated towards another square to avoid the hill. If there are two options, then use the dice to determine direction or allow the player who selected a river to choose the direction.

Terrain cards are laid out. The flow of the river will need to change due a blocking hill.

A river card's direction is adjusted to avoid a hill.

At the moment I have chosen to go with:

  • 4 x open terrain
  • 1 x river which is fordable
  • 1 x large hill
  • 1 x small hill
  • 2 x woods
  • 2 x broken terrain (fields and rocky terrain)

The approach will on occasion throw up four pieces of terrain, but will for the most part will deliver two or three terrain features. Additional blank cards could be added to the card deck for more arid regions when running a campaign, or reduced for more fertile regions.

A tabletop with terrain setup to reflect the cards.

Terrain setup with armies deployed.

Next up will be deciding the armies and their deployment.


Friday 9 April 2021

Ancients Project - Some Buildings

I decided I needed some buildings to represent a town for my Ancients project. So this past weekend I found some old wood offcuts and purchased some wooden dowel and made some simple buildings suitable for an ancient setting. With these buildings I used some moulding paste to help:

  1. Cover up the gaps in the wood from my schoolboy woodworking skills
  2. Create texture for the tiled roofs.

If you are wondering why I am using blocks of wood from the hardware store to create buildings, rather than other modelling products. It all started from when I setup an St. Nazaire game and needed a lot of buildings here. Since then I have taken a wooden block approach as the buildings are practical in the sense that they don't require bases, don't have to be stored carefully, are easy to make, and are cheap to make at a $2 per building (if that).

My test model a small temple

With the exception of the pillars (made from wooden dowel) the other materials are wooden offcuts.

A moulding paste was used to give texture (a new approach with these buildings)

I got the moulding paste from an arts shop. It has the consistency of smooth peanut butter and I both painted it on and layered it on with an old paint brush.

The moulding paste used. It is water based and remains flexible.

Here are some photos of the process of creating the buildings...

Wood offcuts are made into a building.

The moulding paste gets applied and the roof is crisscrossed with a toothpick to give the impression of tiles. This has to be left over night to dry.

A sand coloured base coat is painted on

A suitable terracotta coloured paint is applied to the roofs

A brown wash is applied to the buildings

Windows and doors are painted on in a dark grey as I find black to be too harsh a colour. Then a wash of the original base coat colour is applied to the walls to lighten them up a bit. My original brown wash had been a bit too dark.

Orange is lightly brushed onto the roofs to help pick out the texture and lighten the terracotta look.

The columns get a coat of dark blue followed by a thinned coat of light blue. A brown wash is quickly painted around the windows and doors, no precision painting here!


The buildings are given a coat of PVA glue, then once dry they are ready for the tabletop. 

Time wise this was a relatively quick job:
  • One and a half hours cutting the wooden blocks and gluing them.
  • Half an hour applying the moulding paste and leaving the buildings overnight to dry.
  • A final couple of hours one evening to paint the buildings.
I generally reduce the size of my buildings a fraction to minimise their tabletop footprint and also so they don't dominate the tabletop. From a scale perspective while my figures are 20mm the buildings are nearer 15mm.

So I now have some robust ancient period wargaming buildings which can be thrown into the terrain box container and I don't have to worry about breakages.

Tuesday 6 April 2021

Ancients Project and starting to play a few games.

I have been busily painting up the last few 2nd Punic War units I need, or think I need, while at the same time finally playing a few games. I always seem to start new periods with One-Hours Wargames (OHW) rules by Neil Thomas. As they are a quick way to get some models on the tabletop with minimal effort to learn the rules.

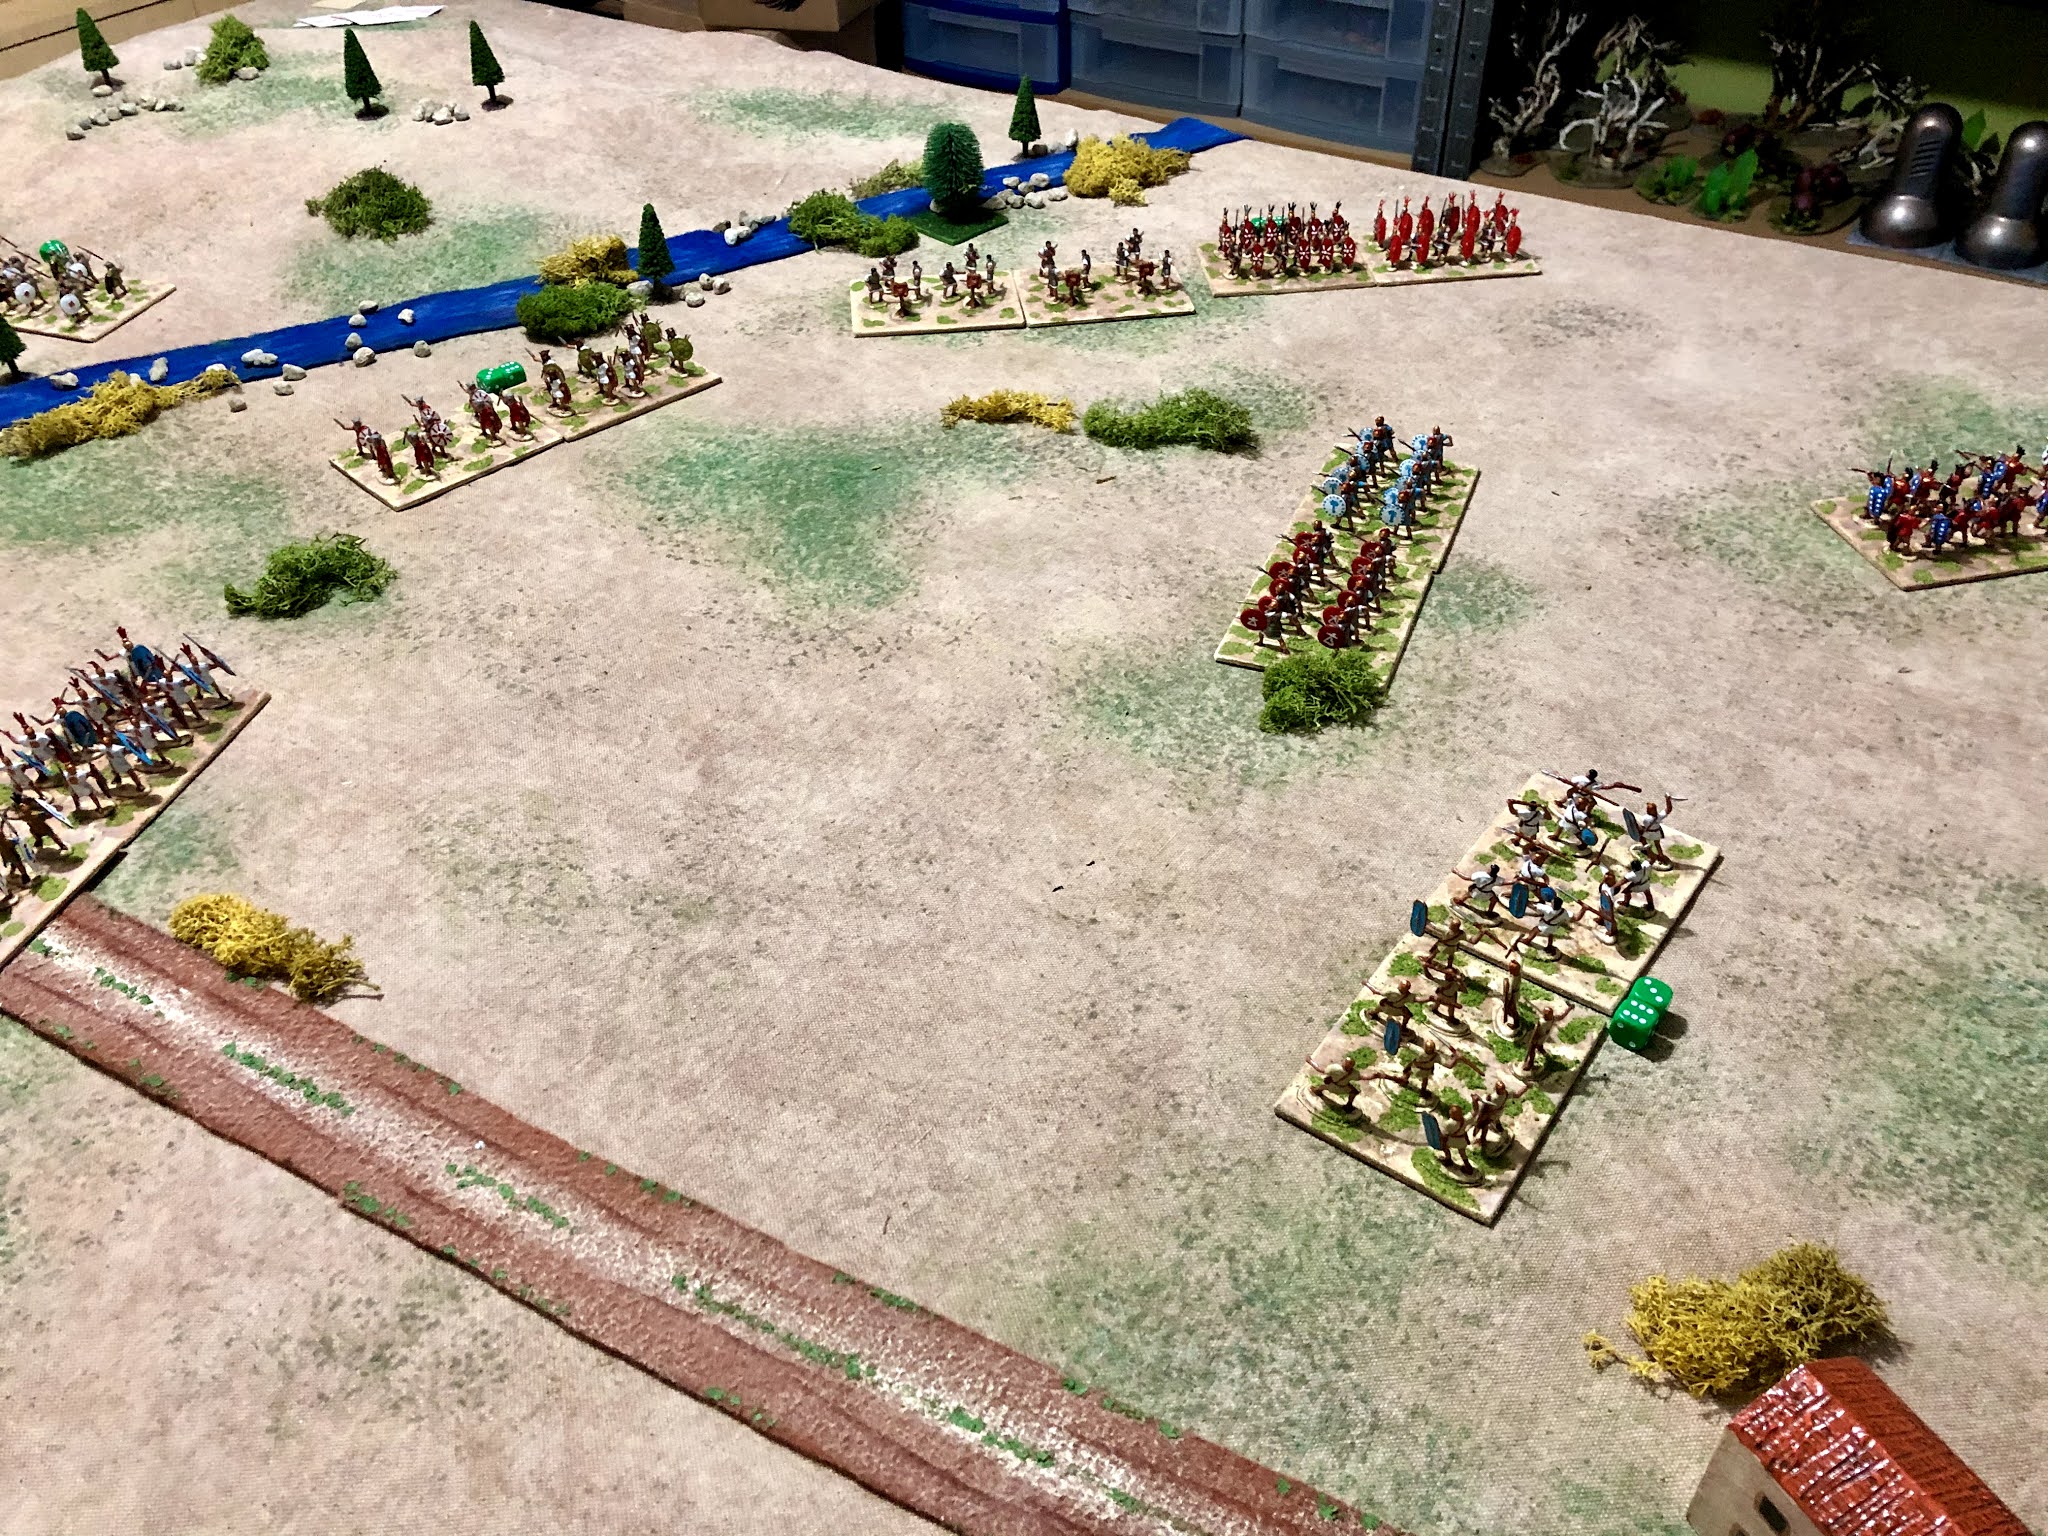
A game setup using a 6 x 4 foot table

The games resulted in a few additions to the original OHW rules. These include:

  • Units types geared towards from the 2nd Punic War (including elephants and catapults).
  • Increase in unit base widths to make manoeuvring difficult (and the units look more substantial).
  • A reduction in the number of hits before unit elimination which is partly offset with additional rally chance cards.
  • An elephant berserk rule upon their elimination.
  • Use of chance cards with some possible options to reflect both army characteristics and leadership quality.
As a solo gamer I often use chance cards in my games, but they are typically added on to the rules rather than incorporated with the rules themselves. The changes are my first attempt at trying to mesh the rules and chance cards together, and I have started with the Rally cards to offset the reduction of hits a unit takes before elimination (down from 15 to 13).

Here are my first variation of the OHW Ancient rules with the modifications mentioned above...

Units Types

The game is geared towards the 2nd Punic Wars and uses the following units types:

  • Veteran Heavy Infantry
  • Heavy Infantry
  • Warband (Gallic Infantry)
  • Light Infantry
  • Light Cavalry
  • Heavy Cavalry
  • Elephants
  • Catapults

The units need to be consistently based and I have been trying large base widths of 8”. This width creates naturally limits to the ability of units in formation to move around easily except when positioned on the flanks.

I have been playing games with 8-12 units per side using the army lists in Ancient and Medieval Wargaming by Neil Thomas as a guide to an army's make up.

My normal basing is 4x3 inches, but for these ancient games each unit has two bases to make units 8x3 inches.

Sequence of play

Each player takes a turn to move, shoot and melee with their units in the following sequence:

  1. Draw chance card
  2. Movement
  3. Shooting
  4. Melee
  5. Eliminating units (and berserk elephants)

The game ends after 15 turns.

Movement

During the movement phase a player can move their units. A unit may move up to the distances listed below:

  • Heavy Infantry - 6”
  • Light Infantry, Warband, and Elephants - 9”
  • Light and Heavy Cavalry - 12”
  • Catapults - cannot move but are allowed to pivot.

Units turn by pivoting on their central point, and may do so at the start and end of their move.

Only light infantry may pass through other friendly units.

Units that move may not shoot.

Terrain

Terrain has an impact on a unit’s movement and combat.

  • Woods - Only light infantry and warbands can enter
  • Towns - No effect on movement and treat as broken ground for combat
  • Marshland and lakes - Impassable to units
  • Rivers - Can only be crossed at bridges and fords
  • Broken Terran (e.g. Rocky, Fields and Streams) - Only infantry can enter and heavy infantry do not halve combat hits.
  • Roads - Units moving all their move on roads add 3” to their move distance

Charges (Moving into contact)

Units may move into contact with enemy units, but have the following constraints:

  1. A unit may only turn up to 45 degrees at the start of their move
  2. Only one attacking unit can contact each side of an enemy unit (front, left flank, right flank, and rear)

Combat is resolved in the combat phase

Shooting

Only light infantry, light cavalry, and catapults can shoot. The procedure for shooting is as follows:

  1. Units may only shoot at a target within 45 degrees of their frontal facing.
  2. Light infantry and Light Cavalry only have a range of 12”, and catapults have a range of 24”.
  3. Assess the number of hits by rolling a D6-2. Halve hits for units in cover, heavy infantry, or elephants.
All models are HAT plastic 1/72 figures

Combat

The procedure for combat is as follows:

Units only inflict hits during their own player turn.

Assess the number of hits

  • Veteran Heavy Infantry - D6+2
  • Heavy Infantry - D6
  • Warband (Gauls) - D6 (D6+2 when first charging into combat)
  • Light Infantry - D6-2
  • Heavy Cavalry - D6
  • Light Cavalry - D6-2
  • Catapults - cannot attack in combat situations
  • Elephants - D6 (regardless of unit type)

Halve hits for attacks on warbands, veteran heavy infantry, heavy infantry, and elephants. Ignore this rule if the attacking unit is an elephant.

If attacking from a flank or rear, all hits are doubled.

Units defending woods, towns, river crossings, or hills halve the number of hits.

Heavy infantry (including veterans) in broken terrain cannot halve hits.

Units cannot retire from combat which only ends with the elimination of one of the contesting sides. Units are allowed to face an attack upon their flank or rear, only if they are not already being engaged frontally.

Eliminating Units and Berserk Elephants

Units are eliminated after taking more than 12 hits. This is different to the 15 used in One-Hour Wargames, and the lower value is compensated by Rally chance cards which remove 2 hits from units (see chance cards).

When an elephant unit is eliminated, check to see if it goes berserk. Roll a D6 and:

  • On a score of 1 or 2 the elephant charges the nearest friendly unit with 12” and inflicts D6 hits. After this the elephant unit is removed from play.
  • On a score of 3 or  the elephant charges the nearest enemy unit with 12” and inflicts D6 hits. After this the elephant unit is removed from play.
  • On a score of 5 or 6 nothing happens and the elephant unit is removed from play as any other unit.

The elimination after 13 or more hits allows hits to be tracked with 2 dice.

Chance Cards

As a solo wargamer I enjoy incorporating chance cards into a game to create uncertainty and also to reflect any army characteristics. In all there are 15 cards one for each turn (the cards also help you keep track of the turn).

The chance cards are acted upon during the turn they are drawn and cannot be carried over to another turn. The cards:

5 x No Event. Nothing happens

2 x Confusion. A player’s units cannot move this turn, but are allowed to pivot.

2 x Ammunition Shortage. A player’s units cannot shoot this turn.

2 x Initiative. One unit can make a move, shoot, or conduct a round of combat. The unit can still be activated as normal later.

3 x Rally. A player can units can remove 2 hits from all units.

1 x Demoralisation. Only half a player’s units in combat (rounding down) can attack.

To help create some army characteristics, the Roman army replaces one Initiative card with a rally card. This represents the ability of Roman armies to maintain discipline and keep on fighting. As for the Carthaginians they replace a Rally card with an Initiative card.

The same approach can be used for good and poor commanders. For poor commanders replace an Initiative card with a No Event card, and for good commanders replace a No Event card with an Initiative card.

There is opportunity for this to be taken further with supply. Armies with supply problems would replace a No Event card with an Ammunition Shortage card.


Thursday 1 April 2021

A bit of tinkering with the ancients game mat

After looking at the gaming mat I made last weekend it looked too much like a desert, rather than the arid landscape I was after. So I decided to add a bit more grass/vegetation to the map. This was lightly sponged on with three shades of green. A mid green which was followed by a light green, before a final sponging of a browny green.

Additional vegetation added
A quick reminder of how the mat looked before the extra sponging.

I did think at one stage of the sponging process I had made a mistake and all together ruined the mat as the green was looking too vivid. However, it all came together with the last sponging of brown-green which toned down the grass/vegetation.

A close up of the sponged area

With the gaming mat now looking more arid and less desert, it was time to play a game of two. I decided to start with some One-Hour Wargaming style games with a number off modifications to represent the troop types.

An ancients game in progress