Thursday 30 September 2021

The post delivers a pleasant surprise

This week the post finally delivered a secondhand copy of "With Pike and Musket" by C.F. Wesencraft to add to my growing collection of wargaming books. I have been keeping an eye out for this particular book for a while after having read some good reviews. At first glance the book contents are meeting my expectations and covers:

  • The weapons
  • Historical organisation
  • Preparation (setting up tabletop terrain and figures)
  • The weather (and construction of a weather gauge)
  • Game rules
  • Battle reconstructions (some 27 battles from mid-1500's to mid-1600's)
  • Summary of the rules of play
It is highly likely my ECW armies will be on the tabletop this weekend.

The latest secondhand book purchase.

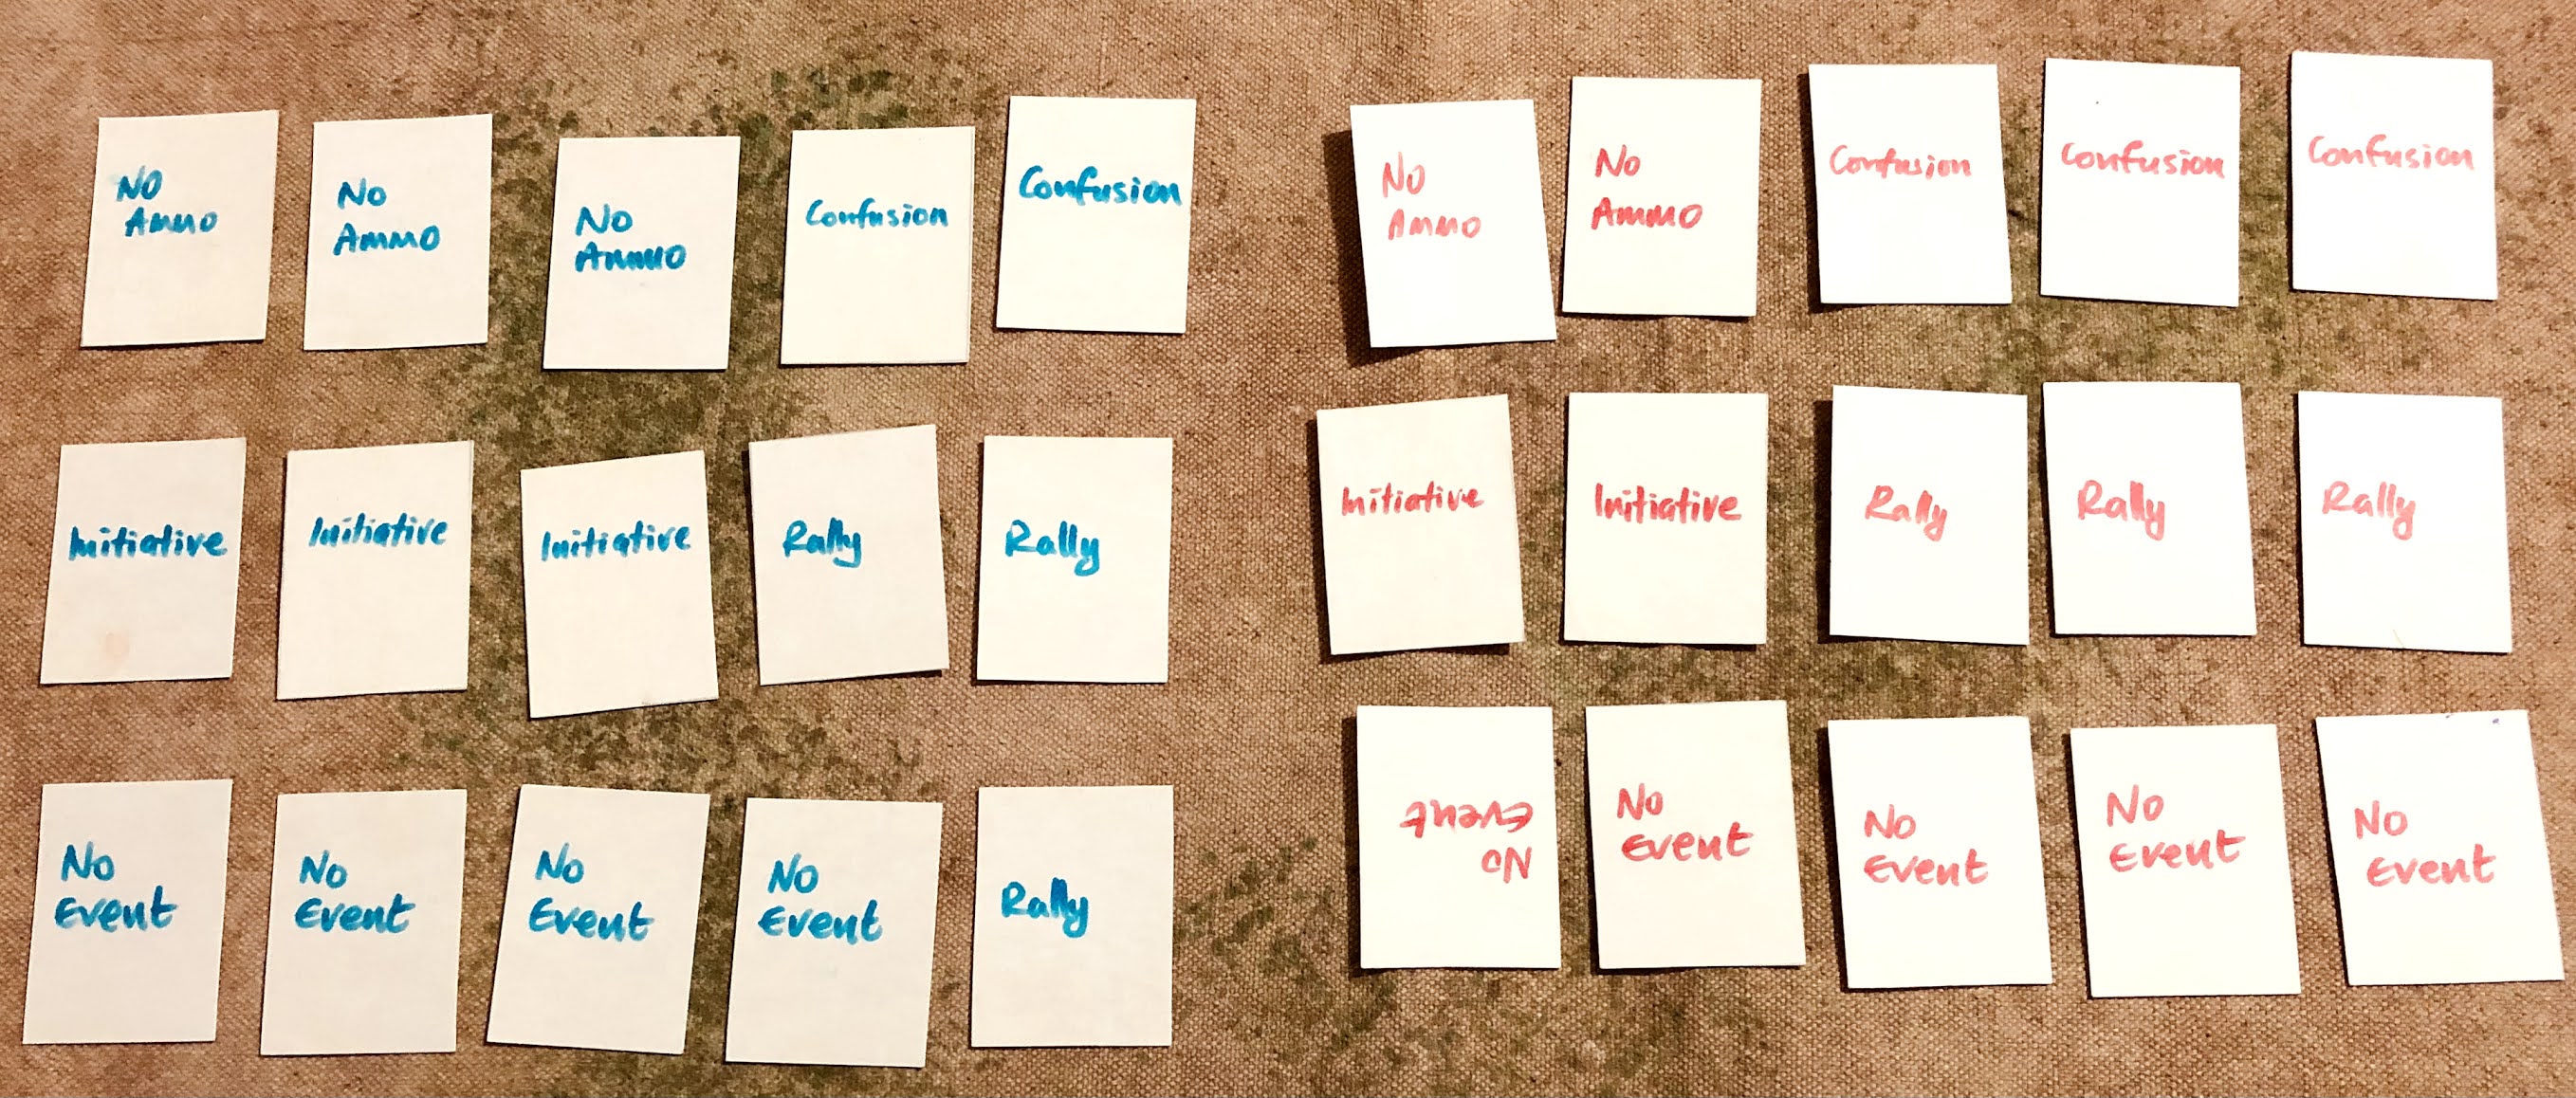
A couple of months ago I decided to try my hand again at writing my second solo wargaming article for Lone Warrior (the journal of the Solo Wargamers Association). My previous article was about setting up a commando raid using some simple rules which determined the defender's actions, which built upon ideas from the St Nazaire game a played in January 2020 (here) - this seems a long time ago now. This time the short article published in LW216 was about using chance cards decks to represent army characteristics and campaign situations. Some of the chance card ideas I have been testing out in the 2nd Punic War campaign which I am currently playing.

Tuesday 28 September 2021

Campaign turn 3 - Battle of Acelum 214 BC game report

The Battle of Acelum 214 BC is being played as part of the 2nd Punic War campaign turn 3. The setup details, deployment, and campaign context can be seen in the previous post. One item left to do before starting the game was to create the chance cards for each army. These differ slightly to reflect an armies characteristics and the Carthaginian chance deck also gain an additional rally card replacing a no effect card because their armies out number the Romans in the North Italy region.

The deployed armies

Chance card decks. The blue are for the Carthaginian army and red for the Roman army.

The opening moves had the Roman centre push forward to engage Carthaginian forces. While Carthaginian forces advance on the right flank. Seeing the risk to their flank the Roman commander moved his reserves to counter the flanking attempt on the hill.

Opening couple of moves as both forces action their battle plans.

Forces quickly came together and melees developed in the centre and on the hill. The reserve Roman heavy infantry arrived in the nick or time to stymie the attempted Carthaginian flanking move. On the river flank heavy cavalry from both sides are also engaged. 

Somewhat unusually both commanders and their attached units are involved early in the battle on opposite flanks. In the game the loss of a unit with an commander will mean any positive chance cards (rally and initiative) drawn are ignored and treated as no effect cards. Negative cards (no ammunition and confusion) however are still applied.

Melees occur in the centre and near flank. 

Carthage's flanking move is slowly gaining traction.

In the centre Roman heavy infantry start to overwhelm the opposing Carthaginian heavy infantry. While Carthaginian flanking attempts have been contained to this point. It is now a race to see if the Roman centre breaks through before their flanks are attacked.

Both commanders have to beat a hasty retreat as their attached units are lost. Any advantages from the chance cards drawn will now be ignored.

Roman forces were impacted by some negative chance cards but are able to breakthrough in the centre, then chase off the remaining Carthaginian forces to secure a minor victory.

The Roman centre is on the verge of breaking through.

Roman forces breakthrough in the centre and chase off the remaining Carthaginian forces.

A much needed Roman victory who are struggling in the campaign.

Sunday 26 September 2021

Campaign turn 3 - Battle of Acelum 214 BC setup

The campaign moves into turn three which covers the years 214 BC - 213 BC. Recruitment and moves have been completed (see map below) and there will be two land battles played in this turn. The first will be the Battle of Acelum 214 BC in Northern Italy. The battles are always played in a clockwise direction starting with Spain.

The map at the start of campaign turn 3 (214-213 BC)

Terrain cards are used to determine the tabletop layout. If there are no opposing terrain features on the flank areas the terrain gets positioned equal distance from both base edges. This does not occur in the centre so the centre areas of the tabletop remains open terrain. The town in this instance will be an impediment to any army deploying along that edge.

Cards initially placed from a deck of 8 cards. 4 x terrain features and 4 x open terrain. Two cards are not used are discarded. Each card represents a 2 x 2 foot square on a 6 x 4 foot tabletop.

Features are placed in the centre on the flanks were there is only no feature opposite. I have been trying this approach over the last few games, it ensures the centre area is open and positioning features in equal distance from the edges gives armies something to fight over to control. 

The tabletop is setup. Looking at the photograph I should have given the cover a quick iron to remove some of those crease lines from it being folded up rather than rolled up.

The tabletop is setup based upon the cards.

The orders of battle are:

Carthage:

  • 3 x heavy infantry
  • 1 x light infantry
  • 2 x heavy cavalry
  • 1 x light cavalry

Rome:

  • 5 x heavy infantry
  • 1 x light infantry
  • 1 x heavy cavalry

The Romans have a very strong centre with their 5 heavy infantry and weak flanks, light infantry covering the hill flank and cavalry on the river flank. The river has compressed the width of both armies which the Romans hope will be to their advantage. They will need all the advantages they can get as the Carthaginian army will gain an additional rally chance card due to having for armies in the Northern Italy region.

Carthaginians lost the dice roll off and will deploy on the edge with buildings. This is not too much of an inconvenience as they have stacked their left flank with their faster troops. They are hoping to hold the centre and launch their attack on the flank.

The deployment rule cheat-sheet below...

Deployment rules.

The tabletop setup...

The armies are deployed.

The Roman centre faces their opponents in the distance.

The Carthaginian right flank readies to launch their flanking attack.

I just need to dig out the chance cards and the game can begin.


Wednesday 22 September 2021

Ancient Campaign Turn 3 Begins

The beginning of each 2nd Punic War campaign turn starts with a naval battle. The losing side has to recruit and move their forces first, followed by the winner recruiting and moving forces. For this game I reduced the number of ships to 9 per side.

The Carthaginian fleet leaves the harbour to engage with the Roman fleet seen in the distance.

Both fleets spread out and manoeuvre before engaging in battle.

The battle begins

As the battle progresses the fleets break into two groups.

As ships are sunk or become entangled, isolated ships seek to regroup with their remaining fleet.

The remaining Carthaginian and Roman ships become isolated and retire and the battle is drawn.

Due to the game being drawn a dice was rolled to decide which side would recruit and move first. The Carthaginians lost and would go first.

The campaign map at the end of turn 2 with the Carthaginians in a strong position.

Moving first Carthage recruits in Northern Italy and moves an army to Southern Italy.

Rome is unable to recruit as it controls no regions and recalls its one remaining Spanish army to Northern Italy.

Two games will be fought in this campaign turn.

Saturday 18 September 2021

Western desert game, Horse and Musket rules, and samurai painting

I initially through I would be playing a ancient naval game this weekend to start for the 2nd Punic War campaign, but I still seem to be stuck in the Western desert messing around with One Hour Wargames rules. Or rather a variation of those rules to include gun calibre are armour thickness. I have started to type up the rules as they seem to be giving me an enjoyable game, and I am now only making a few clarification notes.

In the games played I have a unit is represented by two bases. This gives a 4 inch frontage and each base generally contains 2 or so vehicles or guns. A quick reread of the OHW rules and notes reminded me that a unit in this period represents approximately 3 tanks, guns, or 40 infantry. This lines up quite nicely with models on my bases.

The photographs below are from scenario 12 (an unfortunate oversight). Rather than having a river as described in the scenario I have replaced it with a minefield. The tabletop is 4 by 4 foot.

Italian troops are located around the buildings and old fort unaware the Allies know of another pathway through the minefield.

The Italian react quickly and engage the Allied forces. A tank engagement quickly started and was eventually won by the Allies. The one unit of Grants proved very useful against the lighter armour of the Italian M13's.


A weakened Allied force is able to hold the objective hilltop.

A quick note the D3 Horse and Musket rules I used in an AWI game a couple of posts ago. They are a variant of OHW rules but use D3 dice for hits and have an activation rule. These are now written up as a page (see above). Included on the page is also has a link to a PDF of the rules. I will be revisiting these rules at some point to add rules for regular infantry to charge.

Finally, painting of my samurai armies is progressing at a steady pace. Below are a selection of photographs of the units completed so far. Foot units are made up of two bases so I can mix and match arquebus and pike, bow and pike, or have a unit made up of just bow or arquebus. Mounted units are on a larger base and are treated as a full unit. I look to be about halfway through paining judging by all the available models.

A unit of arquebus and pike

A range of model from Minifigs, Minifigs S-Range, and Dixon.

Bow and pike unit.

All the figures are simply painted with a gloss finish.

Mounted samurai and their retainers following on foot.

Hight wise there is not much difference between the ranges, but some figures are definitely more chunky.


Wednesday 15 September 2021

The post arrived today

The post here in Melbourne has been a tad on the slow side with lots of delays, and I have been waiting for the arrival of a recent secondhand purchase of "Scenarios For All Ages" by CS Grant and SA Asquith. Well, it arrived today a month after it was ordered. After a quick flick through this evening I am most happy with my purchase.

A recent purchase arrives.

On the tabletop I have set up my Western Desert units for a few quick games using a variation of the One Hour Wargames rules. I am trying to factor in both gun caliber and tank armour in the rule variation, and I seem to be edging closer with each game to some rules which work for me. Here are some photographs from one of the game where each unit is made up on two bases.

Allied tanks advance.

An Italian infantry unit takes up a defensive position in some rough ground.

Units are eliminated after taking 3 hits. This Italian armoured car unit has taken one hit.

Once I have finished playing around with the rules. I am hoping to get back to my 2nd Punic War campaign.

Saturday 11 September 2021

A quick AWI Game

This afternoon I was able to set up and play a quick American War of Independence game using scenario 8 (Melee) from the One Hour Wargames book. A small American force holds a hill and the British are making a surprise attack. The objective is to capture or hold the hill. Both forces have units arriving during the game.

For this game I am using two bases to represent a unit. The majority of units are made up of Peter Laing 15mm figures.

Opening moves as the British arrive.

For the rules I am using a variation of One Hour Wargames Horse and Musket rules by Neil Thomas. The rules use D3 dice to determine hits rather than D6 and minus 1 instead of halving the hits. Units are eliminated after 9 hits. I also use a simple activation system to create increasing friction as units take hits. Units have to check to activate when attempting a move or shooting. 2D6 are rolled, if the score is greater than the unit’s accumulated hits, the unit is activated to move or shoot.

Page 1

Page 2

The British plan is to move swiftly down the road to block any reserves arriving down the road and attack the hill around the woods to avoid the American artillery position on the hill.

British move down the road and are faced by American reinforcements arriving to support the hilltop position.

British light infantry have occupied the woods and are engaging the hilltop defenders. While more British troops arrive.

British artillery engage their counterparts on the hilltop.

The last arriving American units are quickly engaged in the battle. A skirmish unit makes it way to the hilltop where the units are under pressure from artillery and shooting from the woods. 

Both sides are suffering losses and the American forces are tenuously hanging on to the hilltop. 

The hilltop is cleared but the British forces are weakened and are not well positioned to take advantage.

By game's end both forces are able to get a unit to occupy the hilltop. A drawn game.

The activity check rule worked well, causing a few problems as the game progressed and units accumulated hits. I will be keeping the activation rules for another game.

Sunday 5 September 2021

Samurai arquebus units painted and some Sci-Fi games

This week a few samurai arquebus units left the painting table. They were a mix of MINIFIGS S-Range and a few Dixon figures. The Dixon figures I bought some 40 years ago and they have been sitting in a box since then. They are slightly taller, only a fraction taller, but they are a lot chunkier. I have kept them on a single base with a standard bearer, which is a MINIFIGS figure but from a later range.

Painted arquebus units. The far base is of the Dixon figures.

On the tabletop the size difference is not particularly noticeable until you get to look closer (see photograph below). I am not too fussed about the size difference and will be including the 30-40 or so Dixon miniatures I have discovered in the armies

A closer view of the size difference.


On the gaming front some of my Warhammer 40K figures made it to the tabletop for a couple of small games. The games were to test out some rules using chance cards to mix things up and also to test out an approach for combat, both shooting and melee, where you look at the advantages and disadvantages of the attacking unit verses the defending unit. Adding the advantages of the attacking unit and then adding advantages for the defending unit. For example:
  • Shooting at close range (attacker advantage)
  • Shooting at long range (defender advantage)
  • Target in cover (defender advantage)
  • Blast weapons (attacker advantage)
  • Armoured vehicles and heavy armour (defender two advantages)
  • Fully armoured infantry (defender advantages)
A unit with two blast weapons would get two advantages.

Once all the advantages have been determined for each unit. If the attacker has more advantages to those of the target unit, then they have an advantage in combat and dice (D6+2). If the target unit has more advantages, then the attacker is at a disadvantage in combat and dice (D6-2). If the advantages between attacker and target unit are the same, then the attack is made with neither advantage or disadvantage and dice (D6).

The size of the advantage, or disadvantage, does not really matter and is ignored. You either have an advantage, disadvantage or neither. As for rapid fire weapons, they are allowed to re-roll their D6 if they want to improve their effect, but must accept the second score.

A few more games will be required to see if the rule ideas work out or the notes get put aside for a later date.

Orks defending a hill against space marines

Ork reserves arrive

Chance cards getting made up for the games