Saturday 26 September 2020

Starting the Necromunda Campaign

Originally I was going to use a snakes and ladders campaign approach I used with a Jacobite campaign (see here) for my Necromunda gang campaign. Then after working through a campaign background where three gangs (Orlock, Escher and Goliath) are trying to control one of the levels of the massive city spire Sub-Primus-X. I decided instead to try an approach based around the Monopoly and drew up a small campaign board (see below). The idea has gangs moving around the board and for each habitat square (with skulls) they land on they get to control it. There are additional squares where gangs:

  • Recruit new members - Gangs can add one new member every time they pass through two of the corners.
  • Go to jail - Lose a member through arrest.
  • Trade - Gangs are able to gain new equipment and abilities
  • Raided by the authorities - Gangs facing off against Adeptus Arbites)

When a gang lands on a habitat square controlled by another gang a game is played. If the winner is the controlling gang, they keep control of the habitat block and improve the likelihood recovery for any members downed during the game. Should the controlling gang lose the game, control of the habitat is given up to the attacking gang, but neither gang benefits from improved recovery for members downed.

Gang members don't want to lose too many members in their games as they can only recruit twice for every rotation of the board.

I will be writing up the rules in more detail as the campaign progresses and I firm up some of the rules.

Campaign Board

I will be using the scenarios from the original Necromunda rule book and dicing to determine which scenario to use.

The original rules have lots of ideas for the narrative and running a campaign.

The campaign moves began with:

  • Gang Escher moving quickly (6 rolled) to secure control of a habitat block. 
  • Gang Goliath moved slowly (1 rolled) and controls a habitat block. 
  • Gang Orlock moved through the level (rolled 5) and had one gang member arrested.

The second campaign turn threw up a couple of games to play:

  • Gang Escher moved forward (2 rolled) to secure control of a second habitat block. 
  • Gang Goliath were raided by Adeptus Arbites (1 rolled) who were aware of gang activity on the level. 
  • Gang Orlock's bad luck continued (rolled 1) and landed on the habitat block recently controlled by Gang Escher. There will be no easy pickings.

Situation after turn 2. Two games will be played. The smaller coloured dice indicate area controlled by the various gangs.

The first game to play is the clash between Gang Orlock and Gang Escher. Both gangs begin with 10 members. The scenario is a straightforward gang fight with the gangs entering from opposite sides. Victory going to the gang that remains standing or does not run away.

The rules I am using are One-Hour Skirmish Wargames.

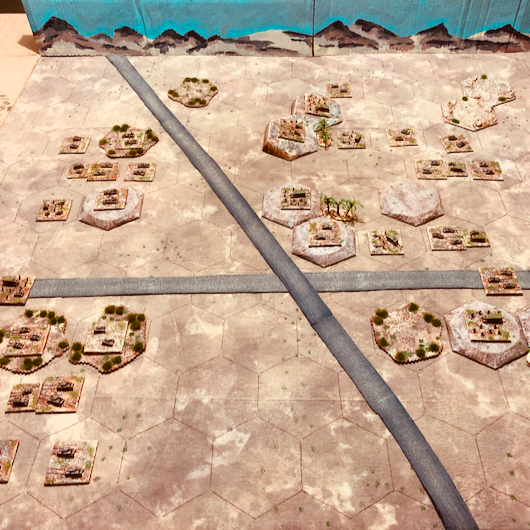
A 3x3 foot tabletop is setup
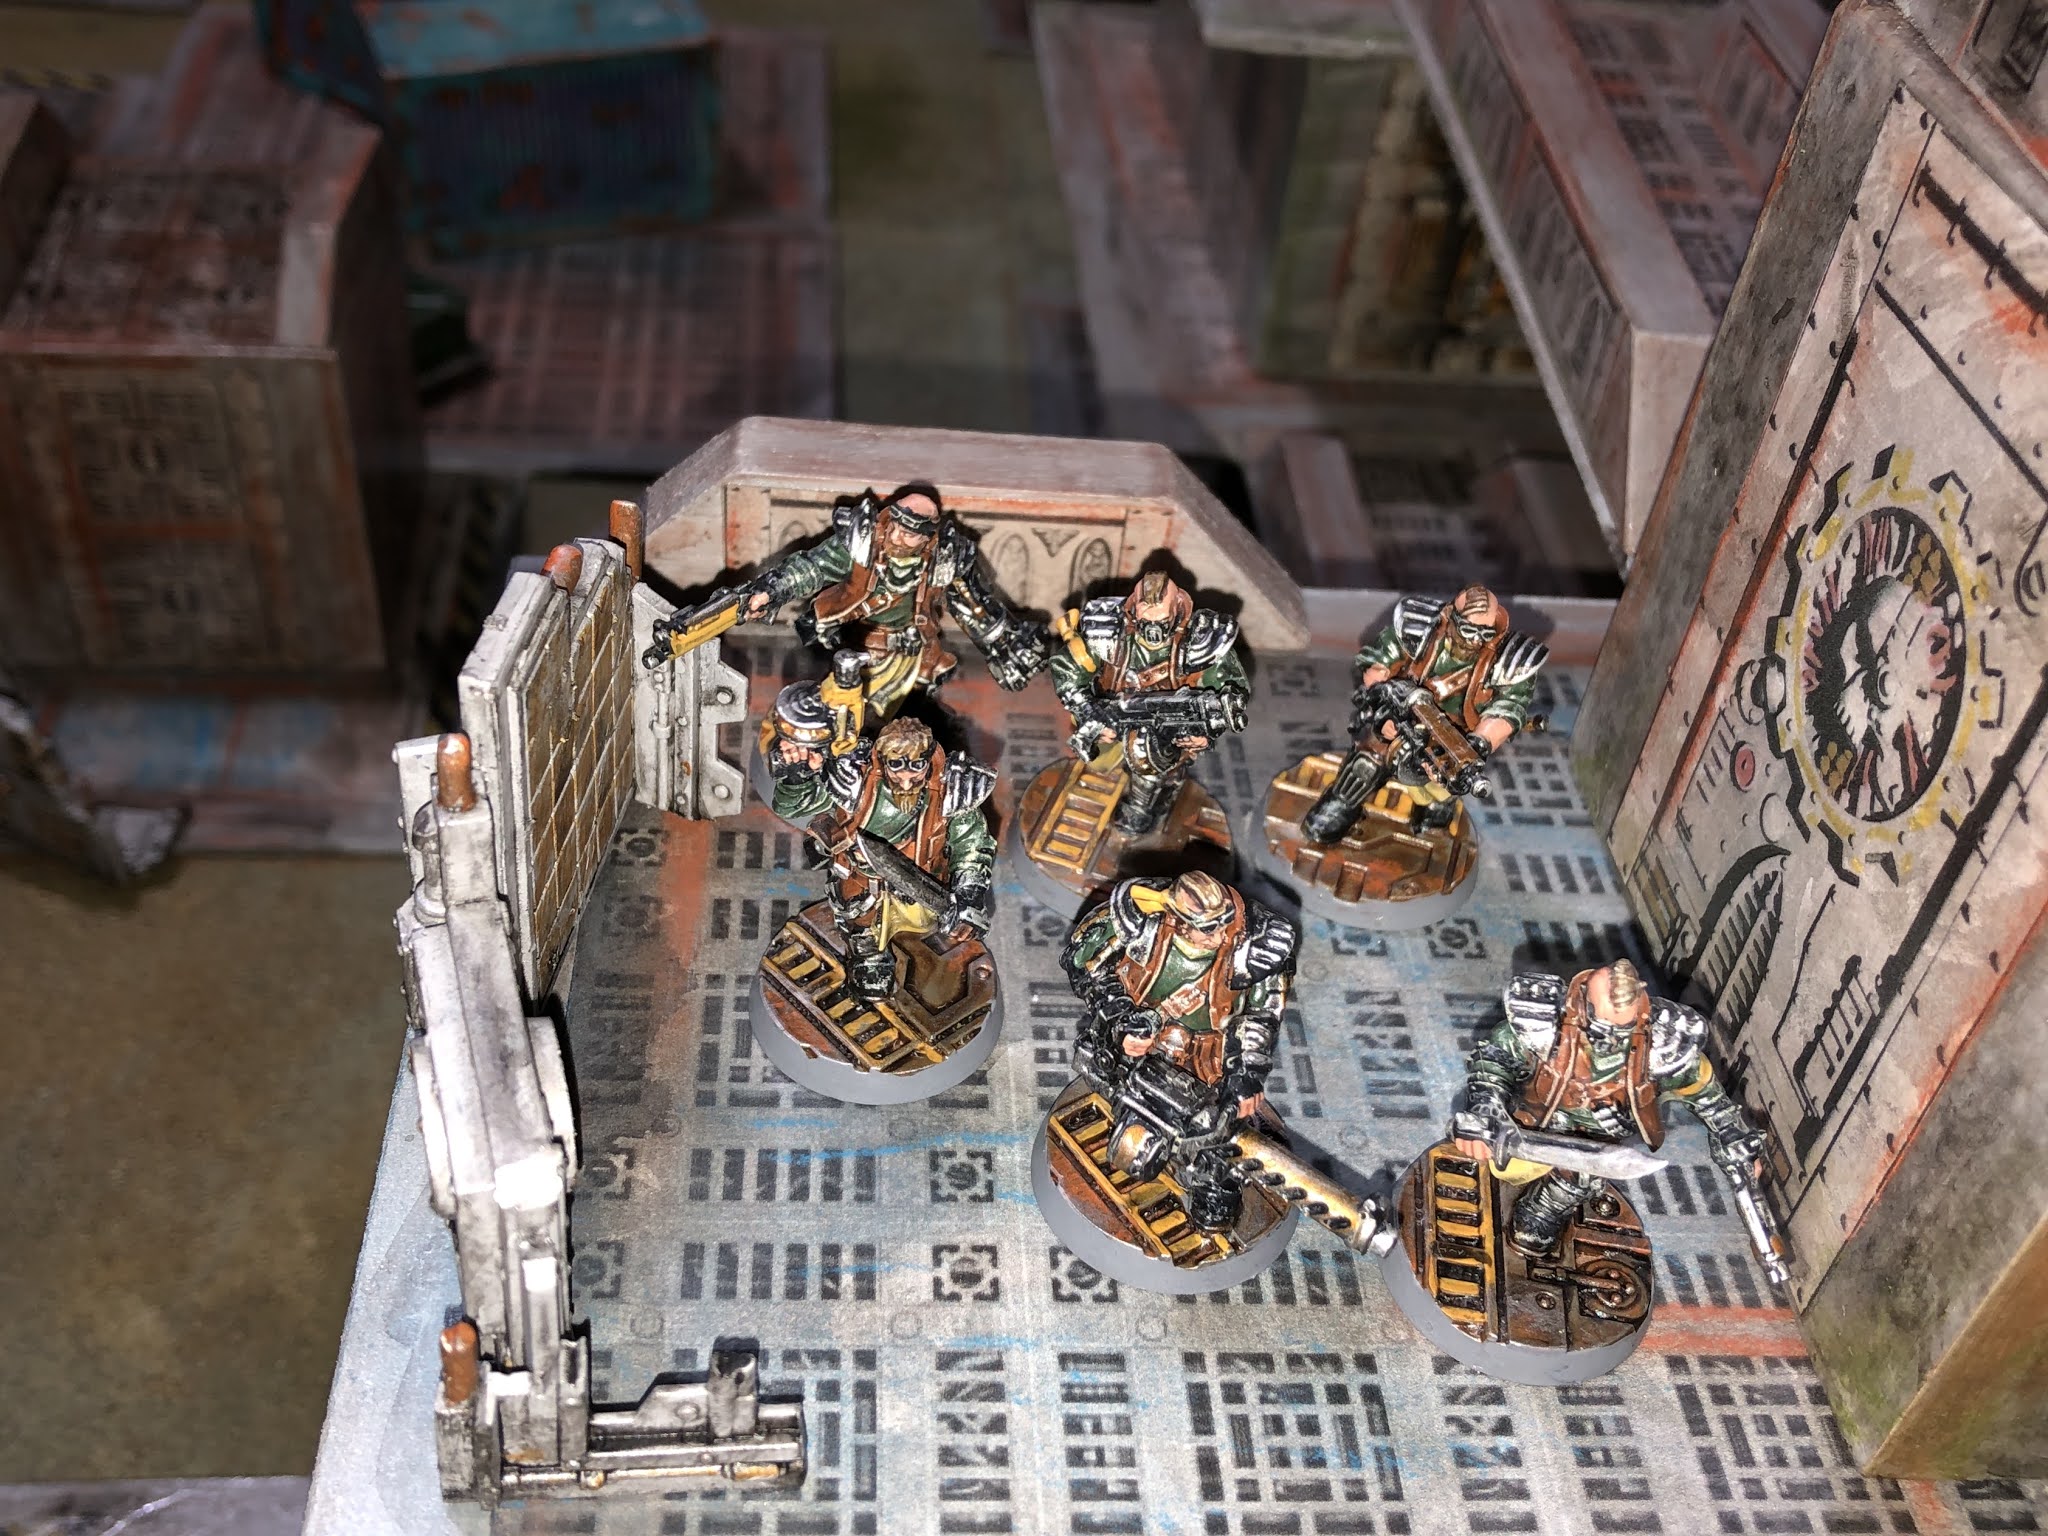
Orlock Gang arrive

Elements of Eschar gang arrive

Now time to play the game...


Thursday 24 September 2020

Reworking rules and ordering figures for new project

I have been playing around with the combat rule mechanism in the WW2 Western Desert rules I am using for my campaign games. These rules themselves are a slight variant on the Tank on Tank rules from Lock n Load publishing. The recent changes have the combat mechanism using opposing D6 dice rolls. After working through the percentage chances of hits I found they were exactly the same as the original rules. This was both interesting to do and made me laugh. I will keep the changes as I do quite like the opposing dice rolls.

The other change made is the introduction of chance cards using a very similar approach to those described in One Hour Wargames (chapter 22) which has about a third advantage cards, a third disadvantage cards, and a third no effect cards.

When making these changes I had started the next campaign turn and have decided to loop back and replay with the turn with the modified rules. I have yet to write up the rule amendments, which will be one of this weekend's activities.

The next campaign game on the tabletop

A few expired down-lights converted to scatter terrain for my Necromunda games have now been painted. I must be getting close to the end of this terrain project and will soon be starting a mini skirmish campaign as I have sufficient figures painted to begin with three gangs. I just need to decide how best to run this campaign, and will most likely be using a snakes and ladders approach as I did with my Jacobite campaign.

Scatter terrain representing some sort of vent.

For a while now I have been thinking about dabbling in the ancients period. The furthest back I go with my collections are: a One Hundred Years War Minifigs collection and 1066 paper soldier collection. The idea of collecting a couple of ancient period armies was cemented after reading Airfix's Guide to Ancient Wargaming.

recent reading

My first efforts at wargaming in this period go back to when I was just a teenager, or maybe a fraction younger, and was with Airfix's Romans and Ancient Britons and a few Robin Hood figures thrown in for good measure. The book "Introduction to Battle Gaming" by Terry Wise was my inspiration at the time, and I used to look at the old black and white photographs time and time again.

Wonderful battles with Airfix figures.

With this in mind I opted to go with soft plastic figures for nostalgia and to keep the costs down. Looking around at what was available online I opted to go with a few Roman and Carthaginian army boxes by HAT Industrie figures

HAT Roman Soldiers

HAT Carthaginian Soldiers

As for rules I have not given it a lot of thought, but I am very tempted to go with DBA as I do have a copy of the rules (version 1.1), and I am sure OHW rules will also get a go.

Rules in the cupboard waiting to be used

Saturday 19 September 2020

Necromunda gang addition and small terrain items

With spring on its way here in Melbourne I am enjoying spending more time outside in the garden planting vegetables and consequently less time painting and wargaming. However, during the week I did managed to get in a WW2 Western Desert campaign game and paint up a few more items for a Necromunda style campaign, which I am still in the process of planning out.

A lone psychic to add a bit of variety to the games

Drain covers for the sewers. Three have been made to allow gangs to enter one and appear randomly the next turn at one of the other two drain covers.

Old used down lights with their connection pins removed will be used to create some more scatter terrain

The WW2 Western Desert campaign is progressing again with the next campaign turn and one game has already been completed during the week. All being well a second game will be played later this weekend. 

I have been tinkering with the rules for these desert games. The current set are very much based upon Tank on Tank rules, but use a D10 dice rather than 2D6 dice for combat resolution. The current tinkering has opposed D6 dice rolls where the attacker adds the number or attacking units and the defender adds a defence value. A few more games will be required before I settle on them, or return to the previous approach.

The early stages of a WW2 Webster desert game

Another change to the game is the introduction of chance cards. 15 cards for each player which are very much along the lines of those described in One Hour Wargames, with slight variations to fit with the rules used. 

I find the use of change cards also helps me to keep track of time in the game, as I always seem to forget to push froward the game clock and in next to no time have lost track of the turns. If find I do not forget to pick a chance card and once the cards are all used up it is the end of the game.

Saturday 12 September 2020

A WW2 game using a scenario from Scenarios for Wargamers

During the week I was able to squeeze in a WW2 North West Europe game. The game used the scenario Holding Actions (1) from the book "Scenarios for Wargames". One of the reasons for playing this game was to see how my WW2 D3 dice rules would work on the hex grid I had marked out a good few weeks ago (see here). The hexes are quite large being 8 inches diameter to accommodate based units and scenery.

Holding Actions (1) from Scenarios for Wargames

One of the challenges of using scenarios from this book is they appear to be for use with larger tables, 8 x 6 foot table is my guess. Using my large hex grid adds to this challenge were I have a table top of 6 x 9 hexes. That said, a number of the One-Hour Wargames scenarios are inspired from scenarios in this book, and they are geared to a 3 x 3 foot tabletop. So it should be possible to adjust (or is it scale down) the scenario from a space and unit numbers.

I thought I would try a layout using Google Slides to workout the best tabletop arrangement. The defending Germans in my version of the scenario are deployed North-West of the red line A-B, and Allied forces arrive randomly on the roads in the South-Eastern corner. The Allied aim is to push along the road and exit the road at point C.

Hex map of the tabletop layout

The order of battle...

German defenders:
  • 1 x Tank unit (Panther)
  • 1 x AT gun unit (75mm)
  • 3 x Infantry units
  • 1 x Mortar unit (Nebelwerfer)
Allied attackers:
  • 4 x Infantry units (3 Half-Tracks and 1 Bren Gun Carrier)
  • 3 x Tant units (Shermans)
  • 1 x Armoured Car unit
  • 1 x Mortar unit
The Allies quickly appear and push their reconnaissance unit towards the northern wooded area. They were soon engaged by infantry and AT fire and quickly retire. The Allied commander had been expecting an encounter with enemy forces and quickly pushed forward his infantry to engage the enemy in the woods, while his tanks took up position on the road.

Allied units arrive

The armoured car unit comes under fire from the woods

Allied unit push into the woods and prepare to attack along the road

Having moved into the woods and set up their mortars in the town, the Allies started pushing forward along the road. At this point the Panther positioned hull down on the other hill fired at the advancing tanks. With a combination of infantry and tanks the attacking Allies were able to eliminate the Panther unit, but took heavy casualties in doing so.  

With only a few weakened infantry units to push on the Allied commander called off the attack. The two remaining German units remained until dusk before retiring. They had done their job in holding up the Allied advance.

The attack is in full swing

A weakened Allied attack decides to retire

An enjoyable game which was not decided until the last few turns. From a rules point of view they worked well using the hex-grid. One thing I allowed during the game was to permit two units to occupy a hex providing it contained no terrain and tank wrecks. Both units receive an activation playing card and can opt to use one or the other card if they move together or shoot at the same target. I have updated the rules (see top of blog).

A messy tabletop when the action cards are allocated


Tuesday 8 September 2020

WW2 Western Desert campaign turn 7 game 2

In the first game of campaign turn 7 the 21st Panzer division fail to make a breakthrough, and their mobile reserve waits patiently. A second attack by the Italian Pavia infantry division hopes to make that breakthrough. The defenders of this attack will be the New Zealand infantry division.

Campaign map

Order of battle:

Attacking Italian Forces

  • 2 x armoured car units
  • 4 x Infantry units
  • 3 x M13/40 tank units
  • 1 x 47mm AT unit
  • 2 x Semovente units
  • 2 x Artillery units

Defending forces

  • 1 x armoured car unit
  • 3 infantry units
  • 2 x 2 pounder portee units
  • 1 x 6 pounder AT unit
  • 1 x Matilda tank unit
  • 2 x Valentine tank units
  • 1 x 25 pounder unit
  • 1 x 5.5" Artillery unit

The defending New Zealanders have about a third of their units in reserve. The remaining forces have taken up a defensive line along a series of hills, escarpment, and town. Additionally AT guns have been positioned forward in an area of scrub in the centre.

Tabletop and planned attacks

An initial Italian force of armoured cars, infantry, and artillery arrive with the aim of eliminating the AT gun threat. Two reserve forces: an infantry force will strike along the road, and a second armoured force will attack on the defenders left flank.

The opening battle moves had initial Italian forces attacking the AT guns. The defending AT guns proved to be very tenacious and eventually air support was called in to help.

Allied AT guns prove very effective and delay the Italian advance.

Italian infantry reserves arrive.

Air support help to dislodge the AT units.

Once the Allied AT guns were dislodged, there was a pause in the battle as reserves were moved up along the road. These attacking preparations were disrupted by Allied air support. 

AT guns are finally dislodged and both sides take the opportunity to reorganise and bring up reserve units.

Allied air support attack Italian reserves as the move along the road.

After a brief pause in the battle the Italian flanking force of tanks arrive. After some initial success the Italian attack was slowly worn down and eventually stopped. At which point a last ditch attack along the road was made with the remaining Italian infantry units. This proved futile and was soon called off.

Italian tanks attack on the flank.

Reserves are called upon to repulse the flank attack.

A final strike along the road by Italian forces.

The final attack on the town fails to make any headway.

This victory for the defending New Zealand infantry division is the second Allied victory of the campaign turn, and now means the initiative moves to the Allies who will be the attackers in the next campaign turn.

Saturday 5 September 2020

The post arrived and Sci-Fi terrain project wraps up

Today I was going to be writing up the latest game report from my WW2 Western Desert campaign. But all plans were cast aside as the post arrived with the latest copy of "Programmed War-game Scenarios" by C.S. Grant. Once upon a time I owned this book back in the 1980's and somehow managed to lose it while moving house and country. So it was great to buy the new reprint from Cavalier Books. I have started reading through the chapters and scenarios, after the obligatory skipping through the pages thinking that looks interesting, and oh I look forward to reading this. I must say I do like the size of the book, it is magazine size and is nicely laid out making it easier to read.

A battle report has yet to be written up for the last WW2 Western Desert game.

The distraction that arrived in the post this weekend.

During the week I was able to complete a few chimneys and a crane. I hope these will to add to the industrial look and feel of my sci-fi wooden block terrain. The chimneys were made from some old cardboard tubes I had saved in the hope that one day they may prove useful. 

I cut the tubes and stuck on an MDF base and a cardboard top. The top was trimmed once the glue was dry. These were finished off they same way as all my terrain for this project with a paint of grey, printed details such as ladders stuck on, a quick wash of black, before using caulk pastels to add some rust and tone to the features.

The crane was made from some left over wood and made so it can reuse a chimney by sitting on top of the structure.

A couple of recently completed chimneys. They fit quite nicely on to the existing buildings to turn them into factories, rather than habitats. 

A chimney on its own.

Old cardboard tubes were used for the chimneys.

An MDF base was glued to the bottom and cardboard at the top and later trimmed once the glue had dried.

The crane fits on to a chimney

Having set up the terrain to take photos it was to good an opportunity not to have a quick skirmish game using One-Hour Skirmish Rules. It also allowed me to use my newly painted gang of squat mercenaries.

Squat mercenary gang

The heavily armed and armoured gang have been employed by the local merchant house to defend a recent shipment of contraband goods overnight.

The squats are tasked with guarding the contraband.

News about the contraband has leaked and a local gang has decided to try and steal it. However, they have to quickly overcome the defenders as the local enforcers will likely turn up once gun shots are heard.

The local gang

Local Enforcers

The attacking gang sneak up as close as possible to the storage area, before launching their surprise attack. After a fierce shootout they are able to get to the contraband. However, they are unable to steal much of the contraband as the local enforcers turn up surprising and taking down some of the gang.

The attack begins

The first contingent of Enforcers arrive.

After the shootout the remaining gang members pose for a selfie.

All being well I hope to post the WW2 game report during the week.