Showing posts with label Peter Laing Miniatures. Show all posts

Friday, 31 July 2026

Some painting, terrain, and a second hand find

This week I managed to finish painting a unit of Highlanders for my Anglo-Zulu War project. These figures, other than the officer, are nicely converted old Airfix Napoleonic Highlanders and have had an interesting journey before finally reaching my painting table.

Converted Airfix Highlanders that were recently gifted and are now painted and based. The officer is from a HaT kit. I could not resist adding the bagpipes.

A view from the front.

The figures originally belonged to John of the "Wargame Hermit: Solo Wargaming" blog before being passed on to James of the "Solo Slow Wargaming" and "The Chauvinistic Blog" blogs. James had been unable to find a use for these, along with a selection of other Colonial miniatures, so very kindly passed them on to me. I wrote about this unexpected gift a couple of posts ago (here). They have now been repainted and based, and make a very useful addition to my growing British force.

A couple of weeks ago I placed a bid on what appeared to be some Peter Laing 15mm American War of Independence (AWI) figures judging by the photo. Fortunately, they turned out to be exactly that and some 60 figures. The Peter Laing range has been unavailable for many years and are difficult to find.

The Peter Laing AWI figures. Alas only one cavalry figure, I could do with another 4 to make a unit.

I originally bought my Peter Laing AWI collection back in 1978, although it remained unpainted until around 2015 when I returned to historical wargaming after reading "One-Hour Wargames" by Neil Thomas. These newly acquired figures will be a very useful addition to the collection and should allow me to add a few more units.

Finally, on to terrain, or more specifically - sci-fi terrain. I am always on the lookout for inexpensive items that can be repurposed for the tabletop, and during a visit to our local $2 shop I spotted some plastic flowers whose heads looked as though they might make some interesting alien plants.

Plastic flowers purchased for sci-fi terrain.

The flowers are removed from the stem and the connector at the bottom clipped off so the flower can sit flat on the tabletop.

Some nice colourful alien terrain.

For around $5 I decided they were worth a buy. Once home, I removed the flower heads from their stems and found that, with clipping off the base that attached them to the stems and a little bending, they sat nicely on the tabletop. I think they look best arranged in clusters of two or three adding some distinctive colours to the tabletop.


Wednesday, 22 April 2020

Adding morale to OHW horse and musket for AWI

As a break from my WW2 Western Desert campaign and associated games. I decided to get out my old Peter Laing AWI armies for a game (or two) and to test out some morale rule ideas which are bolted onto One-Hour Wargaming (OHW) horse and musket rules.

As regular readers know I quite like using D3 dice and often change various OHW rules from using D6 to using D3. So rather than using D6-2, D6, or D6+2, I use D3-1, D3 and D3+1 for hits, and cover reduces the score by 1 rather than halving.

But first the tracking of hits. In the games I was tracking hits on D6 dice, but decided I would rather track units to 8 hits using counters. They are less obtrusive than dice, particularly with 15mm figures. I cut out a number of squares from MDF, painted them green, on one side numbered each edge 1 to 4, and 5 to 6 on the other side.

When tracking hits the side with the appropriate number is placed against the stand

Numbers are written on both sides of the counter
A unit with 3 hits
For the AWI games I wanted to make unit elimination less predictable than just using the normal OHW approach of accruing of hits, and have the possibility of earlier unit eliminations or forced unit retirement. The morale rule can cause early eliminations of cavalry, skirmishers and artillery, while line infantry are forced to retire.

The rules are below after a couple of photos from a recent game using the rule modifications.

Close up of the action
A game in progress
Units

  • Infantry (line infantry)
  • Grenadier
  • Skirmishers (light infantry)
  • Cavalry
  • Artillery

Sequence of Play

  1. Movement
  2. Shooting
  3. Charges
  4. Morale and Eliminating units

Movement

  • Infantry - 6”
  • Artillery - 6” (remain stationary after shooting)
  • Skirmishers - 9”
  • Cavalry - 12”

Turning: Units may pivot on their central point at the start and/or end.

Woods - Only skirmishers can enter.
Towns - only Infantry & Skirmishers may end a move in a town.
Marsh/Lake - impassable.
Rivers - Can be only crossed via bridges & fords. It takes a full move to cross.
Streams - cannot be crossed by artillery. All other units take a full move to cross.
Difficult terrain - only Infantry & Skirmishers can enter.
Hills - all units can move onto hills.

Interpenetration: only Skirmishers can pass through other units and vice-versa.

Shooting
Units that have moved cannot shoot, and cavalry cannot shoot. The procedure for shooting is as follows:

Check field of fire - units can only shoot at a single unit within 45 degree of their frontal facing side. Units in towns have a 360 degree field of fire.

Measure the range - infantry and skirmishers have a range of 12” and artillery 48”.

Assess hits - units roll a D3 dice when shooting with the following adjustments:

  • Infantry - D3
  • Grenadier  - D3, unless within 6" of target then D3+1
  • Artillery - D3-1
  • Skirmisher - D3-1

Artillery can fire over other units if positioned on a hill.

Units in towns always shoot D3-1.

Charges
Only cavalry units may charge into combat with the following restrictions:

  • Can pivot up to 45 degrees before charging.
  • Can only attack a single unit.

Cavalry units roll D3 dice with the following adjustments:

  • Minus 1 from the score if the target is uphill.
  • Double the hits if attacking the flank or rear of a unit.

After the hits are applied. If the defending unit is not eliminated or fails its morale test, then the cavalry retire 6”.

Morale and Eliminating Units
After all shooting has occurred. Any unit that has taken hits must take morale tests.

Roll 2D6 and if the combined score is greater than the unit’s number of hits, the unit carries on. Otherwise the unit fails its morale test.

Artillery, cavalry or skirmishers failing morale tests are eliminated.

Infantry and grenadiers failing morale must retire 6” away from the attacking unit(s). If their retirement path is blocked they are eliminated.

If infantry and grenadiers are charged by cavalry and fail a morale test they are eliminated.

Units are always eliminated upon taking more than 8 hits.

Whenever a unit is eliminated from shooting by infantry positioned within 6" range. One attacking infantry unit can advance into the vacated space. This represents units using the bayonet and charging in when units start to waver.

Note: If you don't like the use of D3 for hits and prefer the use of D6 for hits. Then the morale rule can work the same way by doubling the score of 2D6


Saturday, 21 September 2019

AWI Cavalry and Dragoon units

I have a reasonable collection of Peter Laing 15mm American War or Independence (AWI) miniatures. I brought them way back in the late 1970's shortly after I started work. I started painting them, but never completed the painting until I dug them out of their boxes in 2015, and finished off what I have started some 35 years earlier.

The figures in action
Most games only have 8-12 units per side so the existing armies are quite sufficient for all units types except cavalry/dragoons
Generally I have sufficient miniatures for infantry and artillery, but I am a bit light on for cavalry, with both sides only having one cavalry/dragoon unit. Each unit with a mere 5 figures. Ideally I would like to have some more cavalry so I can play all of the scenarios in the books "Seven Steps to Freedom" and "Wargamer's Handbook of the American War of Independence".

Two enjoyable war-game related books covering the period
British Units
American Units
As Peter Laing miniatures are no longer manufactured, secondhand miniatures are the only option and are unfortunately a bit of a rarity to obtain on eBay. The alternative was then to purchase some other 15mm AWI. One of the problems with other manufactures is the level of detail they have compared with Peter Laing miniatures which are of their time and are much simpler figures.

A question to the MeWe Peter Laing group of other wargamers and collectors of Peter Laing figures regarding possible alternatives helped determine my next steps. They are a helpful group and I soon discovered some of the original miniature ranges were intended to be ‘N’ gauge and are smaller 15mm. Later rangers were truer 15mm miniatures. So with that in mind I began looking at 12mm miniature producers. In the end I settled on 10mm AWI Range from Pendraken Miniatures hoping that most miniatures are a fraction larger than their stated 10mm size.

A couple of weeks ago the figures arrived. In the parcel with the cavalry were some wagons along and a couple of mortars and crew which I had also selected. Comparing the cavalry showed the miniatures to be a fraction smaller, but overall the proportions looked similar. The slight difference in height would be disguised during basing with the addition of 1mm card to the figure's base.

A comparison of cavalry miniatures. Peter Laing 15mm cavalry are painted and the unpainted are Pendraken 10mm cavalry. This shows how the Peter Laing ranges started as being undersized.
The Pendraken mortar will be a nice addition.
A comparison of artillery crew shows the difference. Fortunately I have just enough  spare AWI artillery crew to  man the two mortar units.
The artillery pieces and wagons will work out fine, but I will use my last few Peter Laing artillery crew to man the mortars. The 10mm Pendraken crew are just too smaller scale to be used. All in all a good outcome as I will add two cavalry units to both armies, a couple of mortars with neutral painted crew so they can be used by either army, and a couple of wagons.

Peter Laing miniatures on the left front unit. I chose not to mix the figures and the original cavalry will remain.
A side on comparison. Peter Laing cavalry unit at the front.
Over the next week I will be getting back to my English Civil War campaign which has been paused now for a couple of months.

Tuesday, 5 February 2019

A quick AWI game

In searching for various spare bits to use on my sci-fi block buildings. I came across my American War of Independence (AWI) armies and thought it would good to get them on to the table top for a game. I have been playing a few games with the digital version of Worthington Publishing's game Hold the Line by Hexwar, which appears to be quite a faithful reworking of the boardgame, and thought I would try and use the rules on the tabletop. One hex would translate to 6 inches in the wargame.

Here are a few photos of one of the games. The figures are old Peter Laing miniatures.

American forces hold the hill and the British objective is to take it.
British forces lined up
American forces push forward on their right flank.
British artillery open fire at the Americans on the hill
British units push forward 
The assault on the hill begins, but failed to achieve the objective
I ended up playing a couple of enjoyable games using these rules and will most likely use them again for this period. Although I will see how they translate to a square grid, but for the moment the armies have been packed away for another day.

Tuesday, 9 October 2018

Making some trenches for a WW1 game

For a bit of a break in-between English Civil War games I decided to get out my old Peter Laing WW1 15mm figures for a game. To get some inspiration for a scenario I looked up "Command and Colours The Great War" for some maps and found Cambrai (Bourlon Village & Wood) - 23-25 November 1917. Then setup the tabletop as best I could.


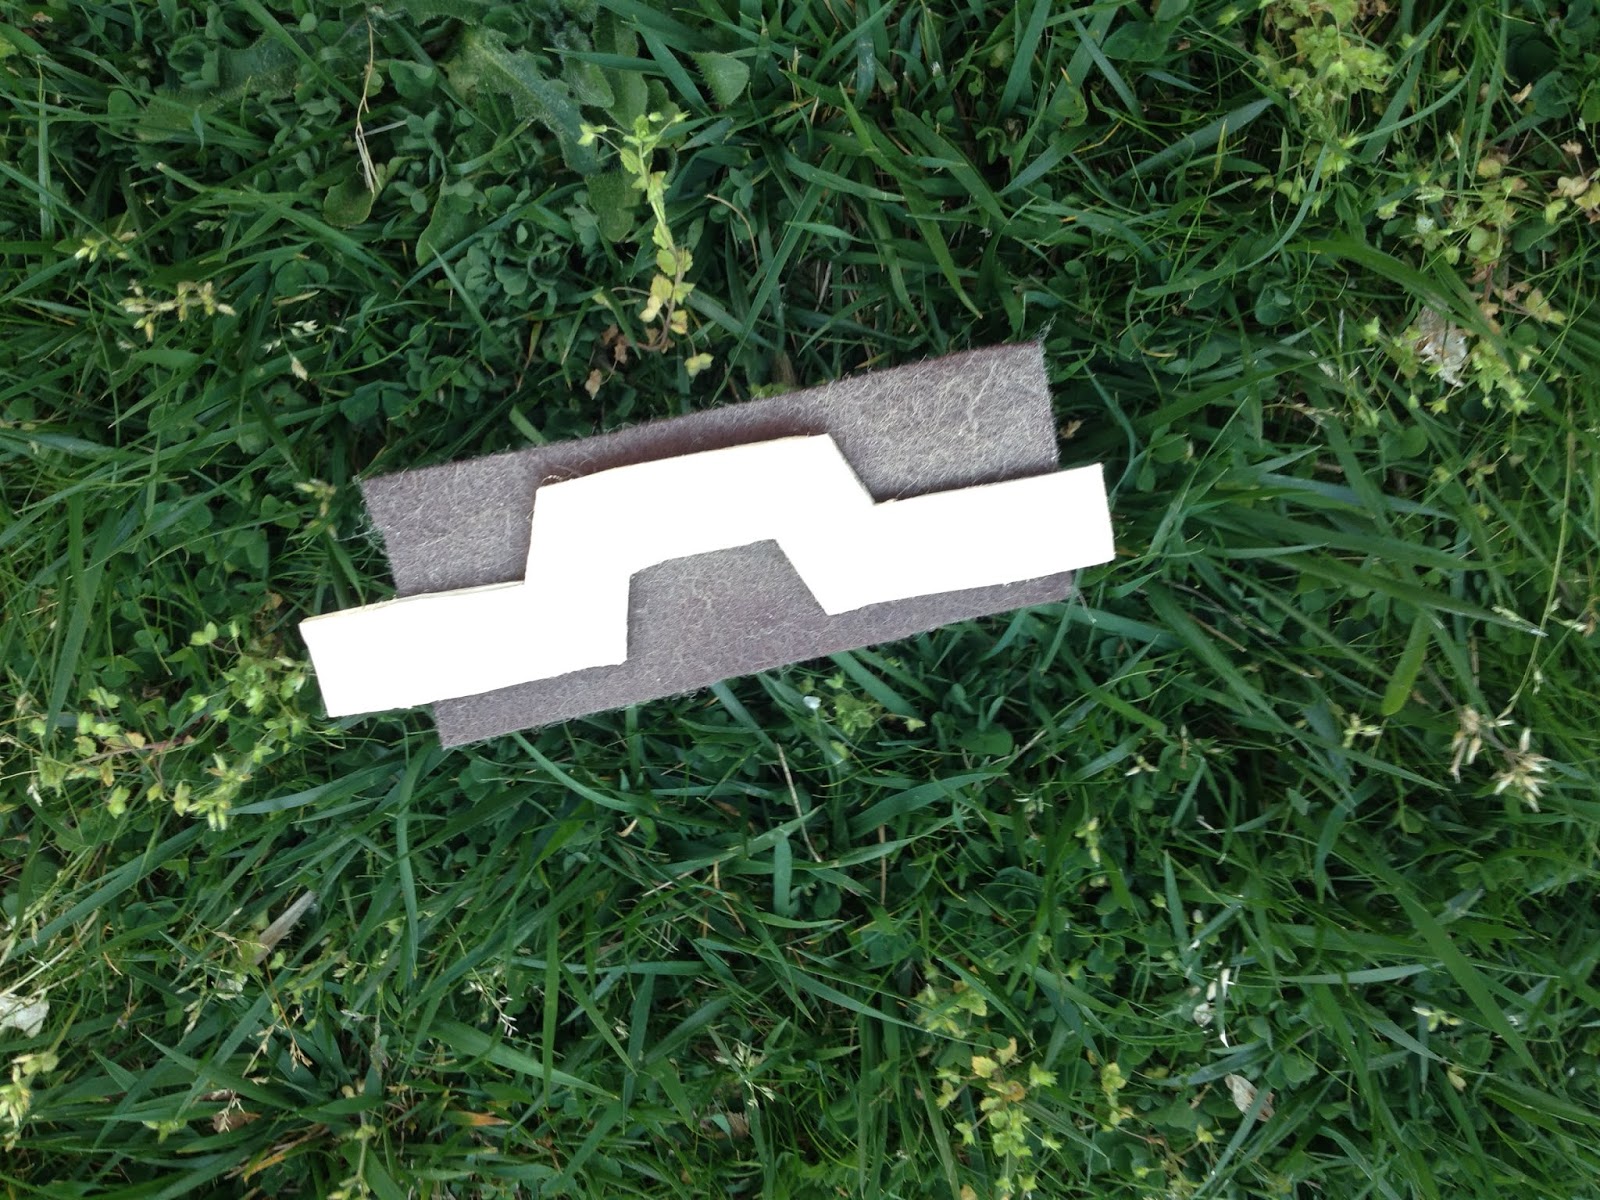
One of the challenges with WW1 games and the tabletop are how to represent trenches. My troops are on fairly large 3x4 inch bases and do not fit into any constructed trench. So my latest attempt is to use dark brown felt, an zig-zag template over which is sprayed a sand colour

A template is placed over the felt and spayed with a sand colour 
The end result from spaying is starting to look trench like (note - the over spray helps to disguise the weeds in the lawn)
A black marker is used to share up the trench outline and give the impression of duckboards in the bottom.
I am using a grid for my WW1 game, so troops occupying a length of trench are placed just behind the trench to show occupation.

A few more photos of the game set up. I plan to use a D3 version of One Hour Wargame rules on a 6 inch grid.

Balsa wood tanks support the assault
Bourlon Village
Bourlon Wood

Thursday, 16 February 2017

Planning for some WW1 games

I am starting to plan out another set of games for the 6x6 challenge this time set in the WW1 period 1917-1918. I plan to use One-Hour Wargames (OHW) rules with a few modifications to add tanks and aircraft, which I used with much enjoyment about a year or so ago.

WW1 Peter Laing figures on a large base 3x4 inches
An infantry unit defending from their trenches
For units in trenches I used some quarter round wood to show units in trenches. They served their purpose, but don't really look very trench like. As I had some surplus brown felt left over from making fields I thought I would try out a different way of representing trenches.

Cost felt used to show trenches
The felt was cut out and duckboards quickly drawn on with a black marker pen as though you are looking down on the trenches. Also communication trenches can be shown.

With old trenches placed at the front
I recon I will just use the felt trenches without the old trenches (see below). Cheap and easy to make which is always a bonus for me.

A German Infantry unit occupying trenches
One rule adjustment which I intend to applying to OHW rules is reducing the number of hits you have to track. I am going to still roll the D6-2, D6 and D6+2 but for every two scored on the D6 deduct 1 hit rounding down. So a roll of 5 on a D6 would cause 2 hits. That way on the 7th hit the unit is eliminated, rather than the 15 in OHW.  Then units in cover require 3 to be scored for a hit (eg. a roll of 5 on a D6+2 = 7 and 2 hits).

Sunday, 5 February 2017

AWI Campaign Game Report - Battle of Fairfield Bridge

The latest battle game of my America War of Independence campaign occurred at a place called Fairfield Bridge, November 16th. 1776.

British forces (representing 3200 infantry, 200 cavalry and 4 guns)
1 x Artillery
2 x Light Infantry
1 x Cavalry
6 x Infantry

Note - in my previous post I have put down 11 units. A mistake on my part as there are only 10 units.

American Forces (respresenting 4000 infantry, 200 cavalry and 8 guns)
2 x Artillery
2 x Frontiersmen
1 x Skirmishers
6 x Continental Infantry
1 x Militia Infantry

The British had won the D6 roll for choice of side and went for the side with the defendable river. From the starting positions both sides occupied some buildings and consequently both increased their commander resolve by plus 1.

American command resolve started at 4 (by dividing number of units by 3 and discarding any remainder) plus 1 gave a starting resolve of 5. British resolve was 4 (10 units divided by 3 and plus 1).

Turns 1 and 2
American forces quickly moved forward to occupy the hills either side of the road. Hills are key features which when occupied give a plus 1 to resolve. American resolve by the end of turn 2 stood at 7.

The British did little other than position infantry near the bridge and have their artillery open up on the advancing american left flank inflicting a couple of casualties.

American advance
Turns 3 and 4
The British continued with their artillery fire while pushing one infantry unit across the bridge. Meanwhile American forces continued to move up and used their artillery to open up on the British left flank to good effect.

Both side prepare for the closing up and swapping volley fire

Turns 5 and 6
Somewhat surprisingly the British took the initiative and pushed a second unit across the bridge while light infantry emerged from the wood to ford the river and provide some additional support. Their cavalry and one infantry unit in reserve were moved to support the attack.

The American forces quickly responded moving a couple of units across from their right flank. Unfortunately their skirmisher and frontiersmen units were entangled in the ever ensuing assault across the bridge. Not ideal as they had no cover and were facing line infantry.

American artillery fire had been very effective and the British left flank had retired just out of range.

American resolve = 7 (no change) and British resolve = 6 (up 1 for holding the bridge).

Battle ensues on and around the bridge
Turns 7 and 8
The battle around the bridge was now the focus of the battle. The American plans to use their numerical superior numbers to advance on the British left flank were stalled, as their commander was bringing more units into the line around the bridge.

Meanwhile, the British were trying to organise their reserves and get them across the bridge as swiftly as possible.

Both commanders lost a unit a piece and reducing their resolve. (American commander resolve = 6 and British = 5.)
British artillery contributing to the attack across the bridge

Turns 9 and 10
Both commanders were rallying their units and trying shore up their lines. The British did successfully rout an American skirmish unit, but their lines were looking pretty precarious. However, the British commander did manage to bring another infantry unit across the bridge leaving their cavalry on the far side.

Commander resolve American = 5 and British = 5.

British forces continue to hold on to their bridge head
Turns 11 and 12
The battle around the bridge was at its fiercest with both sides losing units. The British lost 2 units and the Americans 1 along with some heavy casualties. The British had thrown in all their available reserves except their cavalry. Things were starting to look pretty grim for the British commander as the American second line and flank units started to join the battle.

Commander resolve American = 4 and British = 3.

The British attack was starting to lose momentum with only their cavalry in reserve
Turns 13 and 14
Both sides continued to slog it out exchanging volleys. The Americans were to lose 2 units and the British 1 unit. The British cavalry positioned itself for a charge of the guns positioned on the hilltop.

Commander resolve American = 2 and British = 2.

Turn 15 - Cavalry take the guns

Turns 15, 16 and 17
The climax of the battle saw the British cavalry in a last bid attempt try and steal victory from the American forces who were closing in on the depleted British units defending the bridge. They charged up and took the guns, giving British resolve an important boost (Commander resolve American = 1 and British = 3). Then they charged along the hill towards the American commander and a unit of continental infantry and in the process rolled very effectively in combat over two turns to clear the hill of American units. American commander resolve hit zero and the game was over.

British cavalry clear the hill of defenders
Summary
If it had not been for the final cavalry charge victory would have gone to American forces. It was a close run thing, the British had done better concentrating their forces where the spread out American line took some time (due to rallying) to move on the attack across the bridge. That said, the  British cavalry snatched victory from the jaws of defeat.

Both sides had gambled: the American's in the lead up to the battle with stacking most of their strength to enter with a numerical advantage; and the British making the first assault and holding their cavalry in reserve until the last moment.

I was rather hoping for an American victory to even up the campaign battle victories, but it was not to be. The score now stands at: British = 6 and American = 3.


Saturday, 4 February 2017

AWI Campaign - Battle of Fairfield Bridge, November 16th 1776

It has been a while since I have had a game from the American War of Independence campaign. So far the British forces have won 5 of the 8 battles and recently secured Philadelphia. After a brief respite they are now marching again towards Newcastle. Leading to the ninth battle game of the campaign.
Campaign moves and battles
The American commander took a bit of a gamble with his three columns by making two of the columns very strong and one quite weak. The way I have been determining the available forces for a game is to have them divided into three columns and roll a D6 for each one. The lowest scoring column does not appear on the table and is considered too far away to march to the sound of guns. Where D6 rolls are equal the commander choses the column.

Rolling for American column available for the battle
The gamble paid off! Giving American forces 13 units and British 11 (they were more conventional with an even split across their columns. Both forces were already depleted due to persistent rain and as a consequence could not include one artillery and two other units of their commanders choice.

The battle of Fairfield Bridge was to take place November, 16th, 1776. The tabletop terrain was all randomly generated as I have done so throughout this campaign. This time a river was introduced, which was fordable by all except artillery who could cross at the bridge. The table layout provided a interesting decision. The most defendable side had the river closest to the edge, but only two terrain (building and bridge) squares to boost a commanders resolve. While the least defendable side furthest from the river had three square which if occupied would boost command resolve (two hills and buildings).

The British won the D6 roll and opted to defend along the river.
The numerically stronger American forces line up 
British forces prepare their defence of the river
Light infantry in the woods defend the centre
American forces ready to go
I will post the battle report soon. The game has been played. I am trying to keep my posts shortish as I find long posts consume too much time and can become a bit of a chore.