Monday 27 February 2023

Samurai game using a flank attack scenario

This samurai game was played remotely with Jon of Palouse Wargaming Journal. The miniatures are a mix of old Miniature Figures S range and later range with a few Dixon miniatures thrown in.

A game set in the latter part of the Sengoku period (1467-1615).

In setting up the game I gave Jon red army and myself Blue army which does not tie in with the blue and red on the map. These mistakes happen when you are focused on getting the camera setup and with a good angle for the remote player. The game used scenario 6 from One-Hour Wargaming - flank attack (1) with some additional terrain added to reflect Japanese terrain.

The briefing for the game

Early turns…
In the early stages of the game Jon moved his Red Clan units swiftly down the road and attacked the defending Blue Clan forces blocking the road. My Blue Clan units defending the town engaged the advancing Red Clan forces, but activations were problematic early on and my flanking forces were slow to attack the flank.

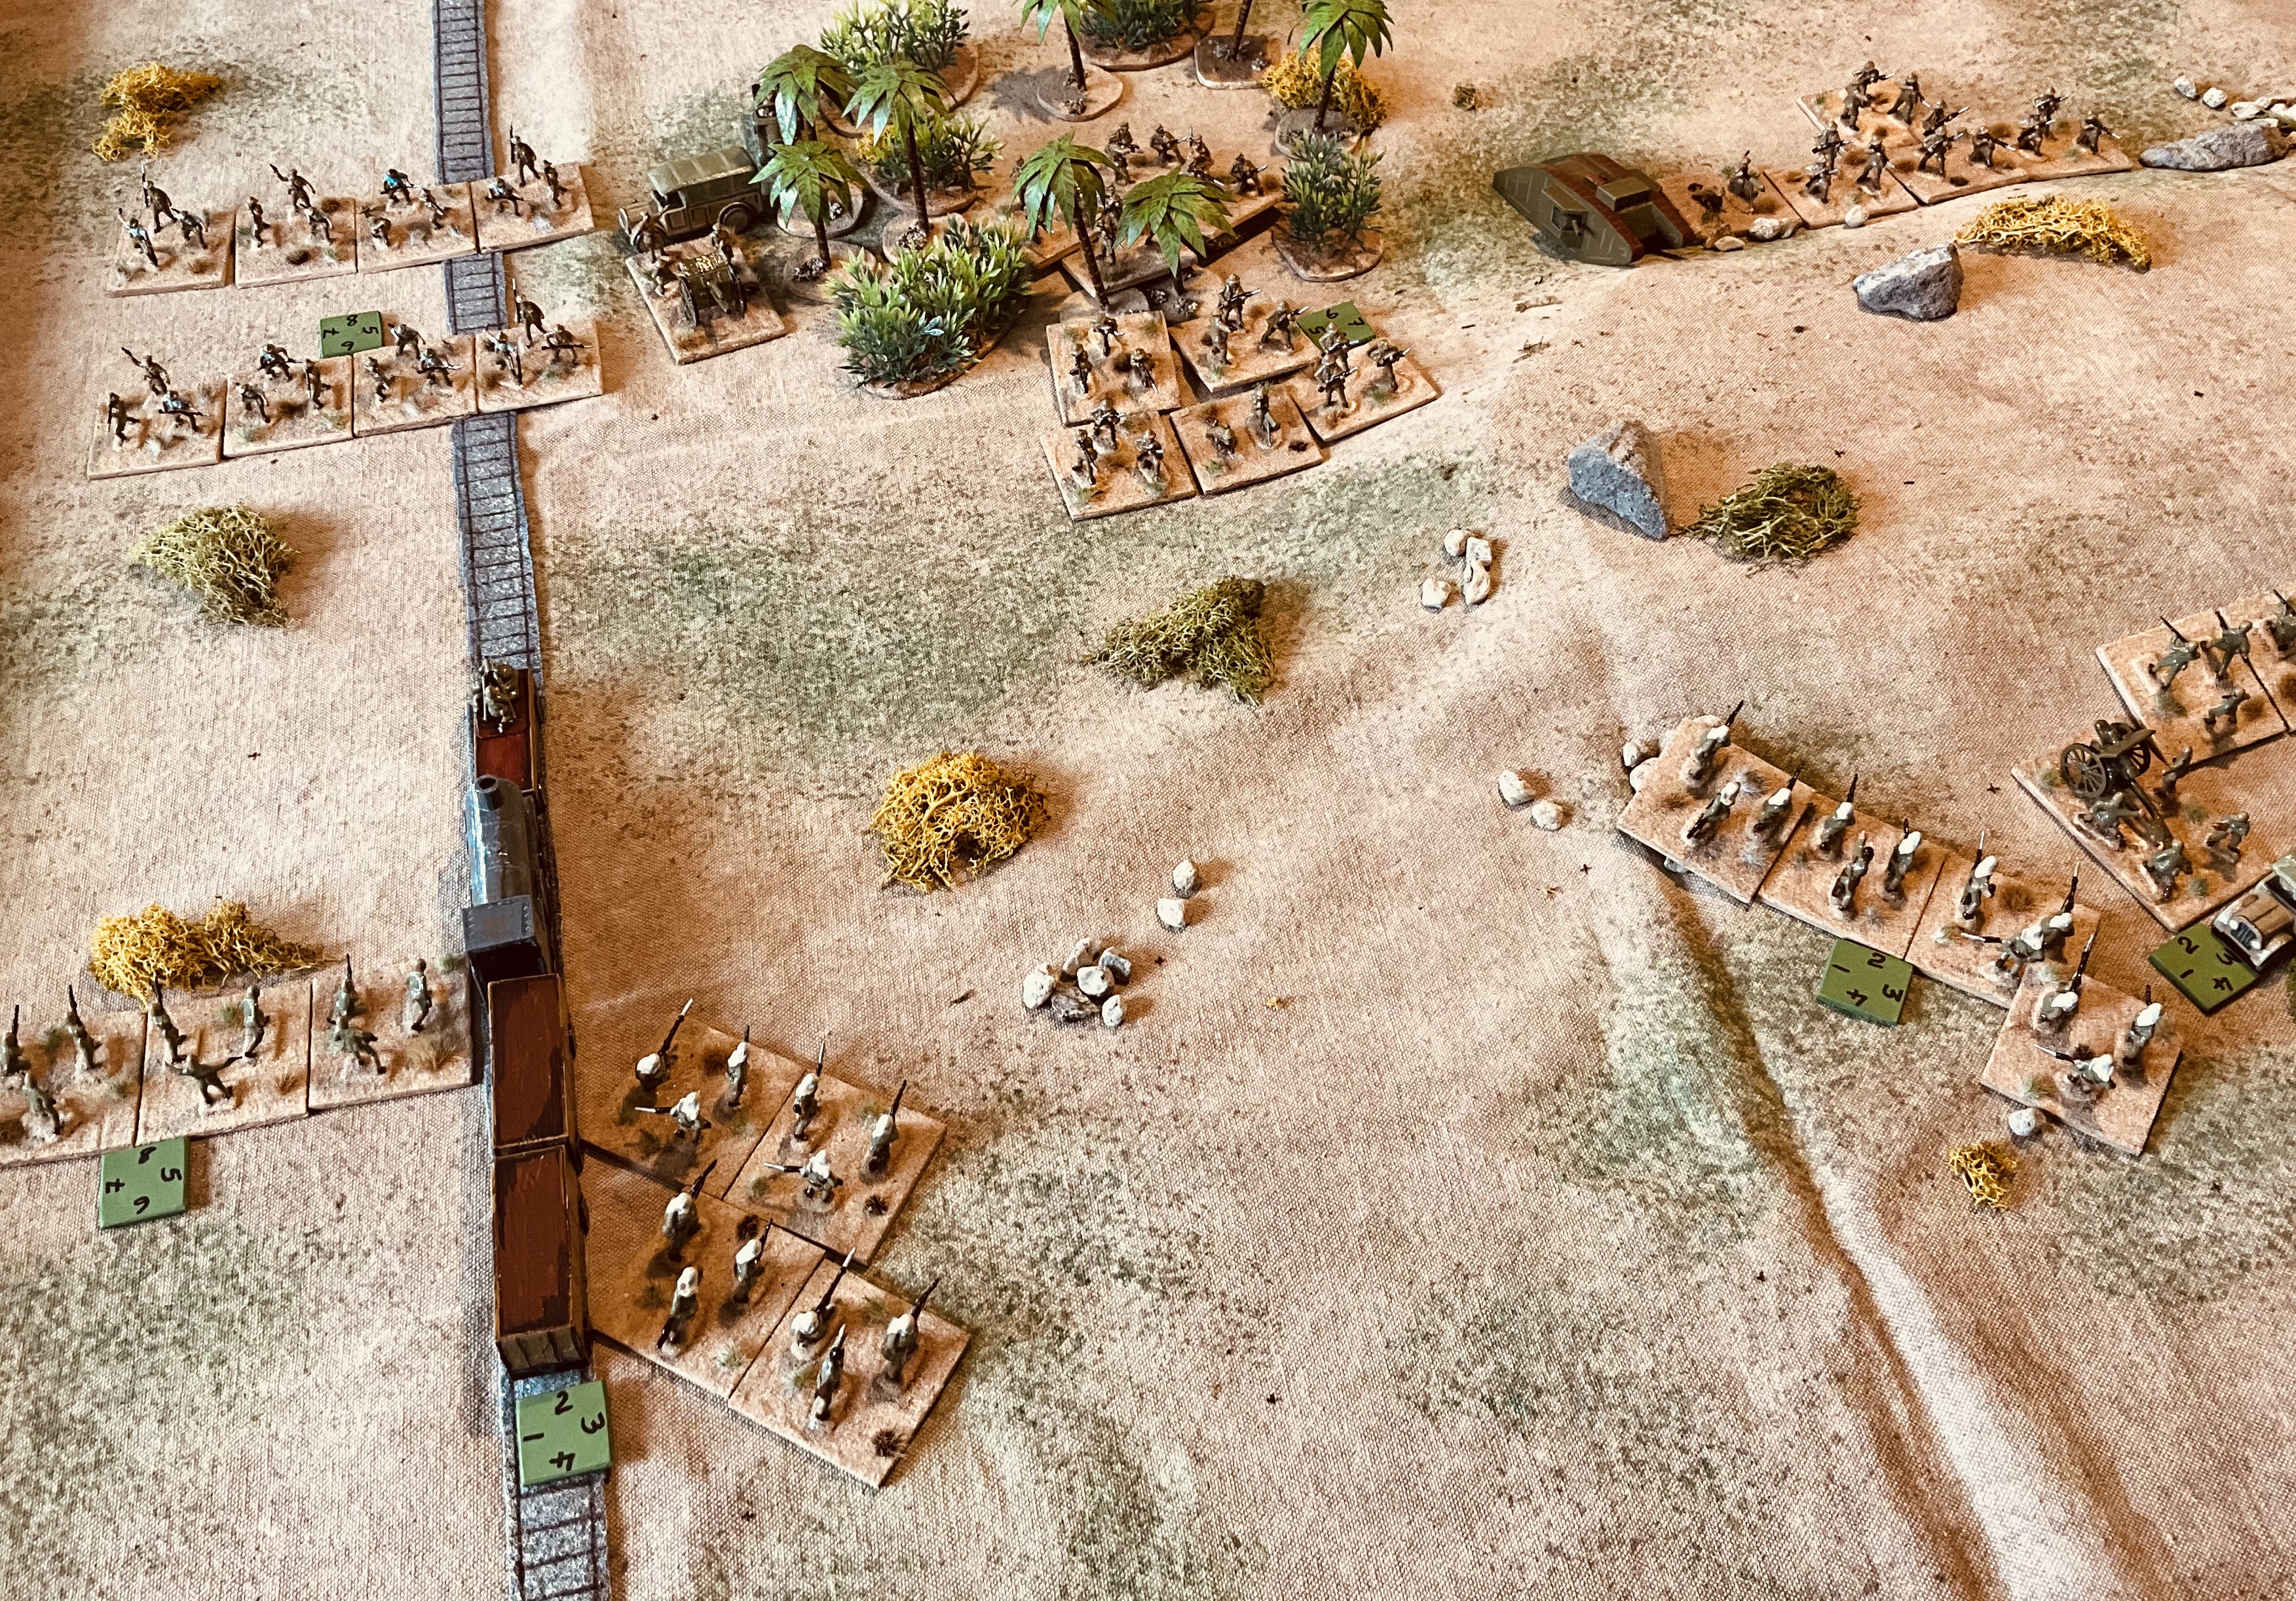
Red Clan forces quickly progress down the road and push out screening units to protect their flank.

Blue Clan forces are slow off the mark and are yet to attack the flank.

Midway through the game…

My flank attack had finally started to engage Jon’s screening units and a cavalry unit had been sent back to support the town defenders who were under pressure.

The flank attack begins and Red Clan’s screening units come under attack.

The defenders are under pressure. Only hanging on due to some timely rally tactic cards (see summary for details on the cards).

End game…

Jon’s screening forces had done their job, allowing his main force to push a pathway through the defenders and begin exiting units off the north tabletop edge. My cavalry were too little and too late to make a difference and as each turn passed another unit slipped its way through. 

A victory to Jon who met the objective of breaking through and existing 3 unit off the tabletop.

Blue Clan cavalry can be seen rushing to support the town defenders. 

Blue cavalry were held off allowing 3 Red Clan units to exit the north edge and win the game.

Summary

Well played by Jon. The screening forces were sufficient to hold off my attack while his main force was able to grind through the defending line. I had placed a skirmish unit in the town defenders and with hindsight should have put a samurai unit there instead. Additionally, I should have used some of the tactical cards (see below) earlier on to advance the flank attack quickly and offset some of my problematic activations.

The flow of the game

The rules used began as a variation of One-Hour Wargames using D3 dice for combat. Since then, activation has been added along with some battle tactic cards. As part of the game preparation players decide what battle tactics they are going to deploy. Having selected a strategy create a card deck made up of the 6 tactic cards. These cards remain hidden from the other player at all times and are only revealed  during a player’s turn when they select one of their cards to play. A single tactics card can be played at the start of a player’s turn. They do not need to be played. Once used the cards are not refreshed.

Battle tactic card rules

I hope to relight this scenario with Jon again soon. We may choose to switch sides.

Jon’s Red forces battle through to victory.


Wednesday 22 February 2023

Three books arrive

Three books have arrived over the past week or so. 

Recent purchases

So far I have just read Sci-Fi Skirmish Scenarios by John Lambshead with the subtitle of “Small-unit missions for use with your favourite wargaming rules”. I like the book for the following reasons:

  • I especially found the chapter on creating your own world and settings particularly useful with its  tips and techniques. The example provide is interesting as you see the tips being used.
  • There are 36 scenarios and a random scenario generator as well. Finally, there are two solo scenarios. Lots of scenario options all around.
  • The chapter on designing scenarios and campaigns has 6 guiding principles to assist you in setting up your own campaign. This is followed by 3 example campaigns.

I often use One-Hour Skirmish Wargaming rules (by the same author) for my Necromunda style games, and will be using this book for setting up the games and adding to the background setting for my gangs.

I will no doubt be getting my AWI and ECW armies on to the tabletop after I read the other two books.

Sunday 19 February 2023

A couple more fantasy models painted this weekend

A couple of models were completed this weekend. The first model was a wraith. It was quick and easy to construct, but took a bit longer to paint as getting the cloak right took a while.

Wraith

A side view of the wraith

The second model was vortex, quite a big model. The painting was quite straightforward followed by a lot of dry brushing.

A vortex

The vortex from the side

While on the tabletop there have been some samurai games to test out a some rules and try out some scenario options for a remote game this coming week.

A test game on the tabletop

Tuesday 14 February 2023

More WW2 games using tank on tank rules

I have been playing a few more WW2 games using the Tank-on-Tank board game rules. This post has a few notes on adjustments to the rules for them to be used with free movement on the tabletop, and a battle report on the action at St James Road (a scenario from the book “Wargames” by Donald Featherstone).

First off the rule adjustments to Lock and Load Publishing's Tank-on-Tank board game series (West Front, East Front, and digital versions on the Steam platform). An online copy of the rules can be viewed here.

  1. One hex equals 8” on the tabletop. I have been playing on a 6 by 4 foot tabletop longways which means the action is more condensed compared to the board game’s map. I could have opted for a hex equals 6” for a less condensed game, but went with 8” for the look and feel.
  2. I use more terrain features than the board game, particularly fields, which make infantry much more useful in the game. They can be used for holding positions to delay advances.
  3. Fields are represented by hedges in the game and any unit within 2” of a hedge is treated as being in cover. Treating them as area terrain rather than linear terrain aligned with the rules where a unit is in an area of cover. Linear terrain presented problems for the combat mechanism if one of the attacking units was not shooting through the hedge, raising the question of whether the unit was in cover of not. I applied this same approach with trees, any unit within 2” of a clump of trees was in cover.
  4. Fields did not block line of sight, just provided cover.
  5. 2 action points allowed smoke to be laid down by artillery on an enemy unit. The enemy unit could not combine with other units to shoot and all units shot at would be treated as being in cover. I limited the amount of smoke used to twice per game.
  6. Self-propelled AT guns (eg STUG III) are treated as personal units and cannot move and shoot.
  7. If an infantry unit moves within 8” of an enemy unit, then artillery can be use to bombard the enemy unit.
  8. Units cannot move to within 4” of an enemy unit.

Game report

The objective for the attacking Germans is to capture the crossroads. They will start with their forces positioned behind the embankment.

The map from “Wargames” by Donald Featherstone was used as a guide to set up the tabletop.

Order of Battle

British (Defenders)
  • 1 x Sherman Firefly
  • 2 x Shermans
  • 2 x 6 pounder AT guns
  • 1 x 17 pounder AT gun
  • 1 x 25 pounder artillery
  • 3 x infantry
  • 1 x armoured infantry
German (Attackers)
  • 2 x Panthers
  • 3 x Pz IV
  • 1 x 75mm PaK40/3 38t
  • 1 x armoured car with mounted 75mm (the old Airfix one)
  • 1 x Wespe
  • 3 x armoured infantry
  • 3 x infantry
The British defenders have positioned their two 6 pounder AT guns near Red farm and the 17 pounder AT gun well back on the hill near the crossroads. The three Shermans are being used as a mobile defence between Copse Hill and the woods.

The tabletop setup with the defending British in position.

This is the fourth time I have played the scenario and opted to have the British defences positioned in greater depth.

German forces ready behind the embankment to launch their attack.

German armoured infantry quickly moved to secure Copse hill, while British tank units gradually ceded ground.

Some more early success for the Germans who have eliminated one of the AT guns near Red farm, but have lost an infantry unit in the process. 

Smoke is laid down to provide cover for the advancing Pz IV’s. The Panthers can be seen positioned on the embankment providing support to the attack on Red farm.

The Panthers advance. The tokens indicate HQs units.

The last resistance around Red farm is dealt with. The Germans are in a strong position to make their advance on the crossroads.

Some accurate shooting from the Shermans and 17 pounder (with its increased range for being on a hill) all but nullified the German attack destroying both Panthers and one of the Pz IVs.

In an attempt to reverse their situation German armoured infantry try to dash up on the British right flank, but it was easily dealt with by the infantry positioned in the woods.

Unable to make any dint in the second British defensive line the Germans withdraw.

So this was the fourth time playing the scenario and it is all even with two games apiece. One additional rule modification I am considering is allowing HQ units to spend 2 APS (action points) and move an additional 8”.

Sunday 12 February 2023

Painting fantasy and WW2 gaming


Boo!

This weekend’s modelling and painting activity finished some Fell Bats for my fantasy armies. They are made by Games Workshop. They we easy put together, much simpler than the tree lord made last week, and fun to paint.

The bat wings were painted with a combination of dry-brushing and washed added at the end. All my figures are getting a gloss finish as it seems to bring out the colours.

I have based the bats on a 3x4 inch base.

At the moment my idea for the fantasy games I want to play is to have a number of wizards of different strengths in the game that can summon up units, such as the Fell Bats. The idea comes from the old SPI game Sorcerer which I played a few times years, years, and years, ago.


WW2 games are continuing on the tabletop using a version of Tank-on-Tank board game rules and using free movement rather than hexes. The games are quick games and played mostly in under 30 minutes duration. Given the short duration, I have been playing scenarios 2 or 3 times trying out different strategies. 

The latest setup uses the scenario “Tank and infantry action on the St James Road” from “Wargames” by Donald Featherstone. I added fields to the scenario so that the infantry can play a more influential part in the game by holding positions and causing delays.

WW2 action at St James Road setup and ready to play.

German forces ready to launch their attack from behind the embankment.

Given the quickness of the games I may create a short campaign. 

Friday 10 February 2023

A little bit of this and a little bit of that

This past week I have been flitting between periods on the tabletop and painting table. On the tabletop, earlier in the week, I had my older Warhammer 40K Ultra Marine and Tyranid armies out using some simple rules with an activation approach. 

Messing around with W40K armies.

These sci-fi game was later replaced with a WW2 game using Tank on Tank board game rules using free movement instead of hexes.

WW2 Game

On the painting table are orcs riders and samurai. I was short one orc rider and found enough spare bits to create another rider with the addition of some green stuff to create the missing boar leg and some ears.

Enough pieces were found and with a little green stuff the missing front foot and ears were made.

The finished model with 3 previously painted orc riders

I purchased a few more MiniFig S Range Samurai from Caliver Books which arrived this week. The S Range are an old range and the horse models are unavailable due to missing moulds. As an alternative I have used the horse from a set of 1/72 plastic samurai cavalry. It is possibly a fraction smaller but is not noticeable. My aim is to add a few additional units to my current armies.

Recently completed samurai cavalry. Very simple block painting and gloss finish.

1/72 plastic horses are used

A combination of samurai cavalry, arquebuses, and spearmen to be added to the samurai armies.

Arquebuses and cavalry unit

Friday 3 February 2023

WW1 Palestine Campaign turn 4 game 4

The WW1 Sinai-Palestine campaign continues. The Egyptian Expeditionary Force (EEF) has the campaign objective of reaching Damascus by October 1918, but this is now in the balance after three failed attempts to breakthrough the Turkish defences positioned around the Judean Hills.

Campaign turn 4 showing EEF progress.

In the latest attempt to break the deadlock the EEF have moved up a tank unit. Their attack is planned to take place, March 1918, the objective to secure a ridge overlooking a nearby rail line.

Each stage on the campaign has 3 associated scenarios selected from the book One-Hour Wargames (OHW). No scenario can be selected twice unless 3 battles have been lost by the EEF player. As this is the fourth battle one of the scenarios is going to be replayed.

Scenarios selected from OHW for stage 4 on the campaign map

The randomly selected scenario was #8 Melee. As this is a replay, I took the opportunity to switch the road to a railway line and introduce a train of Turkish reinforcements into the Scenario.

A Turkish train with machine gun up front. The train is scratch built from bit or wood and card. 

The EEF will arrive from the south along the rail line on turns 1 and 4. The Turks have two units positioned on the ridge and their remaining mobile reserves will arrive from the north along the rail line on turns 3 and 6.


Layout on a 5x4 foot tabletop

Order of Battle

Turkish Forces:

  • 5 Infantry (1 with supporting machine gun)
  • 1 Artillery
  • 1 Armoured train with machine gun

2 units are to be placed on the ridge. On turn 3 two reserve units arrive, and on turn 6 the 2 units and train arrive.

EEF Forces:

  • 5 Infantry (2 with supporting machine gun)
  • 1 Artillery
  • 1 Tank

The EEF will arrive in 2 waves, 3 units on turn 1 and the remaining 4 units on turn 3.

The EEF have 15 turns to capture the hill.

Battle Report

The game was a remote game with Jon of Palouse Wargaming Journal who commanded the defending Turks. While I am getting better at remembering to take photographs during the remote games, I did forget towards the end of the game when things were getting interesting.

Opening moves

The EEF began their advance along the rail line and occupied the woods. This kept them out of sight from the Turkish infantry and artillery positioned on the ridge. The EEF artillery were positioned to target any Turkish reserves that arrive.

Units engage in and around the woods and EEF units prepare to assault the ridge.

The Turks on the ridge retired to be out of sight from the advancing EEF units. They also pushed their reserves along the rail line under the shelling from the EEF artillery.

Action around the woods and along the rail line as Turkish reserves advance.

While units were engaged in and around the wood. The second wave of EEF units, including a tank unit, were finally positioned to launch their attack, knowing the Turks were ready to open fire as soon as they moved on to the ridge.


The EEF launch their attack on the ridge.

The EEF launched their attack and looked well positioned to take the ridge when disaster struck. The tank after the first round of shelling was destroyed. This allowed the Turkish defenders to focus their shooting on the EEF troops who were eventually beaten off. The EEF rallied there remaining troops and made a second assault on the ridge be the Turks remained steadfast and held the ridge. A victory the the Turns.

An after battle photograph of the Turkish commander reviewing the destroyed tank.

A game well played by Jon. From a campaign perspective the EEF are at risk of failing to achieve taking Damascus by October 1918. With only seven months remaining the EEF will only be able to fight one more game at this stage and win the first scenarios at stages 5 and 6.

The EEF advance is stalling.