Today I hosted a remote Star Wars game with Jon of Palouse Wargaming Journal using the Squad Hammer Core rules from Nordic Weasel Games. The rules were adapted for use with a 6-inch square grid, which makes gameplay much easier for remote games.
These skirmish games are relatively quick to play, so we managed to fit in two games, giving each of us the chance to be both attacker and defender.
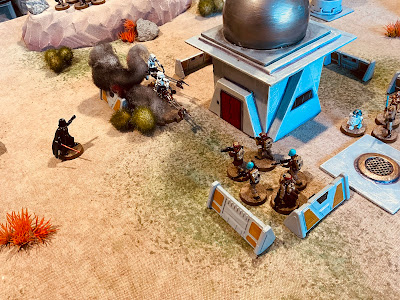 |
| 74-Z Speeder Bikes crash and burn after being surprised by a Rebel unit. |
Scenario Background
On the desolate frontier world of Kholaris situated on the outer-rim, lies the mining settlement of Dusthaven. Built around the richest vein of Virelium Crystals in the sector, they are used for stabilizing and extending hyperdrive jumps.
But the people of Dusthaven have had enough of the empire. Overworked, underpaid, and brutalized by the mining corporations, the miners have staged an open revolt. A force of Rebels has joined their cause led by Luke Skywalker, Han Solo, Chewbacca, R2-D2, and C-3PO.
The Empire has responded with force. Darth Vader has been dispatched by the Emperor to crush the rebellion and ensure the crystal mines return to full production.
Will the spirit of rebellion ignite across Kholaris or be crushed under the heel of the Empire?
Map
The game is played on a tabletop using a 6-inch square grid. While the mat includes dots to mark the corners of each square, these are not easily visible to the remote player. To assist with unit positioning and overall setup, a gridded map was provided, and terrain features such as vegetation and rocks were carefully placed at square corners to make the grid more apparent for the remote player.
 |
| A map with the grid was provided to help with positioning of units. |
 |
| A regimented layout of rocks and vegetation helps to define the squares. |
Built-up and rocky squares provide cover to any units occupying them, while units on hill squares are able to extend shooting ranges. Up to two units may be "stacked" in a single square.
All movement and shooting ranges can be measured diagonally.
Order of Battle
Rebels
All Rebel units begin the game positioned on the tabletop. They must be positioned in a building or hill squares.
- Han Solo and Chewbacca (Hero unit)
- Luke Skywalker, R2-D2 and C-3PO (Hero unit)
- Swoop Bikers
- 1.4 FD Laser Cannon Team
- 2 x Rebel Troopers
- Rebel Sleeper Cell
Empire
All Empire units begin the game along the southernmost row of squares on the tabletop.
- 2 x Stormtroopers
- Dewback Rider
- AT-RT walker
- 74-Z Speeder Bikes
- Riot Control Squad
- Darth Vader (Villain unit)
I also had provided a list of all units and their stats for movement, combat, and shooting to help keep things running smoothly.
Victory conditions
Reducing the opposition to 2 or less units.
Game Reports
These games tend to move along at a quick pace, and between hosting and the fast gameplay, I did not manage to take many photos. So instead, I have written up a report of the game and included any photos that were available after the report.
Game 1 - Peter as the Empire and Jon as the Rebels
As the first Imperial units appeared on the southern approaches to Dushaven, the Rebels had already taken up strong positions. A squad equipped with a Z-6 rotary blaster manned the high ground west of the town, while the 1.4 FD laser cannon team was dug in on the eastern ridge. The remaining Rebel troops were scattered in prepared positions behind makeshift barricades throughout Dusthaven.
Imperial forces opened fire from a distance. An AT-RT walker and a pair of 74-Z speeder bikes strafed the hills in an attempt to dislodge the Rebel positions. But the Rebels held firm, both well-prepared and well-positioned. The walker was destroyed by some precise shooting from the FD laser cannon, and the speeder bikes took minor damage from the Z-6 rotary blaster before disengaging.
Rather than wasting time on the flanks, the Imperials pushed directly towards Dusthaven. Under cover of suppressive fire, Stormtroopers advanced and eliminated the Rebel sleeper cell. However, the Rebels quickly responded and brought down the speeder bikes, which crashed in a fiery explosion.
The Imperial assault intensified. Darth Vader, supported by a riot control squad of Stormtroopers, charged the barricades. But the defenders were ready. Luke Skywalker, Han Solo, and Chewbacca emerged to meet the attack head-on. The clash was fierce, blaster shots flew and lightsabers clashed. Long-range fire from the hills continued to pour in and Darth Vader fell wounded, forced to withdraw from the battlefield. The riot troopers were not so lucky, they were cut down in a storm of blaster fire.
In a final desperate effort, a Dewback rider crashed through the barricades, scattering Han, Chewbacca, and a Rebel squad deeper into the town. But Luke stood firm. Supported again by covering fire from the hills, he confronted the beast and brought it down in close combat.
With their commander gone and losses mounting, the last two Stormtrooper squads pulled back from the ruins of Dusthaven.
A Rebel victory!
 |
| The first assault on Dusthaven. |
 |
| The speeder bikes are destroyed as the Rebels respond. |
 |
| The final assault by the Dewback rider just before it was cutdown by Luke. |
Game 2 - Jon as the Empire and Peter as the Rebels
After their earlier victory, the Rebels knew it was only a matter of time before the Empire returned.
Darth Vader, recovered from his wounds and determined to crush the uprising, led a renewed assault on the mining town of Dushaven. This time the Empire would not underestimate the Rebels again.
Anticipating the attack, the Rebels maintained their defensive positions. A squad armed with a Z-6 rotary blaster held the high ground west of the town, while the 1.4 FD laser cannon team was once again deployed on the eastern ridge.
The Empire struck first, concentrating their initial attack on the eastern ridge. The 1.4 FD laser cannon and its crew were swiftly eliminated with some precise shooting, clearing a key threat to the Empire advance. With the eastern flank neutralized, Stormtroopers unleashed suppressive fire across the town’s defenses.
Then came the main assault led by Darth Vader himself, supported by the Riot Control squad and the Dewback, The defenders at the barricades fought hard, but the assaults were unrelenting. One by one, the Rebels were pushed back from the barricades.
The AT-RT walker, now occupying the eastern ridge, provided steady covering fire that continued to sap the defenders' strength. In the chaos of battle, Han Solo and Chewbacca were cut down in a withering hail of blaster fire, vanishing into smoke and flame. Only Luke Skywalker remained.
With the barricades breached, Luke stood alone against the Empire's attack. Lightsaber in hand, he fought valiantly to hold the line. But with the last supporting unit eliminated he was forced to retire, and with that the defence of Dusthaven collapsed.
Victory to the Empire!
 |
| Setup for the second game. |
 |
| The AT-RT destroys the laser cannon in the initial strike by the Empire. |
 |
| The assaults begin on the town. |
Wrap Up
Well done to Jon on securing two victories, the Force was definitely with him! Overall, the rules worked well converted to a square grid. However, one area that did not seem to flow as smoothly compared to games using free movement was close combat. When a unit attacks a square occupied by two enemy units. If the attacker wins, they are unable to advance if the square still contains another enemy unit. I will have look into seeing if there is a better way of dealing with assaults.


Superb report Peter. Jonathan handled his forces well. Splendid looking game.
ReplyDeleteYes, well played by Jon and a couple of most enjoyable games.
DeletePeter, this was an excellent introduction into the Star Wars genre! Thank you so much for hosting this fine pair of actions. Game #2 with me as the Empire was much closer than you let on. My attacks with Dewback and riot squad were driven back more than once before finally overwhelming the defenders. Even then, the Empire was only one unit away from breaking, itself. Very close!
ReplyDeleteAs for your close combat conundrum, what about allowing a second unit in a square to add some dice to the main combat as support. If defeated, then both units retreat out of the hex, leaving it vacated for the attacker.
Agree, the second game was closer with both sides down to three units. The well positioned AT-RT just tipped the balance in the Empire’s favour.
DeleteI will try out your suggestion and may also try allowing an enemy and friendly unit to occupy the same square.
Thanks for the games, most enjoyable, the second game sped along as we had both memorised the rules.
Great looking games, the table looks really nice. Two good games and a very enjoyable read.
ReplyDeleteThank you. Both games were enjoyable and had their pivotal moments.
DeleteGood looking game! Are those old spotlights on top of the buildings?
ReplyDeleteYes, they are old spotlights. There are also some used downlight LEDs used in the terrain too.
DeleteTwo fine games there and lovelt terrain and figures as always:). The map at the start would certainly be useful to me for a remote game, to help me keep my bearings.
ReplyDeleteIt all seemed to work ok, although occasionally when units fell back into the town they would be somewhat hidden and as the host you need to do reminders they are there.
Delete2 superb looking games
ReplyDeleteThanks.
DeleteLovely looking terrain and figures Peter and both games seemed to go well. If it was me, I would go with Jon's suggestion about two units in one square during melee.
ReplyDeleteThanks. Most enjoyable games. I will be testing Jon's suggestion in a game.
Deletegreat looking table and figures Peter and two wonderful games.
ReplyDeleteI had lots of fun making the terrain for this game.
DeleteSuperb stuff Peter & Jon, and a great set of rules. I must look into that assault plan issue, and you have given me an idea to use hexes with the rules ...great game sir.
ReplyDeleteHexes will work well, better than squares with the rules.
DeleteIt sounds like the games were quite close. That’s usually a good thing - an easy “walkover” isn’t much of a challenge.
ReplyDeleteCheers,
Geoff
The second game was a lot closer and it was nice to switch sides so we both had an opportunity to defend and attack.
DeleteNice scenario. Great game and set up. Thanks for sharing.
ReplyDeleteA simple scenarios that worked well as we tested out the rules modified to a square grid.
DeleteSounds and looks like great fun Peter. Your lovely terrain looks even better with those beautiful figure on it!
ReplyDeleteBest wishes, James
Both games were most enjoyable and it was fun pushing around the toys on the tabletop.
Delete