Sunday, 21 May 2023

WW1 Railway Attack Scenario

After a brief break from remote gaming due to various non-wargaming engagements, Jon (of Palouse Wargaming Journal) and I returned with a WW1 Palestine game. In our recent sessions, Jon has achieved good success while commanding the Turkish forces. However, this time around, we decided to switch things up a bit, giving Jon the chance to command an Arab Rebellion attack on a train.

This photograph is not from the game. I just set it up for fun after the game.

I decided to revisit a scenario I had previously played, inspired by C.S. Grant's "Scenarios for Wargamers." The chosen scenario is number 23, titled "Railway Attack" (pages 58-59), which I have set in WW1 Palestine. In this scenario, the Arab Rebellion forces launch an assault on a Turkish train. To impede the train's progress, the Arabs have erected a barricade of rocks that the train cannot break through. The objective of the game is for the Arab Rebellion force to capture the train within 15 turns before Turkish cavalry arrives to investigate the delayed or missing train.

Scenario Map.

Some time ago, I created this map, and since I'm am now using a 6-inch gridded tabletop for my games, you will notice in the game photograph's that the tabletop is oriented in a slightly different North-East orientation. It's important to note that all rough terrain, buildings, and palm trees on the map serve as cover and hiding spots for the Arab forces during their setup.

The forces involved in the game are:

Turkish forces

  • 3 infantry units
  • 1 infantry unit with machine gun
  • 1 machine gun mounted on the train (which cannot disembark)
  • 1 artillery unit

Arab forces:

  • 2 infantry units
  • 1 infantry unit with machine gun
  • 2 cavalry units
  • 1 armoured car unit

The set up requires that all Arab units are in hidden out of sight behind hills or in cover when the train arrives. The train arrives from the north and must travel forward one square each turn until the Arabs reveal themselves, then it can stop and start, but it cannot reverse. Up to two units can be unloaded from the train each turn.

Units embarked on the train are treated as being in cover. The Turkish player can distribute any hits on the train to units still embarked. The machine gun at the front of the train is in cover and cannot disembark.

For the rules, we continued to use the WW1 Rules used throughout the WW1 Palestine campaign, which are a variation on OHW WW1 rules with activations added.


A tabletop setup with 6 inch grid. The rocks and vegetation are used for remote games as the subtle crosses on the game mat do not show up on the camera. Note - Over the last couple of WW1 games Jon and I have been playing using a square grid, so the above map had to be reworked to fit a grid.

The game report…

The train arrives and quickly comes under fire from Arab units positioned in cover on the hill. While the armoured car emerges from its hiding spot in the buildings.

The rocks blocking the track are spotted and the train stops to disembark two units as Arabs appear from their cover to begin their assault on the train.

The train continues up the track with the aim of disembarking more troops and putting some distance between itself and the Arab forces that have emerge from their cover. Meanwhile, those Turks already disembarked are taking some punishing fire from the Arabs.

The train comes to a halt at the barricade, and the situation appears bleak for the Turks. As the game’s host, I was relieved that I had chosen to play as the Turks, as it seemed like the game was effectively over for them, with an easy victory in sight for the Arabs.

The Arab forces start closing in on the now stationary train, which is now defended solely by a machine gun and an artillery piece. One noteworthy event during the turns was the breakdown of the armored car. In a few earlier games, my tanks suffered breakdowns due to rolling a 1, and this time it was Jon's turn to experience unfortunate luck as he rolled a 1.

During the last few turns, the Arab units encountered difficulties in activating and eliminating the remaining Turkish defenders. It was only on the final turn of the game that they managed to successfully capture the train.

This game was a thrilling contest that remained undecided until the very end. That the game went down to the wire was quite surprising considering that halfway through the game, an effortless victory seemed within reach for the Arabs. What turned the tide? Although the Arab units managed to eliminate the defending Turkish forces, they sustained hits that hindered their ability to activate effectively. This, in turn, obstructed the movement of fresher units, preventing them from engaging the remaining defending Turks. Congratulations to Jon for securing the victory, and overall, it turned out to be an incredibly enjoyable remote game.

You might be wondering how this game fits into the ongoing WW1 Palestine campaign I've been running. Well, it doesn't currently align with the campaign, but I'm considering incorporating it and offering some advantages to the Egyptian Expeditionary Force. This would give them a final chance to capture Damascus within the designated timeframe of their campaign objectives. (See the featured post for details of the campaign).


Saturday, 20 May 2023

ACW game report

This week I've been busy testing morale rules in a few American Civil War (ACW) games and playing a remote WW1 Palestine game with Jon. In the next post, I'll share a report on the WW1 Arab rebellion attack on a train in that game.

Fog of war?

In one of my recent ACW test games, I tried out the “flank attack (2)” scenario from the One-Hour Wargames book. However, I added a twist by incorporating Grant's tile approach from Programmed Wargame Scenarios to create different tabletop layout variations. I little bit more information on this approach can be found in a previous post here.

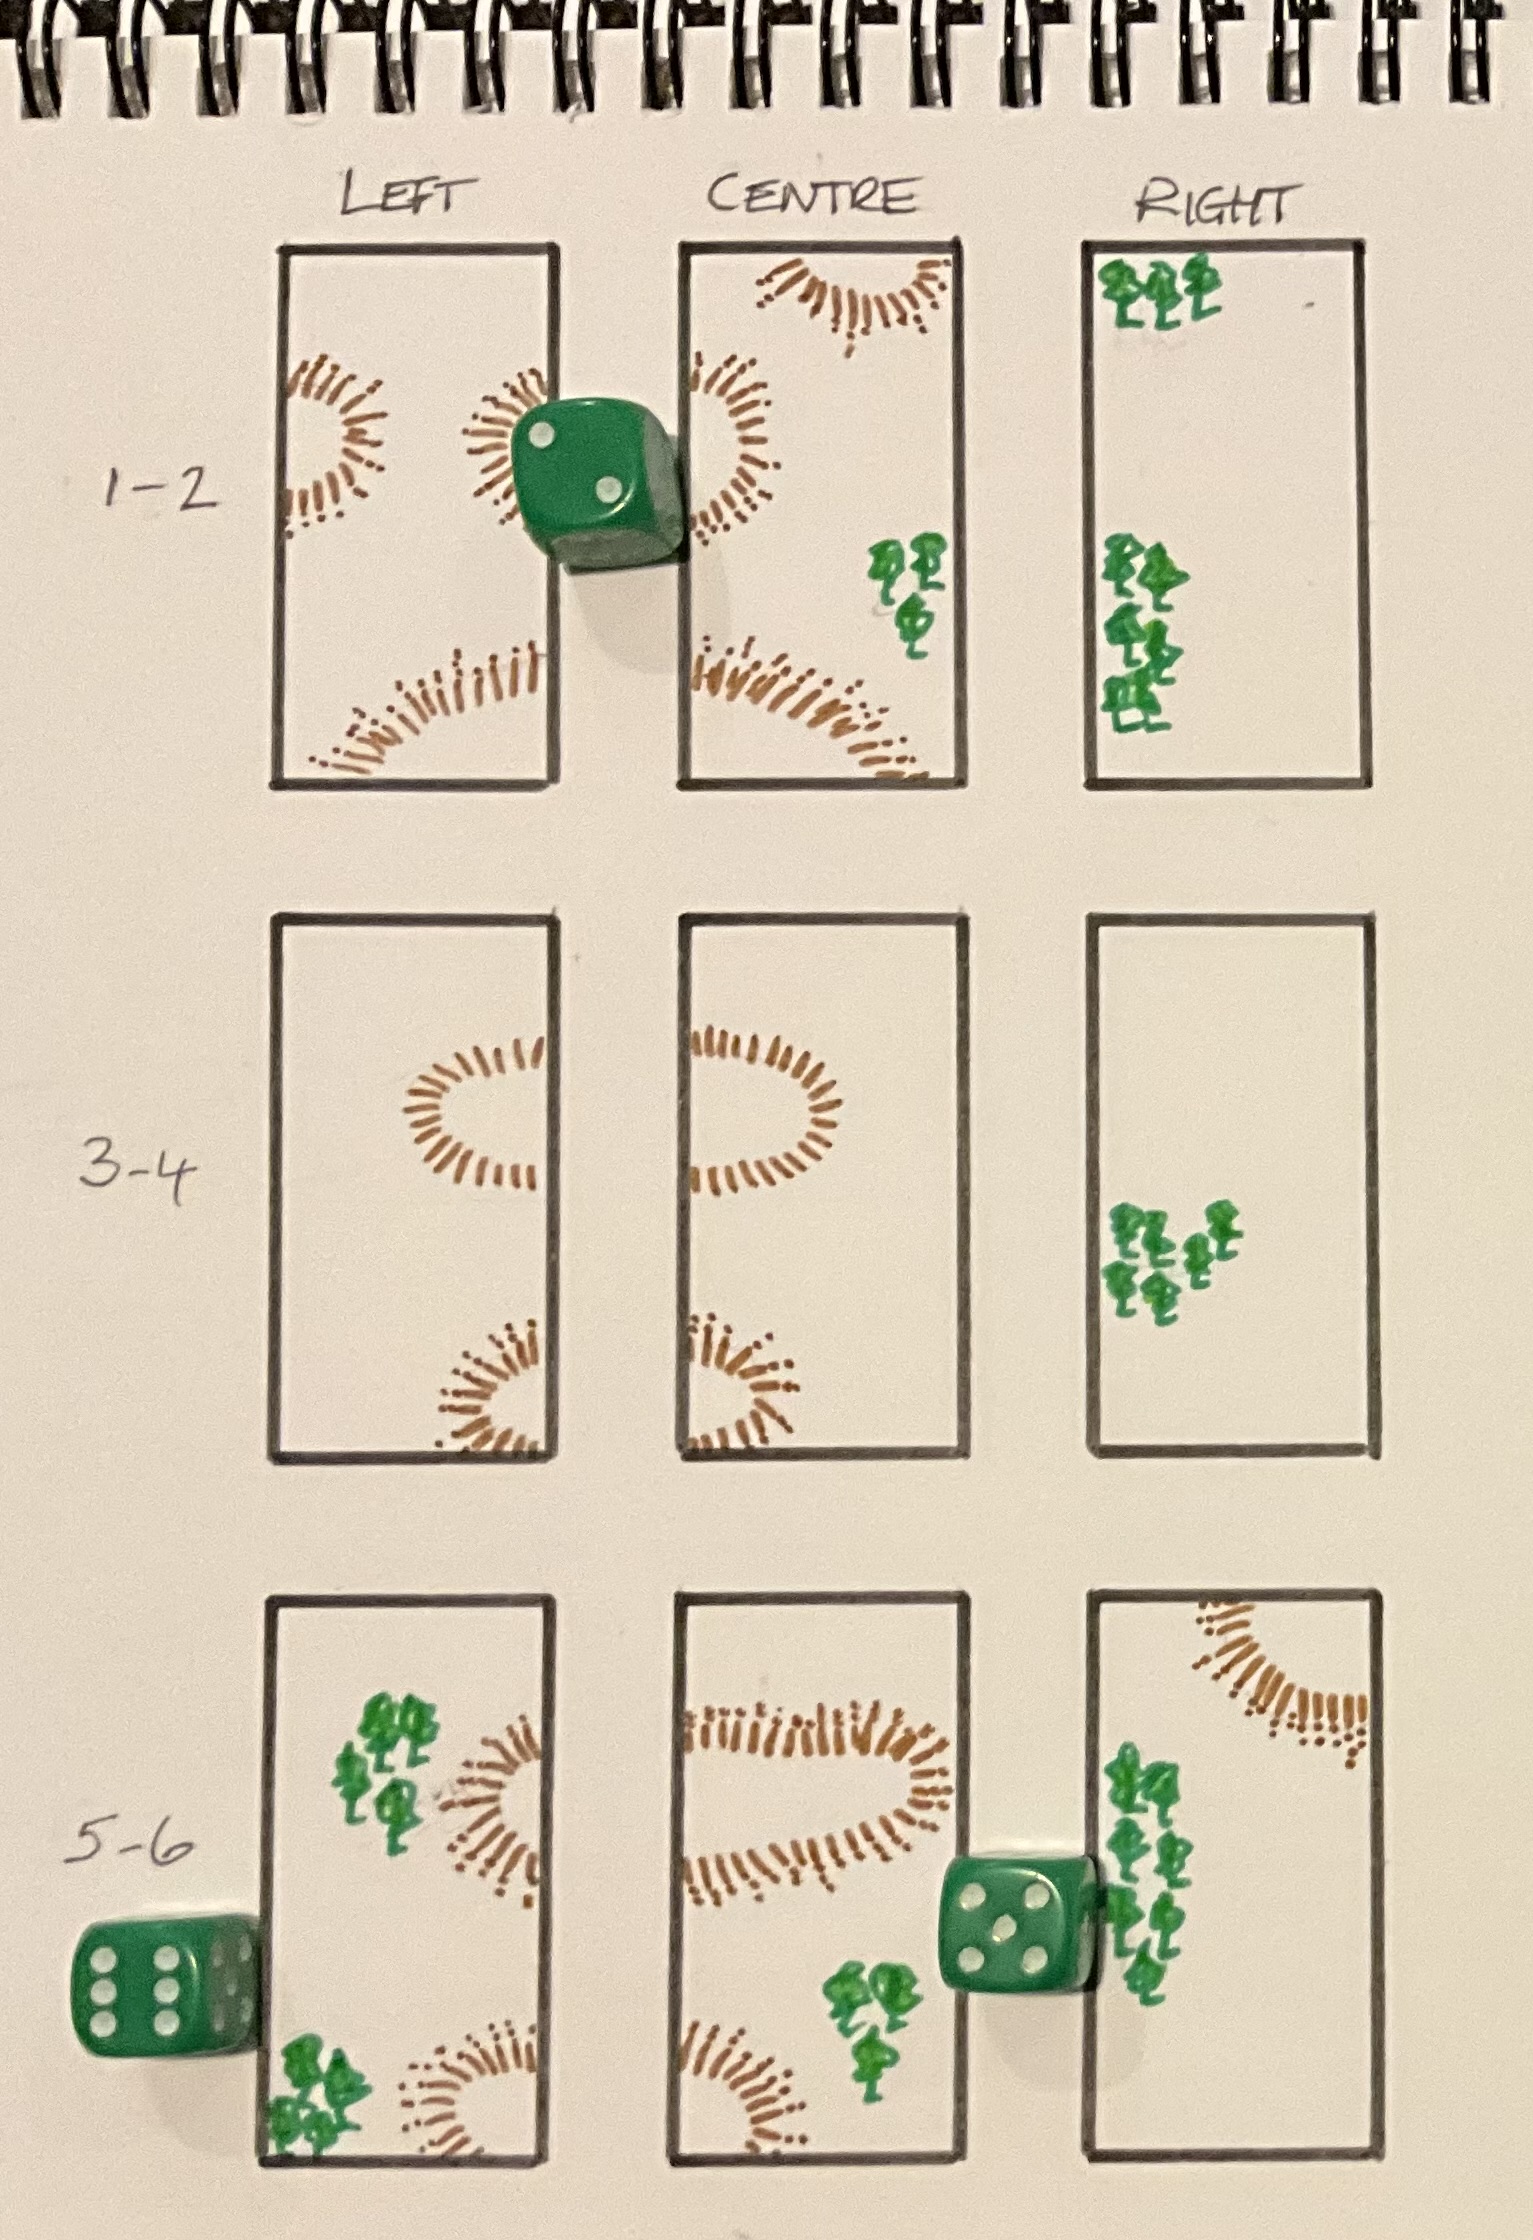
The centre row has the original flank attack layout split into left flank, centre, and right flank. The top and bottom rows are possible variations.

The left flank, centre, and right flanks are determined using dice.

The final tabletop layout is decided for a 4 foot by 6 foot tabletop.

Using these tiles as a guide the tabletop is setup and the troops deployed using the following order of battle. Both sides begin the game with one reserve cavalry unit.

Union:

  • 3 x Infantry
  • 2 x Veteran Infantry
  • 1 x Artillery
  • Reserves - 1 x Cavalry

Confederate:

  • 4 x Infantry
  • 1 x Veteran Infantry
  • 1 x Artillery
  • Reserves - 1 x Cavalry
The tabletop all setup for a game.

A small portion of the Confederate force faces a larger Union force positioned on a hill.

The remaining Confederate force is positioned on the Union flank.

The game will consist of 15 turns, and the main objective is to gain control of the large hill that is currently occupied by the Union force. Both sides have their own deck of shuffled event cards, and each turn one card is revealed. These event cards can either provide advantages or pose challenges for a side. Among the cards in the deck is the Reserves card, which, when revealed, signals the arrival of the reserve cavalry.

Event cards are used in the game

Here is the battle report in pictures…

Confederate forces begin their advance on the flank and in the centre. Union forces react to the flank attack and look to counter in the Confederate in the centre by advancing.

On the flank Confederate forces press forward trying to take advantage their surprise arrival on the Union left flank.

In the centre Confederate forces retire, partially due to failed morale dice rolls and also discretion.

Union forces are under pressure on the flank as Confederate artillery support their flank attack.

Some Union units are forced to retire and attempt to regroup.

The Confederate attack is progressing well as Union forces are trying to reorganise a second line of defence.

The Union defence is struggling to hold.

The attacking Confederate units are starting to accumulate hits, increasing the likelihood of forced retirements. 

Confederate reserves arrive in the form of cavalry.

All Union forces have now retired to defend the hill.

Confederate attacking units are forced to retire before regrouping and entering the fray again. Union infantry are putting up a good defence.

With their flank attack losing its effectiveness, the Confederate centre begins to advance supported by their cavalry reserve which have arrived on the left flank.

All Confederate forces are pressing forward.

Union units are trying to reorganise and fill the gaps in their defensive line.

A much thinned down line is still holding on.

Things are looking pretty grim for the Union defenders with a few game turns remaining.

Units on both sides are depleted close to the end of the game, but the Confederates still have the greater number of units. 

The arrival of the Union in the penultimate turn allowed the Union to just hold on to the hill at the end of the game. 

The rules used in this game was testing out a variation  of the One-Hour Wargames American Civil War rules. The variation used D3 dice to replace D6 dice so hits are D3+1, D3, and D3-1 rather than D6+2, D6, and D6-2. Unit are eliminated after taking 9 or more hits. Additional morale rules are added so any unit that sustains hits during the shooting phase must undergo a morale test.

The procedure for the test is as follows: 

  • Roll D6 and double the score.
  • If the doubled score greater than the number of hits the unit has taken, it passes the morale test.
  • If the doubled score is less than or equal to the number of hits, the unit must retreat 12" directly away from the enemy. During this retreat, the unit can pass through friendly units and must end up facing away from the enemy.
  • Any unit forced off the tabletop is eliminated.

Any unit that has retreated during the opponent's shooting phase retains the ability to move or shoot during its own player's turn. However, retreating units always end up facing away from the enemy and will have to pivot and move to face the enemy again.


Saturday, 13 May 2023

A Cromwell tank to kickstart my painting and some ACW games

In a recent visit to Melbourne, I couldn't resist dropping by one of the Model Shops, even though I didn't have any particular need. In the shop I came across an Airfix Cromwell tank which seemed like the perfect opportunity to kickstart my painting, which has been rather slow or non-existent lately.

Recent purchase

The completed Cromwell tank

During the week I been playing some quick American Civil War games using One-Hour Wargames rules. I have made a few tweaks to the elimination mechanism, modifying them to test unit morale instead, with the aim of avoiding outright eliminations. Instead, when a unit fails their morale test, they are forced to retire, enabling them to be potentially redeployed for defence or regroup to make attack again.

A game in progress using my old Minifig 15mm collection. 

I use the One-Hour Wargames American Civil War as written with the elimination section replaced by a moral section with the following rules.

Any unit that took hits during the shooting phase must test for moral. The procedure is as follows:

  • Roll 2D6 and double the score. 
  • If the score is equal to, or greater than, the number of hits a unit has taken, the unit passes the morale test.
  • If the score is less than the number of hits, then the unit must retire 12” directly away from the enemy. The unit will pass through any friendly units and must be placed facing away from the enemy.
  • Units are only eliminated when they are forced off the tabletop.
Any unit that has retired during the opponent shooting, may move or shoot during its own player’s turn. Although having the unit face away front the enemy will require it to move, pivoting, to face the enemy.

The tabletop setup for an ACW game.

I am planning to do some more gaming with these ACW armies. I will also be adding a few more cavalry and infantry units to them. Using some Minifig miniatures I had purchased 40 years ago but never got around to painting. They have been sitting in storage for all these years, but I'm now motivated to finally put some paint on them and get them on to the tabletop.

A few Minifigs finally see the light of day and will make there way to the painting table.


Saturday, 6 May 2023

Connecting or mashing up a couple of tabletop layout ideas

A lot of my wargames rely upon scenarios from the book "One Hour Wargaming”, either as one off games or incorporated into campaigns. When setting up the tabletop using these scenarios, I generally end up doing two things: 

  1. Modifying the scenario map so it fits with using a 6x4 foot tabletop. This essentially entails stretching the map which is drawn for a 3x3 foot tabletop into 6x4 foot dimensions.
  2. Adding additional terrain features as the tabletop can look very empty otherwise. 

As I replay the scenarios, especially my favourites, I am increasingly finding myself adding a number of terrain features to help add a bit more variation and interest, such as small woods or a knoll here and there.

An example of One-Hour Wargames scenario 7 - Flank Attack (2) using Minifigs 15mm ACW figures.

Anyway, Last week I was travelling to New Zealand to visit the adult children, and to keep myself occupied while waiting at the airport or on the flight, I was reading a book about English Civil War battle of Edgehill. The book was recommended in one of the comments from a post a few weeks ago (a quick thank you for the tip). 
Current reading “Edgehill 1642”

One of the interesting chapters in the book is about how they went about trying to interpret and piece together the battlefield and its features using the different sources and written accounts of those at the battle. Often written many years later, these accounts could have different or conflicting views on the battlefield terrain.

This got me thinking about my approach when I’m laying out terrain features on the tabletop for a game, and whether there was a better or more systematic way of doing things. This jogged a memory about a technique used in the book “Programmed Wargames Scenarios” by Charles S. Grant for selecting tabletop layouts.

A very useful book for solo Wargames

Many of the scenarios in the book use an approach where different versions of a battlefield layout are drawn and then decided by the dice. This clever technique creates a geographical “fog of war” when deploying forces, particularly so for earlier periods when armies on a campaign had none or few accurate maps. 

Example from the book with 3 different options for the left, centre, and right sections of the tabletop. 

The scenario maps were divided into three sections: left, centre, and right. Each section has three variations of the terrain which fits with any of the adjacent sections. So a road or river going across the map would always link regardless of the sections selected with a dice roll.

Prior to selecting the left, centre, and right sections. Each army must write orders or draw their deployment. This can create a few problems for players, for example, they find some difficult terrain in front of their cavalry or a an unexpected building which can assist the opponents defence.

So, I thought I would try and apply the Programmed approach to one of the One-Hour Wargame scenarios. I picked the scenario Flank Attack (2) which is one of my favourites. The first step was to take the map from the book which is for a 3x3 foot tabletop and stretch it to a 6x4 foot tabletop.

Scenario map for Flank Attack (2) modified for a 6x4 tabletop

Having drafted a map it is divided into the left, centre, and right sections. Then each section is reworked into three options which are slightly different. In the picture below the centre row (dice 3-4) represents the above map.

One-Hour Wargames scenario Flank Attack (2) map has been modified to create different terrain options using the Programmed Wargaming Scenario approach. After writing down the deployment, roll the dice to decide the tabletop layout.


The left section selected by a 6, the centre by a 2, and the right section by a 5.

I cut out the sections to help show how the selected sections fit together to create the map.

The final tabletop setup

With the tabletop setup determined the next step is to see how the forces are deployed based upon their prior written orders. Using the ACW forces already set up we find few changes with the Union deployment. However, than two of the flanking units find themselves positioned on a hill and the other two facing woods which they will have to navigate. 

The Confederate force deployment is not quite as planned. Their main line is anchored on a small hill (the scenario objective) and the remaining line spread out in the valley with their cavalry now positioned on a second small hill. There is no nice long ridge to defend as expected.

A view of the troops deployed with limited prior knowledge of the tabletop layout. 

A better view of the Confederate troops spread out in the valley between to small hills.

The half the Union flank attack will now have to navigate the woods.

Anyway, the tabletop is now setup and ready for a game. Time to stop posting and play!