Monday 31 October 2016

WW2 additions

To take a break from painting of Hundred Years War miniatures, I painted up some WW2 models to add to the growing collection I seem to now have. Generally I adhere to the rule, only work on one project at a time. However, I do allow myself to add to my existing collections to create some variety when painting. This way I try and avoid the situation of multiple unfinished armies.

Puma Armoured Car and other recently painted units
I have been on the lookout for a Puma armoured car for a while now and found a second hand one from Hinds Figures Limited. I generally pick the poor or average quality models as they seem reasonable priced and I always give them a lick of paint to fit in with my existing at armies. While looking for the Puma I picked up a few more models of interest to me which I have not seen in my local model shops.

Additional models picked up and painted

Saturday 29 October 2016

AWI Campaign begins with the battle of Flat Top Hill

I have finally found some time to start my American War of Independence campaign.
The campaign starts in May 1776 with British forces landing in New York. For each two week period I roll a dice on a 4+ there is a battle. A 6 was rolled and American forces were quick to meet the newly landed forces on 12 May 1776. A further dice determined the weather would be poor with raining squalls.

New York and the immediate area of operation
Columns from both sides were lined up and dice rolled for each column to determine which would be able to engage in battle. The columns use all the available troops and can be of any size, the only constraint being no column can have more units that the other two combined.

The two columns with the highest dice scores are used in the battle, the column not selected being deemed as too far away to reached the battle area. If there are any ties the player has the choice of either column.

Available forces in columns being selected for battle
The terrain set up was determined by dice. The rules for which I have yet to fully write down, but will do so with a future battle report. They are not that dissimilar to those I used with my WW2 campaign (link) except the AWI games are on a 4x5 foot table.

American forces hold the buildings and flat top hill
Due to the weather conditions both sides were unable to field one artillery and two units from their selected forces. With that sorted the forces took up position on the tabletop. American forces are able to select the table edge the wish to defend (this will be the case for all battles in this campaign).

British forces advance on the buildings
The British first line is able to take and occupy the buildings
The American second line are able to hold the advancing British
While the British first line was able to push back the American first line, their line because disjointed and difficult for the British commander to coordinate both wings as the second American line advanced in the centre and retook the buildings.

British Grenadiers save the day
The British second line was able to steady the centre while the grenadiers on the flank attacked and retook the buildings. At which point the American line started to waver and the day went to the British.

The game was close and could have gone the way of the defending Americans, save for a few poor dice rolls as their second line advanced and came close to breaking the British line.

Sunday 23 October 2016

AWI campaign and trees

In preparation for my American War of Independence campaign I have drawn up my campaign map.  This map will be used to track the battle wins and losses and help create a narrative to the games being played. I could have just kept a record, but this seemed much more fun and I can draw on lines as the armies march around with crossed sabres for where battles occur. Essentially it is my visual record.

Campaign map
The next steps for me now are to write up the rules for weather which will for the most part effect the likelihood of a battle occurring and the availability of troops from a campaign point of view. The games themselves will be effected by weather, for example - when there are heavy rains (reducing shooting ability) and fog (reducing visibility for artillery).

The battle set up will use a dice generated terrain approach which worked out really well for my WW2 campaign battle games. I need to make some changes to those rules to better suit the nature of AWI terrain.

The final part of the campaign puzzle is the calculating what is a drawn game or victory. In my WW2 campaign it was the capture of terrain features. For this campaign my thinking is leaning towards the number of units lost with a couple of modifiers for some terrain features.

During the week I had an opportunity to visit to a model shop where I came across some cheap trees. So I have spent most of my remaining free time basing and getting them ready. These will be very useful. Some of my games can have a fair number of woods (thinking ACW here) and my tree layout on the tabletop gets rather sparse. These will remedy that.

Adding bases fro stability
All the trees based and flocked


Wednesday 19 October 2016

AWI Campaign Plans and Pictures

For my next campaign I am going to use my Peter Laing AWI models. A fair part of this post is a bit of an excused to show some closer shots of my Peter Laing collection as most of my previous pictures have been of games in play and the troops have been at a distance.

British light infantry supported by some loyalist troops
For the campaign I am not trying anything too complicated with the aim of having about 10 battle games. To create a bit of unpredicatbility I am considering a campaign season of 10 months starting March and running through to December. The months will be split into two segments so the campaign will have 20 segments. For each segment I roll one dice - on a 4+ there is a battle and with each roll (battle or not) the campaign clock moves forward a segment. The winner is the side with the most wins. I will be creating a map of sorts to track the score.

American Continental infantry and commander supported by their artillery
The campaign clock will help determine the likely weather for the games to create some challenges both in the set up and during a game.

American Militia
In some recent one-off games I have selected all my available units for both sides, and for each side divided them up into 3 columns with no restriction on the column size. Then using a deck of cards select 2 of the columns from each and set the forces up on the tabletop. The column not selected was deemed as being too far away to influence the battle. I will continue to use this in the campaign as it presents an opportunity to have a large column in the hope it gets selected (although I may stipulate a maximum size).

British commander with cavalry, grenadiers and artillery
I now need to write up these considerations and ideas into some rules and draw a map to track the games. I like the idea of somehow drawing dotted lines on a map and crossed swords wherever a battle is fought. Not sure how to work that at present and will give it some though as I continue to finalise my current iteration of my Sci-Fi rules and put the page back up.

A final picture for fans of Peter Laing models who like me rue the fact they didn't buy more...

British infantry


Sunday 16 October 2016

More on Sci-Fi activation rules and modifications

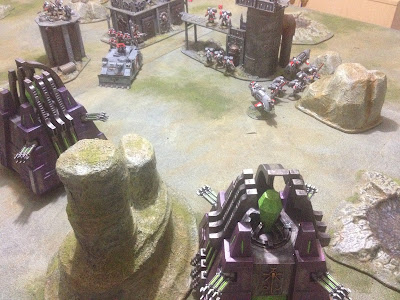
The latter part of this week has been spent revisiting the activation and combat rule mechanisms of my Sci-Fi wargame rules. The focus of this post is on the activation. Over the last year I have tried a number of ideas from One Hour Wargames to Ganesha Game's Swatters with varying degrees of success. As with all my attempts there is often the moment where I think you think things have fallen into place. Whether or not they really have, is often another matter and determined by time and my changing tastes. Anyway this week was another of those moments.

A test game in progress - Necron ambush
The ideas behind the action point system used comes from Tank on Tank game rules, which are from Lock ’N Load Publishing as a downloadable set of rules. I did start using their activation approach proposed for solo wargaming. However, after a couple of games it was a tad too predictable for my tastes.

So this where I am up to...

The game is played in a series of turns. Each player taking turns at activating their units to move, shoot, assault, overwatch or promote leaders.

The action point system most likely will prevent a player from activating all their units.

During a turn a player rolls their allocated action dice. The number of action dice they roll is dependent upon the tactical ability of their army. For example: an elite force has 5 dice and an average force 4 dice.

A player rolls their action dice and providing any of them score a 4+ they can spend 1 action point. Any that did not score 4+ are removed for this turn. The player keeps rolling the remaining action dice and spending action points until they do not score 4+.  When they hand control over to the other player.

An action dice roll allows one action and the two dice scoring less than 4 are removed. You are always rolling for just 1 action point. However, the more dice with a 4+ increases the likelihood of more action points.
The second action dice roll allows another action point to be spent. In this case the Necrons continue the silent advance with all units moving within range of their leader (a Necron lord). The dice with as score of 2 is removed.
The third action dice roll was down to one dice and failed to score a 4+. End of the Necron's turn.

Action points are how a player orders their units to move, shoot, assault, overwatch or field promotions.  It costs 1 action point for most actions.

Action points can be used on unit actions in any order. For example, it is possible for some unit types to move as part of an action and on a following action point to shoot. There are limitation though, no unit may shoot twice and some slow lumbering units cannot move more than once.

When a leader is activated for movement, all units within 1 bound can also move freely. They do not have to end their movement with 1 bound of the leader. A leader when being activated for movement may remain stationary and the order units move.

In terms of an army makeup a player will most likely have more than one leader at their disposal. I have been using 1 leader for every 3-4 units.

So that is where I am now with my Sci-Fi activations. During the week I will post the shooting rule mechanism with their supporting fire approach to increase the likelihood of shooting effects.

Wednesday 12 October 2016

AWI game and post delivery

As I ponder what to do for my next campaign, the postman delivered a couple of books to keep me occupied.
A recent post delivery
I have had a flick through "Battle of Britain - Wargame 1066" by Peter Dennis with rules by Andy Callan. The paper armies look really impressive and are done in such a way to minimise fiddly cutting. I have no plans to start on these yet as I have to complete my Hundred Years War figures, but they will be my next project.

I am looking forward to reading "Tabletop Wargames - A Designers' & Writers Handbook" by Rick Priestley and John Lambshead. It says it is written so you can read a chapter on its own or read through them in order. I suspect I will dip into the chapters individually and see how it goes.

Meanwhile on the wargaming front I fitted in an AWI game earlier this week. As is the norm for me now I let the dice to generate the terrain position. To help select the troops, each side divided up their army into three forces, then used playing cards to select two of the three forces which were able to be fielded in the tabletop. The third force presumable could not march to the guns in time. When setting up the table, the force with the most cannon or least light troops had to be in the second line.

At the moment I continue to try and settle on my Sci-Fi rules. Currently I am trying to modify the activation and combat rules as I am not totally happy with them. More about that progress later and on to an opportunity to show some pictures of Peter Laing's AWI miniatures in action.

Start of the game
British Advance
Americans retire in order


Sunday 9 October 2016

Some thoughts after completing a campaign

Now that I have completed my WW2 campaign I thought I would list down my initial thoughts on what worked and what I would change for next time. So with no pictures of a WW2 game I could resist including some pictures of my Hundred Year War Minifies which are slowly being painted. A few more units and I will not be too far away from a small game of Lion Rampant.
Completed 3 units last week
What worked? Well the dice generated terrain produced many interesting tabletop layouts which I would not have thought up myself. Using a gridded tabletop helps with this sort of random approach as you count X squares across and Y squares down to place terrain features.

The campaign map helped to define the terrain setup depending on the campaign zone being attacked, e.g. a town, wooded area, river, etc. This worked fine, but other than that the map was more of a tally of wins and loses.
Campaign map
In future I plan to introduce two changes here: 

1) Allocation of more points for certain locations or objectives, such as critical cross-roads, bridges, etc.
2) Where zones become isolated (surrounded on 3 sides) there is an impact on the defenders. (Thanks to Norm for this suggestion). However, I am not sure of the impacts yet.

The games rules themselves, have become reasonably settled for the most with only two areas I am considering amending. They are: air support and armoured (mechanised) infantry.

For air support I am considering all attacks are successful with a 4+ or the unit takes a disruption, as I don't want air support hanging around too long. 

Armoured infantry units are currently treated as having better fire power than infantry when attacking units categorised as infantry (foot, motorised and armoured). I am considering making their fire power the same as infantry with a 4+ to hit, but allow a combat move after combat so they can do a shoot and move. Only tanks at present have that move capability. Reconnaissance units (light tanks and armoured cars) would be the same, but have 3+ against infantry to help differentiate between armoured infantry and reconnaisance units.


Campaign attacks were either limited attacks or all out (major) attacks. Both attacks had available 12 units plus the score of 2 average dice for limited and 3 average for major attack. The supply cost of a major attack was twice that of a limited attack. Any major attack pretty much guaranteed a win removing any risk element. While it could be argued that being careful with your supplies allowed a player the luxury of some certain wins. It was almost too certain. While liking the idea of different strength attacks, as it makes a player choose, I plan to change the advantages of a major attack. Preliminary ideas are: 

1) major attacks get the same number of units as a limited attack, but also get air support, reserves arrive on a 3+ rather than a 4+ (better planning and unit availability) and artillery which get disrupted on a 1 get automatic regroup and do not need the usual dice roll of 3+ (representing better supply). 2) Game time would start when the player wants and are not dictated by the dice. During the campaign the start time was the combined score of two average dice plus 2 hours. So if a 3 and 4 were rolled the battle started at 9am and each turn moved the clock forward 1 hour till nightfall at 7pm. When the game ended unless victory points were even, then additional turns were played using night rules until one side or the other ceased additional points.

Thursday 6 October 2016

WW2 campaign comes to an end

With the table set up for my WW2 gaming, it was a simple decision to play out the final game of the campaign. The campaign has turned out to be well balanced with this last game being the deciding game. The odds of a win were in favour of the Commonwealth forces who had sufficient supplies to launch one final major attack.
The final attack of the campaign and the winner takes all
The dice rolls for number of available units also went well for the Commonwealth forces scoring 12 on three average dice plus 12 the standard number for an attacking force. The Germans fared less well scoring 5 plus 6 the standard number for defenders.

The dice generated terrain provided a strong defensive position for the German defenders. So not every thing was going the attackers way and their position was bolstered by minefields and a strong point.

While lacking units the Germans have a strong defensive position
The Commonwealth forces quickly moved forward with a armoured infantry and tanks on their left flank and pushed infantry units forward on the opposite flank. Avoiding the central strong point. Air support arrived early and proved very effective eliminating both a Jagdpanther unit and German artillery support, leaving the armoured attack to quickly force the defensive lines. German reserves arrived, but were quickly swept away and the game became a foregone result.

German defenders wait for the onslaught 
Air support played a decisive role in the attack 
The defensive line quickly succumbed to the attack
On the opposite flank infantry started to clear out the defenders
Too few reserves arrived to stem the attack
A victory to Commonwealth forces - battle and campaign

The campaign has turned out to be well balanced (possibly a good dose of luck in there) and I will be setting up another one soon. First I need to sit back and think through: what worked, what did not, and what changes would be beneficial.

Tuesday 4 October 2016

WW2 campaign - the end is in sight

Three battles were played out in the closing few games of my WW2 campaign.

The first game was a German limited attack on the town of Anisy. The attack began at 8am with a strong showing or armoured units which swept around the flank of the town, quickly suppressing the defending units. Allied air support was effective and eliminated a unit of Panthers, the game swung in the favour of the Commonwealth forces as their reserves arrived. The second wave of German assaults then began on the town and were started to take a toll on the defenders and sucking up the Commonwealth reserves. By 7pm the town was captured by the Germans as the last few defending units were eliminated. A German victory.

Armoured units move around the town flank
Air Support helps stem the advancing tanks
The second attacking wave captures the town
The second game had the Commonwealth forces back on the attack in open country. The dice generated terrain favoured the attacking side. For victory the Commonwealth forces were going to have to take both hills. German forces had stacked one side of the table to defend one of the hills at all costs with the intent of denying the attacking forces a victory.

Commonwealth forces started their attack at 11am, a bit late in the day. This meant they were going have to push on quickly. Both sides were rolling poorly, which was to the advantage of the attacking Commonwealth forces as they could maintain the momentum of their advance. The hill was successfully taken by the Commonwealth infantry, while their artillery was proving the decisive factor as their armoured reserves were delayed. A Commonwealth victory.

Game set up with both hills needing to be captured
Commonwealth infantry quick move up against poor shooting by the Germans
Commonwealth tanks finally arrive after the hills are captured
The Germans use their last campaign supplies for one final limited attack in the third game. The terrain layout was for the most part in the defenders favour. They would have to hang on to both buildings to secure a victory, while the attacking Germans wound need to capture the building on the flank and also the hill it was nestled against.

The attack started well and that was about as good as it would be for the Germans. Their air support failed to achieve any hits and a second wave of attackers failed to materialise. Commonwealth forces bolstered by reserves were able to outnumber the attackers, never a good thing, and concentrate their fire eliminating the attackers one at a time.

There was one interesting moment where both sides had air support on the table at the same time. A dog-fight ensued allowing air units to attack each other using the same rules which are used against ground forces: 5 or 6 is a kill, 4 or 5 no outcome, and 1 or 2 attacking unit is disrupted. The dog-fight was ineffective and the German air unit later left the game soon after when rolling a second 1 in an attack on ground units.

So a victory for the defending Commonwealth forces.

The German attack pushes ahead expecting reserves to follow
Allied air support helped destroy the attacking units
After those battles the campaign situation has the Germans with no remaining supplies available to launch any attacks, and the Commonwealth forces with enough supplies to either launch one major attack or two limited attacks. Major attacks get access to more units determined by an extra average dice roll.

Germans forces hold 13 map zones and Commonwealth forces control 12 map zones. The winner will be the side which holds most map zones after all supplies are consumed by both sides. The question is whether to launch two limited attacks or one major attack to secure one more map zone and secure a victory for Commonwealth forces.

Front lines after the games
The next and final game of the campaign will be a major attack by the Commonwealth forces in an attempt to secure a campaign victory.

Saturday 1 October 2016

ACW weekend - Murfreesboro games

This weekend I have been able to get in two ACW games. The first game used the Murfreesboro scenario from the Battle Cry website as the source. With a little bit of work I can map the hex grid to my square grid tabletop and I keep the selection of units from the scenario.

There are a lot of scenarios available on the site to work through and keep me occupied with ACW games. I have not done a count, but my guess there are 30 of more.

Confederates (red) and Union (blue)
The rivers are all fordable to infantry and cavalry, but not artillery. Units on a river square reduce the dice rolled by one for shooting. (The house rules on tab above).

The game was a marginal victory to the Confederates, who after managing to hold the centre were able to push back the defending Union forces on their right flank.

Beginning of the game

Early stages of the game as Confederate forces advance
Later stage of the game as the Confederate flank push back Union defenders
The second game used a slightly different set up, which was based upon the map from "Introduction to Battlegaming" by Terry Wise. The first wargaming book I ever owned. The board has less terrain and the Confederates get an addition artillery unit.

Introduction to Battlegaming - Murfreesboro
The tactics were the same for both games, Confederate forces advancing and holding the centre while their right flank pushed forward, and the result was the same.

Having less terrain made the Union lines of defence much clearer, and I thought at one point they were going to succeed and successfully fend off the advancing Confederates. Who were only able to push home their attacks at the end by using their commanders to increase their combat capability, at the risk of losing them.

Mid-way through the game on the Confederate right flank
The rules continue to work ok, and there were no modifications other than making all rivers fordable for these games.