Saturday 15 June 2024

A semi-flat samurai castle

I have not done much painting recently, so in an attempt to get back into the swing of things, I decided to create and paint a semi-flat castle for my samurai armies. I thought having a castle in the distance would be useful for the narrative of my samurai games as I test out some rule changes. It seems many battles during the Sengoku period were fought near or around castles, either to relieve the defenders or to besiege them.

The recently finished castle positioned on a tabletop edge.

About a month ago, I created something similar when I made a semi-flat town for my English Civil War games. The steps for making the town can be found here. I use foam board to create the layers and gesso paste to create texture and additional detail.

I position these semi-flat models on a tabletop edge to represent where reserve units arrive or as the reason for whatever scenario is being played. I find it easier to make these semi-flat models than draw and paint a flat model.

The castle was made from three layers of foam board which are covered in gesso-paste used to create texture. 

Units positioned in their defences around the castle.

Here are a few photographs of a game in progress, showing the blue army arriving on the flank of the red army, hoping to relieve a siege. The castle can be seen in the background.

The blue army is attempting to relieve the castle garrison.

Red army reacts to the relieving force arriving on their flank.

Next week, I plan to post more about the draft rules I'm currently using which I mentioned in my last post. Writing up my notes as rules, even in draft form, always seems to take longer than I expect.

Thursday 13 June 2024

A Samurai game using the Bridgehead scenario

Last week, I played a WWII Western Desert game using the One-Hour Wargaming Bridgehead Scenario (number 5). In that game, I replaced the river with a minefield. This time, I decided to replay the scenario with the river back in place and set in a different period. I chose the Samurai period from 1550-1600, as it gave me a chance to test out some activation rule changes. I'm still searching for a set of rules that I'm happy with. For this game, I mashed up the activation system from Songs of Blades and Heroes with many of the combat mechanisms from One-Hour Wargames.

A close-up photo of some Dixon Ashigaru troops. My armies are an eclectic mix of manufacturers and scales, ranging from 20mm to 25mm randomly collected over many years. They're all simply painted with a glossy finish.

In the game, each army has 6 units. At least half the units must be Ashigaru units equipped with spears and a combination of arquebuses and bows units, the remaining units can be a mix of foot samurai used as shock troops or mounted samurai providing mobility.

Game Report

The One-Hour Wargaming scenario has blue army attempting to establish a bridgehead with the red army trying to prevent them. By mistake, I reversed the roles with my red painted samurai army attempting to establish the bridgehead against the blue painted army. To prevent confusion, I use fictional clan names with the Miyamoto army trying to establish the bridgehead and the Takeshita army opposing them.

The Miyamoto army started the game with a unit of mounted samurai positioned across the river.

The first two units of the Takeshita army arrive. While the Miyamoto mounted samurai advance toward the hill.

A unit of Miyamoto Ashigaru arrives and crosses the river to confront the advancing Takeshita forces, while their mounted samurai take up position on the hill and the flank.

The Takeshita army push forward their foot samurai as Miyamoto forces try and move their arriving units across the river as quickly as possible.

As more Takeshita units arrive, their Ashigaru clash in the centre but remain cautious of the Miyamoto's mounted samurai, who have retreated from the hill but still pose a threat on the flank.

Takeshita units mounted samurai successfully launched a charge, forcing Miyamoto's units north of the river to retreat, blocking their reinforcements as they attempt to cross the river.

Miyamoto's units launch a counterattack, regaining the lost ground in the centre and allowing their reserves to cross the bridge.

Both armies attempt to reorganise their formations and deploy recently arrived reserves.

Mounted samurai from both sides are positioned on the flanks, prepared to charge and rout any weakened units.

Takeshita's mounted samurai seize an opportunity to charge into Miyamoto's left flank, routing a unit and impacting their flank.

The position of Miyamoto’s army went from bad to worse as more of their units began to rout.

The game was entertaining and enjoyable with the risk/reward activation mechanism from Song of Blades and Heroes rules providing interesting choices for both armies. When activating a unit, the player can roll one, two, or three dice. A dice score of 3+ is a successful action. However, if two dice fail to achieve a 3+, the player's turn ends. While rolling a single dice minimises the risk of ending a player’s turn early, it also means a unit gets to do very little. Additionally, if any 1s are rolled, the opposing player can react with one of their units for each 1 rolled. A player’s turn ends when all units have attempted activation or if two dice fail to get a 3+.

During the game, there were several instances when a unit of samurai from one army, or the other, charged forward with a couple of moves to surprise the enemy or used their additional actions to improve their combat results to make a decisive assault on an enemy unit. I now need to write up my rule notes, and another samurai game is being set up on the tabletop this weekend to continue testing the rules.

The victorious Takeshita army after the battle


Friday 7 June 2024

A quick WW2 Western Desert game

The recent gift of Rommel’s command and completing some wadi terrain (see previous posts) motivated me to set up a WWII Western Desert game on my tabletop this past week.

Advancing Allied tanks.

Rommel’s HQ gets to play a part in the game.

For this game, I used the One-Hour Wargames Bridgehead scenario (number 5). Instead of a river, there is a minefield with a gap cleared by German engineers, who are now trying to secure it and establish a bridgehead. Alerted by a recent reconnaissance flight, the Allies are scrambling to mobilize nearby armored units to prevent the enemy from establishing a bridgehead.

Here's an overview of the battlefield: the minefield runs north to south. The photographs are taken from the northern end of the tabletop. Several hills are scattered around, primarily concentrated in the south, and there is a wadi located in the northern area (bottom of the photo).

The Allies arrive in three groups on turns 1, 3, and 5, with a dice roll determining which of the three possible entry points they will use. Afrika Korps reserves arrive steadily from turns 1 through to 5 from the western edge. For this game, I'm using the Tank on Tank board game rules, adapted for the tabletop with a few additional modifications, such as a -1 penalty on attacking dice rolls for moving units, which is indicated by the use of dust clouds.

Game Report

Here are the photographs of the game as German units try and create a bridgehead. I have drawn on some of the photographs to indicate where the action is occurring as it is not so obvious with 6mm units. 

In the initial phase of the battle, German forces advanced to secure a hill overlooking a potential entry point for the Allied reserves. Meanwhile, other German units pushed through the gap in the minefield, and quickly spot the dust trails of Allied forces arriving from the east.


Additional Allied reserve units arrive, joining the earlier arrivals who have taken positions on higher ground to assess the buildup of German forces.

The Allies launch an initial attack on the hill to the south but are easily repulsed with losses.

German anti-tank units arrive, with Rommel’s HQ visible in the background. Rommel's presence on the tabletop will enable the Germans to re-roll a couple of their failed activation dice rolls.

In response to the advancing Allies, the Germans launch two attacks to support their units on the hill and block the main Allied advance.

After an initial clash the Allied armour take casualties and choose to retire, while their last expected reserves arrive to launch an attack the hill to the south. The German artillery arrives and is quickly rushed into position to provide support to their troops defending the hill.


A close up on the action. Burning wreaks block line of sight in the amended rules.

The Allied armor initiates an attack from the hill to divert the attention of the German armour while they launch their assault on the hill.

Following a brief yet fierce engagement, the Allies successfully secure the hill to the south. Switching their attention the Germans to use their now superior tank numbers in an attempt to make an outflanking manoeuvre against the Allied armour in the centre.

Following the armor clash in the centre, the Allies have withdrawn to the eastern hills. The German control of the bridgehead remains at risk as long as the Allies maintain their positions.

The Germans attempt to dislodge the Allied units from the southern hill, using their artillery and 88mm gun to support their armoured attack, which has manoeuvred around to the rear of the hill.

After several efforts, the Germans successfully secure the southern hill. Then they use it as a launching point to mount an attack on the eastern hills where the remaining Allied units capable of threatening the bridgehead are positioned.

The final Allied position falls, and the bridgehead is firmly secured.

An entertaining game. The Tank on Tank rules provide quick games which seem very suitable for armoured clashes in the Western Desert.

Saturday 1 June 2024

ECW game Report - The Battle of Blackmore Heath

A couple of weeks ago I posted some English Civil War rules and thought I should post a game report of my last ECW game using the rules.

Background

The Battle of Blackmoor Heath takes place because of the strategic importance of Blackmoor, a town through which Royalist supplies pass through. Royalist forces, led by Sir Percival Ashcroft, aim to secure the town of Blackmoor to ensure the safety of their supply lines. Meanwhile, the Parliamentarians, commanded by Sir Nathaniel Thorne, are determined to prevent this, understanding that control of the town would disrupt Royalist supply lines and bolster his own position in the region.

The Forces

The armies have been organised into the following commands:

  • Right Flank
  • Centre
  • Left Flank
  • Artillery
  • Dragoons
  • Reserve

The rules have a constraint where the flanks, centre, and reserve commands need to consist of either infantry or cavalry. They cannot have a mix of cavalry and infantry units within a single command. While dragoons and artillery have their separate commands of their own. Each force has commanders who are assigned to both flanks, centre, and reserve commands, the commander-generals are assigned to the reserve.

Royalist Orders of Battle

  • Right Flank - 4 cavalry units, commanded by Colonel Edmund Blackwood
  • Centre - 3 infantry units, commanded by Colonel Theobald Hargrave
  • Left Flank - 3 cavalry units, commanded by Captain Reginald Fitzroy
  • Reserve - 2 infantry units, commanded by Sir Percival Ashcroft (commander-general)
  • Artillery - 2 guns positioned left of the centre command
  • Dragoons - 2 units, one positioned on either flank.

Parliamentarian Order of Battle

  • Right Flank - 4 cavalry units, commanded by Colonel Gideon Fairlow
  • Centre - 4 infantry units, commanded by Colonel Ezekiel Marlowe
  • Left Flank - 2 cavalry units, commanded by Captain Josiah Whitlock
  • Reserve - 2 infantry units, commanded by Sir Nathaniel Thorne (commander-general)
  • Artillery - 2 guns positioned on a hilltop left of the centre command
  • Dragoons - 2 units, one positioned on either flank.

The rules have restrictions with an army’s initial deployment. So when deploying commands at the start of the game, all units in a command must be deployed within 12” of their designated commander. However, this restriction does not apply for dragoons and artillery units, which can be deployed independently. It's important to note that this rule applies solely to initial unit deployment and not when moving units during the game turns.
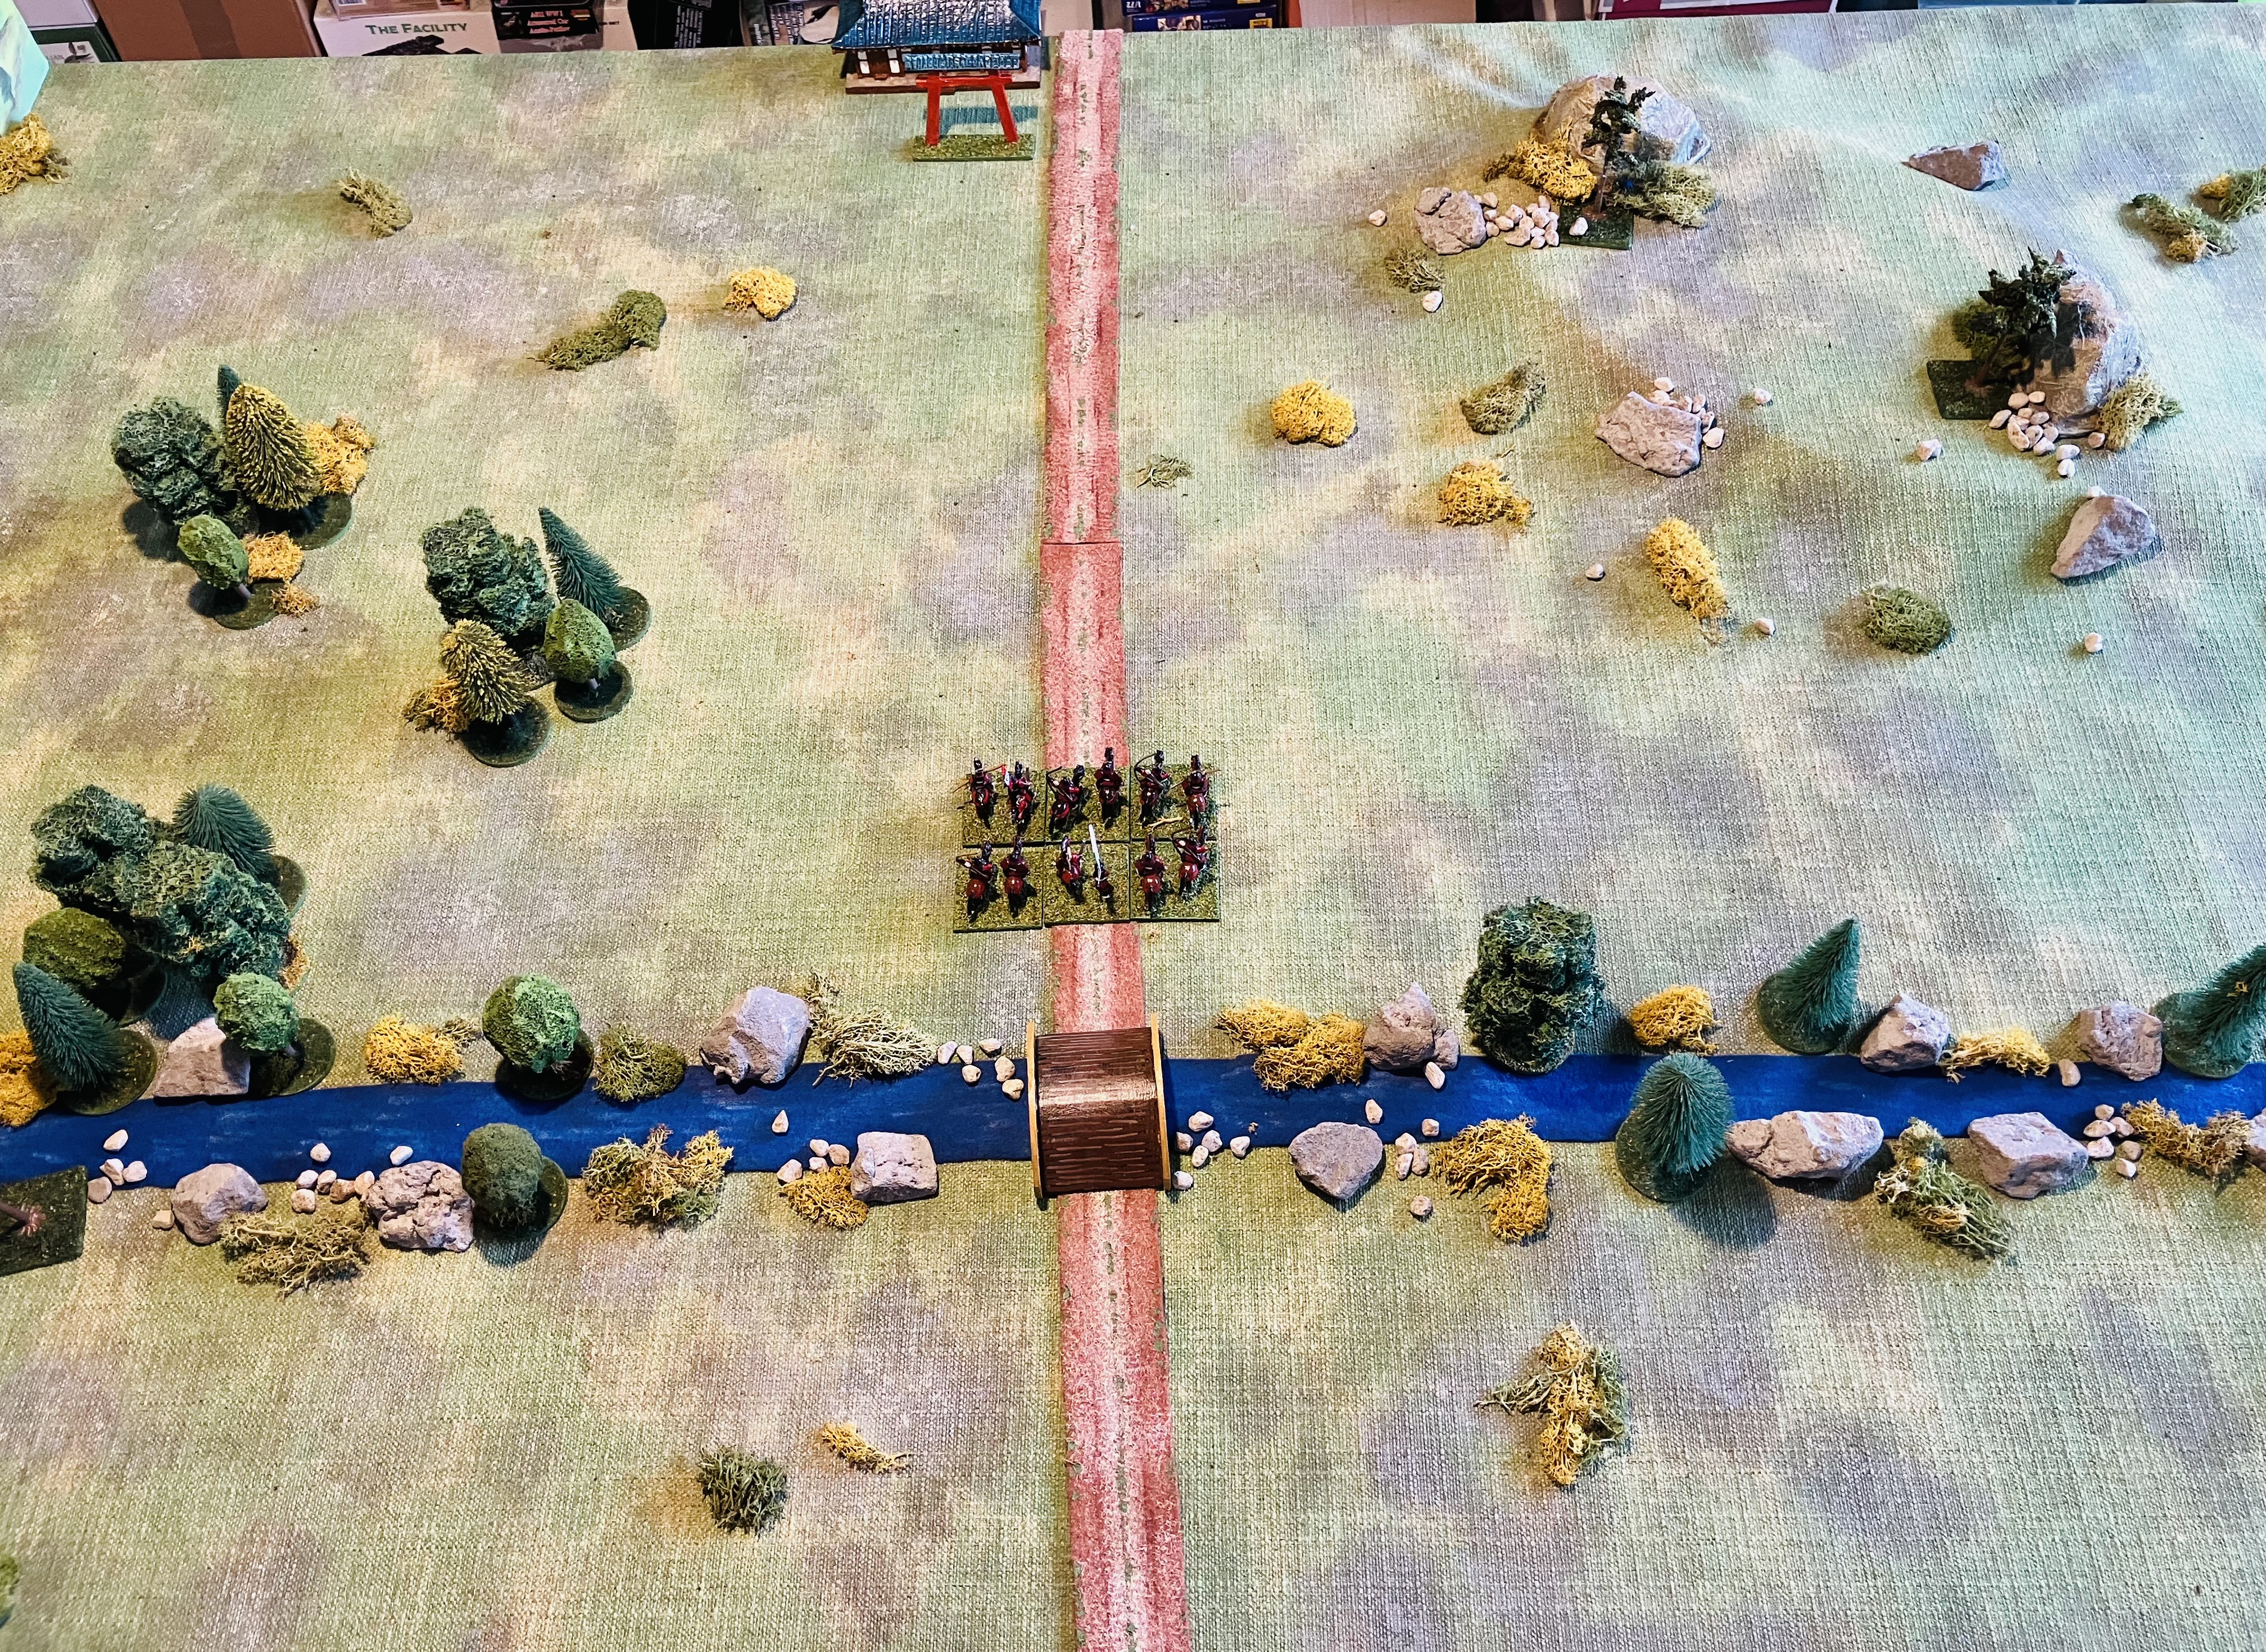
Initial deployment

Both armies have 3 supply bases which are be placed along the army’s tabletop edge. These are spaced out with 12” between them.  If a an enemy cavalry unit reaches a supply base it is removed along with the cavalry unit. The cavalry unit is counted as lost, but the supply marker counts towards victory points. This encourages cavalry to charge off after routing their opponents to capture the enemy baggage and undermine the enemy army’s morale.

The aim for both forces to to eliminate the other and hold the hilltop currently occupied by Parliament’s guns. The game will last for 12 turns and victory will be decided by points which are awarded as follows:
  • Add 1 point for each routed enemy unit.
  • Add 3 points for each enemy supply unit attacked.
  • Subtract 2 points for each commander lost.
  • Subtract 4 points if the commander-general is lost.
  • Add 6 points if the enemy units are reduced by more than half, including any enemy cavalry exiting the tabletop after attacking supplies.
  • Add 6 points if objective, the hilltop, is held.

Battle Report

The opening tactics from both Royalist and Parliamentarian armies were the same, pushing up their dragoons on the flanks and using their artillery to bombard the enemy. The Royalists make the first move, pushing their right flank cavalry forward while continuing to bombard the enemy centre. Parliament’s response was to quickly push forward their left flank cavalry and block the Royalist cavalry who were having to navigate around a small wood and nearby fields. As the cavalry engaged, the Royalist centre advanced. 

Realising his left flank was his weakest the Parliamentarian commander-general, Sir Nathaniel Thorne, moved his reserve infantry to support the left flank.

During each turn, a player can give two orders to their commands. Issuing an order is necessary to move either one unit or all units within a command, or to order an artillery bombardment. However, this restriction only affects unit movement and artillery bombardment. The orders do not limit combat between units that must engage in combat if they are within 3 inches of an enemy unit.

The opening moves had the dragoons advance on either flank and artillery bombard the enemy.

Parliament counters the advancing Royalist right flank cavalry.

The Royalist infantry in the centre advance upon the hill and guns.

As the Royalist cavalry, led by Colonel Edmund Blackwood, gained the upper hand against Parliament's left flank, the Parliamentarian cavalry on the opposite side launched an aggressive charge. They were met by a countercharge from the Royalist left flank. Early in this cavalry clash, the Royalist cavalry commander, Captain Reginald Fitzroy, was killed while leading from the front.

The Royalist infantry in the center managed to advance up the hill and destroy Parliament’s artillery. In response, Parliament's infantry centre and reserve moved forward to engage the Royalist infantry, who were now supported on their right by their cavalry, who had routed their opposition cavalry and commander.

The loss of Captain Reginald Fitzroy was not only a setback for the Royalist left flank, they soon discovered Parliament’s cavalry were both well-trained and equiped by their commander Colonel Gideon Fairlow, and they were beginning to gain the upper hand.

Parliament’s right flank charge forward.

Royalist cavalry counter charge and take the hilltop.

The infantry battle over the hilltop.

The Royalist infantry reserve, held back by a cautious Sir Percival Ashcroft, was prepared when Parliament’s right-wing cavalry advanced after beating the Royalist cavalry. However, this decision left the Royalist centre vulnerable, and under pressure from Parliament's centre and reserve infantry, they were forced back down the hill. Their commander, Colonel Theobald Hargrave, was wounded in the push of pike and had to retire. Support from the Royalist right-flank cavalry was limited as they saw easier targets and plundered Parliament’s supplies and baggage.

As evening closed in, Parliament held the hilltop, having reclaimed it with their infantry. Meanwhile, the Royalist reserve stood firm against Parliament’s cavalry, securing their own supplies.

The fighting is fierce around the hilltop.

Royalist cavalry plunder Parliament’s supplies while their infantry centre are forced off the hilltop.

After 12 game turns the game ends with Parliament holding the hilltop objective.

Who Won?

With the end of the game, it's time to tally the victory points and determine whether the Royalists or Parliamentarians won.

Royalist victory points total 13:

  • 8 Parliamentarian units routed = 8 points
  • 3 supply plundered = 9 points
  • 2 commanders lost = minus 4 points

Parliament victory points total 19::

  • 9 Royalist units routed = 9 points
  • Routed more that half the Royalist force = 6 points
  • Objective held = 6 points
  • 1 commander lost = minus 2 points

It seems like a sound victory for Sir Nathaniel Thorne and Parliament who have disrupted Royalist supply lines and firmed up their own positions in the region. However, a closer look shows it could easily have been a drawn game. One more unit lost for Parliament and the Royalists would have secured a further 6 points for routing more that half the enemy, and increasing their score to 19.

I am now reasonably satisfied with the rules as they stand (found here) and plan only to update them with clarifications from the comments or update the victory points as I play more games. A quick thank you to those who raised a question in the comments, as they help me immensely with clarifying areas of the rules.