Thursday, 28 November 2024

Wargame Matchbox Challenge - Adding Contents (Part 2)

I am continuing the challenge to develop my wargame in a matchbox. The idea behind this fascinating challenge stems from a discussion between Mark and Alan on their blogs Man of Tin and Duchy of Tradgardland.

This week, I have added some new components to the game, riverbanks and a river flow indicator. The riverbanks are represented by pieces of string which can be easily laid out to define the course of the river. The flow indicator is made a card and is important for the game’s movement rules, where ships are activated one by one, starting upstream and progressing downstream until all ships have had the opportunity to move.

Adding some more contents to the matchbox.

A game in progress with the string representing the river banks.

A simple blue arrow is used to show the river flow.

Having opted for an American Civil War (ACW) ironclad game (see previous post) and having scant knowledge of the naval aspects of the ACW. I thought I had better do some reading so I purchased an ebook “Mississippi River Gunboats of the American Civil War 1861-65”.

Some reading to help with the game and provide ideas for the rules.

The current combat rules involve tracking hits to specific areas of the ships. To simplify the tracking of damage, I made a card for each ship where the damage can be marked with a pencil. These cards are designed to fit neatly into the bottom of a matchbox. However, I realised I will need to revise the cards in a way to make the game entirely self-contained in a matchbox, and not rely on the players having a pencil readily available.

Ship cards sized to fit into the bottom of the matchbox.

The next steps are to write up the rules to make sure they fit into the matchbox. The to hit and damage tables will be glued onto the outside of the matchbox to save space. The other idea I want to try out is making the draw of the matchbox into a fort for the game as they played important roles in the ACW naval campaigns.

Friday, 22 November 2024

Joining the Matchbox Challenge (Part 1)

Two wargaming blogs I enjoy following, Man of Tin and The Duchy of Tradgardland, have been discussing a design challenge to create a wargame that fits inside a standard matchbox. This concept interested their readers and they have opened the challenge to anyone, with more details available here. The concept of making a wargame compact enough to fit into a standard matchbox intrigues me, so I have decided to give it a try. Over the past week, I’ve been pondering ideas for the challenge while also making progress on painting my house (and I am happy to report it's now halfway done! The house that is, not my pondering.)

A 30mm long ironclad model steaming along.

Not having any of my wargaming and modelling equipment available means I cannot reuse any models, for example, a handful of 15mm figures for a skirmish game. So I decided I would have to create some models for the challenge, while not fully ruling out land games, this has pushed me in the direction of naval and air wargame ideas. Both have the advantage of not really having to include any terrain features into the game, any features required would take up valuable space in the matchbox. The matchbox’s dimensions (34mm x 55mm x 14mm) set the size constraints for the project. 

In the end I decided on a naval-themed game. The American Civil War riverine battles with ironclads seemed like a good choice because their blocky designs should be easier to make using materials like card, toothpicks, and Milliput epoxy putty. 

Four prototype ships have been built to fit within the matchbox and still leave room for a single D6 die, each ship is 30mm long. Having four ships will allow for a variety of scenarios such as one-versus-three escapes, late arrival of reinforcements, or straightforward one-on-one duels.

The half finished models in the matchbox with a small die.

The models are complete and just need a bit of sanding before being painted in a mix of dark grey and brown.

The next steps in this challenge for me, aside from finishing the models, are:

  1. Create some riverbanks and sandbanks using string, which can be coiled to fit inside the matchbox.
  2. Write some simple rules that fit on a small sheet of paper to fit into the matchbox (around half the size of A4 or Letter paper) or that can be cut up and pasted onto the outside of the matchbox.
  3. Design ship cards for each vessel, including their details and stats to support the rules.
The next post on this challenge will be about the rules where I plan to use the matchbox as a measuring tool for movement and ranges.


    Saturday, 16 November 2024

    Painting and rule changes

    Wargaming continues to take a back seat as pretty much every day I am driving to the house and spend my time painting rooms (not models alas). This gives me plenty of time to think about and ponder the mech rules. However, the downside is that when I do manage to fit in a quick game, I often have new rule changes I want to test, which is slowing down the progress of my mech campaign.

    A random mech photo made to look cartoonish.

    Rule Changes…

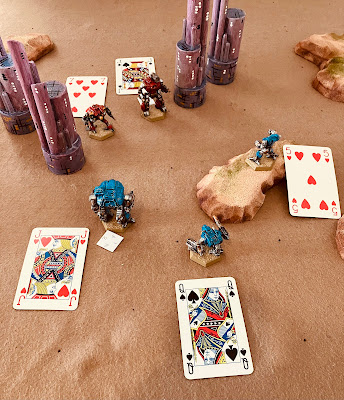
    I have tried various activation methods over the past few weeks while developing some simple mech rules and may have now settled on a playing card-based activation system (I hope). In this activation approach, the cards are shuffled, and each mech is assigned a card. Activation begins with the mech holding the highest card and continues in descending order until all mechs have been activated. Mechs that are attacked but have not yet had the chance to activate can take defensive countermeasures to reduce the effectiveness of combat, but must sacrifice their card and be treated as activated. The main drawback of  the cards is they do clutter up the tabletop. To address this, I might create numbered counters to draw from a bag or look to purchase some very small playing cards to use instead.

    A test game using the card activation.

    Another rule change I tried out previously which has returned, is the critical system failure check. This check occurs whenever a mech takes a hit. A D6 is rolled and if less than the total number of hits accumulated, the mech has a critical systems failure and is eliminated. The mechanism adds a greater level of uncertainty to taking hits where a well aimed shot can eliminate a mech.

    A mech now with 4 hits passes the critical failure test. Requiring a 4 or more for the number of hits a 5 is rolled.

    Painting…

    Returning to the topic of painting, I am halfway through painting the house and one of the rooms completed is my wargaming room. A photo of which can be seen below.

    The wargames room painted and waiting to be filled with shelving units loaded with models and terrain.


    Monday, 4 November 2024

    Battle of Sekigahara Boardgame

    To take a break from my mech campaign, I decided to try something different and purchased a print-and-play game from Wargame Vault. This was my first time picking up one of these games, and with limited wargaming options on hand until we move into our house, I figured it was worth trying one out.


    The game I chose was “Battle of Sekigahara Game” by The Historical Game Company and Blue Panther LLC. I was intrigued by this game because uses event cards to determine the number of moves and attacks each player can make during their turn, along with special events that affect play. The events can range from combat or movement benefits, to major shifts in the battle like an allied clan switching sides.


    The rules are straightforward and fit easily onto four pages. The only thing that tripped me up in my first game was remembering the defensive fire phase, where the opponent can shoot with missile units (arquebus and bow) right after movement and before the combat phase. I found the card mechanics with their events work well when playing solo adding a level of uncertainty.


    A recent print and play purchase

    After purchasing and downloading the game, the next step was printing. Since I don’t have access to a printer and needing the map on A3 paper (approximately 11 x 17 inches) I decided to go with an online printing service. The process proved to be quite simple: I just uploaded the rules, counters, cards, and map, and for each selected the paper size and quality. For example I had the map printed on their highest quality paper so it will be more durable. The printing arrived two business days later, not long to wait.


    Once the printouts arrived, I glued the counters onto card stock using a glue stick, then lined up and stuck on the counter backs. Finally once the glue was fully dry I cut them out. As for the cards, they came on one sheet of paper with the faces on one side and the backs on the other which all lined up nicely. These I covered with clear contact plastic, front and back, before cutting them out. This gave the cards some extra thickness along with durability. There are no pictures of this process as it is quite tricky putting the contact plastic on, one mistake and it all turns to custard.


    The printed front and back of the counters are glued to a piece of card and cut out.

    The completed cards. The printed cards came on one sheet of paper with the faces on one side and the backs on the other which all lined up nicely. These were covered with clear contact plastic, then cut out.

    So far, I have managed to play one game, where the Eastern Army under Tokugawa Ieyasu quickly defeated the Western Army under Ishida Mitsunari. Although the game ended up being a one-sided affair, probably due to my erratic tactics, I will definitely be playing some more games in over the next few weeks as a change from my mech games. One feature of the game I liked is each army has two clans on their flanks that are unreliable and may switch allegiances during the game, as directed by the event cards.

    The game setup ready to play.

    End of the game with an Eastern Army win.

    Looking ahead I am curious if parts of the game’s rules might be adapted for my samurai tabletop games. Something I would like to try once the house is finally set up. The ship with our goods has left Melbourne and with travel and customs it is looking like it we will be in around mid-December, which feels like it’s still a ways off. Although things are progressing, yesterday I was preparing and undercoating the room where I will be setting up my table and models.