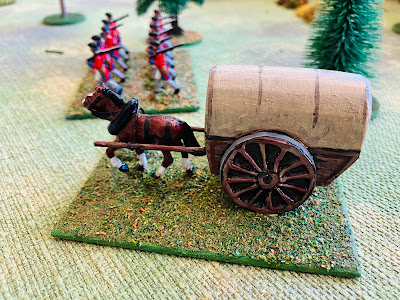
I plan to set up a small campaign for the French and Indian War (FIW) in the near future. As I don't have any supply carts, I decided to scratch-build some for my armies. I used to have some spare plastic cart wheels stored away, but over time they became brittle. I considered buying replacements, but they would take time to arrive, so I chose to make my own by making a mould from one of the broken wheels. Nothing fancy, just something basic that resembles a wheel on one side and can be attached to scrap wood shaped to look like carts. I used a polymer clay to make the wheels which stays flexible until baked in the oven to harden, after which it can be sanded and painted.
 |
| A completed supply cart. |
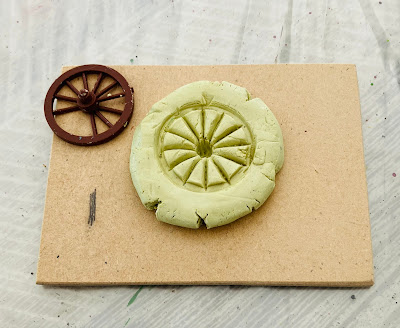
To create the wheels, I began by making a simple mould using Milliput epoxy putty. I pressed the broken wheel into the putty to form the shape. Since the putty takes overnight to set, I had plenty of time to widen the spokes, make gaps for the missing ones, and make sure everything looked ok.
 |
| A mould is made from Milliput using a broken wheel. |
The next steps involved pressing the polymer clay into the hardened mould and cleaning up the wheel ready for baking.
- Lightly dusted the mould with talcum powder.
- Soften the clay by working it until it becomes malleable, then pressed it into the mould.
- Carefully removed the clay from the mould.
- Trimmed off any excess around the edges.
- Straighten the spokes and ensure the wheel is circular (as it does become slightly misshapen during removal from the mould).
- Baked the clay in the oven to harden.
- Once hardened, the wheel is sanded for a smooth finish.
I chose polymer clay over epoxy putty because it's easier to handle and doesn't stick to surfaces as much.
 |
| The polymer clay is pressed into the mould. |
 |
| The clay comes out of the mould slightly misshaped, but this is sorted out later. |
 |
| The excess clay is trimmed off. |
 |
Spokes are straighten and the wheel made circular with modelling tools.
|
 |
| After baking, the set wheels are sanded. |
The cart is made from a piece of wood sawed into shape, with additional items like a canopy or a variety of bits added to represent barrels and crates. The horse an unused cavalry horse from a kit, with its saddle filed off and a collar made from Green Stuff.
 |
| Bits of balsa and beads are added for the stores. |
 |
| A horse and handler are prepared. |
 |
| While the painting is very simple, I do paint on a few highlights, especially the spokes. A final coat of gloss hides the many imperfections. |
Now the carts are made. I plan to make a ship and some boats for some amphibious scenarios.
 |
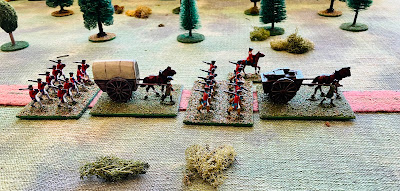
| The carts can be used by either army. |


Very clever work, Peter!
ReplyDeleteIt was a useful test. I am hoping to produce some gun carriages for my Napoleonic armies so I can indicate horse artillery units.
DeleteCracking piece of modelling Peter, lovely additions and they look great on the table, very handy pieces to have.
ReplyDeleteI am sure I will be putting them to use. Hopefully soon.
DeleteNice work Peter
ReplyDeleteThank you.
DeleteVery nice looking carts, Peter....it's the type of thing most wargamers have far too few of....making your own is a great way to overcome this!
ReplyDeleteCarts are often very handy for some scenarios.
DeleteVery clever!
ReplyDeleteJob well done!!
Thanks, Maybe I will try my hand at making some artillery carriages.
DeleteGreat result. Well done mate.
ReplyDeleteThanks. It is always enjoyable doing the odd bit of scratch building.
DeleteNicely done. And your carts fit in rather well with the “old school” look of the Spencer Smith miniatures 👏👏
ReplyDeleteCheers,
Geoff
Hi Geoff. I am very happy with how they ended up and yes, they do blend in well with the other figures. Thanks Peter
DeleteA very clever way to manufacture carts … and I bet that they are very robust as well!
ReplyDeleteAll the best,
Bob
Thanks Bob. They are very much wargaming models and as you say they will be robust. Cheers Peter
DeleteThey're really good, and the homemade appearance makes them blend in perfectly with SSMs.
ReplyDeleteThanks. It is always nice to know I can make some more if the situation arises.
DeleteVery neat idea there Peter and as with your other scratch built stuff, they look the part and very effective too:).
ReplyDeleteNow to get them into a scenario. Thanks.
DeleteVery inventive Peter!
ReplyDeleteI don't know if they are available in the Antipodes, but craft shops often do wooden or MDF wagon wheels. The downside is they can be on te large side.
Neil
I have seen some on line, but will have a look the next time I am in town.
DeleteVery inventive Peter and a great final result.
ReplyDeleteIt turned out better than I expected.
Deletewell OMG that was clever and resourceful and successful. 😁
ReplyDeleteI'm always impressed when people just make something that they want. I always struggle with that.
I enjoy scratch building where I have the skills to do so. I rarely blog about the failed attempts :-)
Delete