This week I played a remote American Civil War (ACW) wargame with Jon of Palouse Wargaming Journal. The scenario played was from the First Battle of Manassas (Bull Run) focussing on the fight for Henry House Hill. Over the past few weeks Jon has been playing a number of remote games using various scenarios from this battle which I have been reading with interest (link here).
 |
| A close up of the action provided by Jon. |
Prior to the game, Jon had sent me through a detailed game briefing along with his ACW version of the Fields of Honor rules. I had the opportunity to use these rules in a previous ACW game with Jon, and they do make for a thoroughly enjoyable game.
 |
| An overhead view of the tabletop provided as part of Jon’s briefing notes. |
At the beginning of the game, the Union forces have most of their brigades deployed on the tabletop, except for Howard's brigade, which was en route and expected to arrive from the road. While the Confederate forces have approximately half of their brigades positioned on or behind Henry House Hill, and the remaining three brigades are scheduled to enter during the course of the game from their base edge.
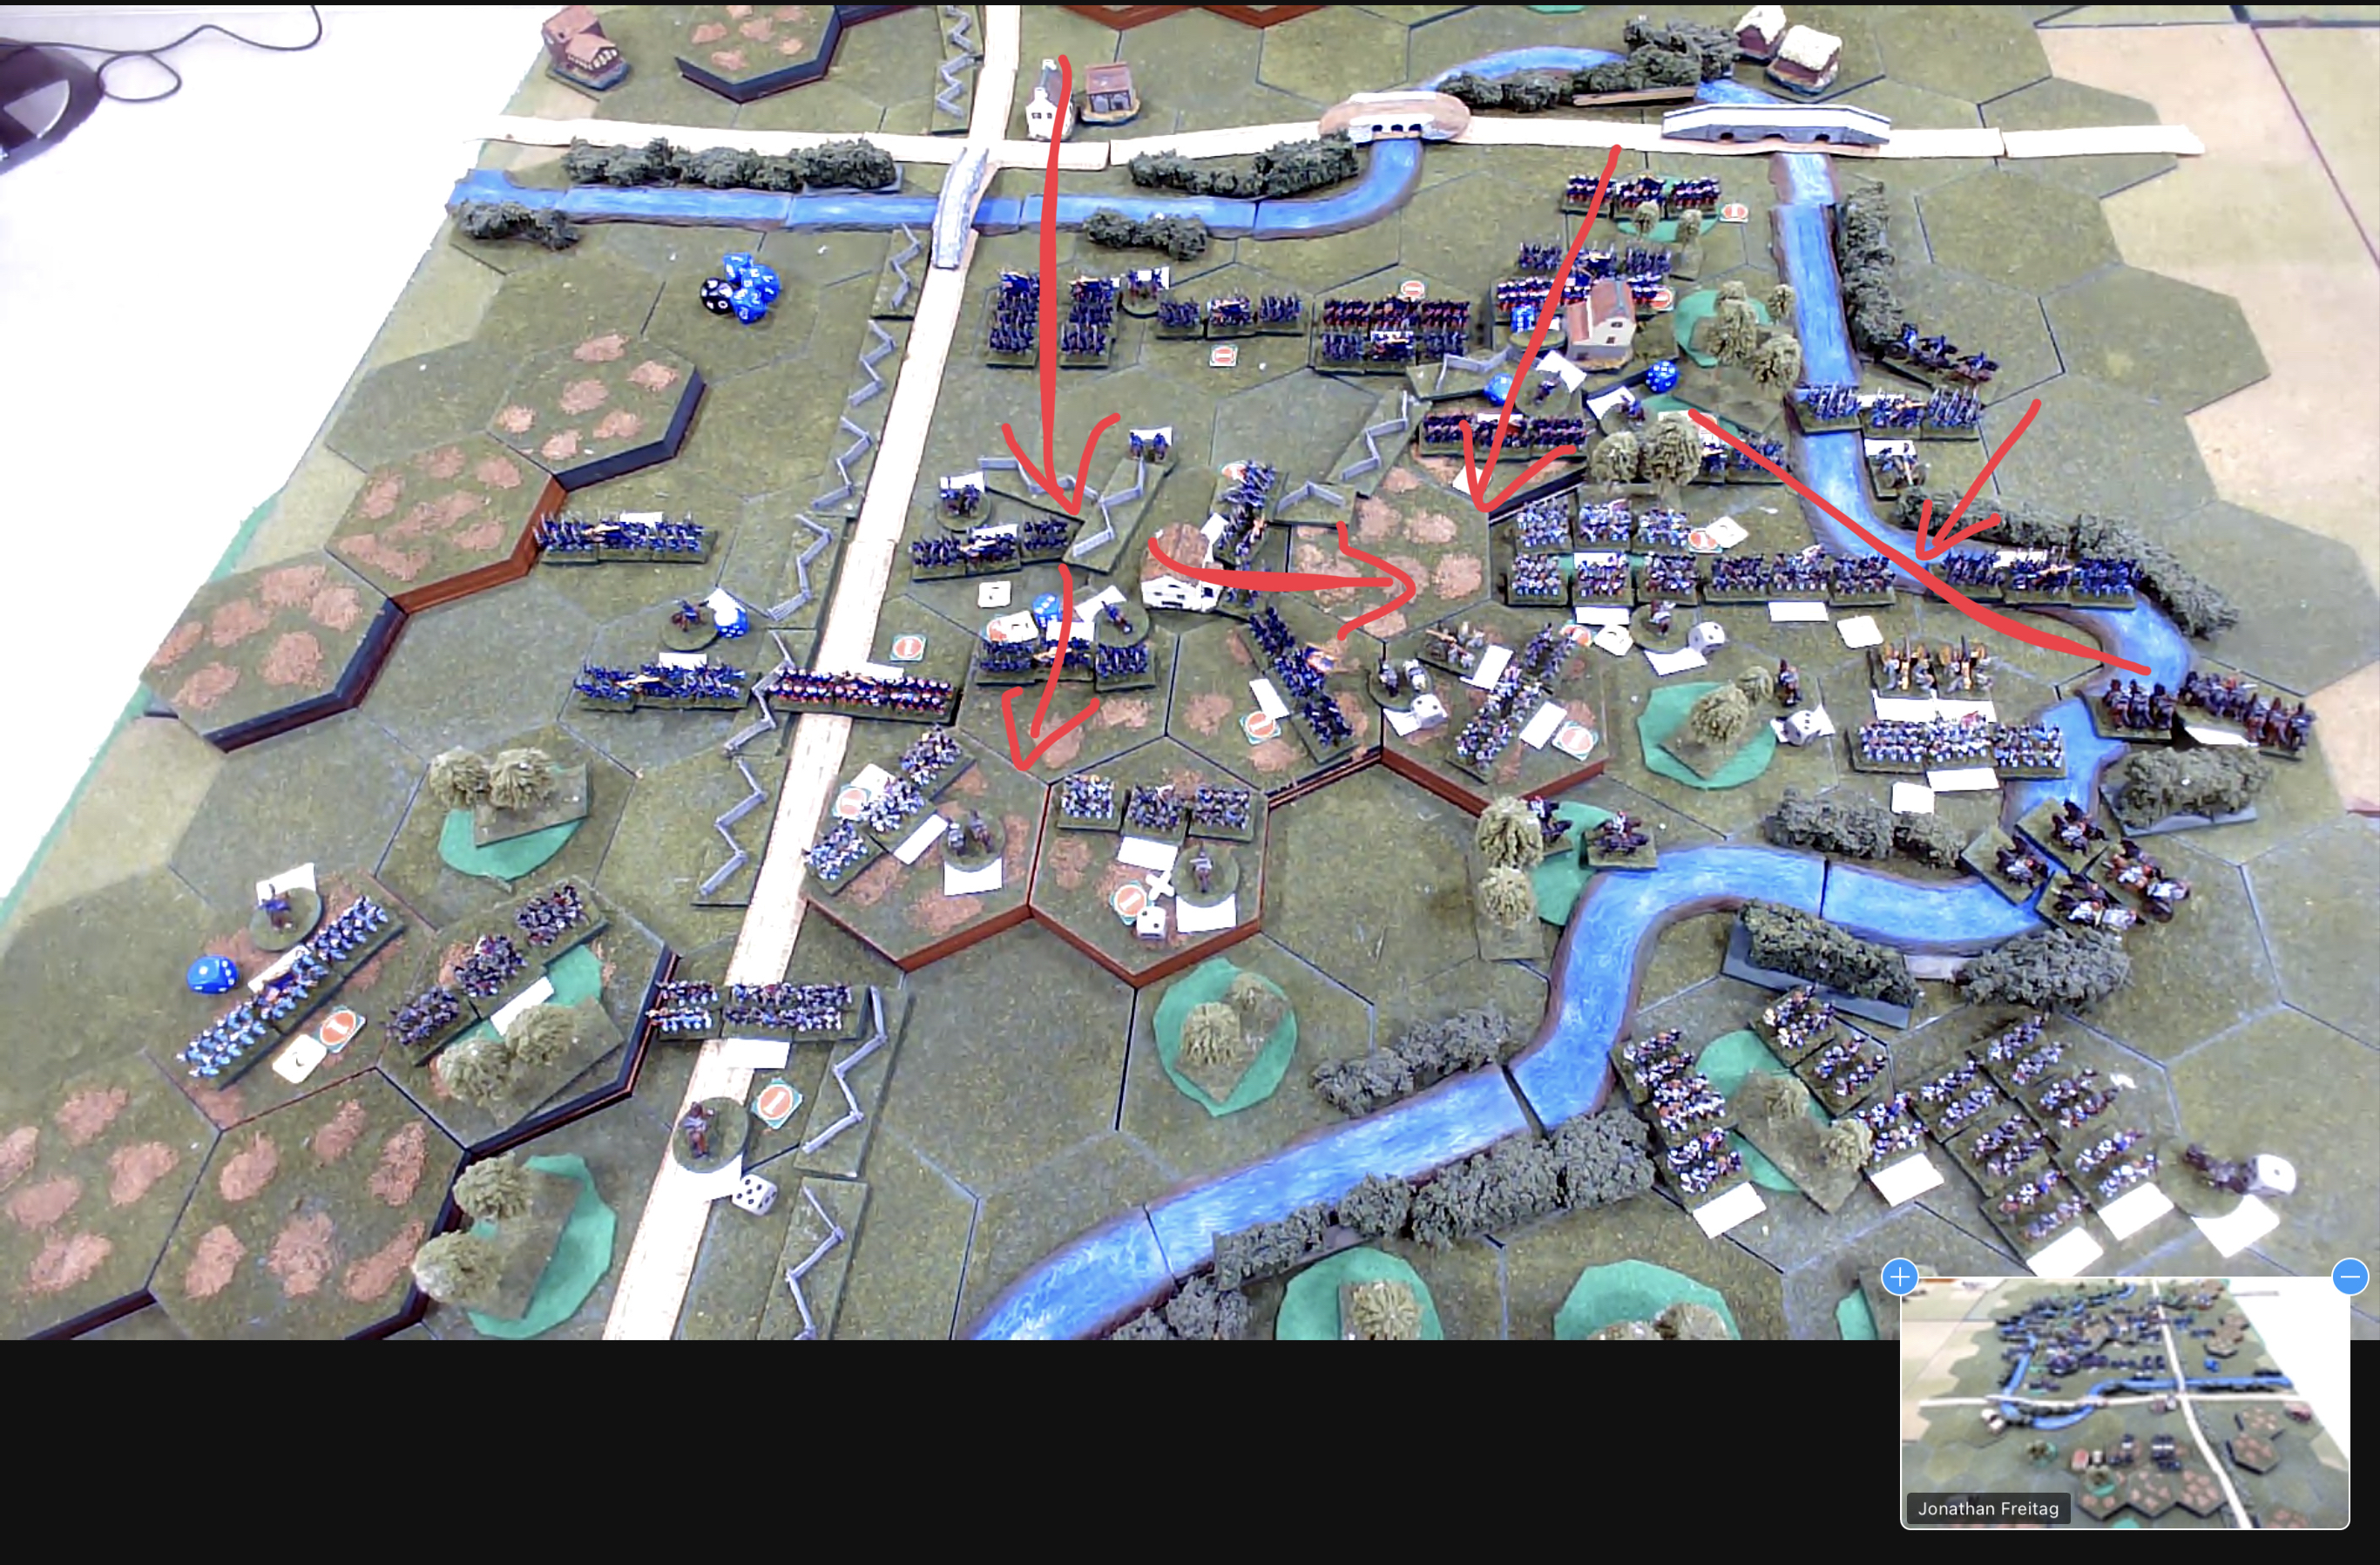
Initially, I didn't have a specific plan in mind other than advancing towards Henry House Hill. However, as Porter achieved some early success in the centre, I did begin to come up with a bit of a battle plan. I opted to launch attacks on both flanks of Henry House Hill. On my left flank I planned to push forward using the river banks for cover, while the right flank attack would take advantage of the road to swiftly advance. Additionally, I positioned all my rifled artillery units on Matthews' Hill to provide support for the assault on the hill.
 |
| My plan of attack |
Turn 1
With Confederate reserves expected I just pushed the units forward as quickly as possible. There was some early success for Porter’s brigade and I began organising all my rifled artillery on Matthews’ Hill which provided a clear view of Henry House Hill.
 |
| Turn 1 |
 |
| Jon has an excellent setup with cameras at both ends of the table allowing the remote players to switch cameras to understand what is happening on the tabletop. As the battle progressed down the table I relied on the view from the camera at Confederate end of the table. |
Turns 2 and 3
Early on Porter's brigade managed to establish a foothold on the hill in the centre. However, due to the attrition suffered by most of the units, they were unable to make further advances. Meanwhile, the right flank had made good progress along the road and was engaged in skirmishing with Confederate force positioned on the hill in and around Henry’s house.
 |
| Turns 2 and 3 |
Turn 4
 |
| Turn 4 |
Turn 5
At this point in the battle, things were starting to get confused as units from different brigades became entangled and mixed together. This confusion was perfectly emphasised by the rule’s activation system, where brigades were activated individually based on the draw of coloured dice from a can, with blue dice representing the Union and grey representing the Confederates.
On my left flank, Sherman's brigade held a defensive line along the river, effectively impeding the advance of Confederate reserves towards the hill. On my right flank, supported by Union artillery positioned on Matthews' Hill, my units began consolidating their position on the hill through a series charges. Successfully pushing back the Confederate brigades which were becoming worn out.
 |
| Turn 5 |
Turn 6
As fresh Confederate reserves arrive in the form of Early’s brigade, the Confederate position on the hill is beginning to collapse with two of their brigades were worn out and another one at risk of being worn out. At this point in the game, after some 5 hours of play, we decided to call it as a Union victory as they held the majority of the hill and had Keyes reserves arriving to counter Early’s brigade.
 |
| Turn 6 |
Wrap up thoughts
This was a thoroughly enjoyable game. I was engrossed in the game for its 5 hour duration. I would best describe the game as a bit of an arm wrestle with units from both sides getting worn out from battle and fresh ones getting thrown in. The Union forces being the attacking force and with greater numbers initially were able to rotate out worn units more easily and avoid having their brigades treated as broken with impacts to their saving dice rolls.
There were a couple of breaks during the game to make coffee, during which my wife asked how the game was going? In both cases I responded “I think I have a slight advantage” and that was the nature of this game, just as you feel you are making good progress and find you cannot capitalise on this advantage as your unit’s strength points are dangerously low. Where things worked well for me was my artillery on Matthews’ Hill. They regularly caused hits on Jon’s units position on the hill, and the flank attacks meant there was always clear line of sight for the artillery. I was fortunate with initiative and the drawing of dice from the tin, which on more than one occasion allowed my right flank forces to get combined attacks on the defenders and caused unit losses. It was only right at the end (turn 6) did the the victory seem at hand.
Many thanks to Jon for putting on this most enjoyable game with his wonderful collection of 10mm armies.
 |
| The game is played on a hex grid with 10mm figures. Photo by Jon. |
Excellent battle recap, Peter! I enjoyed our game very much and hope we can do it again on another battlefield. Seeing your battle plan and thoughts during the game were most enlightening. I would enjoy seeing more of that. Our stopping point was reasonable. While the Butcher's Bill was high for both armies, the situation that the Rebels could break four Federal brigades before losing three was a long shot.
ReplyDeleteThose five hours of gaming passed by in a flash. My body is feeling some of the effects today.
My own battle account is still only a few rough thoughts. Game photos need to be curated and a battle narrative considered. Surveying the table this morning, there were opportunities I missed but ones you would have likely successfully countered no matter.
Well played, Peter!
Many thanks again. I look forward to reading your account of the game.
DeleteA fine account of the game and particularly enjoyed reading how your plan eveolved as the game progressed. Nautrally I look forward to reading Jon's AAR as and when.
ReplyDeleteThanks. I had some good fortune at the start of the game with Porter’s brigade and was able to capitalise upon that with the flanking moves and some effective artillery shooting.
DeletePeter, a nice recap. I think Jon’s recent ACW actions have looked really lovely with the density of the 10mm figs and the birds eye effect of natural battle.
ReplyDeleteThe 10mm units have some 30 odd figures and certainly do look impressive with Jon’s tabletop layout.
DeleteWell done Peter, you achieved what Chris ( Nundanket ) and I struggled with in Jon's previous staging of this game. congrats on your victory, and thanks for a great battle report! Jon's table setup, armies etc are brilliant, too!
ReplyDeleteIt is an interesting scenario and I was fortunate to make some early progress in the attack upon the hill before too many Confederate reserves arrived.
DeleteCongratulations on the win Peter. As David said, you achieved what we didn’t manage. Interesting to read your report and Jon’s side-by-side.
DeleteChris (Nundanket)
Jon’s report certainly captures some of the ebbs and flows of the game, some of which I had forgotten.
DeleteI remember situations leading to defeat more than situations leading to victory...
DeleteWell done Peter, it was interesting to see the tactics you employed. I think they would have been equally successful against me when I played as Jackson earlier on in the week.
ReplyDeleteIt is a well balanced scenario created by Jon which could easily go either way.
DeleteAn interesting AAR, especially how your 'plan' emerged from what was developing. I've been struggling with some rules intended to be fought on hexes; the difficult bit being trying to come up with a simple way to program orders that are neither easy nor quick to change. It's a constant (losing?) battle to keep it simple.
ReplyDeleteThanks. Jon’s hex gridded tabletop worked very well for the remote game. Fortunately I did not have to come up with a plan before the game and could easily adjust to the situation. As for program orders can be quite tricky and some periods seem to be better suited to their use.
DeleteLooks like a great game Peter and congratulations on a Union win. I will be interested to see Jons views on the encounter in due course. With the majority (I think) of the replays resulting in a non historical Union win, it seems the fact that the Confederates actually won the real battle was a significant achievement by them!
ReplyDeleteThe battle itself was a close contest, so its credit to a well constructed scenario that both sides are having wins in the remote games Jon has played. I believe Jon is preparing a write up on the encounter.
DeleteCurrent count is 3-1 to the Union but my game with Peter could have tipped the other way. Maybe...
DeleteThis scenario is certainly making the rounds. Nice job pulling off the victory. Since you got your report posted first it shall be remembered as being the most accurate and of course, history is written by the winners. 😀
ReplyDeleteIt was a most enjoyable game and victory was never a certainty. While my account may have suggested a greater level of certainty with the plan :-)
DeleteBrilliant report of an entertaining game Peter. Thanks for the arrows etc on the photos, that helped follow your narrative.
ReplyDeleteThe arrows certainly do help, even for me when writing the post, and it is something I plan to do more of with my reports.
Delete